Posted on Leave a comment

Rosebud Argyle Color Pooling Stitch

Moss Stitch (linen, granite, seed stitch) modified for longer crochet thread color sequences.
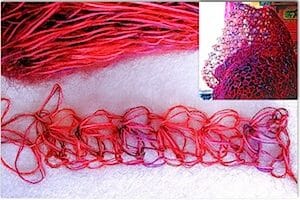
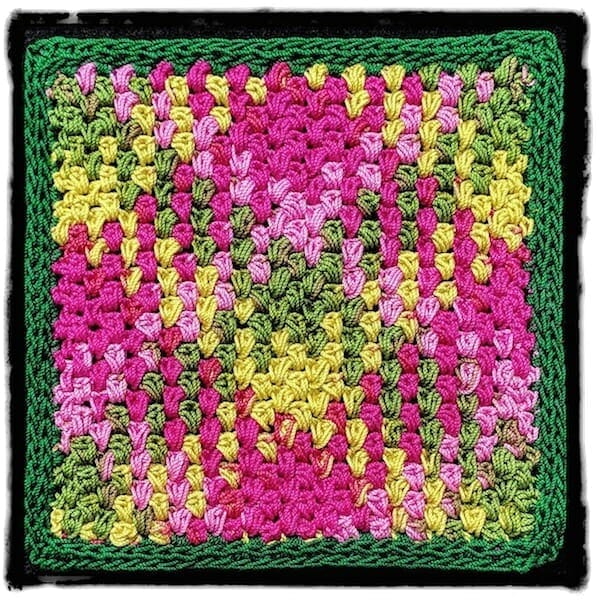
Size 10 variegated Lizbeth cotton thread, color #10-104 Spring Garden. I created a “Color Eater” variation of the moss stitch for it. Row by row pattern below.
View hi-res size.


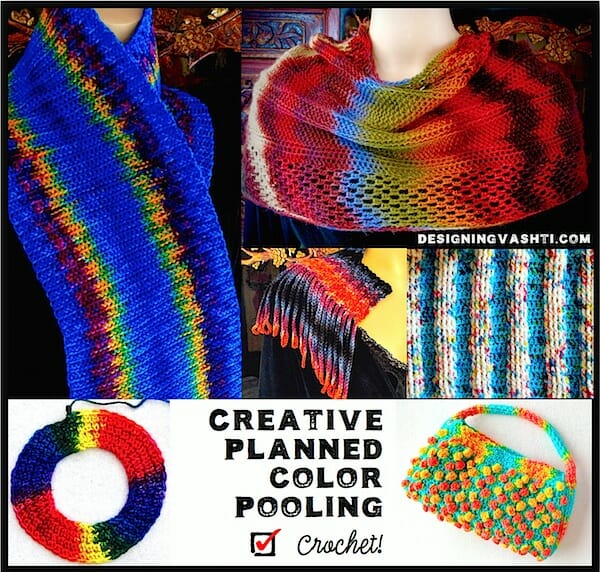
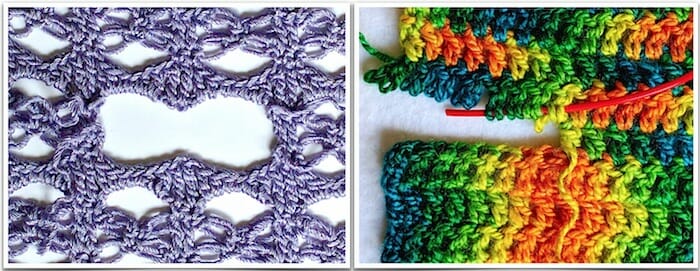
Have you seen the planned color pooling crocheters are doing to get a cool argyle or plaid look with variegated afghan yarns? You can use lots of different stitches for this, but the height of single crochets (sc, or in UK/AUS: dc) is great, especially with moss stitch (a.k.a. linen, granite, seed stitch).

Planned Pooling with Cotton Thread

I pooled the colors of a size 10 crochet thread into an argyle and “Rosebud Argyle” is the result. It’s 3.5″ x 3.5″ and dense because I used a color-gobbling stitch pattern, so I added a border and turned it into a “mug mat” (coaster). I’ll be bringing it to the Creative Planned Color Pooling class.

If I had used the classic moss stitch pattern of [sc in next ch-space, skip next sc, ch 1], my swatch would have come out more than double that size: over 7″ x 7″ (I ripped it out before measuring exactly how much smaller it is with my stitch variation).

Even the 3.5″ size is bigger than I expected! My original goal was only 1″ or 2″. New lesson learned: the color changes in variegated thread look short until you start crocheting with it. The stitches just don’t take up much thread.

Stitches Change the Color Width

I really wanted the experience (and general look) of a moss stitch pooled argyle, so I needed to substitute with stitches that eat up a lot more thread. Why? The length of each color in a variegated thread or yarn is fixed. When the colors repeat, their sequence is also fixed. The total length of one whole sequence is your fixed width. The way you alter this fixed width is with the stitches you use. (There are other options but not for this post.)

Each row of moss stitch is [sc in next chain-space, skip next sc, ch 1]. With each new row, the sc’s are over the ch’s and the ch’s are over the sc’s. It is common to use half double crochets (hdc, or UK/AUS: htr) instead of sc. I haven’t seen much of it lately, though. I hope crocheters are feeling free to alter the moss stitch, especially if you’re doing planned pooling.

Below I’ve written up the stitch pattern instructions for my color-gobbling moss stitch variation. It’s the one I used for the swatch pictured above. I wrote it as if you’re using a solid colored yarn or thread.

Vashti’s “Color Eater Stitch”

Pattern Notes

  1. The “color eater stitch” is [slip stitch, 2-hdc puff] in the next ch-space. The slip stitch is to keep the hdc puff closer to the height of a sc and puffy (rosebud-like). It also helps keep the color changes distinct when you’re pooling.
  2. Like moss stitch, each row is [color-eating sc substitute in next ch-space, skip next color-eating sc substitute, ch 1]. With each new row, the color eaters are over the ch’s and the ch’s are over the color eaters.
  3. It’s easy to fine tune how much you use of a color when you’re pooling with it. For example, sometimes I did a 3-hdc puff instead of 2 to eat up more color. Or, a tighter ch-1 and shorter puff to eat less color. I got better at this with the later rows. Maybe you can tell in the swatch.
  4. When color pooling with it, do whatever you need to at the row ends: just a ss and hdc to use less color, or even a 4-hdc puff to use much more.

Abbreviations

  • ch – chain stitch
  • hdc – half double crochet (hdc, or UK/AUS: htr)
  • 2-hdc puff – [yarn over, pull up a loop] twice in the same designated stitch, yarn over and pull loop through all 5 loops on hook.
  • ss – slip stitch

How to Crochet It

Foundation chain: With a solid colored thread or yarn for your first swatch, chain an even number.

Row 1: Skip 3 chs, *[ss, 2-hdc puff] in next ch, ch 1, skip next ch, repeat from * until one ch remains, [ss, 2-hdc puff] in last ch, ch 2, turn.

Row 2: Skip first puff and ss, *[ss, 2-hdc puff] in next ch-space, ch 1, skip next puff and ss, repeat from * for rest of row, [ss, 2-hdc puff] in space of turning-ch 2, turn.

Repeat Row 2 for pattern.

For more on planned pooling, you might like this recent blog post: Color Pooling Developments.
Posted on 2 Comments

Foundation Star Stitches Step by Step

How to Crochet the Foundation Star Stitch in 14 Steps
View the full size hi-res image.

Star Stitch Foundation

It’s the perfect way to start a Starwirbel! We’re going to use it in the upcoming Starwirbel Way class this July. (CGOA Chain Link conference this July in Portland, Oregon).

For this unusual stitch, two foundation chains must be created as you complete each star. In the text instructions below, a [bracketed number] refers to a numbered photo step above.

First foundation star stitch (fstar):

Chain 3 loosely.

  • [image #1] Pull up a loop in each of the second and third chains; you have 3 loops on your hook.
  • [image 2] Chain 1 (counts as first foundation chain of first star),
  • [3] Yarn over and pull up a loop in the two outermost strands of the chain just made,
  • [4] Chain 1 (counts as second foundation chain of first star),
  • [5] Pinch it while you yarn over and pull through all 5 loops on your hook so that the last loop doesn’t tighten,
  • [6] Chain 1 (eye of this first fstar).

Tips: Pinching also helps you recognize which loops are the new foundation chain loops. Pull up loops loosely enough that a second crochet hook could fit in them.

Add more foundation star stitches:

Vashti's lacy Star Stitch Foundation in a hand dyed mohair for the "Firewirbel" Starwirbel Cowl.*Pull up a loop in each of these places:

  • [7] The Eye,
  • [8] Side of star,
  • [9] Two loops of second foundation chain of star;
  • [10] Chain 1 (counts as first foundation chain of next star),
  • [11] Yarn over and pull up loop in chain just made,
  • [12] Chain 1 (counts as second foundation chain of next star) and pinch it,
  • [13] Yarn over and pull through all 6 loops on hook,
  • [14] Chain 1 for eye.

Repeat from * for each new fstar.

You might be interested in the resources page for the Starwirbel Way class.
Posted on Leave a comment

Creative Planned Pooling: Class Resources

Creative Planned Color Pooling Crochet Class 2018 Vashti Braha
Updated on 7/18/18. View the high-res image. This is a conveniently clickable group of things I mention and display in Creative Planned Color Pooling classes. I teach the next one on July 28, 2018 in Portland OR. (An earlier version of this class was called “Crochet Stitch Games” and included game-like serendipity techniques; between then and now, planned pooling has become a popular technique!).     — Vashti Braha


Thinking of signing up for this class? I wrote Color Pooling Developments with you in mind.

Crochet Patterns & Crochet Alongs

  • Jempool pattern. It’s the blue scarf on the left in the above photo.
  • Crochet AlongThe Jempool CAL (a source of some great info!)
  • See all of Vashti’s color pooling projects and swatches at this self-updating Ravelry link (log in to Ravelry first to see all of them).
  • Crochet to the Color Playbook pattern set. (This is a freeform “stitch pooling” way to modify accidental pooling, rather than doing planned pooling.)

Recommended Issues of Vashti’s Crochet Inspirations Newsletter

My Color Pooling Blog Posts

Photo Albums & Inspiration Boards

Recommended Color Pooling Sites

  • PlannedPooling.com where you can plot the color sequences of your yarn and see how it pools based on your plan.
  • Pooled Knits Ravelry group.
    • This group is how I first found member sanne7788 who does the most inspiring pooled Tunisian crochet I’ve seen so far! (Scroll down to see them all.)
  • Planned Pooling With Crochet Facebook group for crocheting argyles, founded by Summer Cromartie. Especially see Brenda-Leigh Bennett’s 10/21/16 resource page there!
  • Deborah Bagley wrote a meaty multi-part series on several kinds of planned pooling. Start with the introductory roundup of it: Hook and Learn: A Feast for Your Color Pooling Eyes.
  • Laura Bryant: Ikat knitting effects with her ikat-style hand dyed Prism yarns, featured in Vogue Knitting. I took Laura’s pooling class at my local yarn shop and here’s my ikat attempt with slip stitch crochet.
    • If I had to pick only ONE book to read about planned pooling, it would be her 2013 Artful Color, Mindful Knits: The Definitive Guide to Working with Hand-dyed Yarn.
  • Marly Bird: Fantastic YouTube videos and blog posts for crochet planned pooling that argyles.
  • Glamour4You, Sewrella, Rockin’Lola (her granny stitch argyle guest post), Naztazia: Bloggers with popular tutorials for crocheting pooled argyles. Also see Kathy Lashley‘s post, a rare one on the “lightning bolt” effect when pooling in the round, and Kinga Erdem who explains her bold zigzag argyle using just half double crochets [UK: htr].
  • Karla Stuebing: 2013 article, “Art and Science of Planned Pooling.” It’s about knitting but very inspiring for crochet.
  • Wannietta Prescod: this blog post links to her earliest inspiration and to her influential Sweetspot 2009 article for Knitty.
  • Planned pooling crochet patterns, a self-updating link: Ravelry doesn’t seem to have a category for this technique yet, so I used the keyword “pooling”. Of 23 search results it looks like 20 are true planned pooling. Of these, 17 are argyles, and most appear to be seed stitch (as of 4/16/18).
  • Planned pooling knitting patterns, a self-updating link: as with the crochet search link above, I used a keyword search. Of the 91 results (as of 4/16/18), about 80 are true planned pooling designs.

Any Books on Planned Pooling with Crochet?

  • Found one! Yarn Pooling Made Easy by Marly Bird. Published by Leisure Arts, 2017.
Posted on 2 Comments

Self Healing Stitches to Cut: Class Resources

2018 Self-Healing Crochet Stitches and How to Cut Them Class by Vashti Braha
Up to date as of 2/03/2022This page will likely be updated again before class time and possibly after. 
View full size images of steeked swatches
This page is a conveniently clickable group of things I mention in the Self-Healing Crochet Stitches and How to Cut Them classes. I teach the next one online!—Part One on March 8 & Part Two on 9, 2022—from 10:30am –11:30am CST. I show a lots of published and unpublished designs in this class. Each illustrates the stitches and techniques learned.  — Vashti Braha
Considering signing up for this class? Read Why “Self-Healing” Crochet Stitches?

Recommended Articles

Designs & Patterns

Steeked Crochet Designs by Others

Inspiration Boards for this ClassA chunky lace vest that can be completed in 2 hours because you create armholes later with quick steeks (cutting).

Self-Healing Crochet Stitches and How to Cut Them started out Tunisian-only in 2016. It was originally titled Steek (Cut) Tunisian Crochet Lace for Fun, Fast Fashions. I overhauled the title to help differentiate this topic from steeking knit fair isle sweaters and other traditional reasons for steeks.

Three fashion trends are relevant to this class topic: graphic/linear texture, net lace, and fringe. I’ve created a Pinterest board for each trend.

  • Steeks: Ideas These are often simple shapes that become magically wearable and trendy with just a cut or two.
  • Trend: the New Fringe I thought today’s fringe was a passing fad but it continues to have a lot of mojo! That’s great for us. Many cut stitch patterns beg to be fringed, especially if you don’t want to use a double-ended hook for Tunisian lace nets. If you cut across several rows, turning that cut edge into fringe is the ideal thing to do with all the ends.
  • Trend: Simple Crochet Mesh Nets It’s a classic fabric with fresh boho looks. It’ll be a long-term trend because it’s also now going urbane-futuristic-techie.
  • To Try with Tunisian Crochet Nets (linear, visually directional fabric grain as design element)

Cutting self-healing stitch patterns is a unique and fun construction method. Knowing how to easily steek as part of your crochet skillset opens up a whole creative avenue of projects. It’s freeing and empowering. As of 2022, it’s always an option that comes to mind when I’m dreaming up a new design. It goes together with inventive folds and seams I might like to use.

I find it also makes pattern schematics newly inspiring—especially for simple shapes. You might enjoy newsletter #80: Pattern Schematics for Insiders and Outsiders. and its “overflow” blog post, Steek Crochet With Pattern Schematics in Any Language (June 2016).

Any Books on Cutting Crochet?

I’ll add information here as I find it, so please check back. (In 2016 I found nothing in books on specifically steeking Tunisian crochet. (If you know of a source, please leave a comment.)

Original 2016 Steeked Tunisian Lace Class Resources page.
Posted on 3 Comments

Why “Self-Healing” Crochet Stitches?

Love knots removed on the left; row of double crochet on the right, which need a lifeline (in red).
On the left is a self-healing stitch pattern. I’ve removed two rows of love knots, and the stitches left behind are fine the way they are—I have not edged them. No “lifeline” was required to prevent unraveling.
On the right, a red lifeline has been woven into the base loops of some of the double crochet stitches (dc, or in UK: tr). The nearby stitches without a lifeline are unstable and will unravel. View full size.


The Self-Healing Crochet Stitches and How to Cut Them class is thanks to an accidental discovery I made in 2013. A rectangular wrap kept sliding off of my shoulders. It has interesting edges, so I added (cut open) armholes to wear it as a vest.

I held my breath, cut a stitch, and…

Nothing happened. The stitches didn’t care. Why though? (Some stitches DO care. A lot!)

The first armhole is being opened to turn this Tunisian Mesmer Veil stole into a waterfall Maze Vest.
The cut that launched a whole class!

At first I thought it was an odd quality of only a few kinds of Tunisian stitches. After testing why this happened, I created a class called “Steeked Tunisian Lace for Fun Fast Fashions”.

By the time I taught it (2016), I’d already discovered the same effect with some regular crochet stitches. That led to a new version of the class​​, “Easy to Steek Crochet Stitches” in 2017.

Self-Healing vs. “Steek”

Nowadays I’m thinking “self-healing” conveys the topic better than referring to steeks. Steek is a specialized knitting term. I see too many question marks over crocheters’ heads when I use it. Also, steeking often involves cutting across several rows whereas in my class we cut open ONE row.

Cutting a self-healing stitch is creatively liberating and empowering. For me as a designer it’s exhilarating! I think “self-healing” conveys some of the positive, low-stress feeling people have in this class.

​Which Crochet Cutting Class?​

My friend ​Pauline Turner will be teaching a class​ called “Cutting Crochet” at the same event on ​Thursday, ​July 26.​ Our two “how to cut” classes seem to be very different​.

When renaming my class I briefly considered “Cutting Crochet” as a way to avoid the steek term. I worried that it would bring to mind the traditional reasons a crocheter would need to cut crochet: to fix, tailor, or repair it. My class is not traditional.

“Game Changer”?

“It’s a Game Changer” — Vashti’s mom (crocheter).

If you can add a head opening, armholes, and even decoratively shaped openings wherever you wish in a crocheted item, it means this is a distinct, different construction method. Here’s why my mom might be right:

  • It changes what we can do with schematics and simple shapes.
  • Beginners can understand and use the basic principles of it.
  • It simplifies the crocheting: just keep crocheting to the end. No need to make sure you start the armholes in the correct row. Stop crocheting when you want to, not when you’re a fixed distance from an opening.
  • The opening you add later is actually superior to crocheting it in as you go. It’s less lumpy.
  • It’s certainly a game changer when doing planned pooling with a variegated yarn (argyling, color stacking, etc). Crocheting a simple shape straight through is really important for this kind of crocheting. If you were to add an opening as you’re crocheting, you’d throw off your color sequence. To be able to cut open armholes, a head opening, pocket slit, and even a scarf keyhole later is ideal.

It turns out that a large number of stitch patterns are, or can be subtly tweaked to be, self-healing.

Self-Healing Crochet Stitches and How to Cut Them has a 2018 class resources page.