Start here first to learn how to crochet one Love Knot stitch, and a single string of them. (Depending on your project, it might be called “the foundation row” or “Row One” or, “Hey look, I just made a necklace/eyeglass cord/wrap bracelet/ tie belt!”)
That Iconic Love Knot Mesh
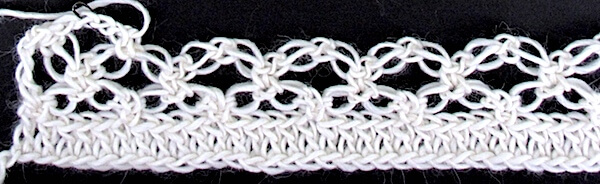
You can see two completed rows of love knots in the above image. The first row is all just double crochet stitches (dc, or tr outside of the US). This 19th century stitch pattern is my first choice for teaching how to crochet the classic love knot mesh. I also used it for Sister Act, a pattern in Interweave Crochet Magazine that I haven’t yet added to my shop.
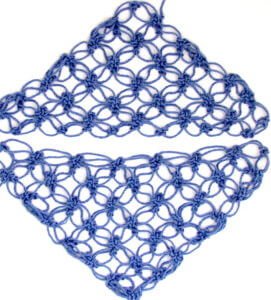
At right is the same mesh crocheted in a triangular shape. One started in the bottom corner then steadily increased to the top long edge. The other is the opposite: Steadily decreased from the top long edge to end at the bottom corner.
You need to know what to expect with all the love knot mesh pattern variations out there. Following that is the row by row pattern instructions for a starter love knot mesh.
Tricky Pattern Versions
I’m amazed by the variations of this mesh pattern! Many of them may look the same, but here’s how they can vary:
- The foundation row might be all love knots, or all chains, or a mix. If love knots, it might be a straight edge of shorter ones, or echo the diamond-shaped spaces with full-sized ones. Starting with a row of double crochets is similar to all chains but it gives you a nice strip to grip.
- How you start and end each row might be all love knots, like you see in the triangle swatches above. Or, start with turning chains and end with tall stitches, like the one in the topmost photo—see its tall stitch at the end of the row? Like the foundation row, using all love knots could result in straight row sides (half-diamond spaces) or be full diamond-shaped spaces (each row has a corner). This could entail mixing love knot sizes.
- How you crochet into a love knot could be with a standard single crochet (sc, or dc outside of the US) in a love knot’s sc; or a sc just before and after its sc—also standard. Less common variations include something other than a sc, crocheting into more than 2 loops of the sc, and adding a tight ch to “lock” the sc.
Today Let’s Do the Easy One
Vashti’s recommended starter mesh for your “first love”: Classic Love Knot Mesh with foundation chains (ch), turning chs, and tall end stitches. Dc = double crochet (tr outside of US). Sc = single crochet (dc outside of US). LK = Love Knot. Tr = treble crochet (dtr outside of US).
Ch 20 (or a multiple of 4).
Row 1: Dc in the fourth ch from your crochet hook, dc in each remaining ch: 17 dc, ch 1, turn.
Row 2: Sc in first dc, *2 half-inch-long LK, skip 3 dc, sc in next dc, repeat from * in remaining dc, ch 4, turn: 4 LK pairs.
Row 3: 1 LK, sc in the center sc of first LK pair, *2 LK, sc in the center sc of next LK pair, repeat from * twice, end with 1 LK, 1 tr in last sc of row, ch 1, turn.
Row 4: Sc in first stitch, *2 LK, sc in center sc of next LK pair, repeat from * twice, 2 LK, sc in top of ch-4, ch 4, turn.
 Repeat Rows 3 and 4 for pattern.
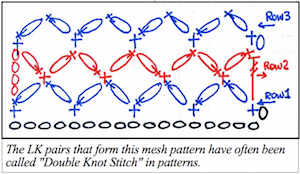
Would you like a diagram for this? I have this one handy. It might help you visualize how the LK rows go together. Keep in mind that it omits the Row 1 dc.
