I seamed with stitch equivalents in this 2019 image. It was not in the original 2011 newsletter issue #2, A Super Crochet Maneuver. It’s explained at the end.
How it looked in 2010.
First, the original newsletter issue, below. It went out to a few more than 300 subscribers in September 2010. That’s nine years ago! I’ve removed the original two-column formatting, colored backgrounds, and especially the outdated links. I’ve refrained from revising the original text, except for light edits.
This stitch equivalents topic looks different to me now. I’ve added my current (September 2019) thoughts at the end.
Subscriptions have doubled since the first issue was sent out 14 days ago, so welcome to all of you new subscribers!
The “super crochet maneuver” I’ve been thinking about lately is not only a big problem-solver for designers, it can single-handedly put the “free” in freeform! It’s not a big secret, but I get the feeling it’s not common knowledge either.
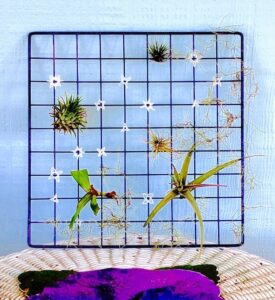
I have a fun summer crochet project to share. I’ve been bitten by the DIY wire mesh panel decor trend and have made several styles. Today’s focus is a cosmic one: wire mesh panel as Starry Firmament.
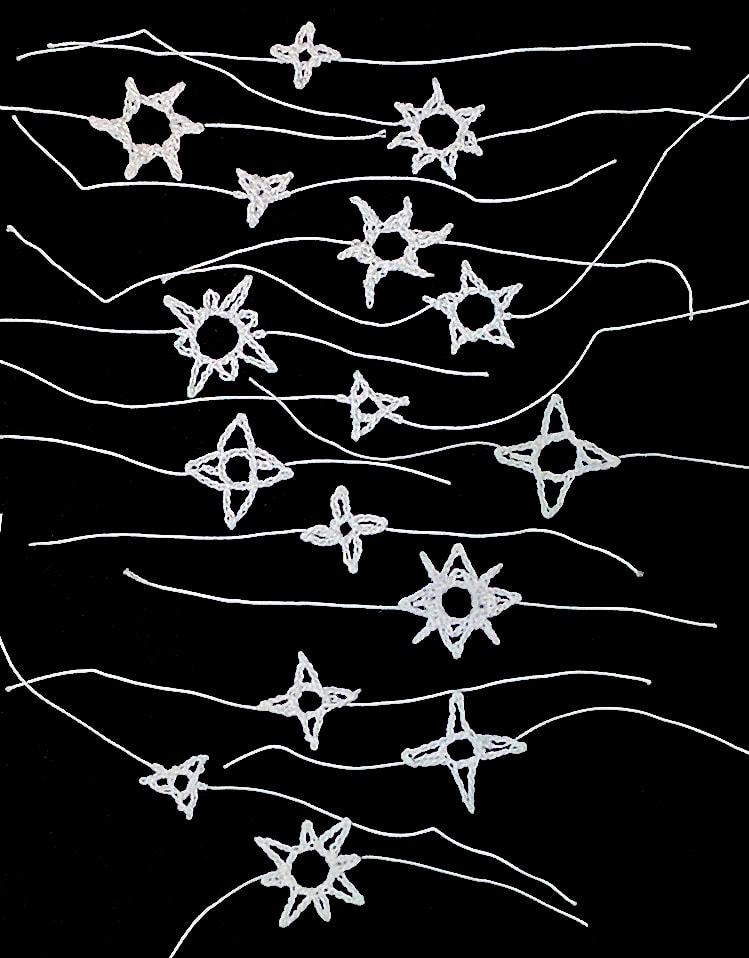
Half of these were made with the pattern below, or a simple variation of it (described in the pattern).
Shown above is a cosmic condominium for air plants, but it could just as easily be a photo memo board. Or see below for other decor ideas.
There’s a free crochet pattern for the stars below.
Wire mesh panels are not hard to come by at all. Not only are they easy to find, they’re a bargain: just a dollar or two for strong, durable, and very serviceable 14-inch {35.5 cm} square panels. In fact, they’re so low-priced and common that it costs more to ship them across the US than it does to buy new ones locally. Hence my problem.
I have stacks of them because they’re great for building show booths, like I’ve done at crochet conferences over the years. It only makes sense to keep them if I do show booths I can drive to. Some panels are getting a bit of surface rust here in the subtropics.
Most people would throw the panels away. I know because that’s the advice I’ve gotten. There’s a creative DIY decorating trend going on with wire mesh panels though! Why spend $15-$50 on one when you could spray paint it rose gold yourself? Or do like I did: add a constellation of stars?
Some wire mesh panel decor ideas I’ve found are: hang them over a desk to organize photos, memos, etc; string fairy lights into them and add a small shelf. Especially inspiring: sprinkle on some quirky air plants.
Crochet Pattern: Basic Firmament Star
I’ve used only the most elementary crochet stitches for this pattern. A new crocheter might struggle with it, though, if s/he isn’t accustomed to using very fine crochet thread yet.
Materials
I used a size #20 white crochet thread by DMC call Cordonnet Special. It’s on the stiff side because it has many plies that are highly twisted. This makes for crisp-looking stars that will hold their shape. If you can’t find it, Handy Hands Tatting make a cordonnet type called Lizbeth in many different sizes and colors. If you don’t have size #20, the next thinner/finer size, #30, seems to give me very similar results.
It doesn’t matter what steelcrochet hook size you use. Choose the smallest size that still makes crocheting with the thread easy. For me it’s a size 1.25 mm in the brand I had at hand. For the thinner size #30 thread I needed a slightly smaller hook size. Psst, you might like what I wrote about steel crochet hook sizes!
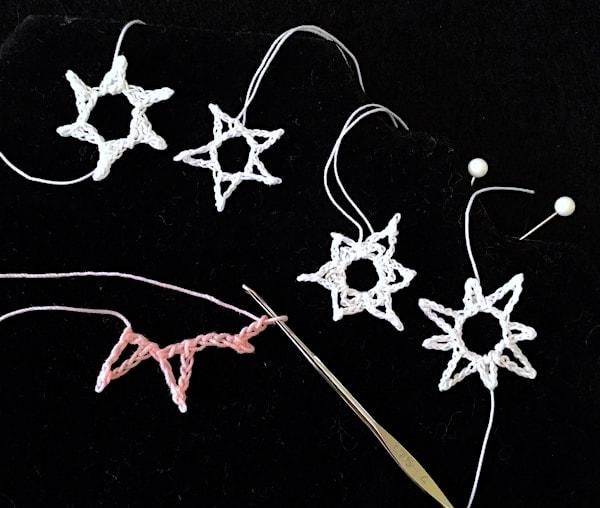
Three thread sizes are represented here: the pink one in progress is size #10, and the two middle ones are the thinnest: size #30. The star on the far left and far right: size #20.
Pattern
Leave the thread ends 4 inches {10 cm} long.
Make a slip knot and place the loop on your crochet hook. Chain 5, slip stitch in the second chain from your hook to make a tiny picot, chain 2 or 3, double crochet in the first chain of this spoke (the chain that’s nearest the slip knot). In the photo above, two pink spokes have been completed. *Chain 5, slip stitch in the second chain from your hook, chain 2 or 3, double crochet in the first chain of this spoke.* Repeat from * to * one or more times, depending on how many spokes you wish the star to have. Then slip stitch in the first stitch nearest the slip knot. Fasten off.
To vary the appearance:
Use half double crochets in place of the double crochets.
Add another stitch (a slip stitch, or single crochet) in the next chain after the picot, then chain one less before finishing the spoke with a tall stitch.
Begin each spoke with 4 looser chains instead of 5 (then chain one less before finishing the spoke with a tall stitch). Or begin with more than 5 chains and add more chains after the picot.
To finish and use the star:
With a fine needle, weave one of the ends to the opposite edge of the star. Notice in the photo above that the ends of the two outermost white stars are opposite each other while the middle two have ends coming from the same place of the star.
Wet it, stretch, pinch the spokes, and allow to dry perfectly flat and as symmetrical as you can get it. Meanwhile prepare your wire mesh panel by sanding off rust if necessary, spraying with a primer and then a dark glossy blue. I then sprayed on a fine multicolored glitter too.)
Tie each star onto a place where the grid wires intersect. Tie one direction and then the other tightly around the intersection. This keeps them stationary. Snip the ends close to the final knot on the back of the panel and apply a drop of glue to the knot.
My one additional step was to spray a light coat of clear acrylic sealer onto the back of the panel. Mod Podge makes one that did not cause the stars to yellow, unlike a few other sealers I tested. Have a toothpick handy to smooth down the sealer where it shows on the stars (it will look hairy or like tiny dew drops in places). This helps keep them crisply starry.
Now add air plants, or use those tiny wood clothespins to clip photos and things to it.
See more images of the Starry Firmament wire mesh panel decor at its Ravelry project page.
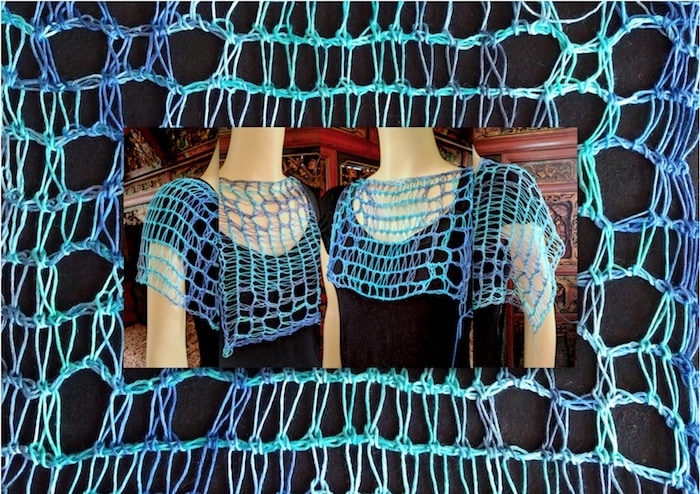
This is the gauge swatch from the new Eilanner Shawl pattern, but I used tencel thread and a giant hook for kicks. So airy! It inspired me to try draping it on a mannequin different ways. View full size.
I released a new Tunisian crochet pattern the other day. There’s a lot going on in it! I think of the design as containing modules of mini-patterns. Some of them hint at new stitch patterns.
Seeds of New Stitch Patterns
Often if you change one thing about a stitch pattern you can get a whole new effect that’s cool enough to count as a new stitch pattern. (This would be a good newsletter issue, come to think of it…) Here are some I swatched while Eilanner was being edited, and the things I changed to generate them. I posted them to Instagram.
Change the Yarn and/or Gauge
An obvious way to get a new effect with a stitch pattern is to use a dramatically different crochet hook size, or yarn thickness/fiber type, or all of these (as in that first image above). Super summery look! Reminds me of tall grasses.
There’s something else going on with it too: it’s really just a gauge swatch pattern. The skill level for Eilanner is Experienced. Getting the exact gauge is not important for the pattern but I thought it would help some crocheters to focus on just the main stitch pattern without the fancy edging at both row ends and the constant increasing.
By the way, if you’re interested in Eilanner but worry it’s too challenging, work up to it with its predecessors. Shakti is like “Eilanner 101” and Islander is “Eilanner 102”. (I named Eilanner after Islander.)
Repeat a Special Stitch Group All Over
Another way to do a stitch pattern spin-off is take a stitch group and repeat that. Here’s Eilanner’s “tattoo flower” eyelet group repeated as an all-over motif.
This right here is a fraction of the possible new stitch patterns to generate this way! For example, the eyelets could be grouped differently, or stacked in columns instead of spread out in an alternating way. Moving eyelets around is an art form in itself.
I haven’t even tried sprinkling in stitch texture contrasts. Have a look at what happened when I added a similar stitch texture: love knots!
I woke up this morning with another idea for a stitch pattern that will probably show up in Instagram once I swatch it up. (The way Instagram displays images helps me contemplate designs.)
Isolate One Key Stitch
Not every stitch pattern has a key stitch to isolate. Eilanner does, though: the shallow-extended stitch I blogged about last week. The swatch below is pretty rustic and it’s not easy to see what is different about the stitch, but have a look.
It’s kind of loose so that I can see what the stitch texture is doing. I chose Icelandic wool for this because I love that the shallow-extended stitch is like a reversible and non-curling version of Tunisian Knit stitch.
If you like seeing my experimental swatches, follow me in Instagram where I tend to post them first. And please tell me what you like or don’t about them! It inspires designs and class topics.
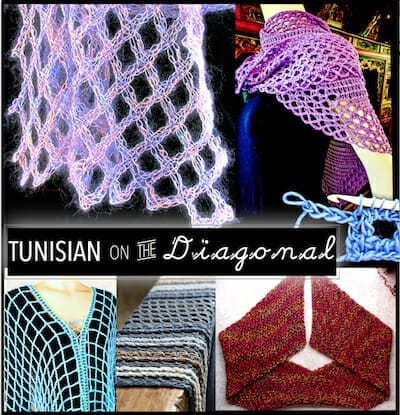
Final update of this page is in progress, please check back. View the high-res image. This is a conveniently clickable group of things I mention and display in Tunisian Crochet on the Diagonal classes. I teach the next one on July 27, 2018 in Portland OR. I show a huge amount of published and unpublished crochet designs in this class including new, never seen! Each illustrates the stitches and techniques learned. — Vashti Braha
Not that I’m aware of. Here are my three favorite Tunisian crochet references in print:
2008: Tunisian Crochet Patterns 100, Nihon Amimono Bunka Kyo-kai, Japan ISBN 978-4-529-04484-4
2000 (1991), Rebecca Jones: Tricot Crochet The Complete Book, Lacis Pubs., Berkeley CA. ISBN 978-1-891656-28-6
2004, Angela “ARNie” Grabowski: Encyclopedia of Tunisian Crochet, LoneStar Abilene Pubg LLC, TX. ISBN 978-0-974972-55-8
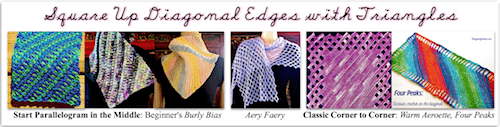
The Five Peaks Tunisian Crochet Shawl design in the news & around the ‘net
I created this resource list for my students & others to explore the Five Peaks Tunisian crochet shawl, and similar start-in-a-corner, edge-as-you-go L-shaped wraps.
Its Ravelry design page (best headquarters for everything concerning the pattern).
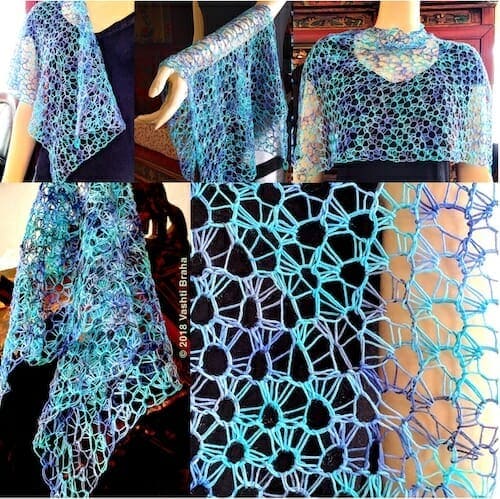
Here it is just a week before I fly out to Portland, Oregon to teach five crochet classes at the Chain Link conference. I have a quick update on my preparations for my class on star stitch lace, The Starwirbel Way!
I converted a Starwirbel (tube in spiraling rounds) into a flat rectangular wrap.How to get the same kind of lace as a flat rectangle? People have requested this for years and I’ve swatched it several times. I love this one! (Pictured above, in progress.) It retains for me the experience and special effects of making it.
More importantly in the long run, it means we can now use Starwirbel fabric to make anything.
Starwirbel Now has a Stitch Diagram
For those of us who like to use stitch diagrams, we’ll have time in class to go over Starwirbel’s. Star stitch diagrams can be a bit quirky to understand at first.
Site-wide Search
Vashti’s Crochet Shop
Get the Newsletter
Sign up to receive Vashti’s Crochet Inspirations Newsletter in your inbox monthly.