The place for all kinds of crochet freebies: Vashti’s free crochet patterns, contests, and giveaways.
Also see:
– Free online crochet class extras in the Crochet Classes category.
– Free back issues of Vashti’s Crochet Inspirations Newsletter, and newsletter overflow posts.
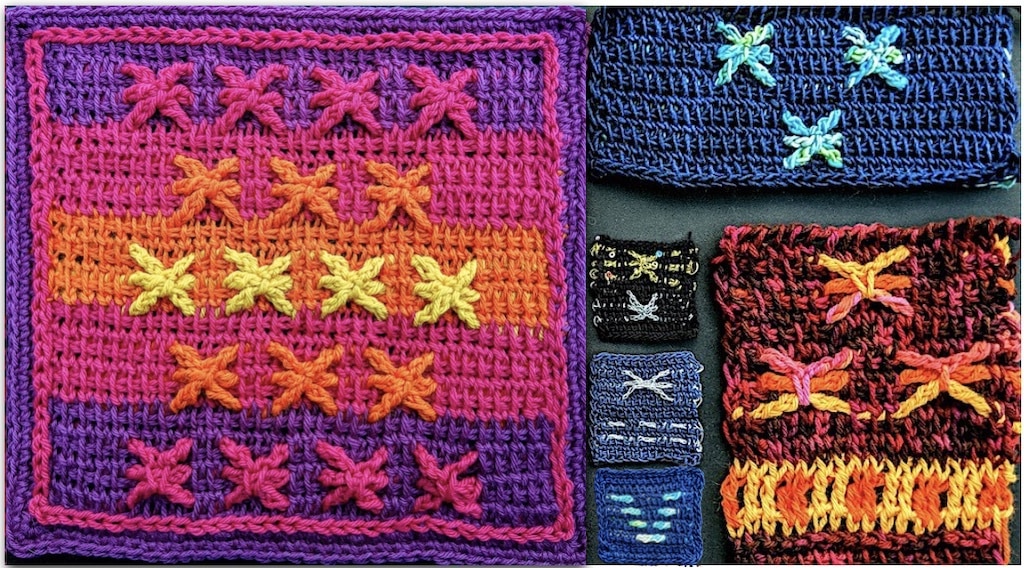
Today I’ll show you how to “emboss” Tunisian return pass crochet stitches step by step. The complete pattern for the blanket square is also included below. The background stitches are Tunisian extended simple stitches (TES). The starry groups are extended Tunisian Yarn Overs (TYO) in contrasting colors.
My 12-inch square for Knitter Knotter’s 2021 Tunisian Blanket Crochet-Along (CAL) features this novel color work method for Tunisian Crochet. The finished 12″ square is the one on the far left in the image above.
About the 2021 Tunisian Square CAL
I love how the CAL is going! Host Arunima Goel has created a fun way for designers to contribute a square, and for crocheters to experience new Tunisian stitches. My square is #18. By the end of 2021 there’ll be 24 fresh and free intermediate-level 12″ square patterns.
Are you a Tunisian Crochet beginner? Or just need a quick review?
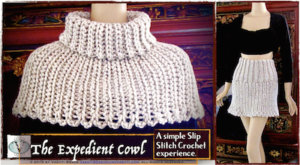
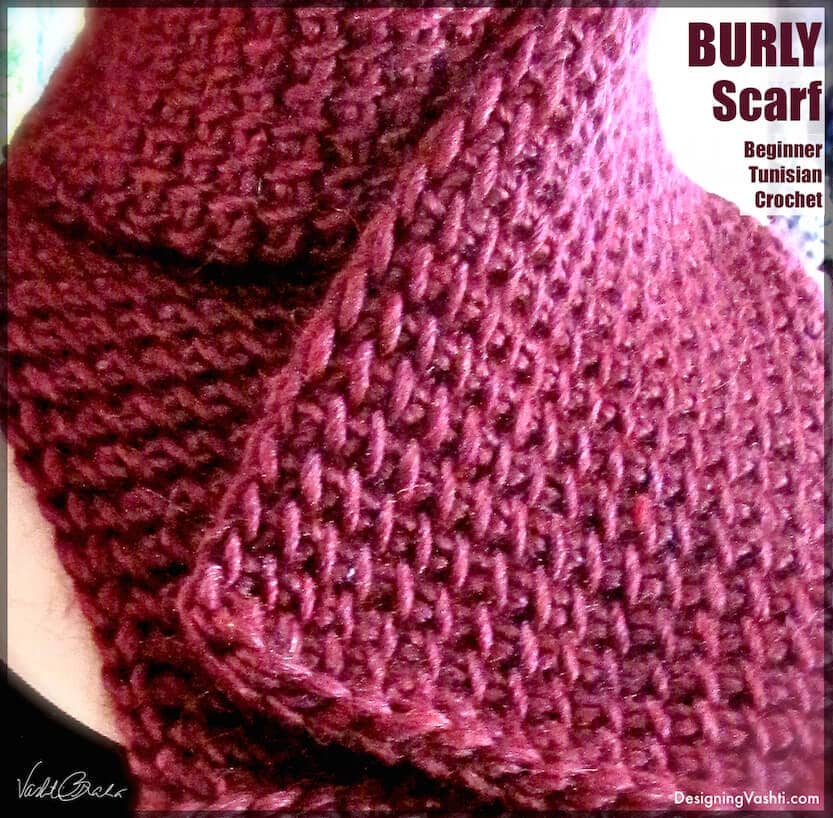
The Burly Scarf is the simplest first project for a Tunisian crocheter. Treat yourself by using a chunky luxurious yarn!
I seem to have stumbled upon a way to get a fully raised texture horizontally, and in a contrasting color. And, no lacy holes!
I wanted to test the usefulness of extending Tunisian Yarn Over (TYO) groups. Sometimes a group of several TYO can get loose and loopy, just like the yarn overs of really tall stitches tend to do in regular crochet. Extending tall stitches by adding a chain here and there while making them helps use up that slack. (For some alternatives to extending, see How to Fix Loose Loops of Tall Stitches.)
Embossing return stitches has potential.
As a return-pass-based color work method it can be combined with existing Tunisian Mosaic, and especially Overlay methods. These are forward-pass-based methods that do fancy things vertically, with tall stitches. The possibilities boggle!
Make other embossed shapes. Once you learn how to emboss Tunisian return stitches, you can make other shapes besides the starry groups you see here. Arrange horizontal bars in patterns. Make some longer or shorter. Modify the stars to have spokes in different lengths or amounts.
As a fabric, it’s self-reinforcing yet lean and flexible. This is mainly thanks to the Tunisian Extended Simple Stitch (TES). If you’ve followed my newsletters and Tunisian classes over the years, you know I’m a big fan of extending Tunisian stitches. Normally TES fabric would be too thin or lacy for a blanket square. This is where the embossed rows come in.
How to Emboss Tunisian the Easy Way
For your first try, pick two colors and alternate them for each row: a main color (MC) for the background, and a contrast color (CC) for the raised embossed stitches. The colors will help you see where to put each next stitch.
Follow the practice swatch; it’s just twelve rows of ten stitches each. The instructions also explain the why’s, and pattern abbreviations as they come up.
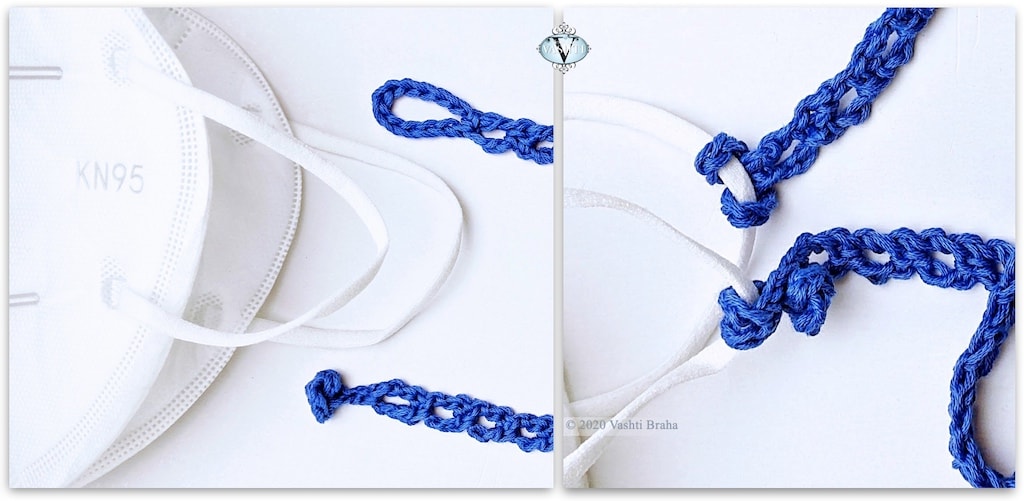
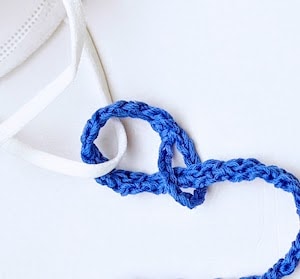
This reversible crochet mask lanyard attaches to each ear loop of a face mask with 100% crocheted fasteners. No sewing on buttons or metal hardware!
Wear the lanyard around your neck. If you remove your mask, there it hangs, already found, like wearing reading glasses on a chain.
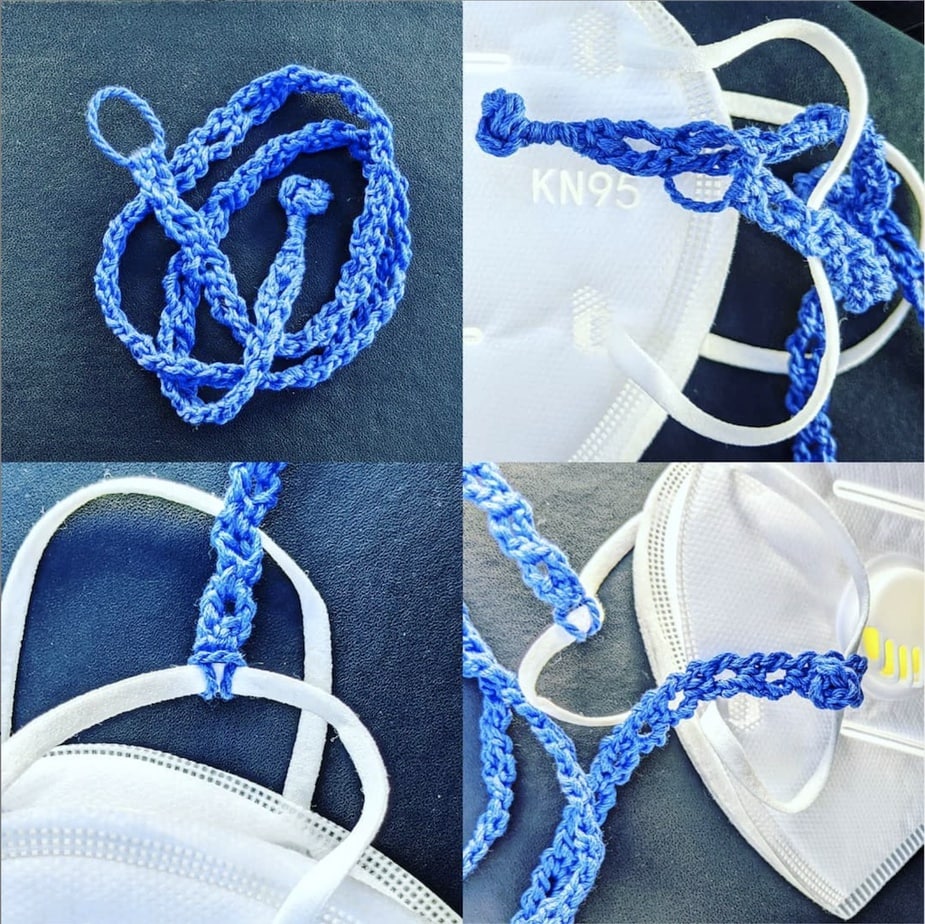
The chain loop end attaches with a lark’s head knot, explained below. The other end has a crocheted peg-like “shank” button. It loops around the other ear loop and buttons into a stitch space of the lanyard. This makes the length easy to adjust. The mask loops can be any thickness.
Three Favorite Things
My favorite thing about this pattern is that it’s “hook-only”: 100% crochet, even the fasteners.
My second-favorite thing is it’s a chance to use my new rosebud button idea for a project. It’s reminiscent of a Chinese frog closure, but like I say, no sewing! Also, unlike some button knots, zero chance of it coming unknotted.
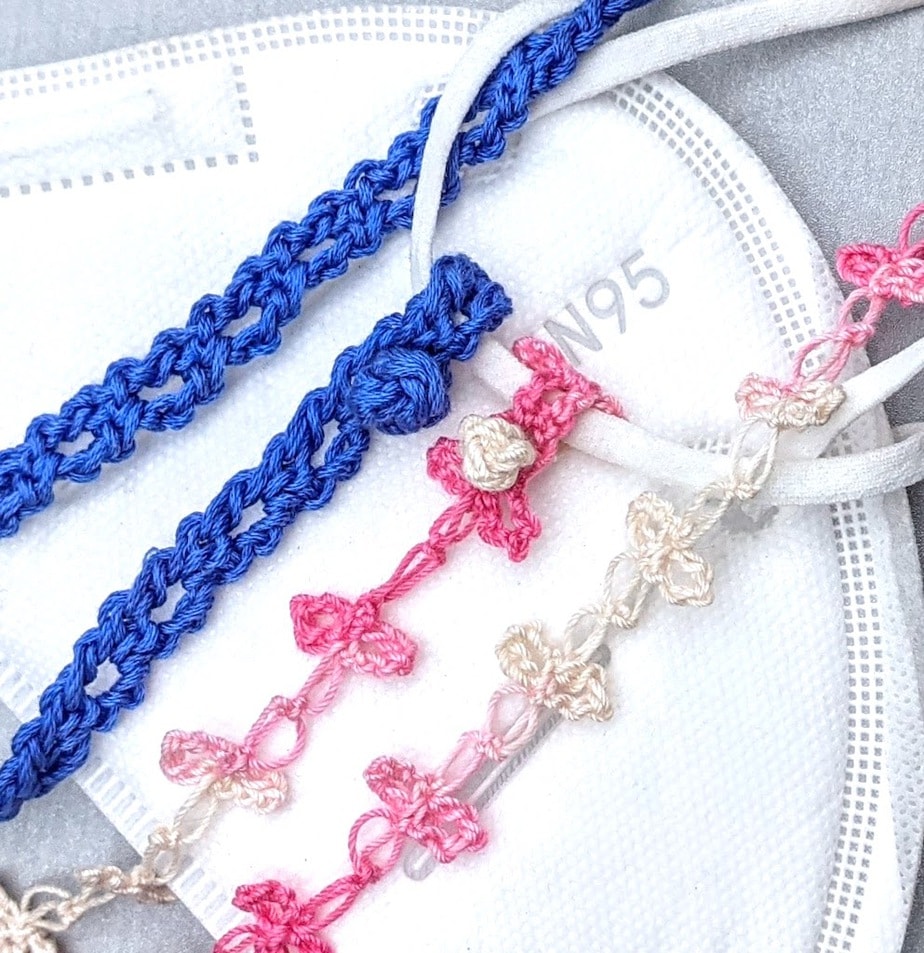
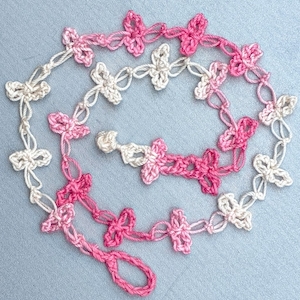
Free crochet mask lanyard pattern below is for the blue one in sport weight cotton yarn. The pink one in size 10 thread uses parts of the same pattern.
And, third, this pattern doubles as a versatile template. I’m already borrowing individual elements from it. The lacy pink love knot lanyard has the same chain-loop end, rosebud button end, and even a few repeats of the blue cord to serve as buttonholes (near the button end). If you have a cord pattern you like, add a few elements from this pattern to keep it hook-only.
Crochet Mask Lanyard Pattern
A PDF version of this pattern was emailed to members of the Crochet Guild of America (CGOA) as a part of a Holiday Shopping Guide, December 1, 2020.
Materials
About ten yards of a sport weight (CYC Size #2 Fine Weight) yarn. Shown (in blue): Lang Fiorina (100% cotton, 135 yds / 125 m per 1.75 oz/50 g)
Size E / 3.5 mm hook
A stitch marker is recommended for the first few rows
Yarn needle
Abbreviations used
Pattern uses US terms. UK/AUS terms are in { }
ch = chain
dc = double crochet {UK: treble}
hdc = half double crochet {UK: half treble}
sc = single crochet {UK: double crochet}
sl st = slip stitch
st = stitch
yo = yarn over {UK: yarn over hook}
Gauge
8 pattern repeats (row pairs) = 4″ {10 cm}. Exact gauge is not necessary for this pattern to work.
Size
21 inches {53.34 cm} long. Length is determined by the number of pattern repeats so it’s easy to choose a different finished length.
Pattern Notes
Pattern begins at the fastening loop and ends at the other end with the button. The strap between these two ends has a two-row repeat: it’s a long narrow column of just one stitch per row.
To begin each new row, turn your work clockwise. (If you’re crocheting left handed, turn the other way.) The yarn will end up in back of the hook and turning chains instead of in front of them.
Instructions
Time needed: approximately 30 minutes
Chain 12. Hdc in 12th ch from crochet hook to form a ring. This is the fastening loop.
Ch 3, dc in the same ch as the hdc.
Ch 1, turn, place marker in bump of ch and in a top loop of dc, sc in space between dc and ch-3.
Ch 3, turn. Dc in bump of turning ch-1 and back loop of dc (the marked loops).
Ch 1, turn, move marker (until you can identify the loops to crochet into), sc in space between dc and ch-3.
Repeat steps 3 & 4: 38 times or until it’s the length you prefer.
Do not fasten off.
Rosebud Button
Crochet all stitches tightly. Ch 13, sl st in the front loop of the 2nd ch from crochet hook, sl st in the front loop of each of next 10 chs. Leave last ch unworked to form the “shank” at the button’s base. Remove crochet hook from loop for the next step. Place marker in loop to secure. Tie the strip of 11 sl sts into a simple overhand knot so that the tip of the sl st strip peeks out. Ignore how it looks for the moment. Replace hook in loop and in two or three strands of the sl st tip, and tightly sl st around the unworked ch-1 of shank. (Knot will bend over.) Sl st in same ch, sl st in nearest next stitch, fasten off, and weave in ends. Tug on sections of the button knot to even it out; plump it up to make it cute. The goal is to center the shank under a mushroom cap shape. Spritz with water to set it.
Attach to face mask
Slide loop end under an ear loop of the mask. Feed the button end through the loop end and pull the full length of the lanyard through so that the loop wraps around the ear loop tightly with a lark’s head knot. Slide the button under the other ear loop of mask. Fold button over and press it through one of the nearby spaces of a dc row. (Reverse these steps to release lanyard from mask.) If the length you made doesn’t fit over your head, attach the button end after you’ve placed it around your neck.
Variation I
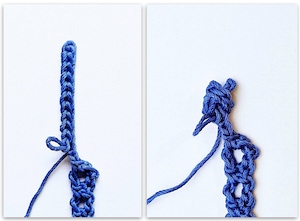
Wrap the fastening loop with the starting yarn end, and wrap the shank of the button with the other yarn end when you’re about to weave in the ends. It’s a nice look. I did this for the button shank of this prototype.
Variation II
Use your own favorite crochet cord pattern and incorporate sections from this pattern. Here’s how the complete pink love knot example looks:
FAQ About Crochet Mask Lanyards
Why crochet a face mask lanyard? Is it better to crochet one?
Crocheting a lanyard is easy and fast, especially when you can also crochet the fasteners. Crochet makes a strong and durable lanyard with very little yarn (about ten yards).
Are crocheted lanyards washable and comfortable to wear?
Yes: use a soft, washable yarn. It’s comfortable and almost weightless. I forget that I’m wearing it sometimes.
How much yarn do I need to crochet a mask lanyard?
The pretty blue one shown here required only ten yards of a sport weight cotton yarn, and a size E (3.5 mm) crochet hook. Even the lanyard clips are crocheted!
What’s the difference between a mask holder, mask extender, mask chain, and mask lanyard?
“Mask holder” and “mask extender” usually refer to a small strip that has a button at each end. Wear it to eliminate pressure or irritation behind the ears. It shows at the back of the head where the ear loops of the mask hook around the buttons instead of the ears. Another term is “ear saver”. “Mask chains” and “mask lanyards” drape around the neck like necklaces. It’s the same idea as wearing a badge holder, or a chain for reading glasses.
How long does it take to crochet mask lanyards?
The simplest one of all—just crochet chain stitches—would take 5-10 minutes. The fancier one shown here took 30 minutes.
Do I have to sew buttons or metal clips onto a crocheted mask lanyard?
No. It’s possible to crochet the whole lanyard, even the fasteners! That’s what it means when a crochet project is “hook-only”.
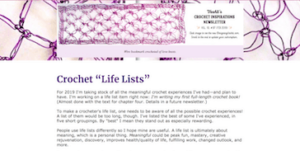
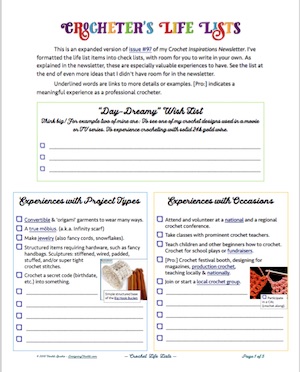
Here is the full downloadable PDF version of the crochet life lists in issue #97 of my Crochet Inspirations Newsletter. There were seven short life lists by topic in that issue.
First page of the five-page Crochet Life Lists PDF.
The seven topics are preserved and expanded a bit in the PDF. I also had more room for adding checkboxes, and blank lines so that you can customize them.
The last two pages of the PDF (it’s five pages in all) list additional items to give you ideas for what to add to your lists. Curious what are on my own crochet life lists? Look for the red boxes on those last two pages!
Download the three charts shown above—with extra columns!—as a free PDF. See below. There was no room for this material in my newsletter issue about crochet hooks. It pairs well with this one: Deluxe Crochet Hook Diagram.
Hey there, New Crocheter?: On the face of it, crochet hook sizes are beginner-level stuff. Question one quirky thing and you can end up in a maze. I did. Over the years I’ve had five key realizations. They build on each other in a logical order, below. I wish I could have read this post when I started questioning! Bookmark this if you’re not quite ready for it yet. Better yet, add a comment about where you’re at.
I originally created these charts for my own use.The PDF has more information than the three charts pictured at the top of this blog. For example, two more columns, and how to use the charts and understand the size increments. Each chart is a full-page size:
All Steel Crochet Hook Sizes in 0.10 mm increments: 0.40 mm – 3.50 mm
NON-Steel Crochet Hooks, medium-range in 0.25 mm increments: 1.75 mm – 7.75 mm
NON-Steel Crochet Hooks, jumbo sizes in 1.00 mm increments: 8.00 mm – 36.00 mm
Crochet Hook Sizes, the Five Keys
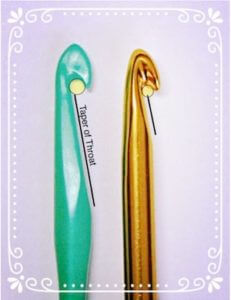
1. I watch exactly where on the hook I make each stitch.
I especially watch the starting loop on the hook because it will become the top two loops of the new stitch. My goal is to avoid forming stitches on the tapered part (“throat”) of the crochet hook.
Some hooks have such a long throat that I can’t avoid making my stitches there. This is a big deal with some stitches. The taper will give my tall stitches loose top loops.
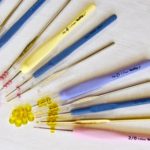
Pictured at right is my first crochet hook (green) and one of my current favorites (gold). My green crochet hook made my stitches look more stringy and uneven than they had to, even for a newer crocheter.
A big revelation for me (thank you Nancy Nehring) was that the crochet hook’s true size is where my stitches are made on it. So the other reason I watch where I make stitches on the hook is to know where to measure the hook size.
2. I treasure my slide gauge tool.
Needle gauges, the kind with holes, are everywhere. They’re even given out for free at yarn shops and conferences. I tossed them all out and only use a slide gauge. If I could find a reliable source for my favorite slide gauge I’d have it in my shop already. Lacis has had this one for a long time. It’s now also at JoAnn Fabrics, Amazon, Walmart, etc. Here’s another one. You can also search for millimeter calipers.
Once I know where on the hook I make my stitches (see #1 above), I measure that with a slide gauge or caliper. I get my true size of each hook in a jiffy. No forcing a hook in or out of the holes of a needle sizer with the risk of scratching the hook in the process!
When I did this with all of my crochet hooks, I found out that about a third of them were not the sizes I thought they were (based on how I use them).
At some point in my crochet life I realized why we have so many crochet hook sizes. When the stitch gauge is based on the hook size and not on the yarn thickness, or personal habit, some amazing crochet fabrics are possible! Starwirbel, Weightless, stretchy slip stitches, and many more.
There are two more reasons: it’s the way to get the most polished stitching gauge for each project. It also standardizes our results as an international crochet community.
Before this realization I thought the different hook sizes were there to make crocheting with different yarns more pleasant. “I think this yarn is too thick for this hook. Must mean I need a bigger hook size”. That’s a fine reason, but if it were the real reason for the sizes, we’d only need about eight sizes—one per yarn thickness category. See the How Many Crochet Hooks? section of my other crochet hook post.
4. I think in millimeter (mm) sizes.
Instead of the “H hook” of my childhood I now think “5 mm hook”. It has improved every day of my crocheting life. I no longer have to deal with traditional hook size systems that are riddled with overlaps and exceptions.
Not only that, the mm sizing makes it plain where there are gaps in the standard hook sizes, and how large each gap is. This in turn opened up to me a wonderland of in-between or nonstandard crochet hook sizes. Hello handmade crochet hooks, imported hooks, and other collectibles, including odd manufacturing runs of established brands.
5. The actual number of crochet hook sizes? Infinite.
The American Craft Yarn Council (CYC) maintains a chart of 29 steel and 28 non-steel crochet hook sizes according to American and British standards. It’s a good start and includes equivalent mm sizes. I build on it in my crochet hook sizing charts by adding Japanese hook sizes and placeholders for missing sizes.
The millimeter measure accounts for all possible hook sizes, including the sizing standards of other countries. I love seeing how US, UK, and Japanese hook sizes all fit together.
Does an infinite number of crochet hook sizes seem overwhelming? Every crocheter needs a different number of sizes. Check for yourself with my list of five factors.
How Did We Get Here?
I think of the non-metric crochet hook sizing systems as being two great crochet traditions (cotton/silk threads vs. wool yarns) that got mushed together, then sprinkled with sizing standards of different countries. It’s quite the heady brew.
Steel crochet hooks were designed for lace crochet with thread. Steel is very strong for even the finest hook sizes. They’re numbered from 00 to 14 (sometimes 16). The larger the number, the smaller the hook.
Non-steel crochet hooks, whether made of aluminum, wood, bamboo, plastic, or glass, get numbered and lettered sizes (from B to U so far) according to an American system. Sizing systems in other countries use different numbering systems. Unlike the steel sizes, the large the number, the larger the hook.
Let’s talk about the size “G” hook. The CYC lists three non-steel G hooks: 4.0 mm, 4.25 mm, and 4.5 mm. Each one is a useful size. Labeling all of them size “G” is unnecessarily confusing.
The Way of Peace
Just focus on the millimeter size. A crochet hook that measures 4.0 mm (on the part of the hook where you make the stitches) will always be that size for you. It won’t matter what it’s made of, where you live, or which country manufactured the hook. Feels peaceful, doesn’t it?
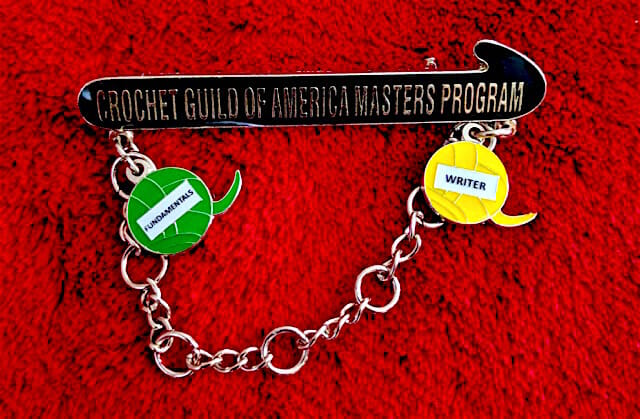
I like this new pin for CGOA’s new Master’s Program (view full size image). These pins were given out on a special night at the conference. I earned the Writer charm for writing two sections of the Masters in Fundamentals.
Do you know what I do on the plane flight home from a conference? I fill out a simple worksheet. It’s a nice way to reflect on everything.
I’ve done this since 2008. That’s at least ten conferences. (In some years CGOA had two conferences, a national and a regional. I’ve also attended a TNNA show here and there.) It has really come in handy so I’ve turned it into a PDF that you can download below for free.
Here’s the story on two of the six entry fields of the worksheet.
“What Got Crocheted?”
This is the first question. What it really means is “Of all the crochet supplies I packed, what did I actually get to?” Can you relate? Originally it was to help me be realistic about how many crochet projects and balls of yarn I need to stuff into my luggage! I know I’m not the only one who packs too much crochet for a trip LOL.
Nowadays I just plain enjoy reflecting on it. Sometimes I’ve even crocheted more rows on a project because I look forward to saying so on the worksheet, so it’s also motivational.
This year, what got crocheted is a swatch idea I’ve always wanted to try: to substitute the chains in a spiderweb pattern with love knots:
I also added so many more rounds to “Astrowirbel” during the 5.5 hour flight to Portland that I almost doubled its size.
“Goals Met & Unmet”
This part of the worksheet used to be more freelance minded, such as, “I finally sat down with X editor.” It has become much more, though. It’s a way to commemorate new friends I’ve made. It has also helped me see that a goal I started with wasn’t very realistic for the event, or as important in retrospect. Or, that I accomplished more than I realized while I was having so much fun.
This year, an unmet goal was to go out into Portland and see lots of roses, the Powell’s City of Books store that sounds amazing, a Peets coffeehouse, and get some supplies for my room. I was too busy teaching, or making sure I ate well between classes.
Some goals I met are: no typos in my class handouts (except a minor one in the Self-Healing Stitches class). I met and spent quality time with Dela Wilkins! I got to know CGOA’s new management company, a great group of people. I think they’re going to be a great fit with CGOA.


 I especially watch the starting loop on the hook because it will become the top two loops of the new stitch. My goal is to avoid forming stitches on the tapered part (“throat”) of the crochet hook.