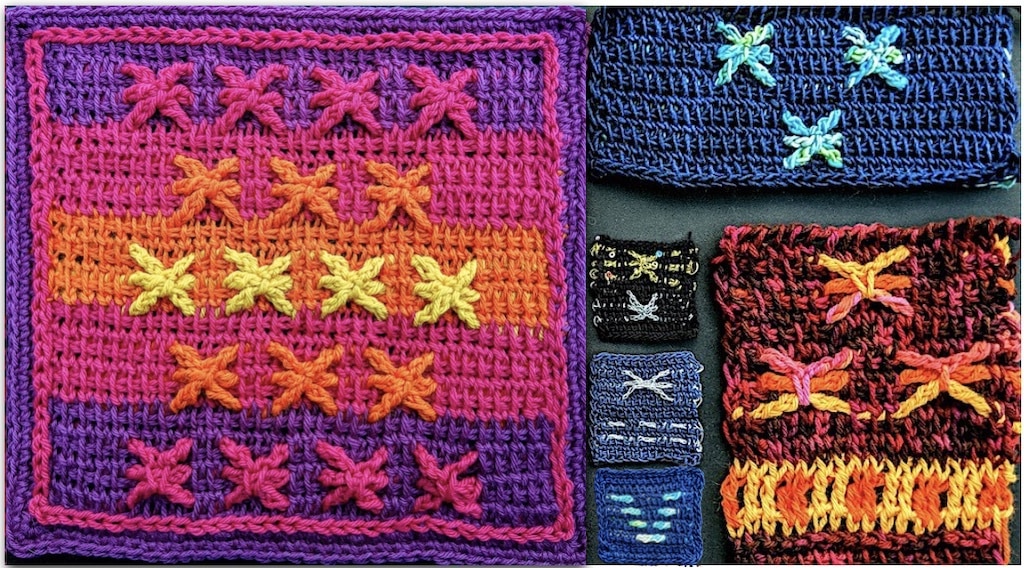
Today I’ll show you how to “emboss” Tunisian return pass crochet stitches step by step. The complete pattern for the blanket square is also included below. The background stitches are Tunisian extended simple stitches (TES). The starry groups are extended Tunisian Yarn Overs (TYO) in contrasting colors.
My 12-inch square for Knitter Knotter’s 2021 Tunisian Blanket Crochet-Along (CAL) features this novel color work method for Tunisian Crochet. The finished 12″ square is the one on the far left in the image above.
About the 2021 Tunisian Square CAL
I love how the CAL is going! Host Arunima Goel has created a fun way for designers to contribute a square, and for crocheters to experience new Tunisian stitches. My square is #18. By the end of 2021 there’ll be 24 fresh and free intermediate-level 12″ square patterns.
Are you a Tunisian Crochet beginner? Or just need a quick review?
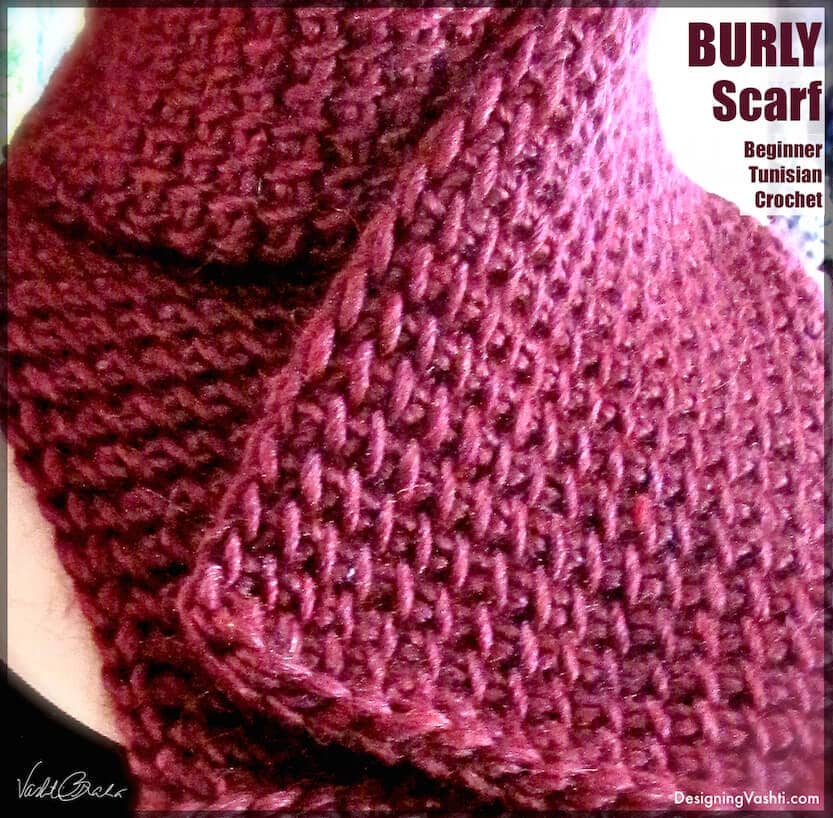
The Burly Scarf is the simplest first project for a Tunisian crocheter. Treat yourself by using a chunky luxurious yarn!
I seem to have stumbled upon a way to get a fully raised texture horizontally, and in a contrasting color. And, no lacy holes!
I wanted to test the usefulness of extending Tunisian Yarn Over (TYO) groups. Sometimes a group of several TYO can get loose and loopy, just like the yarn overs of really tall stitches tend to do in regular crochet. Extending tall stitches by adding a chain here and there while making them helps use up that slack. (For some alternatives to extending, see How to Fix Loose Loops of Tall Stitches.)
Embossing return stitches has potential.
As a return-pass-based color work method it can be combined with existing Tunisian Mosaic, and especially Overlay methods. These are forward-pass-based methods that do fancy things vertically, with tall stitches. The possibilities boggle!
Make other embossed shapes. Once you learn how to emboss Tunisian return stitches, you can make other shapes besides the starry groups you see here. Arrange horizontal bars in patterns. Make some longer or shorter. Modify the stars to have spokes in different lengths or amounts.
As a fabric, it’s self-reinforcing yet lean and flexible. This is mainly thanks to the Tunisian Extended Simple Stitch (TES). If you’ve followed my newsletters and Tunisian classes over the years, you know I’m a big fan of extending Tunisian stitches. Normally TES fabric would be too thin or lacy for a blanket square. This is where the embossed rows come in.
How to Emboss Tunisian the Easy Way
For your first try, pick two colors and alternate them for each row: a main color (MC) for the background, and a contrast color (CC) for the raised embossed stitches. The colors will help you see where to put each next stitch.
Follow the practice swatch; it’s just twelve rows of ten stitches each. The instructions also explain the why’s, and pattern abbreviations as they come up.
There’s more than one way to crochet two rows at once. You can also crochet three or more rows as one. I’ve only seen other people combine two rows with plain and fairly dense stitches, like rows of all single crochet or double crochet (in UK & AUS that’s doubles and trebles). I’m going to show you how I did it with a lacy stitch pattern.
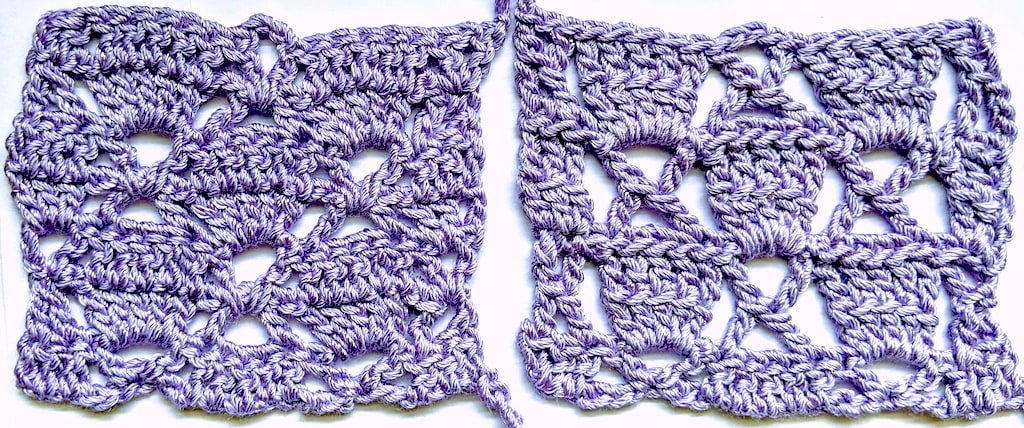
The green swatches below are from my newsletter, issue #102: “Wild Whys of Y-Stitches”. I didn’t have room to include the lavender ones shown above. That means this post also qualifies as newsletter overflow, woo-hoo!
Crocheting two rows as one is a tall stitch “hack” that I stumbled on while researching X- and Y-shaped stitches with my upcoming online class in mind, Tall Stitch Virtuosity. In this post I’ll break it down, ending with actual row-by-row instructions for a 2-row stitch pattern, and for my one-row version of it.
Linked Stitches: Classic & Beyond
First, we all need to be on the same page about linked stitches if we’re going to crochet two rows at once.
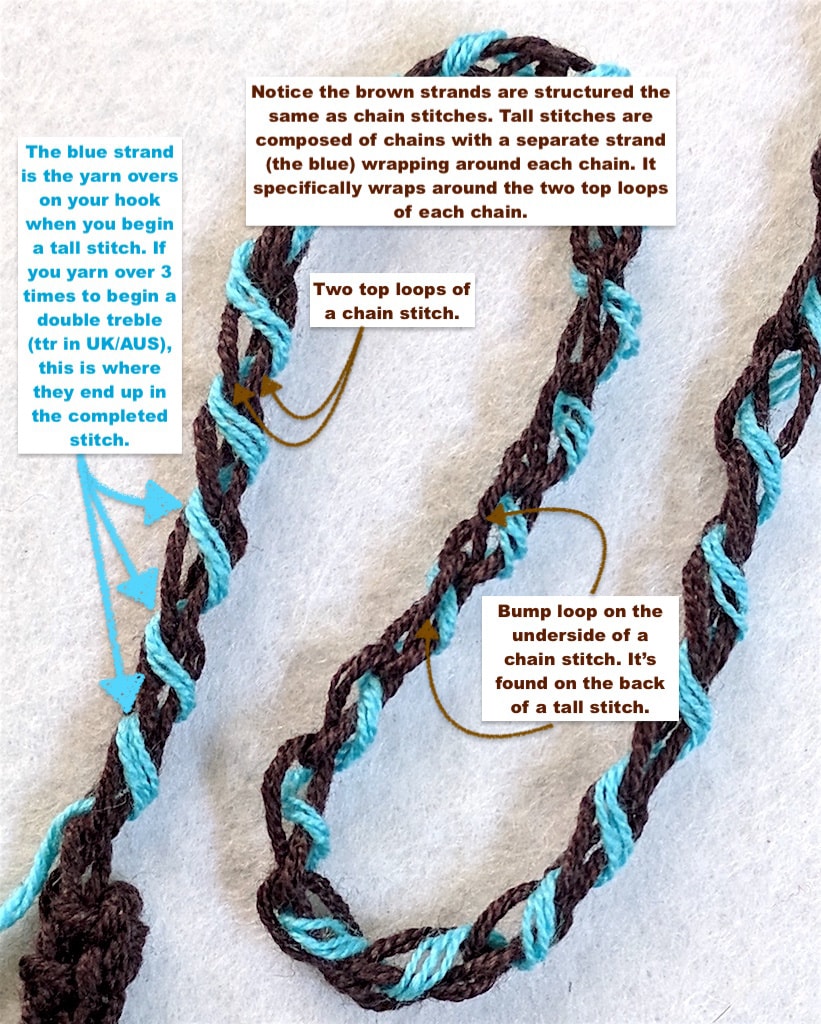
A world of special effects with linking opens up when you can identify the individual strands of a tall stitch. I’m surprised how long it took for my eyes to distinguish what goes on in tall stitches, structurally. I used to think they were like bundles of muscles and ligaments.
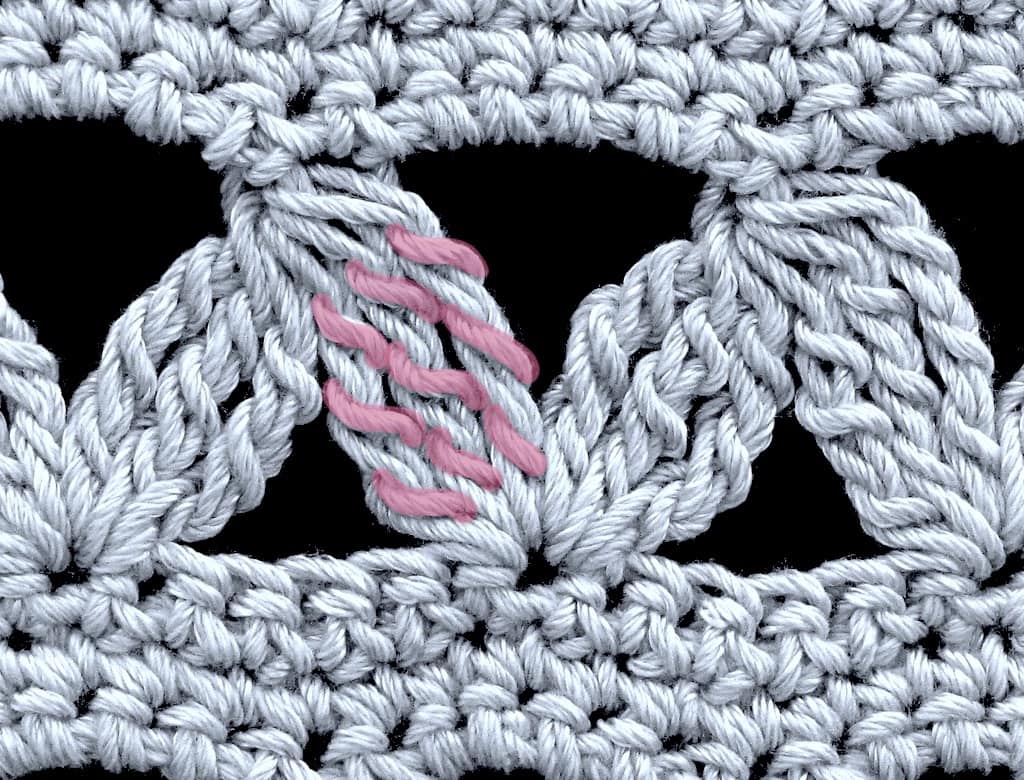
So, let’s dig in to what each strand is doing in the post (a.k.a. stem) of an astonishingly tall 2-color stitch. I loaded yarn overs onto my hook with blue yarn. Then I worked them all off the standard way (two by two) with brown yarn. I crocheted it loosely so you can see through the stitch:
I used this image in issue #94 of my newsletter, “Stitch Parts: Where We’re At” to compare Tunisian crochet similarities.
Find the Yarn Over Strands
Here’s a row of 6-dtr split clusters (dtr = double treble; in the UK/AUS it’s ttr). I yarned over 3 times to begin each dtr. The tinting shows where the three yarn overs end up in each stitch post.
Tip: Just count the yarn overs in a stitch post and you know which tall stitch was used…as long as it’s not a variation, such as an extended stitch.
Linking the Classic Way
A classic linked stitch is a tall stitch that is linked all along its post to the yarn over strands of the stitch just before it. I call this “classic” because it seems to be the default or expected way to do a linked stitch, even though in actuality the ways to link them are infinite.
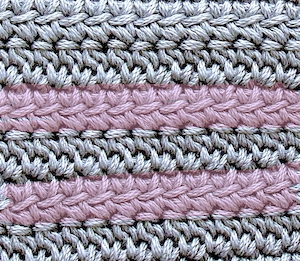
The classic method welds them together from top to bottom. In photo A below, all of the tall stitches are linked in three places. The right cluster is “classic”: all 3 yarn overs link to the 3 yarn overs of the previous stitch. In photo B, this is what you get when you link the yarn over of each double crochet of every row.
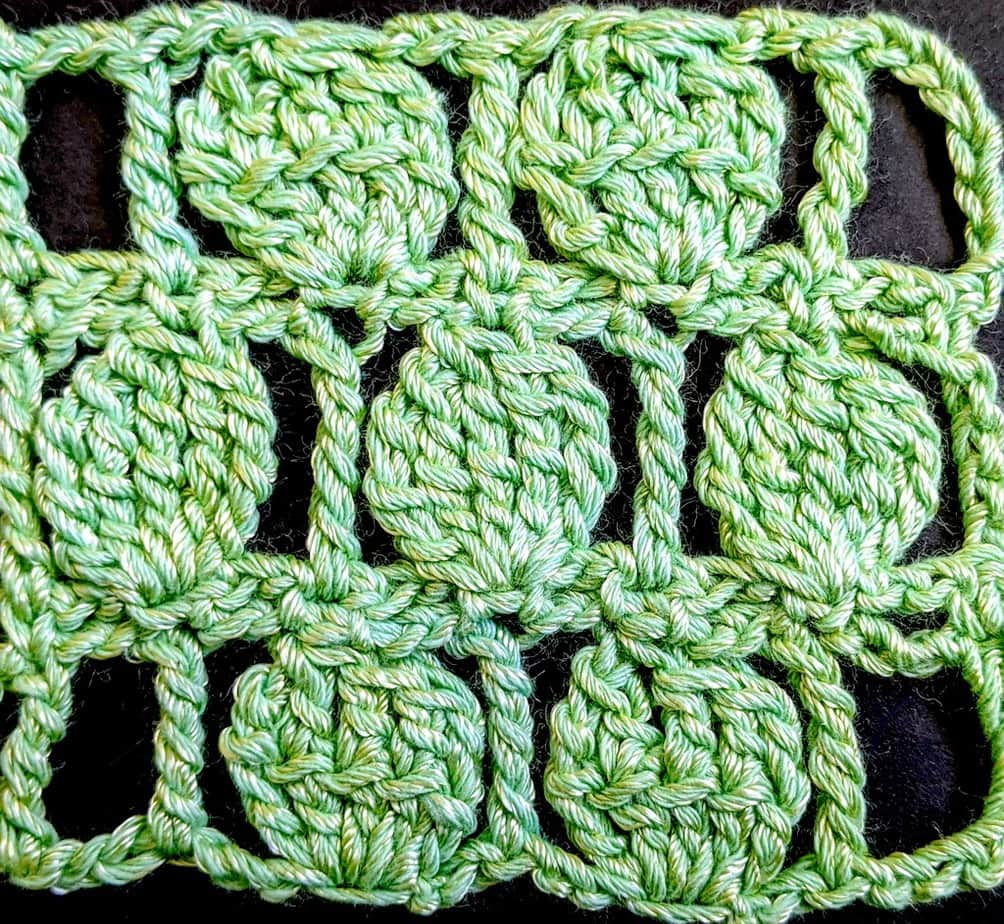
In photo C, I forgot to link the clusters in the middle row. The clusters in the bottom and top rows are linked only with the middle yarn over. Can you see the horizontal strands where they’re linked? It causes the cluster to flatten just a bit and to move as one unit, almost like a coin. I like their surface texture. They’d probably become stiff and a bit concave if I linked them the classic way, with all three of their yarn overs.
A) Left Cluster: linked in vertical strands of posts.
B) Linked dc (UK/AUS: tr). Rows facing the front are tinted pink.
C) Middle row of clusters has NO linking.
I’ve used classic linked stitches as borders for Tunisian designs like Liebling and Graven. The pros and cons of classic linked stitches resemble those of Tunisian simple stitch (Tss):
It eliminates gaps between tall stitches. This may be its most common use. It also tightens the gauge a bit. It’s a great fabric for a bag (Sterling).
It changes the surface texture to the flatter woven look of Tss.
The fabric feels thinner. It has less stretch and less drape. Stitch fronts may bend slightly inward in a concave way. (Akin to the “Tunisian curl”.)
Selective Linking
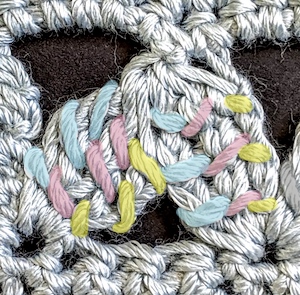
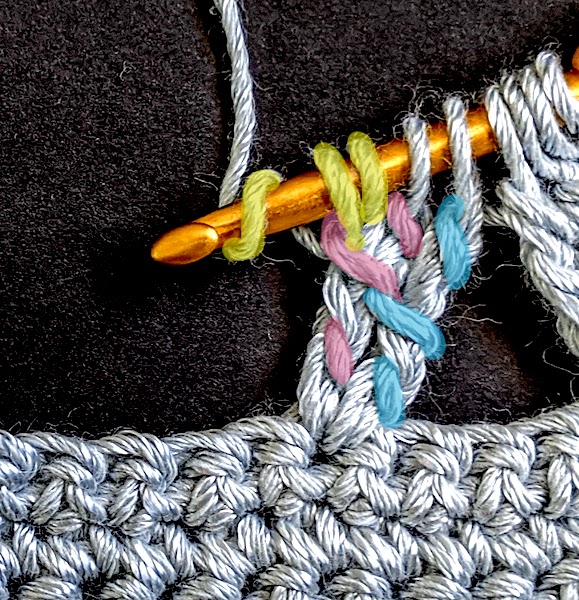
Here’s a row of 3-dtr clusters in progress; I’m linking only their middles. The 3 initial yarn overs of each dtr are tinted. See how the middle pink and blue yarn overs are linked? The other blue and pink ones are not.
Yellow-tinted yarn overs for a new dtr are on the hook. See that the 2nd yellow one is linked to the 2nd pink one? Here’s how:
Yarn over (counts as 1st of 3 initial yarn overs in yellow); insert hook down through the top of the the 2nd (pink) yarn over of the previous dtr, yarn over and pull up a loop in it (counts as 2nd of 3 initial yarn overs); yarn over (counts as 3rd of these yarn overs). To complete stitch, insert hook in same stitch of row as the previous two dtr, *yarn over and pull up a loop, yarn over and pull through two loops on hook, repeat from * twice. In this case for a cluster, yarn over and pull through the remaining loops on the hook.
Crochet Two Rows at Once, Creatively
I hope you’ll explore what you can do with linked stitches. Here are some that need future blog posts.
X- and Y-stitches are very much like linked stitches; the main difference is the next stitch is started in the side of the stitch post, not just linked to it. For an X or Y shape, the next stitch is shorter, like a branch crocheted onto the “trunk” of a taller stitch. I needed X-stitches for the lavender swatch (top of the page) to be able to crochet two rows at once. The two-row version has a V-stitch crocheted into an inverted V-stitch. Isn’t that a two-row X?
I’ve discussed where to link, and how many times to link in the same stitch. What about how you might link. The equivalent of a slip stitched link is where you insert your hook in a strand of the previous stitch and leave it on the hook (don’t yarn over and pull up a loop in it). The opposite would be to start a taller stitch there: it worked for me when I crocheted a letter A-shape.
A Sample Two-Rows-as-One Pattern
The one-row example has more supple drape without the usual horizontal grid-like connections between stitches of a row.
Pattern abbreviations: ch = chain stitch, dc = double crochet (UK/AUS tr), dtr = double treble (UK/AUS ttr), sc = single crochet (UK/AUS dc), st(s) = stitch(es), yo = yarn over hook
Special Stitches:
Shell = [2-dc cluster, dc, 2-dc cluster] all into designated stitch
2-dc cluster = *yo, pull up loop in designated stitch, yo and pull through two loops on hook, repeat from * in same stitch, yo and pull through all loops on hook.
Split Cluster = [*yo, pull up loop in first st of Shell, yo and pull through two loops on hook, repeat from * in same stitch], [yo, pull up loop in 2nd st of Shell, yo and pull through two loops on hook], [*yo, pull up loop in 3rd st of Shell, yo and pull through two loops on hook, repeat from * in same stitch], yo and pull through all 6 loops on hook.
Coin-Cluster = Yo 3 times, insert hook in next st, *yo and pull up a loop, [yo and pull through 2 loops on hook] 3 times, yo, insert hook in 2nd yo strand of previous st, yo and pull up a loop, yo, insert hook in same st of row, repeat from * four times, [yo and pull through 2 loops on hook] 3 times, yo and pull through all 6 loops on hook.
Original Two-Row Stitch Pattern
Chain 20 for a swatch. (Multiple of 6 stitches + 5.)
Row 1: Dc in 8th ch from your hook, *ch 1, skip next 2 sts of row, Shell, ch 1, skip next 2 sts of row, dc in next st, repeat from *. Ch 5, turn.
Row 2: Skip next 2 ch, *dc in next dc, ch 2, skip next ch, Split Cluster over next 3 sts of Shell, ch 2, repeat from *, dc in next dc, ch 2, dc in 2nd ch of turning ch.
Repeat Rows 1 and 2 for pattern. Or, for Row 3 put Shells where the dc are, and dc where the Shells are to stagger the pattern.
The One-Row Version
Chain 23 for a swatch. (Multiple of 6 stitches + 7.)
Row 1: Dtr in 11th ch from your hook, *ch 2, skip next 2 sts of row, Coin-Cluster, ch 2, skip next 2 sts of row, dtr in next st, repeat from *.
If you don’t mind having the wrong side of Coin-Clusters facing every other row, repeat Row 1. To have them all face the right side, work this pattern in the round with no turning. Or, use this Row 2 as shown in the swatch: Ch 1, turn. Sc in first dtr, *ch 2, skip next 2 ch, sc in next st, repeat from * to the end of the row, placing last sc in the next turning ch after you skip 2 of them.
Repeat Rows 1 and 2 for pattern. Or, for Row 3 put Coin-Clusters where the dtr are, and dtr where the Coin-Clusters are to stagger the pattern.
So I’d like to hear from you if you’ve had linking adventures, or troubles.
Want to crochet two rows at once of a favorite stitch pattern? I think some probably can’t be done, while with others there could be several ways to combine rows.
I’m eyeing a pattern right now that has 3 rows of single crochet, then 1 row of clusters. I’m mulling how I could turn its 4-row repeat into 2: turn a sc row + cluster row + sc row into one row, and have the sc row that separates them be the one row that faces the wrong side!
I swatched a fancy tall stitch pattern recently. It’s actually a section that I isolated from a larger all-over pattern in issue #187 of Duplet magazine (September 2016). Each of its nineteen rows is unique. This is a first-time-puzzling-through swatch, so please ignore the uppermost rows which need re-doing. I worked exclusively from the symbol diagram because I don’t know how to read Ukrainian or Russian.
I added turning chains and opted to link the first tall stitch to them. It’s easier to see this in the extreme close up further down. Also, the first row of very tall stitches (quadruple trebles) along the bottom is not in the Duplet pattern; I started off by testing very tall foundation stitches.
Tall Stitch Pattern Symbols
Something I love about symbols for very tall stitches is that the initial yarn overs required show as small lines crossing the long vertical line of the stitch post. You just count the wee hashes. Even nicer for UK and Australian crocheters, the number of them also tells you the name of the stitch. (American crocheters: just use the name for the next shorter stitch.)
Below is a sampling of Duplet’s symbols for the very tall stitches. Notice the four longest vertical lines at the far right edge, with five little hash marks: it means you yarn over five times to begin the stitch. These are quintuple trebles in the UK & AUS, or call them quadruple trebles in the US.
According to the symbols, crochet these four very tall stitches into four tall stitches that have only two hash marks: they are double trebles in UK/AUS or just trebles in US terminology.
An Upside Down Y-Stitch
Duplet 187
See that symbol in the upper left that looks like an upside-down Y with hash marks ? See how its right leg stands over a sort of horizontal line? That line is some number of chains (4 in my swatch). The other leg skips some stitches that are mostly outside of the picture. This symbol means you begin with five yarn overs, then insert the crochet hook into a chain or the chain space. Work two of the five yarn overs off of your hook, as if to make a treble (UK/AUS dtr). Then, yarn over twice to begin the other leg of the stitch while the 3 unused yarn overs are still waiting on the hook. Work the treble of the other leg into another chain space, and then finish working the remaining 3 yarn overs off of the hook.
A variety of clusters and shell stitches flow into each other to give the crocheting an undulating feeling. It’s exciting to see it take shape, and it kept me on my toes. I’d do a few things differently if I swatch it again. Duplet and Zhurnal magazines offer many expressive patterns and innovative ways to use very tall stitches.
As Class Material
This particular tall stitch pattern is mainly research for me. It’s too involved for the Tall Stitch Virtuosity class, but of course I’ll bring the swatch and magazine with me. When there’s time in class we can take a closer look at examples like this.
It’s not too involved, however, for…my Pinterest board called Tall Stitch Artistry!
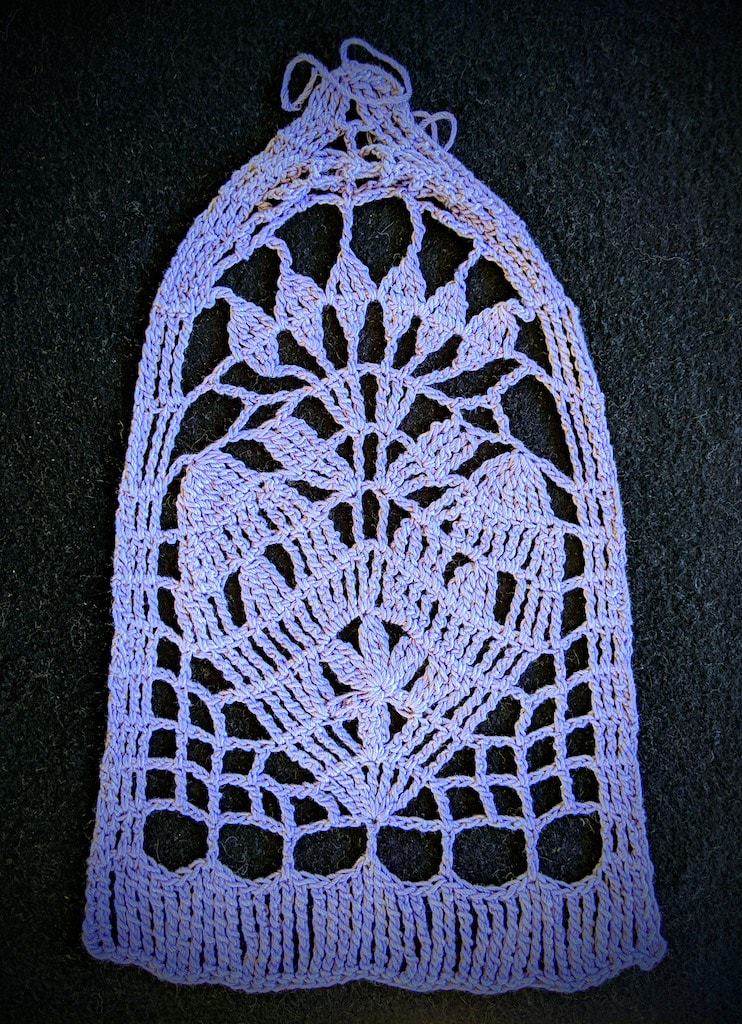
This is the gauge swatch from the new Eilanner Shawl pattern, but I used tencel thread and a giant hook for kicks. So airy! It inspired me to try draping it on a mannequin different ways. View full size.
I released a new Tunisian crochet pattern the other day. There’s a lot going on in it! I think of the design as containing modules of mini-patterns. Some of them hint at new stitch patterns.
Seeds of New Stitch Patterns
Often if you change one thing about a stitch pattern you can get a whole new effect that’s cool enough to count as a new stitch pattern. (This would be a good newsletter issue, come to think of it…) Here are some I swatched while Eilanner was being edited, and the things I changed to generate them. I posted them to Instagram.
Change the Yarn and/or Gauge
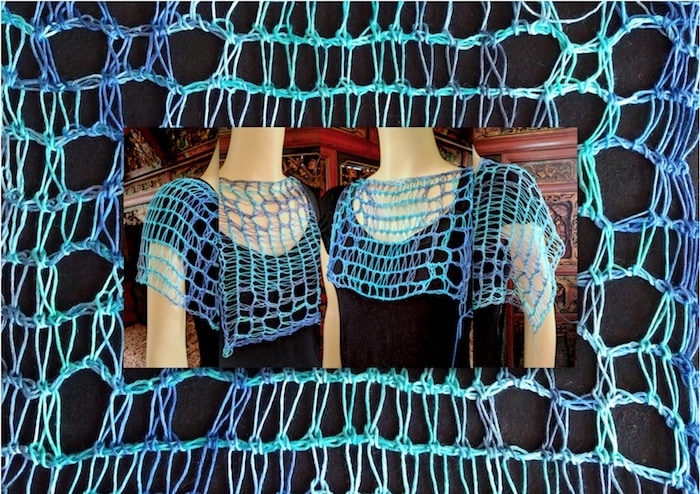
An obvious way to get a new effect with a stitch pattern is to use a dramatically different crochet hook size, or yarn thickness/fiber type, or all of these (as in that first image above). Super summery look! Reminds me of tall grasses.
There’s something else going on with it too: it’s really just a gauge swatch pattern. The skill level for Eilanner is Experienced. Getting the exact gauge is not important for the pattern but I thought it would help some crocheters to focus on just the main stitch pattern without the fancy edging at both row ends and the constant increasing.
By the way, if you’re interested in Eilanner but worry it’s too challenging, work up to it with its predecessors. Shakti is like “Eilanner 101” and Islander is “Eilanner 102”. (I named Eilanner after Islander.)
Repeat a Special Stitch Group All Over
Another way to do a stitch pattern spin-off is take a stitch group and repeat that. Here’s Eilanner’s “tattoo flower” eyelet group repeated as an all-over motif.
This right here is a fraction of the possible new stitch patterns to generate this way! For example, the eyelets could be grouped differently, or stacked in columns instead of spread out in an alternating way. Moving eyelets around is an art form in itself.
I haven’t even tried sprinkling in stitch texture contrasts. Have a look at what happened when I added a similar stitch texture: love knots!
I woke up this morning with another idea for a stitch pattern that will probably show up in Instagram once I swatch it up. (The way Instagram displays images helps me contemplate designs.)
Isolate One Key Stitch
Not every stitch pattern has a key stitch to isolate. Eilanner does, though: the shallow-extended stitch I blogged about last week. The swatch below is pretty rustic and it’s not easy to see what is different about the stitch, but have a look.
It’s kind of loose so that I can see what the stitch texture is doing. I chose Icelandic wool for this because I love that the shallow-extended stitch is like a reversible and non-curling version of Tunisian Knit stitch.
If you like seeing my experimental swatches, follow me in Instagram where I tend to post them first. And please tell me what you like or don’t about them! It inspires designs and class topics.
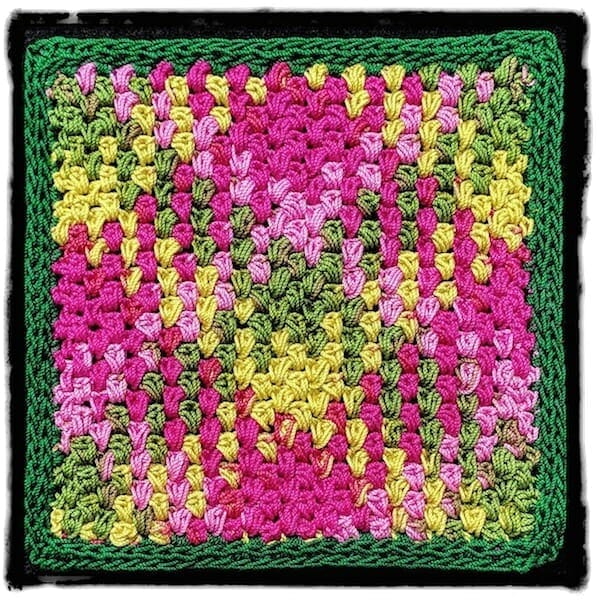
Size 10 variegated Lizbeth cotton thread, color #10-104 Spring Garden. I created a “Color Eater” variation of the moss stitch for it. Row by row pattern below.
Have you seen the planned color pooling crocheters are doing to get a cool argyle or plaid look with variegated afghan yarns? You can use lots of different stitches for this, but the height of single crochets (sc, or in UK/AUS: dc) is great, especially with moss stitch (a.k.a. linen, granite, seed stitch).
Planned Pooling with Cotton Thread
I pooled the colors of a size 10 crochet thread into an argyle and “Rosebud Argyle” is the result. It’s 3.5″ x 3.5″ and dense because I used a color-gobbling stitch pattern, so I added a border and turned it into a “mug mat” (coaster). I’ll be bringing it to the Creative Planned Color Pooling class.
If I had used the classic moss stitch pattern of [sc in next ch-space, skip next sc, ch 1], my swatch would have come out more than double that size: over 7″ x 7″ (I ripped it out before measuring exactly how much smaller it is with my stitch variation).
Even the 3.5″ size is bigger than I expected! My original goal was only 1″ or 2″. New lesson learned: the color changes in variegated thread look short until you start crocheting with it. The stitches just don’t take up much thread.
I really wanted the experience (and general look) of a moss stitch pooled argyle, so I needed to substitute with stitches that eat up a lot more thread. Why? The length of each color in a variegated thread or yarn is fixed. When the colors repeat, their sequence is also fixed. The total length of one whole sequence is your fixed width. The way you alter this fixed width is with the stitches you use. (There are other options but not for this post.)
Each row of moss stitch is [sc in next chain-space, skip next sc, ch 1]. With each new row, the sc’s are over the ch’s and the ch’s are over the sc’s. It is common to use half double crochets (hdc, or UK/AUS: htr) instead of sc. I haven’t seen much of it lately, though. I hope crocheters are feeling free to alter the moss stitch, especially if you’re doing planned pooling.
Below I’ve written up the stitch pattern instructions for my color-gobbling moss stitch variation. It’s the one I used for the swatch pictured above. I wrote it as if you’re using a solid colored yarn or thread.
Vashti’s “Color Eater Stitch”
Pattern Notes
The “color eater stitch” is [slip stitch, 2-hdc puff] in the next ch-space. The slip stitch is to keep the hdc puff closer to the height of a sc and puffy (rosebud-like). It also helps keep the color changes distinct when you’re pooling.
Like moss stitch, each row is [color-eating sc substitute in next ch-space, skip next color-eating sc substitute, ch 1]. With each new row, the color eaters are over the ch’s and the ch’s are over the color eaters.
It’s easy to fine tune how much you use of a color when you’re pooling with it. For example, sometimes I did a 3-hdc puff instead of 2 to eat up more color. Or, a tighter ch-1 and shorter puff to eat less color. I got better at this with the later rows. Maybe you can tell in the swatch.
When color pooling with it, do whatever you need to at the row ends: just a ss and hdc to use less color, or even a 4-hdc puff to use much more.
Abbreviations
ch – chain stitch
hdc – half double crochet (hdc, or UK/AUS: htr)
2-hdc puff – [yarn over, pull up a loop] twice in the same designated stitch, yarn over and pull loop through all 5 loops on hook.
ss – slip stitch
How to Crochet It
Foundation chain: With a solid colored thread or yarn for your first swatch, chain an even number.
Row 1: Skip 3 chs, *[ss, 2-hdc puff] in next ch, ch 1, skip next ch, repeat from * until one ch remains, [ss, 2-hdc puff] in last ch, ch 2, turn.
Row 2: Skip first puff and ss, *[ss, 2-hdc puff] in next ch-space, ch 1, skip next puff and ss, repeat from * for rest of row, [ss, 2-hdc puff] in space of turning-ch 2, turn.