Posted on 1 Comment

Starry Crochet for Wire Mesh Panel Decor

Crochet DIY for Wire Mesh Panel Decor!

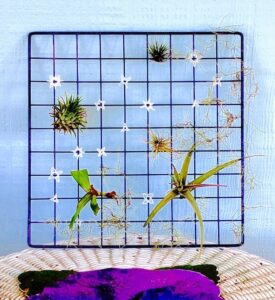
I have a fun summer crochet project to share. I’ve been bitten by the DIY wire mesh panel decor trend and have made several styles. Today’s focus is a cosmic one: wire mesh panel as Starry Firmament.

Unique crochet stars for wire mesh panel decor
Half of these were made with the pattern below, or a simple variation of it (described in the pattern).

Shown above is a cosmic condominium for air plants, but it could just as easily be a photo memo board. Or see below for other decor ideas.

There’s a free crochet pattern for the stars below.

Wire mesh panels are not hard to come by at all. Not only are they easy to find, they’re a bargain: just a dollar or two for strong, durable, and very serviceable 14-inch {35.5 cm} square panels. In fact, they’re so low-priced and common that it costs more to ship them across the US than it does to buy new ones locally. Hence my problem.

I have stacks of them because they’re great for building show booths, like I’ve done at crochet conferences over the years. It only makes sense to keep them if I do show booths I can drive to. Some panels are getting a bit of surface rust here in the subtropics.

Most people would throw the panels away. I know because that’s the advice I’ve gotten. There’s a creative DIY decorating trend going on with wire mesh panels though! Why spend $15-$50 on one when you could spray paint it rose gold yourself? Or do like I did: add a constellation of stars?

Some wire mesh panel decor ideas I’ve found are: hang them over a desk to organize photos, memos, etc; string fairy lights into them and add a small shelf. Especially inspiring: sprinkle on some quirky air plants.

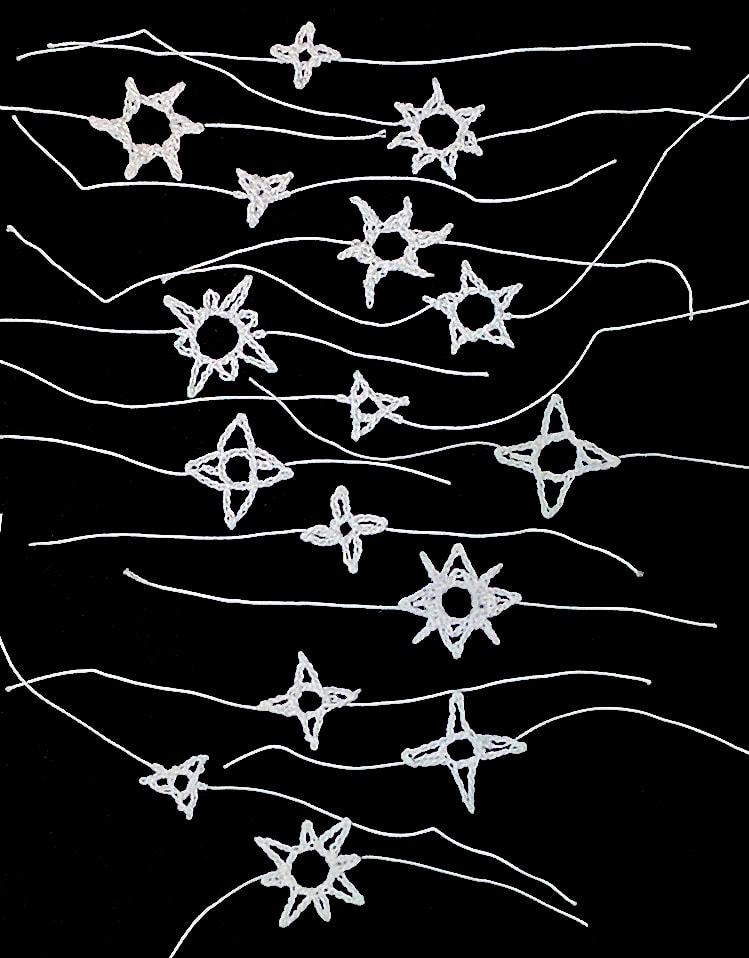
Crochet Pattern: Basic Firmament Star

I’ve used only the most elementary crochet stitches for this pattern. A new crocheter might struggle with it, though, if s/he isn’t accustomed to using very fine crochet thread yet.

Materials

I used a size #20 white crochet thread by DMC call Cordonnet Special. It’s on the stiff side because it has many plies that are highly twisted. This makes for crisp-looking stars that will hold their shape. If you can’t find it, Handy Hands Tatting make a cordonnet type called Lizbeth in many different sizes and colors. If you don’t have size #20, the next thinner/finer size, #30, seems to give me very similar results.

It doesn’t matter what steel crochet hook size you use. Choose the smallest size that still makes crocheting with the thread easy. For me it’s a size 1.25 mm in the brand I had at hand. For the thinner size #30 thread I needed a slightly smaller hook size. Psst, you might like what I wrote about steel crochet hook sizes!

Three thread sizes are represented here: the pink one in progress is size #10, and the two middle ones are the thinnest: size #30. The star on the far left and far right: size #20.

Pattern

Leave the thread ends 4 inches {10 cm} long.

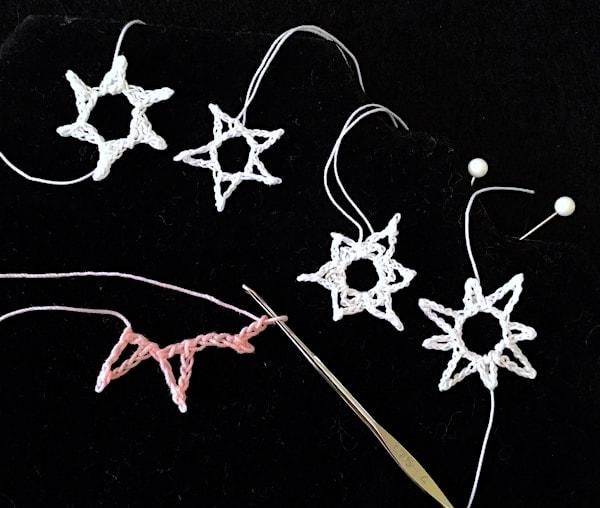
Make a slip knot and place the loop on your crochet hook. Chain 5, slip stitch in the second chain from your hook to make a tiny picot, chain 2 or 3, double crochet in the first chain of this spoke (the chain that’s nearest the slip knot). In the photo above, two pink spokes have been completed. *Chain 5, slip stitch in the second chain from your hook, chain 2 or 3, double crochet in the first chain of this spoke.* Repeat from * to * one or more times, depending on how many spokes you wish the star to have. Then slip stitch in the first stitch nearest the slip knot. Fasten off.

To vary the appearance:

  • Use half double crochets in place of the double crochets.
  • Add another stitch (a slip stitch, or single crochet) in the next chain after the picot, then chain one less before finishing the spoke with a tall stitch.
  • Begin each spoke with 4 looser chains instead of 5 (then chain one less before finishing the spoke with a tall stitch). Or begin with more than 5 chains and add more chains after the picot.

To finish and use the star:

  1. With a fine needle, weave one of the ends to the opposite edge of the star. Notice in the photo above that the ends of the two outermost white stars are opposite each other while the middle two have ends coming from the same place of the star.
  2. Wet it, stretch, pinch the spokes, and allow to dry perfectly flat and as symmetrical as you can get it. Meanwhile prepare your wire mesh panel by sanding off rust if necessary, spraying with a primer and then a dark glossy blue. I then sprayed on a fine multicolored glitter too.)
  3. Tie each star onto a place where the grid wires intersect. Tie one direction and then the other tightly around the intersection. This keeps them stationary. Snip the ends close to the final knot on the back of the panel and apply a drop of glue to the knot.
  4. My one additional step was to spray a light coat of clear acrylic sealer onto the back of the panel. Mod Podge makes one that did not cause the stars to yellow, unlike a few other sealers I tested. Have a toothpick handy to smooth down the sealer where it shows on the stars (it will look hairy or like tiny dew drops in places). This helps keep them crisply starry.
  5. Now add air plants, or use those tiny wood clothespins to clip photos and things to it.

See more images of the Starry Firmament wire mesh panel decor at its Ravelry project page.

Posted on 1 Comment

V-O-T-E Early and Often with Crochet

Crocheted letters V-O-T-E against sunrise-colored crochet background
View the image above full size.

Last week I used a new Tunisian crochet stitch to swatch up a few letters of the alphabet. You can see four of the letters above. (The background is something I crocheted for the kitchen years ago.) Just look at what I can spell! I also made an ‘L’ to spell LOVE. I’ll explain how to do the cool Tunisian stitch below.

Eight-Color Poster

Tunisian crochet letters spell V-O-T-E against a rainbow aran crochet background.
It came out to approx. 12″ x 14″. View full size in Ravelry.

I’m working on a newsletter issue (#95!) about COLOR. It gave me the idea to crochet a “poster” background for the letters using as many of my Lotus yarn colors as possible.

Does the stitch pattern of the background look familiar? Maybe not—it’s rarely done with color changes. (Not sure I’ve ever seen it in more than one color. I think it’s traditionally thought of as an Aran crochet texture in off-white wool.)

I used this stitch pattern for the Chainmaille scarf, in just one color. The shiny alpaca-tencel yarn gives it a very different look!

Chainmaille: Free for October

Add the Chainmaille pattern to your cart then use the code free-poster-stitch.

For the poster, just use four pattern repeats of the Chainmaille scarf. For the flatter middle section where the letters go, I did the [ch 1, skip next ch-space, sc] part of the stitch pattern across each row for about 18 rows, then resumed the Chainmaille pattern again. Use a shallow single crochet instead of a regular single crochet if you know how. (Keeps the background a bit denser.)

 The Tunisian Stitch I’m Excited About!

I don’t know what else to call it but a shallow extended knit stitch.

First you must do a row of Tunisian Extended Stitch (ExtTSS or as I much prefer to call it, TES). It’s how you crochet the next row into them that turns them into shallow extended knit stitches.

For the alphabet letters I did just one row of TES into the foundation chains: skip the chain nearest your hook, insert your hook under the bump loop of the next chain, yarn over and pull up loop; at this point you’d leave it on your hook for a TSS. Chain 1 and it becomes a TES. To continue, [insert hook under the bump loop of the next chain, yarn over and pull up loop, chain 1] in each remaining chain of the row.

Standard return pass: chain 1, then [yarn over and pull through next two loops on hook] until one loop remains on the hook.

Have a look at your TES row. Compare them to TSS. The chain-1 you added to each TSS doubles its height and adds a horizontal loop on the back of the stitch. See it? See how it resembles the horizontal loop on the back of a single crochet stitch? (See this blog post about that “third loop”.)

Close up of how to crochet a shallow Tunisian extended knit stitch.
This is the front of an extended Tunisian stitch. (This one is an extended knit stitch: a TEKS.) If your hook went where the red arrow points—between the front and back vertical bars—you’d make a TEKS. Insert the hook where the yellow arrow points and it becomes a SHALLOW TEKS.

To do a row of shallow extended knit stitch: chain 1 to begin the row (count as first stitch), *insert hook knitwise (between the front and back vertical bars) and under the lower horizontal “bump” loop (as seen on the back) of the next stitch, yarn over and pull up a loop, chain 1. Repeat from * in each remaining stitch of the row.

Return pass is the same.

As with all occasions when you’re crocheting shallow stitches, the looser your gauge is, the easier it is to pick up speed crocheting them.

Posted on Leave a comment

Crochet Glow-in-the-Dark Yarn Idea

I crochet pretty little things for my bedroom that glow. The one pictured here is from about three years ago and it has kept me from bumping into this bedpost every night since then.

Glow in the dark crochet bracelet pattern
Glow in the dark crochet “Jasmine Rope”

I like to sleep in total darkness. This puts me at risk of bumping into something if I have to get up in the middle of the night, but even the dimmest night lights are too bright for me.

My favorite solution is a bit of crochet that glows in the dark! It glows just enough in the middle of the night that I don’t notice it while I’m in bed, only if I’m walking around in total darkness. I can make it any size, shape, and color.

I also crocheted a snug mesh cover for the bathroom doorknob in the same yarn.

(Pattern and yarn info: the yarn is Bernat Glow in the Dark, discontinued. Other glow in the dark yarns or carry-along threads should work. The soon-to-be-published pattern, Jasmine Ropes, has a project page that you check in on to find out when the pattern PDF is ready.)