Posted on 1 Comment

Spring Lace Pullover: Zegue-Along Class

Pile of lacy cream-colored antique-looking Tunisian crochet swatches

I’m ready to commit to one of these five swatches for a Jane Austen-y lace pullover. My new Zegue-Along online class starts in a few weeks. This blog post will give you initial information in case you want to make something like this in class. My goal is a beautiful, uplifting springtime layer–a roomy pullover–that might even make a great Mother’s Day gift, or bridal accessory.

Five lace swatches arranged flat, each a bit different.

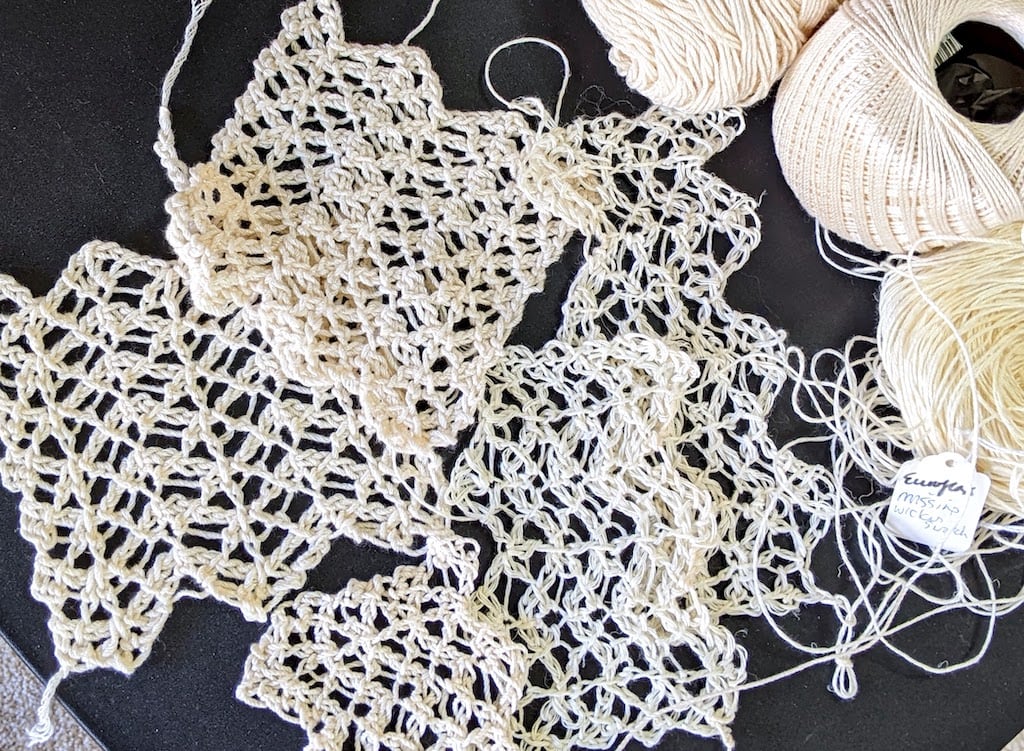
These 5 swatches test many things like yarn twist, fiber content, crochet hook size, and a stitch variation. The two leftmost swatches are my Lotus yarn with a 5 mm (H) crochet hook and a 5.5 mm (I) hook. Top right: J.P.Coats Royale and an H hook. The other two are Euroflax linen with a 4.5 mm (G7) hook and an H hook.

I’ll get to these in a bit.

First, my “pullover” plans.

Basic Lace Pullover Shape

Most of all, I want long sleeves of this lace. Kind of roomy but not as much as a kimono. Long sleeves are a commitment! And, I’d like to use only simple shapes—no shaping, just a few rectangles—but I might need to do a bit of tapering to avoid kimono sleeves.

I’l be crocheting from the top down instead of bottom up (or possibly from side-to-side), because I want the option to stop at a cropped length. This way I could wear it during class and then add length later.

What About the Head Opening? Neckline?

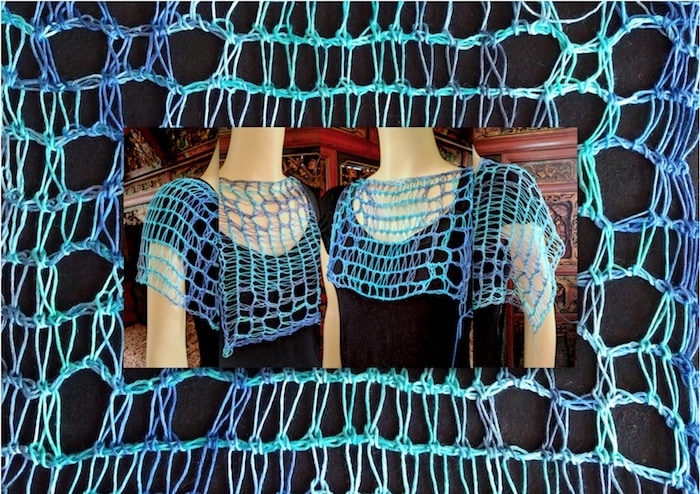
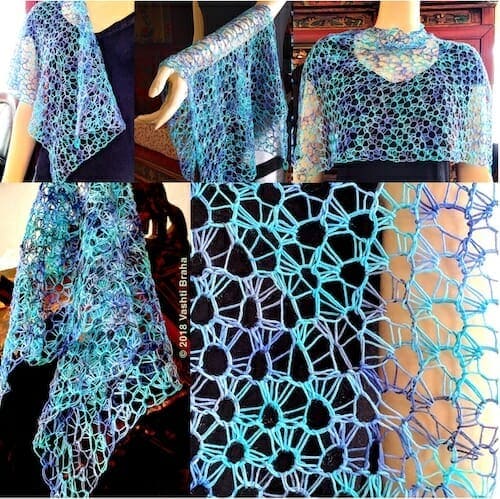
I like wearing V-necks, and boatnecks if modified slightly. Both are great for a lace pullover. This lace will be easy to steek! This means it’s “self-healing” if you cut it. So I have a nice option of just crocheting big rectangles, then cutting a head opening later!

If I crochet the rows horizontally, a steeked neckline would be a boatneck type. If crocheted side-to-side, the rows would run vertically, and a steeked head opening would result in a V neckline.

All of these things help bring the construction method into focus.

The Swatches

I used the same Zegue variation for all five swatches. Instead of extended Tunisian knit stitch (“Teks”), I used a twisted Tunisian extended stitch (“TwTes”). I’ll demonstrate how to crochet both of these in class, and more.

The three yarns I tested are considered sport weight. I used hook sizes ranging from 4.5mm to 5.5mm because this is Tunisian crochet. A crochet hook size of 3.5 (E), 3.75 (F), or 4.0 (G6) with sport weight is more typical for regard crochet.

Twist and Spin

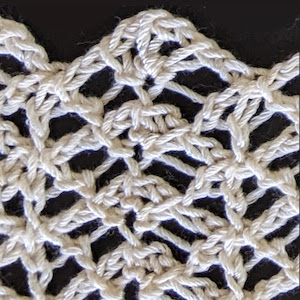
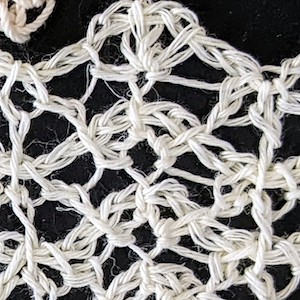
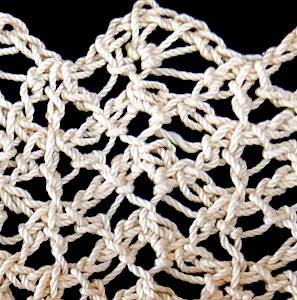
Three kinds of twist are going on in these swatches! The yarn is twisted, the crocheter adds some twist, and the stitch loops are twisted. So, I tested this pattern with yarns spun in both directions. You can see the texture differences in the close up photos.

I crochet right handed, so I automatically add a little counter-clockwise or “Z”-twist to the yarn as I go. Crocheting left handed does the opposite: adds a bit of clockwise “S”-twist to a yarn. The twisted-loop Tunisian stitch I used adds “S” twist. A leftie would twist the loop in a “Z” direction. It’s a lot of twisting. Or, untwisting.

Please bear with me, I just have to get this out of the way: yarns with two or more plies twisted together also tend to start off with twist in the opposite direction, but this doesn’t concern us here. The Lotus and Royale yarns have S-twisted plies that are then twisted together in a Z direction. This is called its “final twist”. For this project I’m only concerned with a yarn’s final twist direction.

Yarns vary not only in their twist direction, but also in how much twist. A yarn with a lot of twist is said to have a “hard twist”. The Euroflax yarn is a good example of a “soft twisted” yarn.

The Lacy Verdict

I started out hoping I would love the Euroflax. I’ve had 1600 yds of it waiting in my yarn stash since 2007! Still waiting for the perfect project for it, I guess. I love linen and I only want to use it if the project shows it off. Here, though, it looks old and stringy.

Until I tried a 5.5 mm hook with the Lotus, I preferred the Royale. The surface texture looks rich and fascinating in person (in photos the surface texture tends to look flat). It has enough twist to stay twisted even with all the S-twisted stitch loops. The ropy look gives a slight nautical and casual effect compared with the fine-grained sheen of the 12-ply Lotus.

If you can pick out the return pass chains in the Euroflax swatch, you might see that my Z-twist crocheting of them has canceled out almost all of what little S-twist the yarn has. Then see how the forward pass stitches with their S-twisted loops preserve the yarn’s S-twist better.

Lace Pullover: Next Steps

  • Measure the rows and stitch repeats per inch of the Lotus swatch I did with the 5.5 mm crochet hook.
  • Decide the finished length and width I want of the sleeves.
  • Decide if I’m crocheting the rows from sleeve cuffs to cuff, or widthwise. I’m leaning toward two widthwise sleeve pieces for a v-neck result like this top (except with longer sleeves).

My working name for it is Clarenzeg (link goes to its Ravelry project page). I can’t wait to start!

Posted on Leave a comment

Stitch Pattern Spin-Offs from Eilanner

A "spin-off" stitch pattern from Eilanner design, here tested in tencel thread and draped on a mannequin
This is the gauge swatch from the new Eilanner Shawl pattern, but I used tencel thread and a giant hook for kicks. So airy! It inspired me to try draping it on a mannequin different ways. View full size.


I released a new Tunisian crochet pattern the other day. There’s a lot going on in it! I think of the design as containing modules of mini-patterns. Some of them hint at new stitch patterns.

Seeds of New Stitch Patterns

Often if you change one thing about a stitch pattern you can get a whole new effect that’s cool enough to count as a new stitch pattern. (This would be a good newsletter issue, come to think of it…) Here are some I swatched while Eilanner was being edited, and the things I changed to generate them. I posted them to Instagram.

Change the Yarn and/or Gauge

An obvious way to get a new effect with a stitch pattern is to use a dramatically different crochet hook size, or yarn thickness/fiber type, or all of these (as in that first image above). Super summery look! Reminds me of tall grasses.

There’s something else going on with it too: it’s really just a gauge swatch pattern. The skill level for Eilanner is Experienced. Getting the exact gauge is not important for the pattern but I thought it would help some crocheters to focus on just the main stitch pattern without the fancy edging at both row ends and the constant increasing.

Know what else started out as “just a gauge swatch”? Fish Lips Scarf-to-Shrug!

By the way, if you’re interested in Eilanner but worry it’s too challenging, work up to it with its predecessors. Shakti is like “Eilanner 101” and Islander is “Eilanner 102”. (I named Eilanner after Islander.)

Repeat a Special Stitch Group All Over

Another way to do a stitch pattern spin-off is take a stitch group and repeat that. Here’s Eilanner’s “tattoo flower” eyelet group repeated as an all-over motif.

This right here is a fraction of the possible new stitch patterns to generate this way! For example, the eyelets could be grouped differently, or stacked in columns instead of spread out in an alternating way. Moving eyelets around is an art form in itself.

I haven’t even tried sprinkling in stitch texture contrasts. Have a look at what happened when I added a similar stitch texture: love knots!

I woke up this morning with another idea for a stitch pattern that will probably show up in Instagram once I swatch it up. (The way Instagram displays images helps me contemplate designs.)

Isolate One Key Stitch

Not every stitch pattern has a key stitch to isolate. Eilanner does, though: the shallow-extended stitch I blogged about last week. The swatch below is pretty rustic and it’s not easy to see what is different about the stitch, but have a look.

It’s kind of loose so that I can see what the stitch texture is doing. I chose Icelandic wool for this because I love that the shallow-extended stitch is like a reversible and non-curling version of Tunisian Knit stitch.

If you like seeing my experimental swatches, follow me in Instagram where I tend to post them first. And please tell me what you like or don’t about them! It inspires designs and class topics.

Posted on 3 Comments

Starwirbel as a Rectangular Shawl

Five views of my new flat rectangular version of Starwirbel, in progress

Here it is just a week before I fly out to Portland, Oregon to teach five crochet classes at the Chain Link conference. I have a quick update on my preparations for my class on star stitch lace, The Starwirbel Way!

New Features Added to the 2018 Class

How to use my Star Stitch Foundation

Start a Starwirbel with it, or any star stitch project, instead of foundation chains. Once you try it you won’t want to go back.

How I created a “Flatwirbel”

I converted a Starwirbel (tube in spiraling rounds) into a flat rectangular wrap.How to get the same kind of lace as a flat rectangle? People have requested this for years and I’ve swatched it several times.  I love this one! (Pictured above, in progress.) It retains for me the experience and special effects of making it.

More importantly in the long run, it means we can now use Starwirbel fabric to make anything.

Starwirbel Now has a Stitch Diagram

For those of us who like to use stitch diagrams, we’ll have time in class to go over Starwirbel’s. Star stitch diagrams can be a bit quirky to understand at first.

Posted on 4 Comments

Starwirbel Class Resources

Crochet class image for Starwirbel webby veil-like star stitch lace
Updated on 7/18/18View full size Starwirbel images. This is a conveniently clickable group of things I mention in The Starwirbel Way: Lacy Star Stitches classes. I teach the next one on July 26, 2018 in Portland OR. See student feedbackI show a lots of published and unpublished star stitch designs in this class and try new things with the stitch for each class! Each illustrates the stitches and techniques learned.   — Vashti Braha


Thinking of signing up for this class? I wrote this post for you.

Crochet Patterns & Crochet Alongs

Recommended Issues of Vashti’s Crochet Inspirations Newsletter

Starwirbel Class, Blogged

Inspiration Boards for this Class

  • Star Stitch Crocheting (Featured by Pinterest: “We think your board is amazing, and it really demonstrates what Pinterest is all about!”)
  • My Star Stitches Flickr album since 2013. Note that newer images display last (chronologically), the default in Flickr. Almost 600 images so far.

Any Books on Star Stitch Crochet?

Yes! Learn Star Stitch Crochet by Jenny King (2014, Annie’s)

Posted on 2 Comments

A Crochet Class in a Vest

The first corner of a hanky-hem love knot mesh vest in spring sunshine.
View full size image.

Want to see what I’m working on? This will be Flowerfall, a hanky-hem waterfall vest that I can wear when I teach 21st Century Love Knot Adventures this July in Portland, Oregon. I’m now two-thirds done.

Several Class Skills in a Vest

I’m designing Flowerfall to be a visual aid for several skill levels. I’ll also be adding the pattern to my shop for those who can’t attend the class.

Love Knot Beginner Skills

Another view of this diamond mesh would be the love knot sections of Lovelace. (It’s so iconic that the stitch is synonymous with the mesh in some how-to sources from the 1800’s to now.) Then, compare it with the Electra Wrap’s triangular love knot mesh.

For Students With a Bit of Experience

  • How to increase and decrease this mesh, and add picots as one way to finish the edges as you go.
  • The when, why, and the how-to: making love knots with slip stitches instead of single crochets (UK: dc).
  • My new favorite way to keep love knots from loosening later if the yarn is slippery.
  • A new way to crochet into love knots that I recommend for a project like this one.

For Those With More Experience

  • How to do corner to corner (C-2-C) love knot mesh in which you start in one corner and end in the opposite one.
  • How to sprinkle in other stitches with the classic love knot mesh to create lacy new stitch patterns!

Multi-Purpose Visual Aids = Ideal

This is my seventh year shipping teaching aids across the USA for crochet classes. I teach four to six different topics per event. Visual aids are everything! I always end up with a lot of crochet items to ship.

In the past few years I’ve started designing class items that combine several points of information in one. Not only do I cut down on the shipping this way, it’s a fun design challenge. I also love coming up with how a design for one class topic can double or triple as a visual aid for other topics I’m also teaching.

Self-Healing Stitch Alert

An example of this is I’ll be adding armholes to Flowerfall by cutting them open. Know what this means? It’ll also be a great visual aid for the Self Healing Stitches and How to Cut Them class! I might even bring it to the Tunisian on the Diagonal class if I don’t make a Tunisian one in time. Even though Flowerfall isn’t Tunisian, it’s an example of an easy shape to crochet from corner to corner in any stitch. (Flowerfall is even relevant to my slip stitch classes. It’s the first design I’ve done with slip stitch love knots.)

I’ll post again about this design so that you can see its modified diamond shape, how its armholes happen, and different ways to wear it. I’m smitten ? . Flowerfall’s Flickr album has three photos so far.