Updates October 20, 2020: I expanded the Timeline entries for 1977, 1982, and 1991.
The limpet stitch crochet topic evolved dramatically in the ten years since I wrote my third newsletter about it. As of September 4, 2020, this greatly updated version is now my ultimate resource page for crocheting limpets, limpet variations, and more reasons to crochet with half hitches. It even has a timeline and a table of related terms.
“Limpets, those cheery, little-used sideways shells.”
Sue Perez (a.k.a. Mrs. Micawber)
Issue #003 went out to just over 370 subscribers in 2010. That’s about 70 more than for issue #002. I remember feeling very encouraged by that. One of my early goals was to find likeminded crocheters. Back then, the only folks talking (enthusiastically!) about the limpet stitch, like Mel, Myra, Barbara, Margaret, and Pippin, were members of FFCrochet, the International Freeform Guild (INTFF) yahoo group. Limpet stitches have expanded their reach, as you’ll see below.
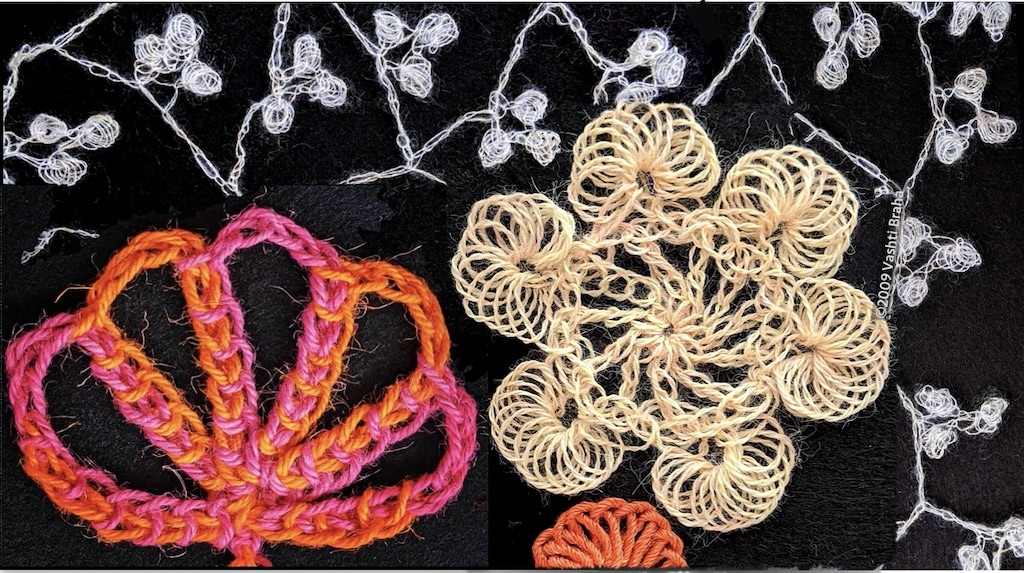
From the Archives: A Very Different Kind of Crochet Stitch
Vashti’s Crochet Inspirations Newsletter, Issue #3 (First Published September 30, 2010)
I’ve been looking forward to writing up a little love letter to the Limpet Stitch. It’s not like any other crochet stitch because it is a fundamentally different way to add loops onto the crochet hook. (September 2010)
The first thing a crocheter learns, after making a slip knot and putting the loop on a crochet hook, is to yarn over (wind or wrap the yarn around the crochet hook). We can’t make any basic stitches without it. Strictly speaking there’s only one way to do it. If you wind the yarn around your hook the opposite direction, it’s a yarn under. (Read all about yarn overs, yarn unders, and reasons to use both.)
There are other ways to add new loops to the crochet hook beside yarning over (or under). The one we use for limpet stitch crochet is challenging at first only because changing how you yarn over feels very alien! It’s actually simple, easy, and quick to do. The limpet stitch has an avid fan club.
Beyond the Standard Yarn Over
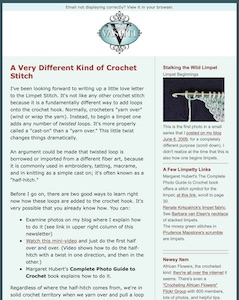
This is a Tunisian crochet hook but any crochet hook is fine for crocheting limpets.
From a crocheter’s point of view, limpet stitch yarn overs have an added half-twist in them. In the photo at right you can see how the two loose loops on the hook have a little twist at the bottom of them. Adding the half-twist as you yarn over is a neat trick.
This simple little twist is powerful. It is the basis of all needle lace, macramé, and tatting. It’s fundamental to sewing and embroidery. Latch hook rug making requires it, and bobbin lace starts with it. It’s the simplest cast on in knitting.
Making room for it in our crochet toolbox means reclaiming the DNA that crochet shares with these other string arts. You may wish to make room for two more, like I have. The little half-twist can turn in two different directions: to the left (counterclockwise), or to the right (clockwise). The two loops in the photo turn to the left, as if a cursive letter “e” is written backwards: “ɘ”.
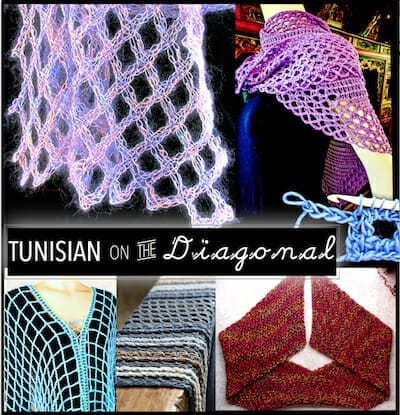
Final update of this page is in progress, please check back. View the high-res image. This is a conveniently clickable group of things I mention and display in Tunisian Crochet on the Diagonal classes. I teach the next one on July 27, 2018 in Portland OR. I show a huge amount of published and unpublished crochet designs in this class including new, never seen! Each illustrates the stitches and techniques learned. — Vashti Braha
Not that I’m aware of. Here are my three favorite Tunisian crochet references in print:
2008: Tunisian Crochet Patterns 100, Nihon Amimono Bunka Kyo-kai, Japan ISBN 978-4-529-04484-4
2000 (1991), Rebecca Jones: Tricot Crochet The Complete Book, Lacis Pubs., Berkeley CA. ISBN 978-1-891656-28-6
2004, Angela “ARNie” Grabowski: Encyclopedia of Tunisian Crochet, LoneStar Abilene Pubg LLC, TX. ISBN 978-0-974972-55-8
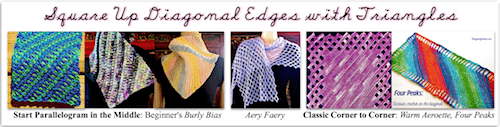
The Five Peaks Tunisian Crochet Shawl design in the news & around the ‘net
I created this resource list for my students & others to explore the Five Peaks Tunisian crochet shawl, and similar start-in-a-corner, edge-as-you-go L-shaped wraps.
Its Ravelry design page (best headquarters for everything concerning the pattern).
Watch me open the armholes after I finished crocheting the lace: Snip & Unzip An Armhole. These self-healing stitches don’t mind being cut. It’s the low-stress way to create armholes. Really! Much easier than breaking the crochet flow to place them correctly.
Special Shape
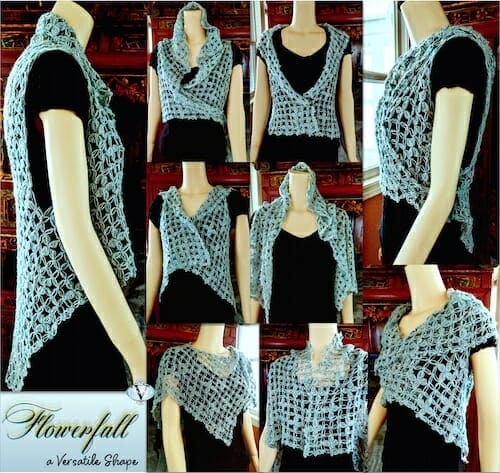
Flowerfall is a modified diamond shape: imagine a diamond with its top and bottom corners lopped off. You start crocheting the shape at the left front corner and end at the right front corner.
When you wear it upside down, the hem ends at a different place and the amount of fabric in the collar changes. (It’s also reversible.)
The armholes are generous and not centered, which increases its wearable ways. You can even treat the armholes like head openings. That results in a poncho look, see the bottom images.
An older design, the Leftfield Diamond, is the first time I crocheted this shape. That’s when I found out how versatile it is.
Side-Tied Waist Option
See the top right-hand image above? There’s a hint of a tie belt at the waist. It inspired me to add ties to the front corners for a wrap belt option. These are removable and repositionable, with a petal-like accent that echoes the chained petals in the stitch pattern. I don’t have photos of them yet.
Want to see what I’m working on? This will be Flowerfall, a hanky-hem waterfall vest that I can wear when I teach 21st Century Love Knot Adventures this July in Portland, Oregon. I’m now two-thirds done.
Several Class Skills in a Vest
I’m designing Flowerfall to be a visual aid for several skill levels. I’ll also be adding the pattern to my shop for those who can’t attend the class.
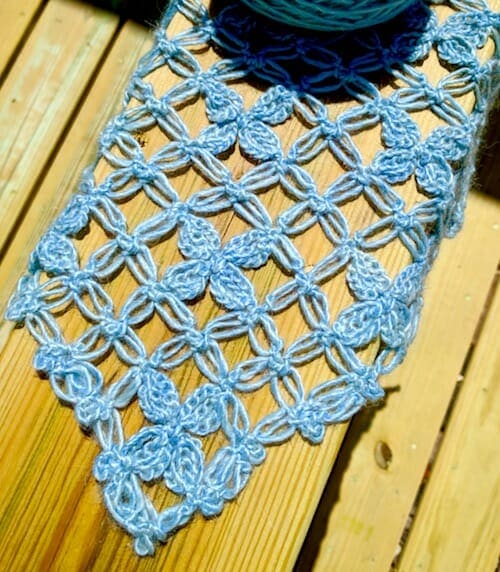
Updated things you can do with this mesh, such as this waterfall vest.
How the yarn choice affects the stitch.
Another view of this diamond mesh would be the love knot sections of Lovelace. (It’s so iconic that the stitch is synonymous with the mesh in some how-to sources from the 1800’s to now.) Then, compare it with the Electra Wrap’s triangular love knot mesh.
For Students With a Bit of Experience
How to increase and decrease this mesh, and add picots as one way to finish the edges as you go.
The when, why, and the how-to: making love knots with slip stitches instead of single crochets (UK: dc).
My new favorite way to keep love knots from loosening later if the yarn is slippery.
A new way to crochet into love knots that I recommend for a project like this one.
For Those With More Experience
How to do corner to corner (C-2-C) love knot mesh in which you start in one corner and end in the opposite one.
How to sprinkle in other stitches with the classic love knot mesh to create lacy new stitch patterns!
Multi-Purpose Visual Aids = Ideal
This is my seventh year shipping teaching aids across the USA for crochet classes. I teach four to six different topics per event. Visual aids are everything! I always end up with a lot of crochet items to ship.
In the past few years I’ve started designing class items that combine several points of information in one. Not only do I cut down on the shipping this way, it’s a fun design challenge. I also love coming up with how a design for one class topic can double or triple as a visual aid for other topics I’m also teaching.
Self-Healing Stitch Alert
An example of this is I’ll be adding armholes to Flowerfall by cutting them open. Know what this means? It’ll also be a great visual aid for the Self Healing Stitches and How to Cut Them class! I might even bring it to the Tunisian on the Diagonal class if I don’t make a Tunisian one in time. Even though Flowerfall isn’t Tunisian, it’s an example of an easy shape to crochet from corner to corner in any stitch. (Flowerfall is even relevant to my slip stitch classes. It’s the first design I’ve done with slip stitch love knots.)
I’ll post again about this design so that you can see its modified diamond shape, how its armholes happen, and different ways to wear it. I’m smitten ? . Flowerfall’s Flickr album has three photos so far.
This blog post is an overflow page for issue #76 of my crochet newsletter. Scroll down to see the heart shape chart, and then the full text of the Slip Stitch Crochet Hearts Free Pattern. To print, click on the little printer icon at the end of this post.
We Need to Talk: Slip Stitch Skill Levels
I rate this pattern Intermediate for slip stitch crocheters, and Advanced if you’re new to Slip Stitch Crochet. A good free crochet pattern for slip stitch beginners would be Eva’s Ribs Scarf. After that, Slip Tectonics or Undaria would bring novices solidly up to speed for these hearts.
Seriously.
These crochet hearts were originally used for a three-hour intermediate-level class on slip stitch shaping methods. “Slip Stitch Crochet 101” class was a prerequisite. After crocheting this heart, students would be equipped to crochet fitted sleeve caps and gracefully shaped armholes!
You’ll be adding or subtracting only a stitch or two to make this heart. Not a big deal if you’ve ever increased and decreased with single crochets. It takes practice, though, to shape every row of slip stitches.
Consider that even if you’ve already completed some slip stitch projects, most existing slip stitch crochet patterns involve only occasional shaping, if any. (If you’ve crocheted a slip stitch pattern with a significant amount of shaping, please tell me about it in the comments.)
For a slip stitch beginner, the biggest challenge is recognizing what the stitches are doing to avoid increasing or decreasing by accident. It’s like learning to crochet all over again—and that’s humbling if you don’t expect it, but what a beautiful thing! How many of us long-time crocheters remember what it was like to learn how to crochet for the first time? If you’ve crocheted for at least ten years already, you can revisit this life changing moment.
Challenge Accepted? Great!
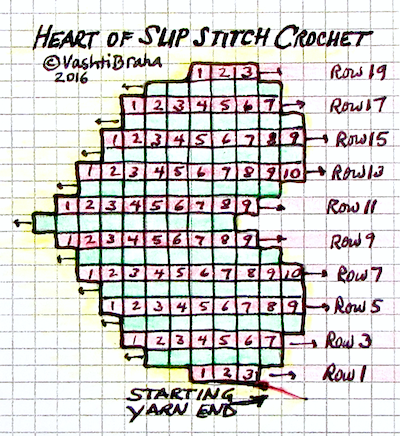
Welcome to the “heart” of slip stitch country. Start with a thick smooth yarn and a big hook.
Cross off each row when you complete it to easily keep track of where you are. (I have to. For these crochet hearts it’s easier to count stitches, not rows.) For pattern help, visit my fabulous forum.
This heart shape is crocheted from side to side. Use any yarn. Image missing? See this album.
Chain 4.
Row 1: Skip ch nearest your hook, ss in any loop of each remaining ch, turn: 3 ss. Easy, right?
Notice that every odd-numbered row ends at the top of the heart and every even-numbered row ends at the bottom of it. The yarn end (called “tail” from now on) is at the top of the heart, so when you crochet toward the tail end, you must be on an odd-numbered row.
Row 2: Ch 2, ss in 2nd ch from your hook (an increase of one st), Fss in first ss, 2 Fss in each of next 2 ss, turn: 6 ss.
No row will ever have more than 10 sts in it. If you have trouble seeing which loops to crochet into:
It will get easier after 3 rows or so. You won’t see the heart shape develop until you’re halfway there (Row 9).
The st count matters more than choosing the correct loop. Count as you crochet and add a st in a good enough loop if need be. The most common problem for slip stitchers is identifying which st is the last one of the row. Counting as you go helps and you won’t need to use a stitch marker.
I don’t count my rows. As I complete each row I put a check mark next to it on the pattern. I also rely heavily on the yarn tail to know whether I’m crocheting a row toward the tail or away from it.
Row 3: Ch 2, ss in 2nd ch from your hook, Fss in each ss, turn: 7 ss.
Rows 4 & 5: Repeat Row 3. At the end of Row 5 you’ll have 9 ss.
Row 6: Ch 1, Fss in each ss, turn: 9 ss.
Row 7: Repeat Row 3: 10 ss.
Row 8: Ch 1, skip first ss (a decrease of one st), Fss in each remaining ss, turn: 9 ss.
Row 9: Ch 2, ss in 2nd ch from your hook, Fss in each ss to last st, turn leaving last st unworked: 9 ss.
Row 10: Ch 1, skip first ss, Fss in each ss to last st, 2 ss in last st, turn: 9 ss.
Row 11: Repeat Row 10: 9 ss.
Row 12: Repeat Row 9: 9 ss.
Row 13:Ch 1, Fss in each ss to last st, 2 ss in last st, turn: 10 ss.
Row 14:Ch 1, Fss in each ss to last st, turn leaving last st unworked: 9 ss.
Row 15:Repeat Row 6: 9 ss.
Row 16-18: Repeat Row 14. At the end of Row 18 you’ll have 6 ss.
Row 19: Ch 1, skip first ss, Fss in next ss, [skip next ss, Fss in next ss] twice, turn: 3 ss.
This is how it looks after a quick blocking, and before edging it with a round of slip stitches. (If image is missing, see this album.)
Round 1 (add a border of ss): Fss in each ss of Row 19, ss in one loop at the end of each row to bottom point of heart, [ss, ch 1, ss] in it, continue edging row ends to first row, ss in each of the 3 foundation chs, ss in remaining row ends, join to start of round with a ss.
Note: Edging these crochet hearts is not as laborious as it might seem. Even though it’s not easy to identify the same loop of each each row end, this needn’t slow you down. I mostly just estimate where to put my next stitch, and it comes out fine.
Finishing: Fasten off, or add another round of ss, or reverse sc. Be sure to damp block: stretch all edges in every direction then let it settle into a smooth, symmetrical-enough heart shape and let dry. Make another like the first so that you can seam them together with a ss seam, add a bit of stuffing and hide the ends.
Experiment Freely with this Free Heart Chart
The grid rows of the chart match Fss stitch height, but why impose limits on your heart? Try using single crochets instead; the heart shape may widen or narrow a bit. Or, try back-loop slip stitches (Bss) after you’ve made a few crochet hearts in all front-loop slip stitches (Fss). (The back loops of slip stitches are trickier to find than front loops for some folks at first.)
I hope you’ll show us your crochet hearts in my forum.
Site-wide Search
Vashti’s Crochet Shop
Get the Newsletter
Sign up to receive Vashti’s Crochet Inspirations Newsletter in your inbox monthly.