Herringbone chains are naturally sleek, strong, dense and flatter than regular crochet chains. This makes them as useful for functional reasons as for decorative ones. They twist up less than regular chains. This type of chain stitch has the same structure as the decorative military bugle cord that knot tyers traditionally make. They have a single bugle, double bugle, triple and more; we’ll learn how to crochet all of these!
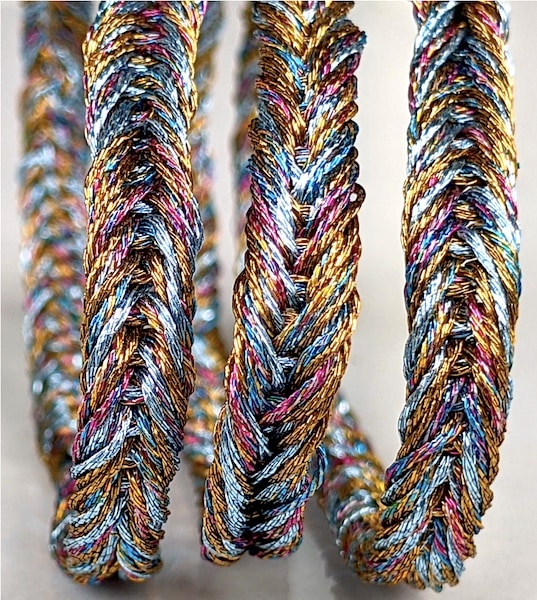
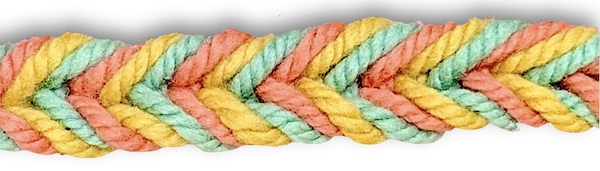
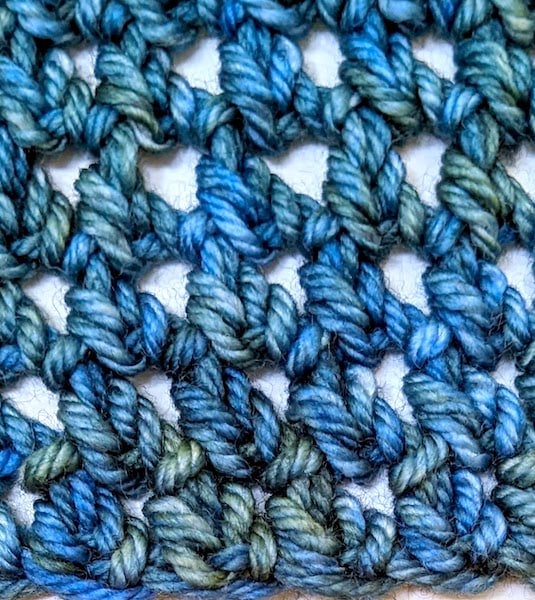
Herringbone Chains on a big scale: triple-herringbone variation in three colors of chunky wool
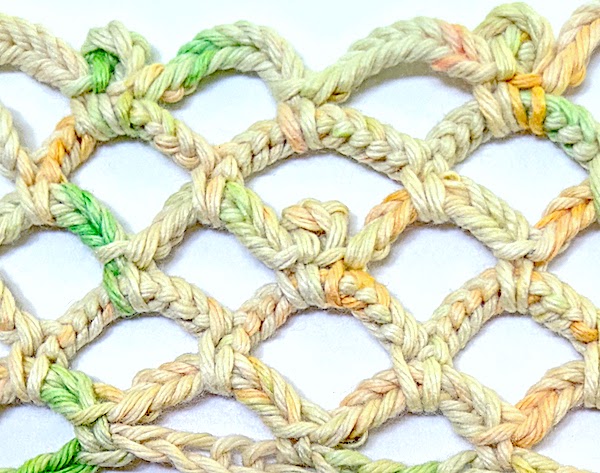
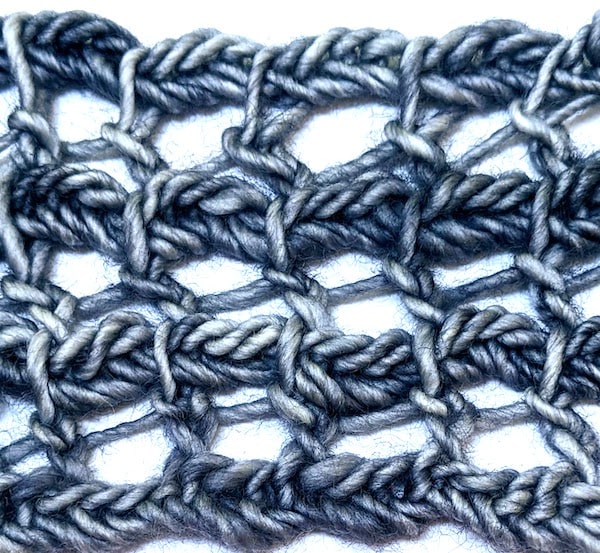
This handy new crochet stitch resembles fishtail braids and soutache cord. When crocheted very loosely, it also looks like nålbinding.
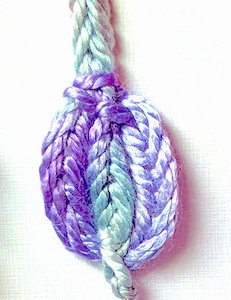
Herringbone Chains used in filetHerringbone-Chain Fishnet & PicotsHerringbone Tunisian return passHerringbone-esc (extended single crochet)Herringbone Tambour!Herringbone-chain raindrop (extreme closeup)
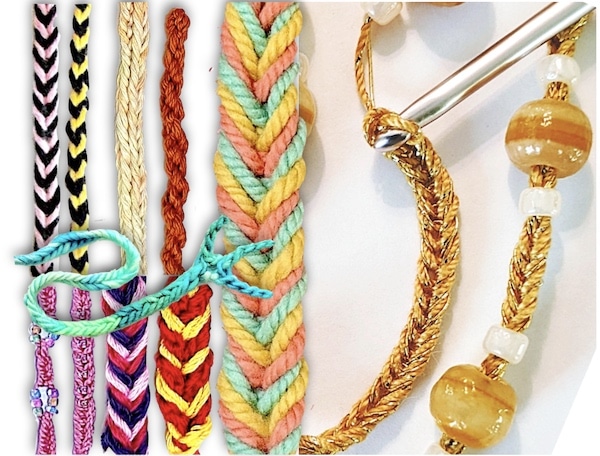
Herringbone-Chain cord experiments with beads, stitch size, color & fiber changes.
Flickr photo album for this class. A great way to see class material at full resolution, and an array of new uses and variations. I use stitch albums like this one for my own reference. I’m continually creating swatches and photos to add to this album.
My Pinterest Herringbone Chains Pin Board created for this class topic. It compares the look of herringbone chains with other arts–beading, leatherwork, embroidery, etc.
Recommended Articles
“Fancy Cords in 360°” Crochet Inspirations NewsletterIssue #17 (04/28/2011; most links in it are out of date)
“Tweak Those Gaps Along Row Edges” Crochet Inspirations Newsletter Issue #25 (08-2011; most links are out of date)
“Effect of ‘Sproing’ fibers on stitches”: Vashti’s Crochet Inspirations NewsletterIssue#11(Feb 3 2011; links in it are out of date)
“Wish Bracelets: Why Not Crocheted?” Vashti’s Crochet Newsletter Issue #69 (07/04/2015; most links are out of date)
“What IS Crochet, Really?” Vashti’s Crochet Newsletter Issue #103 (10/2020)
Still need to register for this class? Register with CGOA. This is a NEW two-hour class held online over two days: Wednesday, May 18 & Thursday May 19, 2022 at 1:00 pm – 2:00 pm Central Time. Registration closes 5/15/22 or when the class is filled.
I seamed with stitch equivalents in this 2019 image. It was not in the original 2011 newsletter issue #2, A Super Crochet Maneuver. It’s explained at the end.
How it looked in 2010.
First, the original newsletter issue, below. It went out to a few more than 300 subscribers in September 2010. That’s nine years ago! I’ve removed the original two-column formatting, colored backgrounds, and especially the outdated links. I’ve refrained from revising the original text, except for light edits.
This stitch equivalents topic looks different to me now. I’ve added my current (September 2019) thoughts at the end.
Subscriptions have doubled since the first issue was sent out 14 days ago, so welcome to all of you new subscribers!
The “super crochet maneuver” I’ve been thinking about lately is not only a big problem-solver for designers, it can single-handedly put the “free” in freeform! It’s not a big secret, but I get the feeling it’s not common knowledge either.
Issue #72 of my Crochet Inspirations Newsletter is about “long tail crochet”: crocheting with a long yarn end instead of just weaving in a shorter one to make it disappear. As promised in that issue, below is the full size comparison chart of crochet foundations in order of stretchiness. All but the first two and last two examples can be considered long tail crochet foundations.
Hand chaining is when you crochet chain stitches with your hands and fingers instead of with a crochet hook. It’s also called finger crocheting. Hand chaining is so easy! Kindergartners do it. It’s a popular way to crochet trendy necklace-scarves with fancy yarns in under 30 minutes.
Love it! “Poseidon Scarf Kit” at loopymango.com
You might have learned hand chaining as a child in kindergarten, at camp, or from a babysitter. It’s often taught as a stand alone activity rather than as an introduction to the larger world of crochet, knot tying, or knitting. I don’t even remember how I learned it. I just already knew how by the time I officially learned how to crochet with a hook at the age of nine.
For the next blog post I viewed several videos that show how to do hand chaining as a crocheter, a knitter, or a knot tyer. It left me with a new way of thinking about the origins of crochet.
Not Just for Beginners
Hand chaining is so fun to do that even experienced crocheters are at risk of getting “hooked” (if they remember to try it). It’s often forgotten as a crochet method even though it offers nuanced control over unusual yarn combinations for edgy, artsy effects. I get new, deeper insights into simple stitches when I hand crochet them, thanks to the intimate, tactile experience of crocheting.
Hand chaining a special subset of crochet that merits a closer look than it usually gets.
Hand Chaining vs. Hook Chaining
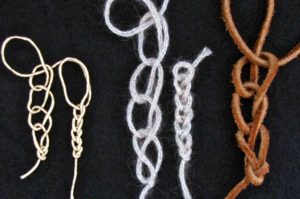
Hand Chaining loosely vs. tightly. L to R: Satin cord, wool knit tube yarn, suede lacing.
Hand chaining cuts out the middleman (er, the crochet hook). This is perfect for crochet beginners! Learning to use a new tool with yarn loops for the first time takes the focus off of the stitch. Shouldn’t getting to know a stitch be the most important part of learning to crochet? Especially when that stitch—the chain stitch— is the foundational core of all crochet? I think so.
The crochet hook is the one central tool of crochet. When researchers encounter an unfamiliar fabric, they consider the tool used to create it. An item made with a crochet hook is usually classified as crocheted. I wonder how hand-chained items are classified.
Earliest Crochet Roots?
Hand chaining straddles two worlds: Crochet, and Knot Tying. The same basic crochet stitches can be made with hand chaining as with a crochet hook: Chain Stitch, Slip Stitch, and Single Crochet. (Other stitches are more of a struggle without a hook.) The fingers or the whole hand simply take the place of the crochet hook. Perhaps hand chaining came first, at least in some early cultures, and the crochet hook evolved to substitute for hands and fingers.
Among knot tying aficionados, hand chaining is called many other things: Drummer Boy’s Sinnet, Zipper Sinnet, Monkey Braid, Sea Chains, Chain Knots, Caterpillar Sinnet, and Daisy Chains. Boys and men may have encountered hand chaining via knot tying. Some practical uses among knot tyers include:
To quickly neaten long lengths of rope or electrical wire for storage. (To this linked video, a commenter added, “This is used by riggers [who set up e.g. the ceiling on stages for rock concerts] as a cool way of shortening and storing several long ropes in a hurry.”)
Launder climbing rope so that it can be easily machine washed, allowed to dry, and then “unzipped” for use afterwards.
Even if you already know how to crochet, I think Chain Stitch In Depth and other posts about crochet basics offer some new ways to think about our most basic and important crochet stitch of all, the Chain Stitch.
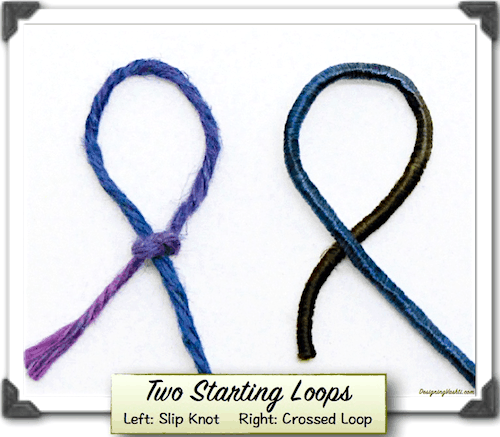
Classic Slip Knot (left), Simple Crossed Loop (right). Either one works. View larger.
How We Tend to Start
Let’s really look at how we start crocheting, and why we do it this way. Most of us learn to make a slip knot that gives you your first loop (called a slip loop) that you can tighten or loosen a bit to fit nicely over your crochet hook.
Later, some of us may alter the beginner’s slip knot, depending on the project. We may start crocheting in the round with a magic ring instead; or we might undo it later because that starting knot is too noticeable in the yarn we’re using. Some crocheters loosen it and crochet the last stitch of the row into it.
Over the next few posts I contrast the advantages of the standard slip knot with some alternatives.
Are you a beginner? Head over to this post first so that you’re clear on the best way to make the standard starting slip knot.
Many Crocheters Don’t Know:
The simple slip knot we all learned as beginners is one of two types based on which yarn end tightens the slip loop. Which one we learned matters.
The slip knot has a special relationship to the chain stitch. (That’s the first stitch you make after putting the slip loop on your crochet hook.)
A slip knot is not required at all, but it’s helpful if you’re a beginner.
The knot part is optional. Compare the two starting loops in the image above. Frankly, you don’t even need a crochet hook or a specific kind of yarn. Isn’t this a remarkable thing about crochet? Musicians need to tune their instrument first, and weavers need to string a loom first. Even knitters need to cast on more than one loop.
The minimum a crocheter needs to start crocheting is a yarn end looped around a hook (or your finger if finger crocheting).
About the “Yarn”
To start crocheting with a loop implies that you need a length of something that bends into a loop, right? If you’ve never, ever crocheted before, you don’t need a ball of yarn. Start crocheting right now with a piece of yarn-like cord that’s at least 36″ long (almost 1 meter). Ideally your cord or string is smooth, limp, and a light enough color to see well. Kind of thick—like craft yarn or cotton clothesline. Not stiff or wiry, neither bristly nor bumpy, and not as skinny as kite string. From here on I’ll refer to this as “yarn.”
The Crossed Loop
When a simple loop has crossed ends, you’ve already got a starting loop for crochet. See it in the photo above? When you think about it, all of crochet is based on loops with crossed ends.
The two crossed ends of a loop matter later. They have different roles in crochet. (For a future post.)
A quick and easy way to think of this Crossed Loop is to imagine that you’re writing a cursive letter “e”. You can do it in the air or “write” with the yarn on a table. See how the Crossed Loop in the photo above could be a cursive “e”?
From Crossed Loop to Slip Knot
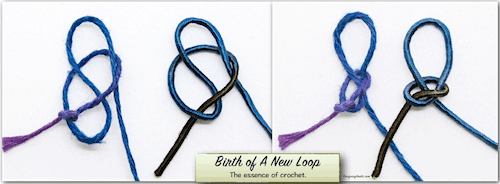
If You’re Right-Handed
Pinch and hold a Crossed Loop with the fingers of your left hand where the yarn crosses itself. It now appears that two strands are hanging down from your hand. With your right hand, pick up the strand on the right that crosses in front of the other strand. Bring it around behind your loop. Bend it so that you can pull a new loop through the first loop, from behind. Leave it sort of loose, and set it down.
Two kinds of yarn shown. Slip knot is loose on the left and tighter on the right. View larger.
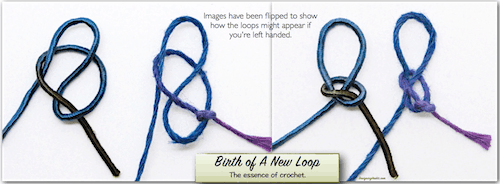
If You’re Left-Handed
Turn it around, pinch and hold it with the fingers of your right hand where the yarn crosses itself. Or, you could write a cursive “e” backwards. It now appears that two strands are hanging down from your hand. With your left hand, pick up the strand on the left that crosses in front of the other strand. (See below.) Bring it around behind your loop. Bend it so that you can pull a new loop through the first loop, from behind. Leave it sort of loose, and set it down.
For Lefties. Two kinds of yarn shown. Slip knot is loose on the left and tighter on the right. View larger.
Slip Knot: It’s a Chain Stitch!
You’re already crocheting. When you pulled the bent or “looped” strand through the initial loop, you finger-crocheted. You can see why some crocheters just leave the knot loose and crochet into it like it’s one of the foundation chains.
Key Takeaways
1. The Crossed Loop is one loop away from being a Slip Knot. Once you pull a new loop through a simple Crossed Loop, just tighten it to reveal that it’s actually a Slip Knot. (To tighten, pinch the loop and tug on the other strand to watch the knot tighten around the loop.) Notice that you can also adjust the loop size of the Slip Knot, and the knot part preserves the size of the loop.
2. The Slip Knot is the standard, official way to start crocheting, especially for beginners. This is probably because beginners also usually start crocheting with a crochet hook in their hand (as opposed to finger crocheting). The Slip Knot is great for this. You can tighten its loop around a crochet hook and wave it around like a magician. It stays put. Very handy!
3. Once you pull a loop through an initial Crossed Loop you’ve crocheted. A Crossed Loop is a fine start for any crocheting, when you’re ready for it. For finger crocheting, you wouldn’t need a Slip Knot to keep a loop on your finger because you can easily hold it. Just keep pulling a new loop through the next loop and you’re crocheting.
4. Chain stitches are self-knotting at the starting end. It’s another reason that a Slip Knot is not essential, it’s optional. Try it: undo the initial Slip Knot after you’ve crocheted some chains. Tug on that starting yarn end and the very next chain stitch automatically becomes the new starting knot. This is why some crocheters can leave the initial knot loose and undo it later.