Posted on Leave a comment

Simple Pleasures Crochet Bling Bangles

Several Kinds of Easy Crochet Ribs for Stretchy Holiday Bling Bam Bangles

Crocheting *Bling* Bangles, My Cheerful Distraction

I’ve had several stressful challenges this month. Each evening I curl up with super sparkly yarn, crochet hooks, and simple stitches. I go to bed in a merry mood and drift asleep picturing other stitches or color combinations to try.

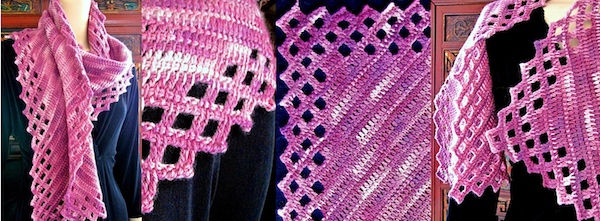
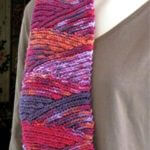
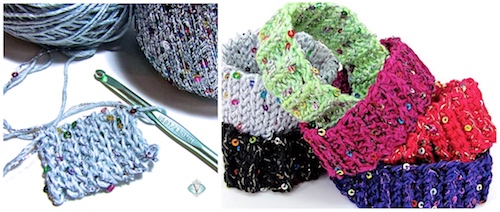
As I described in yesterday’s post, these slip-on crochet bling bangles are based on the simplest ribbing stitches. The red one is rows of single crochet in the back loop only (outside of the USA it’s called a double crochet). The silvery one in progress is rows of slip stitch in the back loop only.

* Twinkly * sequined * ribbing * is very satisfying.

It also makes sense for a slide-on bracelet! Ribbing is nice and stretchy. I had some sequined carry-along metallic threads in my yarn stash. Now is the perfect time to crochet a *bling* strand of Premier Yarns Enchant with a strand of…my Lotus yarn! I chose Lotus for its cheerful colors that can stand up to all the bright bling action.

I also chose Lotus because it’s sport weight: once you crochet double-stranded (with two strands of yarn held together), you naturally make thicker stitches. I didn’t want super thick stitches for these small crochet bling bangles. The bling string I used is slightly thinner (“fingering weight”).

The yarn math: Add 1 sport strand + 1 fingering strand and you get “DK wt,” a.k.a. “light worsted.” A G-7 (4.5 mm) hook is a good all-purpose size to use for this weight.

Let’s Talk About * Sequin * Management *

Two Bling Bam Bangles of DesigningVashti Lotus yarn and sequined strands.
I tested the sequin theory with these. See the giant square sequins? It took longer to crochet. Worth it though!

Sometimes, sequins get in the way of smooth, stress-free crocheting. If sequins can catch on a loop while you’re trying to pick up crocheting speed, it slows things down.

The secret is pairing a thick enough yarn with a sequined strand to buffer or neutralize the sequins. To me, “thick enough” means it roughly matches the diameter of the sequins. The tiny sequins in the Enchant yarn match the thickness of my Lotus yarn. Lotus gives the stitch loops smooth passage through other loops.

Result: the sequins only pile on more joy. No interruption of the joy.

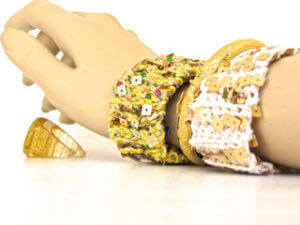
The Right Kind of * Stretchy *

Enough stretch puts the bangle in crochet * Bling Bangles *—literally. A bracelet earns the right to be called a bangle when it can be slid on and off instead of requiring some kind of clasp.

The bling string (Enchant) has zero elasticity. I expected this (it’s typical of carry-along bling strings) but didn’t know its strength and durability. To reduce the stress that could be put on the bling strand, I avoided stretchy yarns like wool. DesigningVashti Lotus has no stretch either, so these two yarns are nicely matched: Lotus won’t let my crochet project stretch more than the Enchant strand can, so both yarns will share the wear and tear equally.

It’s the crochet stitches that provide all the necessary stretchiness of a slip-on bangle! That way I can use whatever yarns I wish. The crochet * bling bangle pattern * includes several kinds of ribbing for beginners and beyond.

*  *  *

2018 update: Want to see my cheerful distraction during the 2017 holidays?

Posted on 1 Comment

Picot Crochet Card Edge (Free Pattern)

I found my old notes!

The other day I posted a photo of a freeform crochet card edge I did over four years ago. In that post I described how to crochet it, to the best of my memory. Back then I mailed off the card right away. I have no memory of having written down any how-to info.

Well, I just now I found the notes to myself about it (pictured at right). I’ve been going through lots of old files, boxes, CD roms, etc. so I’m finding all kinds of things.

Below I’ve typed in everything from that paper to be readable. I suppose you could say this is a…

Picot Crochet Card Edge Free Pattern

Supplies Needed:

  • Size #7 Boye steel crochet hook (or size that will pull the thread you’re using through the holes punched in the card).
  • Size #10 cotton crochet thread: Coats Opera (100% mercerized cotton, 230m per 50g ball), 2 colors.
  • Greeting card: the thicker the card stock, the better. Glossy card stock is even stronger.
  • Single hole paper punch: 1/16″ diameter holes. (Look for one in the scrapbooking section of a craft store.)

Stitches and Abbreviations Used:

  • ch = chain
  • sc = single crochet
  • sl st = slip stitch
  • st(s) = stitch(es)

Begin Picot Petals Crochet Card Edge

Step One: I punched holes fairly randomly. Sometimes I filled in with additional holes later.

Step Two: With pink thread for flower petals, *ch 6 or 7, sl st in the 6th or 7th ch from your crochet hook, sc in the same or next hole, depending. (Depending on how it looks and how far away the next hole is. Bunching them here and there brings out the petal look.) Repeat from the *, or just sc again in a hole; add a ch or two to adjust the tension of the sts as you edge the card.

Step Three: With green thread for leaves, ch 6 or 7, sl st in 4th or 5th ch from your hook. Space these out a bit more than the petals were. I spaced them with only just enough chs to sc in the next hole gracefully.

I ended the pattern notes with, “I like how the bunched pink petals look next to the more spread out green sts.”

Posted on 1 Comment

Greeting Card Crochet with Picot Petals

Greeting Card Crochet with Picot Petals

Isn’t this greeting card crochet experiment lovely?

I made it about four years ago. The recipient was touched by it. I’m glad I took a photo before I gave it away—I smile whenever I see it.


My goal was to try crocheting a fine irregular edge in a freeform way. (I had already crocheted chunky, evenly-spaced borders into other things, such as with the Venus Flytrap Action Toy, and the Cheerful Chores.) tablecloth

The first step was to punch tiny holes randomly spaced along a portion of the card’s irregular edges. Instead of poking holes with a needle, I found a 1/16″ single hole paper punch at my local craft store. I’m glad I did. The holes are clean-edged and look like the card came with them.

Inside of Greeting Card Crochet with Picot Petals


Randomly spaced holes can vary in distance from each other, and from the edge of the card. When you’re crocheting into these holes, you just have to chain more to get to a hole that’s farther away, and chain fewer to get to a closer hole.

In standard pattern language, this is eyeballing (i.e. freeform), because it’s adjustable instead of being a fixed pattern. This automatically puts it in the Intermediate Skill Level category.

Sometimes I slip stitched (sl st) into a new hole, then chained one (ch 1) so that I could sl st again into the same hole.

The picot petals are just long picots. I added extra chains before the sl st or single crochet that closes the picot.

Greeting card crochet is a useful Intermediate Level skill to know for other kinds of crochet too.

I have a Pinterest board with lots of examples: http://www.pinterest.com/vashtibraha/crochet-mixed-media/

I’ve listed a few other links below to other crocheters’ blog posts about greeting card crochet edgings. Each blogger describes a similar step of adjusting the number of chains to accommodate the space between the holes.

http://onesheepishgirl.com/2012/01/adding-a-crochet-edge-to-paper-valentines-frames.html

http://vimeo.com/11981377

http://thimbleanna.com/projects/valentinecard.html

http://www.thriftyfun.com/tf95779670.tip.html

http://dutchsister-s.blogspot.com/2011/11/tutorial-recycled-christmas-card-with.html

Posted on 3 Comments

How to Increase Tunisian Crochet Stitch Blocks

New Corner-to-corner Warm Tunisian scarf with filet border

Three ways to add stitches at the end of a Forward Pass

It’s good to know how to increase Tunisian crochet stitches more than one way because every project is different. These first two methods are my favorite because they don’t limit how many stitches you can increase at a time. This means I can smoothly add big lacy spaces and whole blocks of solid stitch repeats, when and where I wish, in Tunisian crochet. This is something I’ve always loved about regular crochet.

Have a favorite method of your own? Please let me know in the comments!

Method #1. How to Add Tunisian Stitches with Half Hitches

Each of the two loops added to the crochet hook are loosened to make it easy to see that they're simple loops with a bit of twist before adding to the hook.
A half hitch is simply a loop with a twist in it.

In my original 2009 blog post about this method, I use a pair of half hitches as one increase. This pair is well known to those who do macramé as the double half hitch (dhh). As far as I know, I’m the first to use it as an edge increase.

A single half hitch can also be used for adding a new stitch, and I’ve since found it mentioned for this in a few older books on Tunisian crochet. I add them to a timeline in this half hitch resource post as I find out about them.

The half hitch is also well known in knitting as the simple/single/backwards loop cast on in knitting. This video shows half hitches being added to a knitting. This is how I do it and I’ve really picked up speed.

How to Do the Double Half Hitch Increase (DHH)

3-step diagram of how to increase Tunisian Crochet stitches.
Two crossed loops, or half hitches, have been added to the crochet hook. The pink bar indicates which loops are the half hitches. In Step 3, the two have been crocheted off of the hook together. It’s a mini-limpet!

Method #2. Use Tunisian Foundation Slip Stitches as Increases

Tunisian foundation slip stitch: at the end of a Forward Pass, chain, remove last loop from hook, insert hook in a ch loop, then put live loop back onto hook. An increase of one stitch.
Feel free to choose a loop other than the tinted ones shown.

At the end of your Forward Pass, insert hook in one side loop of the end stitch, yarn over and pull up a loop. Then chain the number of stitches you wish to add. (I chained four in this photo.) Then take the last loop off of your hook; your chain stitches should resemble those in the photo.

Then, insert your hook under one loop of the first chain (tinted pink) and leave on your hook. Repeat with each remaining chain; then put the live loop back on your hook, as described in the caption.

I discovered this Tfslst method after I designed the Five Peaks Shawl with half hitch increases. Tfslsts is the method of choice in the Four Peaks Scarf pattern and in the Warm Aeroette Scarf (pictured at the top).

I love having both of these methods to choose from, depending on the project.

They are probably interchangeable enough that you could use the one you prefer. (More on that in the newsletter.)

The most important thing is to choose a method that doesn’t impose a limit! Especially when you’re crocheting something that has a diagonal edge and needs to drape nicely, like a triangular shawl or an asymmetrical scarf. Compare the triangles below.

Often when someone asks in a forum how to increase Tunisian crochet stitches, the advice is to squeeze them in. Typically this means adding a stitch in another loop just behind or next to another stitch. This method is fine if you’re replacing a stitch that you accidentally decreased in an earlier row. If you think of basic Tunisian crochet fabric as a grid, space was already reserved for the missing stitch, and you’re just filling it back in.

Method #3. The “Squeeze-It-In” (my least favorite shaping method).

Left triangular swatch is starting to curl along one edge. Other triangle is symmetrical with nice drape.
Effect of the “squeeze-it-in” method shows in the left swatch. Not recommended for something like a shawl.

The Squeeze-it-in method has limits. It’s okay for just a rare stitch here and there, and away from the edges. In other words, as an “internal” shaping method. I don’t mean to impose rigid rules. Depending on the project, yarn type, and hook size, squeezing in new stitches when you wish may come out fine.

For me, this shaping method often interferes with my goal of a languid, swaying drape for Tunisian crochet accessories. When I consider how to increase Tunisian crochet edges for a new design, Squeeze-it-in is last on my list.

Posted on Leave a comment

Free Slip Stitch Crochet Scarf Patterns and Answers

It’s fall! That’s when my two free slip stitch crochet scarf patterns are downloaded a lot, and I get questions about them.

I have nine slip stitch crochet scarf patterns published so far. These two are free downloads: Slip Slope Crochet Short Rows Scarf, and Eva’s Ribs Slip Stitch Scarf 101.

Molly asked me, “I am wondering if you allow our finished items to be sold if you are given credit as the designer?” The answer is yes I do, and thanks for including designer credit. I’m honored when my design inspires a crocheter to make several items. As a crocheter I love it when I’m making something and I start thinking, “Ooo… I could see making one of these for everyone on my gift list this winter.” Or, like Molly: I can imagine so many other people wanting the scarf I crocheted.

When I keep using the same pattern, I can try different yarns or color combinations. I find ways to perfect little things or increase my speed, like how I finish the edges or something. Another thing that happens is that I start naturally memorizing most or all of the pattern. That’s when I really pick up speed.

For more questions and answers, see this list of Slip Stitch Crochet FAQs students ask me in my slip stitch crochet classes. Scroll down for a slip stitch short row photo tutorial.

If you’re new to slip stitch crochet, try the free Eva’s Ribs scarf first. It makes for good TV crocheting, or while listening to an audiobook. The free Slip Slope scarf is the next step after Eva. It’s a lot like Eva with one new skill added (the short rows). A different next step after Eva is the Shamlian Weltie.

After the Slip Slope scarf, a bunch of my other slip stitch crochet scarf patterns will make perfect sense! For example, Undaria, Notch, and Slip Tectonics.