Posted on 1 Comment

Crochet Bunnies Flat or Puffy

2 flat crocheted bunnies (sihouette), 2 stuffed ones, in different slip stitch crochet textures.

This past month I used Tunisian and slip stitches to crochet bunnies flat, rather than in the round. Make two, seam together, and stuff for 3D bunnies. Leave flat for appliqué!

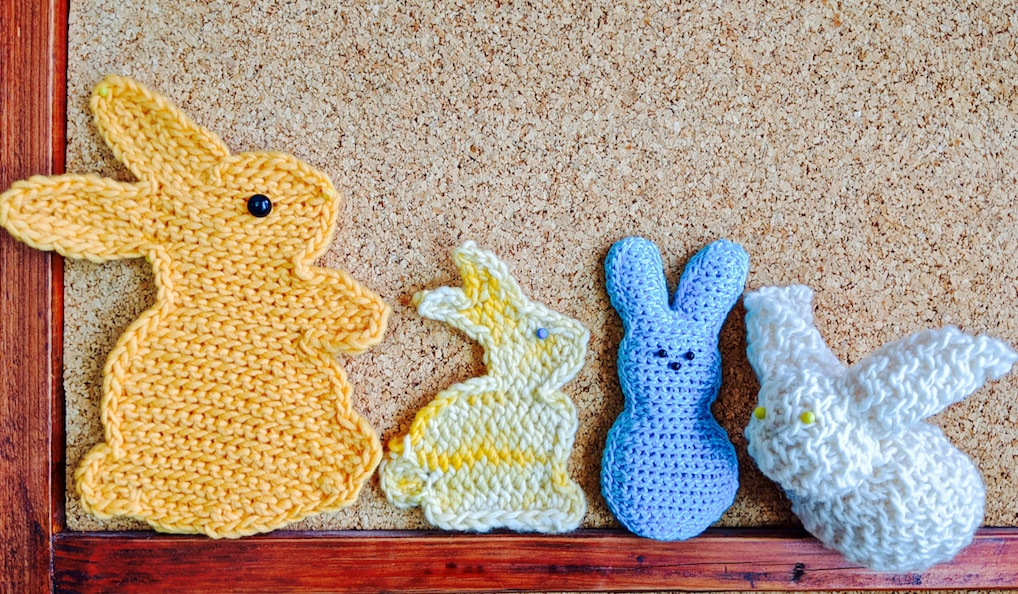
Compare all the shapes in the photo above and below: there are some side-view silhouettes (the yellow wool bunnies) plus several marshmallow candy style bunnies in light blue Lotus yarn.

Two are stuffed, but all started out flat. The stuffed white wool bunny (above far right) uses the square method: I crocheted a flat square of inverse slip stitches, and then seamed and stuffed it. (I followed this tutorial for a knitted square bunny.)

Five marshmallow-candy-shape bunnies lined up from shortest (3 slip stitch) to tallest (2 Tunisian crochet)
From left to right: Three slip stitch bunnies (front-loop slip; inverted back loop; inverted front loop). Two Tunisian crochet bunnies, flat: TSS (simple stitch), TKS (knit stitch). I also added a simple slip stitch outline to all bunnies except the TSS one.

My informal and rather obsessive online research tells me that 95% of all the crochet amigurumi (stuffed toys) are single crochet stitches in the round. The other 5% are single crochet flat, in rows. It’s easy to know which were crocheted in rows because the texture is very different from rounds with no turning. Crochet designers Donna & Michaelene rock the flat method with single crochet.

Internal or External Shaping?

5 slip stitch roses of different colors and petal shapes
Slip Stitches are fabulous
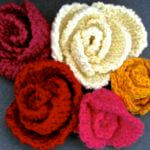
for shaping flower petals

When you crochet bunnies flat, all the shaping happens at the beginning and/or end of a row; never in the middle of a row. This is external shaping. I’ve liked this kind of crochet ever since I swatched lots of shaping techniques for my Slip Stitch Shapes and Special FX class.

External shaping should be an elementary challenge, but it depends on the stitch and the shape. Each row might be different from the rest. I bet crocheters rarely do it constantly for a whole project, though. See my free heart pattern. It’s an easier shape than a bunny because you’re adding or subtracting no more than two stitches at a time.

New to external shaping in every row? Use the short stitch you’re most familiar with: single crochet (sc), slip stitch (sl st), or Tunisian simple stitch (TSS). You need to be able to easily count your rows and stitches. For most people it’s single crochet.

Crocheting any shape in the round (other than a straight tube) requires internal shaping. It kind of depends on the crocheter how basic that is. It’s probably easier for those who started early on with granny squares, flowers, and other motifs in the round.

Slip Stitches, or Tunisian Crochet?

I found no examples of TSS or sl st crochet bunnies, flat or otherwise, except this sweet one in Tunisian knit stitch (TKS). (You’ll need a Ravelry account to view it). I decided to do side by side bunny comparisons. Yes, I went down a rabbit hole.

Surprising Differences

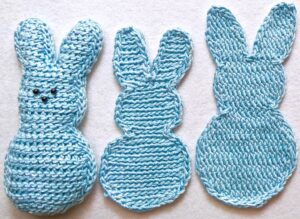
I used the same chart size for each blue bunny. The Tunisian bunnies are much bigger! After making several sl st bunnies, the forward and return passes of Tunisian felt like double the work for the same bunny. Compared to sl st fabric, the return pass seemed to add padding and height to the stitches. The TKS one also feels heavy. It has so much more yarn in it than the others.

Two flat crochet bunnies and a stuffed one, all "marshmallow peeps style" in light blue Lotus yarn
Three slip stitch amigos. See more in progress
on their project page.

Of the three blue sl st bunnies, the inverse front loop one (far right) has the most height. I used it for two bunnies in the first photo above too: the smaller yellow silhouette, and the white bunny from a square.

TSS is similar to using sc. Besides being of similar height, it’s easy to count rows, especially the TSS rows. Both prevent stuffing from showing through (so does sl st). Unlike sc and sl st, Tunisian stitches do lean, but more weakly than it appears. The lean readily blocks out.

Tunisian crochet has a few strong advantages over sc and sl st. There is no turning, so following a charted shape is the easiest. Another big advantage is when edging the shape. I like to edge flat shapes with a round of slip stitches before I seam them together. Crocheting into Tunisian row ends is a joy. “Joy” isn’t the word that comes to mind when crocheting into row ends of sc or sl st.

Happy Easter 2020 everyone!

Posted on 1 Comment

V-O-T-E Early and Often with Crochet

Crocheted letters V-O-T-E against sunrise-colored crochet background
View the image above full size.

Last week I used a new Tunisian crochet stitch to swatch up a few letters of the alphabet. You can see four of the letters above. (The background is something I crocheted for the kitchen years ago.) Just look at what I can spell! I also made an ‘L’ to spell LOVE. I’ll explain how to do the cool Tunisian stitch below.

Eight-Color Poster

Tunisian crochet letters spell V-O-T-E against a rainbow aran crochet background.
It came out to approx. 12″ x 14″. View full size in Ravelry.

I’m working on a newsletter issue (#95!) about COLOR. It gave me the idea to crochet a “poster” background for the letters using as many of my Lotus yarn colors as possible.

Does the stitch pattern of the background look familiar? Maybe not—it’s rarely done with color changes. (Not sure I’ve ever seen it in more than one color. I think it’s traditionally thought of as an Aran crochet texture in off-white wool.)

I used this stitch pattern for the Chainmaille scarf, in just one color. The shiny alpaca-tencel yarn gives it a very different look!

Chainmaille: Free for October

Add the Chainmaille pattern to your cart then use the code free-poster-stitch.

For the poster, just use four pattern repeats of the Chainmaille scarf. For the flatter middle section where the letters go, I did the [ch 1, skip next ch-space, sc] part of the stitch pattern across each row for about 18 rows, then resumed the Chainmaille pattern again. Use a shallow single crochet instead of a regular single crochet if you know how. (Keeps the background a bit denser.)

 The Tunisian Stitch I’m Excited About!

I don’t know what else to call it but a shallow extended knit stitch.

First you must do a row of Tunisian Extended Stitch (ExtTSS or as I much prefer to call it, TES). It’s how you crochet the next row into them that turns them into shallow extended knit stitches.

For the alphabet letters I did just one row of TES into the foundation chains: skip the chain nearest your hook, insert your hook under the bump loop of the next chain, yarn over and pull up loop; at this point you’d leave it on your hook for a TSS. Chain 1 and it becomes a TES. To continue, [insert hook under the bump loop of the next chain, yarn over and pull up loop, chain 1] in each remaining chain of the row.

Standard return pass: chain 1, then [yarn over and pull through next two loops on hook] until one loop remains on the hook.

Have a look at your TES row. Compare them to TSS. The chain-1 you added to each TSS doubles its height and adds a horizontal loop on the back of the stitch. See it? See how it resembles the horizontal loop on the back of a single crochet stitch? (See this blog post about that “third loop”.)

Close up of how to crochet a shallow Tunisian extended knit stitch.
This is the front of an extended Tunisian stitch. (This one is an extended knit stitch: a TEKS.) If your hook went where the red arrow points—between the front and back vertical bars—you’d make a TEKS. Insert the hook where the yellow arrow points and it becomes a SHALLOW TEKS.

To do a row of shallow extended knit stitch: chain 1 to begin the row (count as first stitch), *insert hook knitwise (between the front and back vertical bars) and under the lower horizontal “bump” loop (as seen on the back) of the next stitch, yarn over and pull up a loop, chain 1. Repeat from * in each remaining stitch of the row.

Return pass is the same.

As with all occasions when you’re crocheting shallow stitches, the looser your gauge is, the easier it is to pick up speed crocheting them.

Posted on Leave a comment

First Look: Yveline, a Tunisian Wrap

Photos by Daniel Shanken
All Images © 2018.  Photographer: Daniel Shanken for Stackpole Books. View hi-res.

I’ve been looking forward to sharing some sneak peeks! You’re looking at Tunisian crochet eyelets on the diagonal, frilled ? with love knots ?. I used our Lotus yarn in these colors: Carbonite, Pearly Pearl, Satin Grey, and Lustrous Tan.

Yveline is one of two new crochet patterns I contributed to a forthcoming book. It’s called Delicate Crochet: 23 Light and Pretty Designs for Shawls, Tops and More by Sharon Hernes Silverman. The book’s official publication date is December 1, but look for it as early as October. 

Yveline Goes to Class

I’ll be traveling with Yveline to the CGOA crochet conference in Portland OR next month because she wants to meet everyone who is taking the Tunisian Crochet on the Diagonal class AND 21st Century Love Knot Adventures.

If you’re going to the conference and you took one of my earlier Tunisian lace classes, Yveline will want to meet you too. I brought swatches to those earlier classes that have since come of age in the form of the lovely Yveline.

Her Story

First, the name. It started out “Lean In” because that’s what I called the early swatches. It fascinated me how much some Tunisian stitches liked to lean with a little encouragement. Not just how much, but the kind of movement; sometimes it’s like Tunisian lace stitches have hinges or ball joints.

When it came time for a grown up name, I was in a dual swoon from binge-watching the Versailles series while adding the love knot frills! I looked for names associated with Versailles and learned that the city is located in a département called Yvelines.

About Those Love Knots

Wallet-sized beige cashmere bag of Tunisian crochet, embellished with double ruffles, woven with grey satin ribbons.
A small bag I designed 9 years ago inspired the ruffle idea. Image missing? View it here.

I’m still swooning a bit from using love knots for surface embellishment. I haven’t seen anyone else do this and it’s just the kind of odd new thing I like to try each time I teach 21st Century Love Knot Adventures. (I mean, look at what I called the class.)

It did take several swatches. Remember last year when I did a newsletter on ruffles? It was shortly after I shipped Yveline to Sharon, the book author. I’d been swatching and meditating on the essence of a crocheted ruffle for a few months.

The Tunisian eyelet fabric is so airy and “flexy” (another name I gave to the early swatches) that most of the ruffles I tried were too heavy. I love how airy the love knot frills are! Love!

About the Ruffle Idea

The urge to frill has a story too. Years ago I crocheted the cutest little bag. It’s Tunisian simple stitch with ruffles surface-crocheted on it.

So that’s my Delicate Crochet story of Yveline. I have a very different story coming up about the other design I did for the book!

Posted on Leave a comment

CGOA’s Lotus Yarn Pattern (Last Day Free!)

My swatch in Crystal Blue DesigningVashti Lotus yarn, and sketches of scarf and yarn amount options

Happy NatCroMo! (National Crochet Month)

Designer Andee Graves featured our Lotus yarn with her new Shining Day Wrap crochet pattern. She’s one of CGOA’s 2018 board members. At her blog she explains,

“There will be 3 other patterns available free for CGOA members only, each only for 1 week. Be sure you’ve renewed your membership or joined CGOA before you miss out!”

Today is the last day you can get this pattern for free.

Why? It’s part of the 2018 CGOA NatCroMo celebration and this one is free for everyone—CGOA members and nonmembers.

Shining Day is crocheted in a lacy stitch pattern that is flowing wonderfully off my [pink] hook. I think it flows so much because you crochet into chain spaces at an easy gauge.

A Flowing Foundation Row

This wide lacy rectangle is worked from the center out on both sides of the foundation row. You’ll have matching ends, each with a pretty picot border.

For a design like this, you wouldn’t want the foundation chains to look noticeable or feel tighter than the rest of its flowing lace. No problem! Andee uses a great type of foundation row. It’s not only stretchy, it has a nice texture that blends in.

About Yarn Amounts

Andee used four 100g. balls of Lotus to get a wrap that is 16.25″ X 68.5″. Four balls is 1,024 yds (4 X 256 yds).

The Cone Idea

Some folks have wisely been ordering Lotus Z-Bombes, which are value-priced one-pound cones. One pound of Lotus is a bit over 1,100 yds, or about 4.5 balls. (I always allow a Z-Bombe to go a bit over a pound after subtracting the weight of the cardboard. I write the exact unique weight of each Z-Bombe on its tag.)

The Lotus Snacks Idea

A floral six-pack: Orange Luxe, Grenadine, Pink Sugar, Peachy SHeen, Rose Red, Lala Yellow.
One of several springtime color combos!

In my recent newsletter issue #90, I mentioned a multicolored Shining Day using a six-pack of Lotus Snacks. I think spring fever made me do it. I kept picturing a riot of floral colors like I do every spring.

Unfortunately I miscalculated the yarn amount for that in the newsletter. The mini Snacks are one-third the size of a regular Lotus ball: 85 yds per 33 g. Not one-half.

CORRECTION: A Six Pack O’ Snacks totals 512 yds, not the 768 yds I stated in the newsletter.

My 512-yd. Shining Day

Andee Graves aka Mamas2Hands produced a lovely PDF to match her pretty lace wrap design.
Page one of Andee’s pattern. Isn’t it pretty? 

See my drawings above in that photo of my light blue swatch? That’s me figuring out that a two-ball (same as six Snacks) Shining Day would come out to 12″ X 51″ (or a bit longer).

My swatch is 11.5″ wide. I needed 46 foundation stitches to do 4 stitch pattern repeats.

Andee’s Shining Day pattern is definitely worth paying for if you miss the free version. It includes stitch charts and a photo-tutorial on making the picots.

Join the CGOA MEGA CAL group in Facebook!

Posted on Leave a comment

Crochet for the Easter Weekend (Check-in)

The matching yarns are shown against the skirt colors for comparison.
The yarn colors match up with the colors in the skirt. Another view: https://flic.kr/p/TkJm53

Happy Crochet Easter! Today I’m taking a break from lots of behind the scenes crochet work to post a quick update. Below is a long silk skirt I’ve worn every spring for years. It’s one of my all-time favorites. This weekend I mused on its colors.

This “Vashti’s Silk Skirt” color combo would make a striking crochet Easter/springtime project, wouldn’t it? Perhaps a wrap, shrug, or bolero to go with the skirt?

Full length silk skirt with a floral print. Lavender and cream colored background with rich gem colors in the foreground of the print.
My favorite long skirt. I look for reasons to wear it at Easter time.

I can picture multicolored motifs. Or, a cream and lavender thing, with the darker colors as a contrasting border–little flowers, maybe.

In fact I’m going to create a project page for this in Ravelry after I finish this post.

I’ll be able to send out a newsletter issue after I meet a big design deadline this week. So close! I’ll also be able to keep moving forward on new blogging and crochet video plans I’m excited to share.