Posted on 1 Comment

Picot Crochet Card Edge (Free Pattern)

I found my old notes!

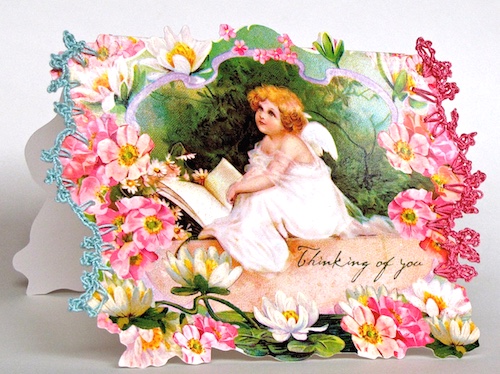
The other day I posted a photo of a freeform crochet card edge I did over four years ago. In that post I described how to crochet it, to the best of my memory. Back then I mailed off the card right away. I have no memory of having written down any how-to info.

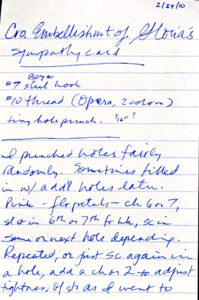
Well, I just now I found the notes to myself about it (pictured at right). I’ve been going through lots of old files, boxes, CD roms, etc. so I’m finding all kinds of things.

Below I’ve typed in everything from that paper to be readable. I suppose you could say this is a…

Picot Crochet Card Edge Free Pattern

Supplies Needed:

  • Size #7 Boye steel crochet hook (or size that will pull the thread you’re using through the holes punched in the card).
  • Size #10 cotton crochet thread: Coats Opera (100% mercerized cotton, 230m per 50g ball), 2 colors.
  • Greeting card: the thicker the card stock, the better. Glossy card stock is even stronger.
  • Single hole paper punch: 1/16″ diameter holes. (Look for one in the scrapbooking section of a craft store.)

Stitches and Abbreviations Used:

  • ch = chain
  • sc = single crochet
  • sl st = slip stitch
  • st(s) = stitch(es)

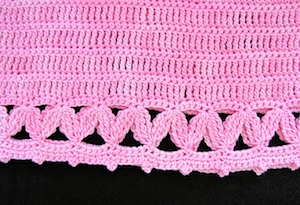
Begin Picot Petals Crochet Card Edge

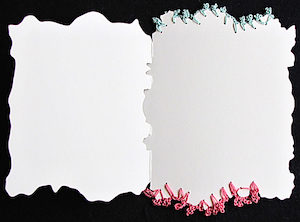
Step One: I punched holes fairly randomly. Sometimes I filled in with additional holes later.

Step Two: With pink thread for flower petals, *ch 6 or 7, sl st in the 6th or 7th ch from your crochet hook, sc in the same or next hole, depending. (Depending on how it looks and how far away the next hole is. Bunching them here and there brings out the petal look.) Repeat from the *, or just sc again in a hole; add a ch or two to adjust the tension of the sts as you edge the card.

Step Three: With green thread for leaves, ch 6 or 7, sl st in 4th or 5th ch from your hook. Space these out a bit more than the petals were. I spaced them with only just enough chs to sc in the next hole gracefully.

I ended the pattern notes with, “I like how the bunched pink petals look next to the more spread out green sts.”

Posted on 1 Comment

Greeting Card Crochet with Picot Petals

Greeting Card Crochet with Picot Petals

Isn’t this greeting card crochet experiment lovely?

I made it about four years ago. The recipient was touched by it. I’m glad I took a photo before I gave it away—I smile whenever I see it.


My goal was to try crocheting a fine irregular edge in a freeform way. (I had already crocheted chunky, evenly-spaced borders into other things, such as with the Venus Flytrap Action Toy, and the Cheerful Chores.) tablecloth

The first step was to punch tiny holes randomly spaced along a portion of the card’s irregular edges. Instead of poking holes with a needle, I found a 1/16″ single hole paper punch at my local craft store. I’m glad I did. The holes are clean-edged and look like the card came with them.

Inside of Greeting Card Crochet with Picot Petals


Randomly spaced holes can vary in distance from each other, and from the edge of the card. When you’re crocheting into these holes, you just have to chain more to get to a hole that’s farther away, and chain fewer to get to a closer hole.

In standard pattern language, this is eyeballing (i.e. freeform), because it’s adjustable instead of being a fixed pattern. This automatically puts it in the Intermediate Skill Level category.

Sometimes I slip stitched (sl st) into a new hole, then chained one (ch 1) so that I could sl st again into the same hole.

The picot petals are just long picots. I added extra chains before the sl st or single crochet that closes the picot.

Greeting card crochet is a useful Intermediate Level skill to know for other kinds of crochet too.

I have a Pinterest board with lots of examples: http://www.pinterest.com/vashtibraha/crochet-mixed-media/

I’ve listed a few other links below to other crocheters’ blog posts about greeting card crochet edgings. Each blogger describes a similar step of adjusting the number of chains to accommodate the space between the holes.

http://onesheepishgirl.com/2012/01/adding-a-crochet-edge-to-paper-valentines-frames.html

http://vimeo.com/11981377

http://thimbleanna.com/projects/valentinecard.html

http://www.thriftyfun.com/tf95779670.tip.html

http://dutchsister-s.blogspot.com/2011/11/tutorial-recycled-christmas-card-with.html

Posted on 3 Comments

Customized Tank Top with Crochet: Update

I customized a tank top with crochet edgings and a peplum. Looks great on my mannequin.

Remember I started to customize a tank top with crochet?

I cut a tank top to crop it and to give it a deep V-neck. Then I added crochet to it to customize it.

It’s mostly done now, and I like it. This is a size Medium tank top on a Small-size mannequin. In standard sizing, Lindsay the mannequin is on the Extra-Small side of Small. I’m on the Large side of Medium. On me, the waistline of the top sits higher, like an Empire-waist top. Also, on me there is no ruffling where the crochet meets the cut hem.

I uploaded a bunch of photos of this project to its Ravelry project page. (If I take a selfie I’ll add it there too. Maybe even here on the blog if I’m not too shy.)

This is my first attempt at a customized tank top with crochet. Thank goodness for a timely email I received from designer Sue Perez! She shared with me her sewing experience: a V-shaped neckline needs special reinforcing. I took that into account when I chose the crochet stitches and gauge for the neckline.

This experience of refashioning store bought clothes answered lots of questions I had. For example:

The Yarn Thickness Worked Out

It’s standard sport weight, very smooth, and is a cotton mixed with rayon for drape. In crochet thread sizing this would be a Size #3.

I wouldn’t want to go with a yarn that’s any thicker than this, or that has any fleecy loft or friction on the yarn’s surface.

A thinner yarn (a.k.a. a crochet thread Size #5 or #10) would work great, especially for fancier, fussier garments. This sport weight thickness works for the casual nature of a daytime tank top, or for a tee shirt. It also gave me the feeling of making progress quickly enough to stick with it.

Amount of yarn

I’d say it took up to 1.5 balls of Lotus yarn; that’s 325-375 yds.

Method of Attaching the Crochet

Seems fine so far. It will also have to hold up to washing and wear. Crocheting right onto tee shirt fabric like this? Yes, it can be done. I used a needle-sharp steel crochet hook. It was the largest I have and was not quite large enough for the yarn. A larger one might have left noticeably big holes in the fabric though.

I didn’t loooove doing the first row. Funny thing about crochet – that’s often the case. Crocheting into the foundation chains isn’t my favorite thing either, nor is crocheting foundation stitches. I usually want to get whatever the first row is over with. Same with this top.

Holes Where Stitches Meet Fabric

I mostly don’t want to look at the holes where the crochet stitches meet the fabric. When I wear it I don’t notice it at the hem. It stands out in this photo to me because it’s rippling a bit. At the neckline, though, I added a surface crochet row that covers the holes.

A customized tank top with crochet looks pretty nice, doesn’t it? I super love the hem. Those are split clusters of triple trebles.

Posted on Leave a comment

I Fixed Adjustable Straps of a Bra Top with Crochet

This easy crochet fix for adjustable straps wins a five year test.

The adjustable straps of my bra tops usually loosen. They should just stay where I put them! Some of these straps are slippery or satiny. My thinking was to use crochet to add more friction to the strap, but still be adjustable when and if I choose. Can I have it my way? The answer turns out to be YES!

I took the first two photos in December 2008 – over five years ago. (I thought I might want to blog about it.) These were a few hurried shots with my new camera, while also making Christmas and Hanukkah gifts. In the holiday rush I forgot about the photos until…yesterday. Meanwhile, I wore this hard working garment almost daily for about five years.

After these three photos (click each to enlarge and see more info) I list the steps of how I did this fix.

The simple steps I took to improve these adjustable straps with crochet:

I chose a size #10 cotton crochet thread in a matching color. In this case, a light blue Coats Opera thread. You can see it in this photo.

With a #7 steel crochet hook, I chained about 50 and then fastened off.

Applied a layer of any fabric glue to the relevant area of the strap. Before it dried I arranged the crochet chain in the wavy pattern you see here. Note: it stays in place best if the bottom of the chain stitches is facing up. The top loops of the chains form the flattest side of the chain. So if you look closely at these strap photos, you might see that you’re looking at the “bump” loops of the chain stitches (At this blog it’s called the “back ridge.”)

When dry enough, I sewed along each edge of the strap with the zigzag setting of my sewing machine. Using the glue first made this step super quick and low-stress. That’s it!

The zigzag stitch is very important. You need to include flex in your stitches because the straps need to retain their elastic range. Otherwise you risk breaking the sewing thread during wear.

This is another benefit of using crochet chains. The crochet stitches build in just a bit of flex, especially when arranged the way they are here.

I’m 100% pleased with this diy crochet fix. I would do this again with the adjustable straps of my other tops. (Did you notice the paws of my kitten in the first photo? I didn’t until today.)

Posted on 1 Comment

Lab Experiment: I’m Customizing a Tank Top with Crochet

Pink Tank Top in Progress, Close Up

This is my first attempt at customizing a tank top with crochet, so I’m using a $4 scoop-neck tank top from Walmart (White Stag brand).  Update: It’s coming along well! See this followup post.

It looks dowdy on me straight off the store shelf, so I’ve drastically cropped it and turned the neckline into a deep V.

The crochet you see adds length along the bottom hem. I’m using standard sport weight yarn and a US/F (3.75 mm) crochet hook. The steel hook shown in the photo above is the largest sharp-headed crochet hook I have. I wish I had one that’s slightly bigger for pulling through loops of sport weight yarn.

The Real Reason I’m Doing This

Fancy triple-treble stitch clusters in a zigzag pattern add drama to the picot hem of the peplum I added to a storebought tank top.
Crocheting the bottom hem.
Armholes & neckline next.

What is it like to crochet DesigningVashti Lotus yarn onto t-shirt fabric? Is sport weight yarn a good match? (If I have to use lace weight yarns, I might as well just crochet the whole darn thing.) What does the texture of this yarn look like with a plain cotton machine knit fabric? 

I have mill ends of this “Pink Sugar” color; the dyeing looks more tonal than solid (not in this photo though). Do I like it? What is it generally like to pair Lotus colors with my tee shirt colors?

Can I use a super sharp crochet hook when customizing a tank top with crochet? I want to be able to start crocheting right onto fabric and get a result I like. Would I enjoy doing it more than sewing along the cut edges first? (I sealed the cut edges with an invisible permanent washable no-fray liquid.)

Customing a tank top with crochet to give it a well defined v-neck and picot-trimmed armholes.

How will it all hold up to wearing, machine washing and drying, and the Florida sun? Will the no-fray liquid add enough strength to the edges?

How will I like wearing it? Will I find I have a preference for customizing a tank top with certain kinds of crochet stitches? What if the crochet adds too much weight to the top?

Lots of what-ifs. Will I want to do something similar with my cashmere sweaters? ::gasp::

I have a few pullovers that I want to convert into cardigans. Ideally, give them a roomier fit while I’m at it. Heck, add beads. Cashmere love is a many splendored thing.