The other day I posted a photo of a freeform crochet card edge I did over four years ago. In that post I described how to crochet it, to the best of my memory. Back then I mailed off the card right away. I have no memory of having written down any how-to info.
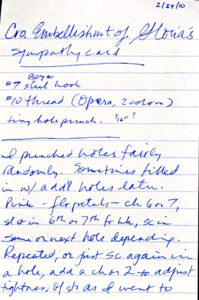
Well, I just now I found the notes to myself about it (pictured at right). I’ve been going through lots of old files, boxes, CD roms, etc. so I’m finding all kinds of things.
Below I’ve typed in everything from that paper to be readable. I suppose you could say this is a…
Picot Crochet Card Edge Free Pattern
Supplies Needed:
Size #7 Boye steel crochet hook (or size that will pull the thread you’re using through the holes punched in the card).
Size #10 cotton crochet thread: Coats Opera (100% mercerized cotton, 230m per 50g ball), 2 colors.
Greeting card: the thicker the card stock, the better. Glossy card stock is even stronger.
Single hole paper punch: 1/16″ diameter holes. (Look for one in the scrapbooking section of a craft store.)
Stitches and Abbreviations Used:
ch = chain
sc = single crochet
sl st = slip stitch
st(s) = stitch(es)
Begin Picot Petals Crochet Card Edge
Step One: I punched holes fairly randomly. Sometimes I filled in with additional holes later.
Step Two: With pink thread for flower petals, *ch 6 or 7, sl st in the 6th or 7th ch from your crochet hook, sc in the same or next hole, depending. (Depending on how it looks and how far away the next hole is. Bunching them here and there brings out the petal look.) Repeat from the *, or just sc again in a hole; add a ch or two to adjust the tension of the sts as you edge the card.
Step Three: With green thread for leaves, ch 6 or 7, sl st in 4th or 5th ch from your hook. Space these out a bit more than the petals were. I spaced them with only just enough chs to sc in the next hole gracefully.
I ended the pattern notes with, “I like how the bunched pink petals look next to the more spread out green sts.”
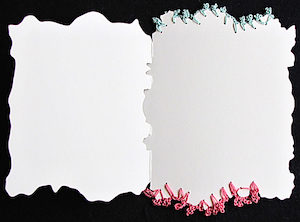
Isn’t this greeting card crochet experiment lovely?
I made it about four years ago. The recipient was touched by it. I’m glad I took a photo before I gave it away—I smile whenever I see it.
My goal was to try crocheting a fine irregular edge in a freeform way. (I had already crocheted chunky, evenly-spaced borders into other things, such as with the Venus Flytrap Action Toy, and the Cheerful Chores.) tablecloth
The first step was to punch tiny holes randomly spaced along a portion of the card’s irregular edges. Instead of poking holes with a needle, I found a 1/16″ single hole paper punch at my local craft store. I’m glad I did. The holes are clean-edged and look like the card came with them.
Randomly spaced holes can vary in distance from each other, and from the edge of the card. When you’re crocheting into these holes, you just have to chain more to get to a hole that’s farther away, and chain fewer to get to a closer hole.
In standard pattern language, this is eyeballing (i.e. freeform), because it’s adjustable instead of being a fixed pattern. This automatically puts it in the Intermediate Skill Level category.
Sometimes I slip stitched (sl st) into a new hole, then chained one (ch 1) so that I could sl st again into the same hole.
The picot petals are just long picots. I added extra chains before the sl st or single crochet that closes the picot.
Greeting card crochet is a useful Intermediate Level skill to know for other kinds of crochet too.
I’ve listed a few other links below to other crocheters’ blog posts about greeting card crochet edgings. Each blogger describes a similar step of adjusting the number of chains to accommodate the space between the holes.
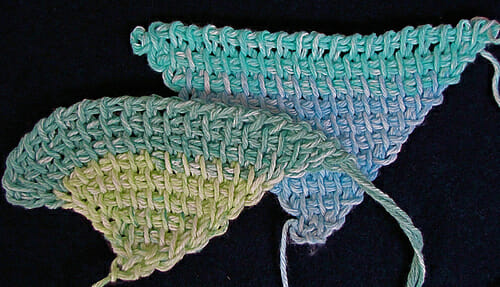
I’m looking over the photos I’ve taken so far of my newest Tunisian crochet design. Lately, the weather here has created some moody lighting. Have a look at these!
My first filet-like Tunisian crochet lace in opalescent mohair and silk.
I’m calling it Aery-Faery because it is faerie-like and diaphanous, like fairy wings. I’ve crocheted most of it while watching the first season of Once Upon a Time. In fact, I’m pretty sure the idea for this design first came to me while watching the show.
Scarf shown draped like a stole. It’s very stretchy!
The yarn is divine for a lacy Tunisian crochet scarf.
It’s Artyarns Silk Mohair Glitter; a strand of Lurex is plied with the silk and mohair. It’s particularly fine and smooth. The dyeing is gorgeous. You can’t tell from some of the photos, but it’s the subtle colors of a milky opal. The colors shift like they do in an opal, too.
The Aery-Faery pattern draft is done. I’m testing a variation tonight and have the final proofreading to do before sending it off for tech editing and testing.
Three ways to add stitches at the end of a Forward Pass
It’s good to know how to increase Tunisian crochet stitches more than one way because every project is different. These first two methods are my favorite because they don’t limit how many stitches you can increase at a time. This means I can smoothly add big lacy spaces and whole blocks of solid stitch repeats, when and where I wish, in Tunisian crochet. This is something I’ve always loved about regular crochet.
Have a favorite method of your own? Please let me know in the comments!
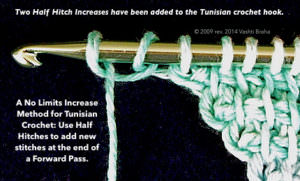
Method #1. How to Add Tunisian Stitches with Half Hitches
A half hitch is simply a loop with a twist in it.
In my original 2009 blog post about this method, I use a pair of half hitches as one increase. This pair is well known to those who do macramé as the double half hitch (dhh). As far as I know, I’m the first to use it as an edge increase.
A single half hitch can also be used for adding a new stitch, and I’ve since found it mentioned for this in a few older books on Tunisian crochet. I add them to a timeline in this half hitch resource post as I find out about them.
The half hitch is also well known in knitting as the simple/single/backwards loop cast on in knitting. This video shows half hitches being added to a knitting. This is how I do it and I’ve really picked up speed.
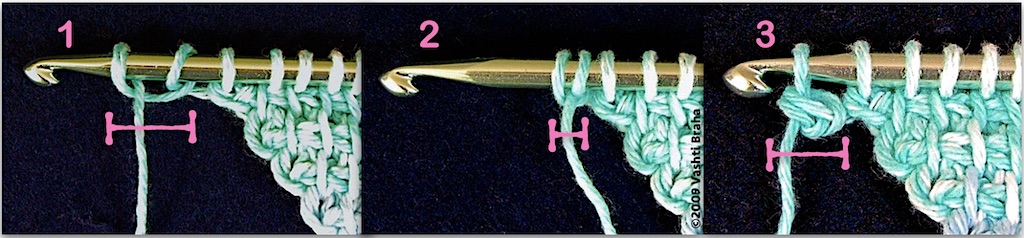
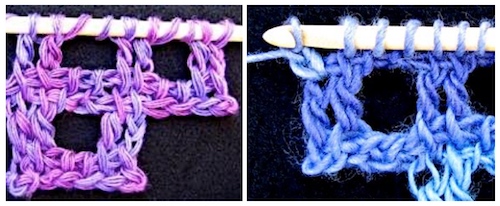
How to Do the Double Half Hitch Increase (DHH)
Two crossed loops, or half hitches, have been added to the crochet hook. The pink bar indicates which loops are the half hitches. In Step 3, the two have been crocheted off of the hook together. It’s a mini-limpet!
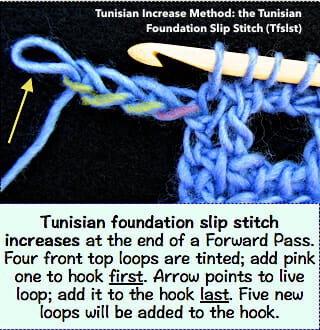
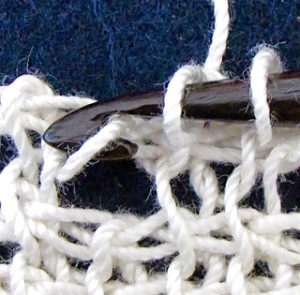
Method #2. Use Tunisian Foundation Slip Stitches as Increases
Feel free to choose a loop other than the tinted ones shown.
At the end of your Forward Pass, insert hook in one side loop of the end stitch, yarn over and pull up a loop. Then chain the number of stitches you wish to add. (I chained four in this photo.) Then take the last loop off of your hook; your chain stitches should resemble those in the photo.
Then, insert your hook under one loop of the first chain (tinted pink) and leave on your hook. Repeat with each remaining chain; then put the live loop back on your hook, as described in the caption.
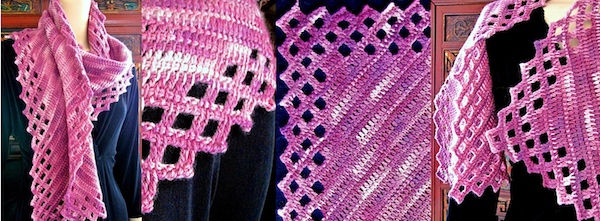
I discovered this Tfslst method after I designed the Five Peaks Shawl with half hitch increases. Tfslsts is the method of choice in the Four Peaks Scarf pattern and in the Warm Aeroette Scarf (pictured at the top).
I love having both of these methods to choose from, depending on the project.
They are probably interchangeable enough that you could use the one you prefer. (More on that in the newsletter.)
The most important thing is to choose a method that doesn’t impose a limit! Especially when you’re crocheting something that has a diagonal edge and needs to drape nicely, like a triangular shawl or an asymmetrical scarf. Compare the triangles below.
Often when someone asks in a forum how to increase Tunisian crochet stitches, the advice is to squeeze them in. Typically this means adding a stitch in another loop just behind or next to another stitch. This method is fine if you’re replacing a stitch that you accidentally decreased in an earlier row. If you think of basic Tunisian crochet fabric as a grid, space was already reserved for the missing stitch, and you’re just filling it back in.
Method #3. The “Squeeze-It-In” (my least favorite shaping method).
Effect of the “squeeze-it-in” method shows in the left swatch. Not recommended for something like a shawl.
The Squeeze-it-in method has limits. It’s okay for just a rare stitch here and there, and away from the edges. In other words, as an “internal” shaping method. I don’t mean to impose rigid rules. Depending on the project, yarn type, and hook size, squeezing in new stitches when you wish may come out fine.
For me, this shaping method often interferes with my goal of a languid, swaying drape for Tunisian crochet accessories. When I consider how to increase Tunisian crochet edges for a new design, Squeeze-it-in is last on my list.
I’ve learned to take three things into account: the yarn’s plying, color, and thickness.
Yarn plies: I have the best luck with a single ply yarn. More than one ply can add a distracting texture, especially in close ups. I love the look and colors of the purple yarn in the first photo, but its plies worried me. (Each individual ply of this unusual 100% cashmere yarn is twisted, but there’s no twist holding them all together.)
The color(s): Yarn colors also matter for Tunisian crochet filet close ups. A single light color shows texture depth the best. I tend to avoid variegated yarns, with exceptions here and there.
Opera crochet thread is known for its polished, silky beauty. This extreme close up is not its best look.
Subtle color shifts can be a real plus with Tunisian crochet, though! I think this might be because it helps the eye distinguish forward pass loops from return pass loops. (Four Peaks images are good examples of this. Strong contrasting color shifts would normally be distracting. This isn’t the case for Four Peaks because of the small, fine-grained Tunisian simple stitches.)
Yarn weight: If I’m taking close up photos, and the camera has a good zoom lens, why does it matter how thin or thick the yarn is? How about using a crisp crochet thread? I discovered the hard way that I have better luck with a thick yarn. With thread and skinny yarns, the individual fibers show up too much in each loop. Even slight fuzziness is magnified. It makes the yarn or thread look old, shaggy, and worn out.
#2. A Winter Yarn
I fell in love with my first Tunisian crochet filet design in wool. That would be…Warm Aeroette! (Hence the “warm” part.) Traditional filet lace has mostly been a cotton thread kind of crochet project. Maybe that’s why I didn’t think of wool at first.
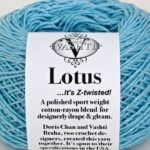
Until Aeroette I’d only had Tunisian crochet filet thoughts in bamboo (Ennis), silk (Aero), and cotton (dishcloth test in my Lotus yarn). It’s thanks to Warm Aeroette that I discovered how nice Four Peaks is is in a toasty aran-weight wool.
I needed to test with classic wool yarn to know Aeroette better. Could it work in something other than Aero’s fancy silk? Unlike Four Peaks, the wool yarn I used isn’t thick; it’s a fingering/sock weight fine-micron merino wool. (Fine-micron merino has a lot in common with cashmere.)
Thin fingering weight gives the tall Tunisian filet stitches a fine-grained texture. In a thick wool like the Mochi Plus (blue photo above), the filet-style lacy eyelets could look clunky or lumpy as a scarf. Would be a lovely afghan border though!
Site-wide Search
Vashti’s Crochet Shop
Get the Newsletter
Sign up to receive Vashti’s Crochet Inspirations Newsletter in your inbox monthly.