The place for all kinds of crochet freebies: Vashti’s free crochet patterns, contests, and giveaways.
Also see:
– Free online crochet class extras in the Crochet Classes category.
– Free back issues of Vashti’s Crochet Inspirations Newsletter, and newsletter overflow posts.
It’s the perfect way to start a Starwirbel! We’re going to use it in the upcoming Starwirbel Way class this July. (CGOA Chain Link conference this July in Portland, Oregon).
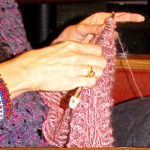
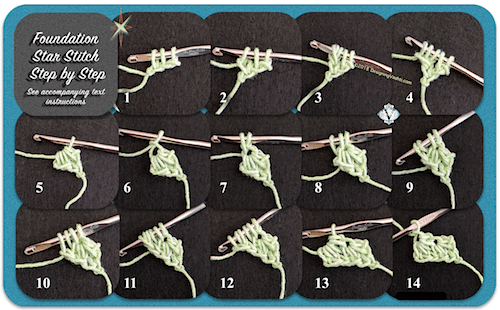
For this unusual stitch, two foundation chains must be created as you complete each star. In the text instructions below, a [bracketed number] refers to a numbered photo step above.
First foundation star stitch (fstar):
Chain 3 loosely.
[image #1] Pull up a loop in each of the second and third chains; you have 3 loops on your hook.
[image 2] Chain 1 (counts as first foundation chain of first star),
[3] Yarn over and pull up a loop in the two outermost strands of the chain just made,
[4] Chain 1 (counts as second foundation chain of first star),
[5] Pinch it while you yarn over and pull through all 5 loops on your hook so that the last loop doesn’t tighten,
[6] Chain 1 (eye of this first fstar).
Tips: Pinching also helps you recognize which loops are the new foundation chain loops. Pull up loops loosely enough that a second crochet hook could fit in them.
Add more foundation star stitches:
*Pull up a loop in each of these places:
[7] The Eye,
[8] Side of star,
[9] Two loops of second foundation chain of star;
[10] Chain 1 (counts as first foundation chain of next star),
[11] Yarn over and pull up loop in chain just made,
[12] Chain 1 (counts as second foundation chain of next star) and pinch it,
[13] Yarn over and pull through all 6 loops on hook,
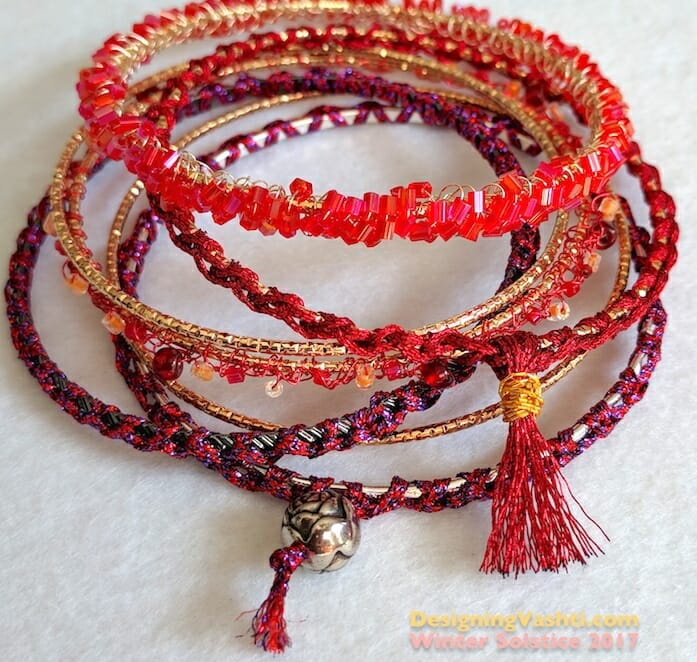
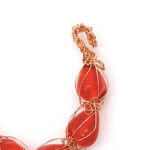
I’m crocheting these festive bangles for quick holiday gifts (Hanukkah, solstice/yule, Christmas), hostess gifts (I have five holiday parties to attend), and for myself. It’s relaxing now to make them. I’ll wear some to the parties.
Each completed bangle is costing me about 50¢ (not including labor, a.k.a. the love in every stitch ❤️).
“Solstice Bangles” Free Pattern
Below is the complete pattern for what I’ll call “Solstice Bangles” because tomorrow morning is the Winter Solstice (first day of winter). I contemplate this sometimes as I crochet around the bangles; it’s a satisfying “full circle” feeling. I’m completing another sparkly “wheel of the year”.
Skill level
The starter pattern is Beginner-friendly. So many ways to get fancy with it. Add some challenge with wire or beads.
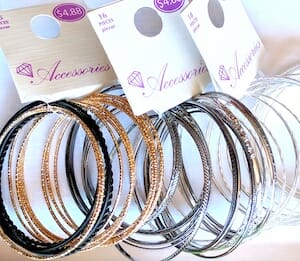
The stackable bangle sets I bought at Walmart this week.
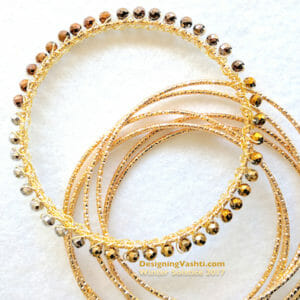
I covered a slim gold bangle with gold wire crochet and metal beads.
Materials
This section looks long because it includes tips for substituting with items you have on hand.
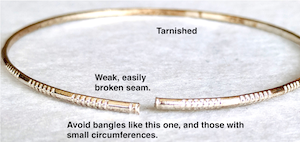
Bangle “blanks”: Look for thin, narrow, permanently closed (not hinged or locking) metal bangles. They’re often sold as a group to be worn stacked, meaning all at the same time. If they are labeled with a size, choose only “large” because any crocheting you add will reduce the final inner circumference. I don’t want any tarnishing or chipping, so I prefer to buy them exposed to air without a package wrapper. If they have soldered seams, check them for strength. This is especially important for gifts because you don’t know how much force someone will use to slide it on over their hand. I only buy them locally so that I can test the seam and finish of each one. Over the years I’ve kept an eye out for them in places like Claire’s, Wal-Mart, Target, etc. The quality varies wildly. I can recommend the ones in Wal-Mart now (pictured). They come in bunches of 15-18 bangles for $4.88.
Yarn, if you’re not adding beads: Here’s where you can use the interesting embroidery braids, flosses, and fine novelty yarns languishing in your stash. My first choice is a fancy metallic Kreinik braid type if I’m not adding beads. My little 5-meter spool can cover two, possibly three skinny bangle blanks. Some fingering and lace weight yarns would work, and any crochet thread size. Beginners: start with a sock yarn or size #3 or #5 crochet thread, and no beads. Then graduate to a fancy metallic floss/braid type, then try very fine wire without beads first (30ga to 32ga thickness).
Yarn if you’re using beads: I’ve had the best luck crocheting with wire. The wire holds the beads in place the best for me. Wire is a unique crochet experience. If you’ve never tried it, please see my newsletter issue on it, or the Embracelet pattern.
Crochet hook: This is easy. Use whatever hook size that makes it easiest for you to crochet tightly and evenly.
Beads (optional): I like very small beads for this. I don’t go much larger than “e-beads” (size 6 seed beads). Beads with small holes also work better for this so that they don’t jiggle and shift around. This means gem, chip, and pearl beads are great! You can use a larger accent bead for a tassel finish.
Sealer, stiffener, adhesive, fine yarn needle, etc. (optional): You might wish to use a fabric protectant such as Scotchgard if your yarn is an absorbent fiber. I used three coats of clear nail polish to secure a tassel of metallic embroidery floss because it doesn’t hold knots well. I may use this, or some clear fabric paint, on the inner surface of a bangle to keep the stitches from twisting around the bangle.
Pattern Abbreviations
ch = chain stitch
sc = single crochet (UK/AUS: dc)
ss = slip stitch
Crochet a Basic Solstice Bangle
Step 1: Leave a 4″ yarn end that you can crochet over it, weave in later with a needle, or leave hanging with a bead or tassel. Crochet all stitches tightly. Slip stitch around the metal bangle tightly, *ch 1, ss, repeat from * until bangle is covered.
This is up to you: use fewer stitches to cover the bangle by stretching them taut around the bangle. They’ll be less likely to twist and shift around the bangle, and you’ll see more of the metal. Or, use an excess of stitches for a different look: I love the wavy zig-zag texture of the (ch 1, ss) combo. You’ll see much less of the metal this way.
Step 2: When you’ve crocheted the number of stitches around the bangle that you like, join the last stitch to the first one. I remove my hook from the stitch loop, insert the hook in the first ss, and pull the last stitch loop through it with the hook, then fasten off.
Step 3: Decide what you want to do with those yarn ends. Weave them in. Or, string an accent bead onto both ends, knot them, and trim ends close to the bead. A third option is to tie the ends together, cut more yarn lengths, then add to the yarn ends and tie into a bundle to make a tassel.
Step 4, optional: If you add a fabric protectant, test a swatch first. You could coat the inner rim with a glue or sealer to prevent stitches from twisting around the bangle. Add a drop to knots if they might loosen with wear.
Add Challenge
The basic Solstice Bangle pattern is crazy simple, right? Add just one variable and it’s a different experience. For example:
Add other stitches or change them completely. You could try all sc. I used such a fine red wire for a beaded bangle that I had to use sc instead of ss to make them more visible. Embracelet is an example of using love knots.
Hold two different glittery strands together as you crochet, or use 6-strand embroidery floss. (Managing multiple plies as you crochet so tightly around a bangle does get tricky.)
Just add beads. That’ll keep you busy! I like to add one or more beads to the ch of the (ss, ch 1).
Use wire as the yarn. A thicker wire such as 26ga may be difficult for some people to crochet with, but it sure shows up well, and makes a statement even without beads. It also holds up nicely and is less likely to twist around the bangle. Finer wire is great for showing off beads.
Try to crochet the wire as tightly as you can. (It will still be looser than you intend.) When you’re done, tug on each bead a bit while also giving it a half-twist. This will tighten the stitch around the bead and bangle. I also compress everything by pressing and scrunching the stitch loops together into the bangle. I guess you could consider this a “blocking” method for wire jewelry?
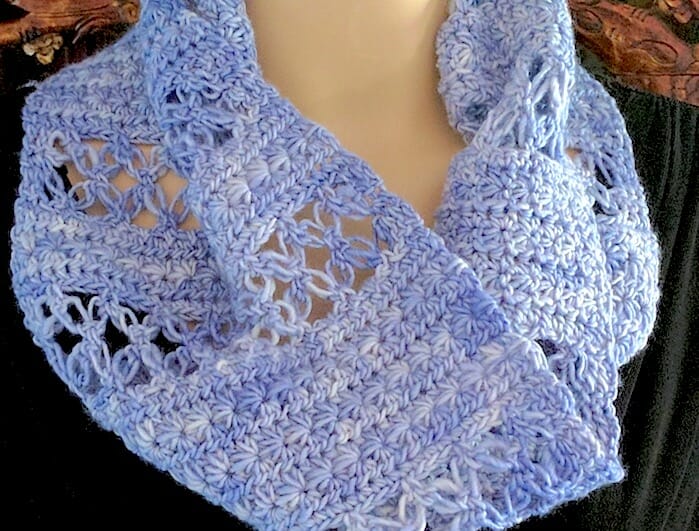
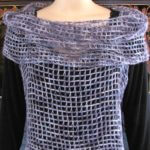
A star stitch crochet scarf with love knots? (About as common as a love knot scarf with star stitches.) So beautiful together! I’m calling it Lovelace Ring Scarf.
Two years later a visitor to the DesigningVashti Facebook page requested the pattern. Again in deep crochet class prep mode, I had to put it off until after teaching and a series of seven crochet tutorials I’d agreed to do for the Cut Out & Keep site.
Alternate yarn idea: Love knots and star stitches both benefit when crocheted with two yarn strands held together. This is Satin Grey Lotus yarn with a lace weight metallic mohair.
By then the US election had just taken place. I appreciated the sweet, loving patterns crochet and knit designers were spontaneously posting. I returned to the 2014 attempts to blend stars and love knots in one pattern. It was a pleasure to finally polish it up into a fun, versatile, balanced stitch pattern. I hoped the idea of harmonizing and unifying two popular stitches of very different traditions might lift others’ spirits.
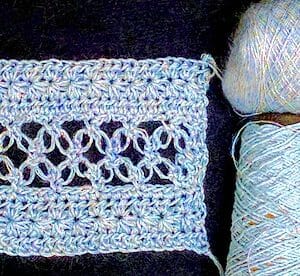
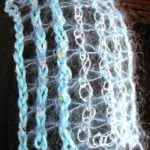
The basic stitch pattern is available here. I used it to make a 6.5″ square block with DK weight yarn and a G7/4.5 mm hook. A border would probably turn it into a 7″ block.
The Lovelace Ring Scarf design happened next because I needed a self-edging version. It came to me during Thanksgiving. As I lay there contemplating the stitch pattern I’d sent off to Cut Out & Keep, I wondered about giving the basic stitch pattern a selvage (no need to edge it later).
The start and end of the love knot section always looked a bit stringy and unstable to me. I also wanted to vary the texture bands and widen it for a lush, romantic ring scarf.
This is how Lovelace came to be.
Is a Love-Knot-to-Star-Stitch Scarf…Challenging?
Both are Intermediate-level crochet stitches but that doesn’t mean they’re difficult. I include tips and visual aids in the pattern that have worked in my classes. Most of Lovelace is rows of easy, familiar stitches like single and half double crochets (sc and hdc, or as they say in the UK: dc and htr).
These easy stitches are a backdrop to the fancy stitches. Like peacekeeping diplomats they harmonize relations between the two iconic, culturally powerful, individualistic “diva” stitches.
My experience of crocheting star stitches (stars) and love knots (LK) in the same pattern is that I get some comfort zone rows of simple stitches, then a spicy row or two, then more comfort zone.
Dramatic Differences Between Stars & Love Knots
I researched both of these two unique stitches deeply. I don’t recall ever seeing them combined in one stitch pattern. If you have, please let me know in the comments.
Love knots are reversible, star stitches are not. It was an issue with my early swatches.
Love knots are more independent than the usual crochet stitch, and star stitches are the other extreme. This shows in lots of ways. Add Love Knots anywhere like a chain stitch because it’s a type of foundation stitch. Each LK is distinct, complete, and recognizable from a distance.
Star stitches require context. The stitch just before it, after it, and often above it determine how recognizable each star is!
Love knots likely originated as a southern lace, star stitches as a northern thermal fabric. LK were almost always crocheted in very fine cotton and silk threads for delicate and summery edgings, baby bonnets, and petite “opera bags”.
Stars have been used most often for making thick, dense coats and blankets in wool. Even when early stars looked like fine spidery lace, wool was the fiber of choice. (That’s why my unofficial name for the original swatch is “North and South stitch pattern“.)
Interesting Similarities Between Them
Both LK and stars are romantic, iconic, classic/old-fashioned, popular, and beloved.
Both originated in the early to mid-1800’s.
Both have long been favored for baby things. (Stars: baby blankets and coats; LK: sacques, bonnets, layette edgings.)
Both can be lacy. When star stitches are lacy, you’re looking at pulled loops, just like with LK.
Bookmark this page! It contains self-updating links to my future free crochet stuff too. After the three self-updating links below is a gallery of clickable photos of each free crochet pattern that’s available as of today (April 19 2016).
Three Self-Updating Links to All Free Crochet Stuff by Vashti
Self-Updating Link #1: This shortcut link tells Ravelry to display only my crochet patterns that are free. I have over 100 crochet patterns in Ravelry and I add at least one new one each month. If I publish a new free crochet pattern on this blog, I also add it to Ravelry.
Self-Updating Link #2: This link tells this blog to display all the posts that I’ve tagged with “free pattern.”
Self-Updating Link #3: This goes to my list of the 20 most recently published issues of Vashti’s Crochet Inspirations Newsletter. Occasionally I put a free crochet pattern right into an issue. In fact, I originally expected to put free crochet patterns in most issues, but I discovered the hard way how limited a newsletter is for full pattern instructions. (For example, space is very limited, and there’s no way to update an issue if errors are found. It’s also not searchable, so Google can’t find it for you.) Each newsletter offers other kinds of information for free that you either won’t find anywhere else, or that you usually have to buy a book or pattern to get.
Please note that I do not own the rights to some of the older free crochet designs. Even though I wrote the original pattern, the company that bought all rights to it then edits it. These companies are the best equipped to deal with questions about their versions of the patterns. Thank you for your understanding.
Clickable Gallery of Vashti’s Free Crochet Patterns
Under construction (and may end up being too much work…!)
Clicking an image will [hopefully…(once tested)] take you to another page of this blog with more information about the pattern, and a direct link to download the pattern. It’s not to make you jump through hoops. It’s just how my blog template deals with clickable images.
This [incomplete!] gallery is current as of April 30, 2016. For my newer free crochet stuff, use the self-updating links above. Over time, some of the older free crochet patterns in this gallery might develop a broken link that is out of my control. If you try to download a pattern in this gallery and it doesn’t work, let me know so that I can update the link.
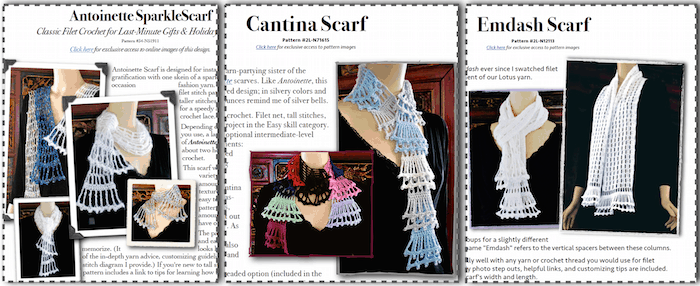
In honor of (Inter-)National Crochet Month, I’ve added a lacy spring scarf pattern to my Ravelry shop: the double-flounced Emdash Scarf. It’s free for one week.
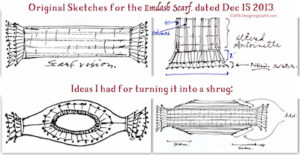
I thought I’d show you Emdash’s crochet story in pictures. National Crochet Month is for crochet stories, right? Especially about lacy spring scarves. First, the design sketches:
There they are all together at the top of this post. It’s easier to show some alternate views of them this way. Antoinette is the eldest (I published her popular pattern in Nov. 2011). She loves lace weight metallic mohair with sequins and other holiday party yarns. Cantina is the youngest, even though her pattern was published before Emdash’s (in Dec. 2015). Cantina is a freewheeling hippie girl who likes color parties, scrap yarns, and beads.
How did Emdash get her name?
While I was exploring special characters on my keyboard, I kept seeing the scarf draped on my mannequin. The columns of tall stitches are grouped with vertical spacers. (I like the slightly different crocheting rhythm of it.) They started reminding me of emdashes, yes—a type of punctuation. It shortens so nicely to “Emmy.”
The last part of her design story is that I learned how to format and print out kit patterns with the Emdash Scarf, for the show booth I had last summer. This means Emdash is also available as a printed pattern while they last.
Happy National Crochet Month!
Site-wide Search
Vashti’s Crochet Shop
Get the Newsletter
Sign up to receive Vashti’s Crochet Inspirations Newsletter in your inbox monthly.
 *Pull up a loop in each of these places: