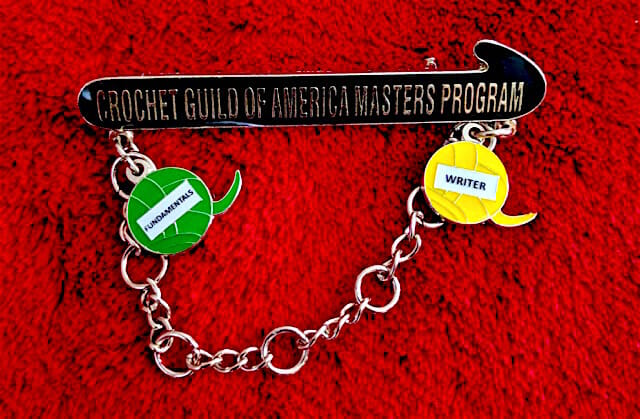
I like this new pin for CGOA’s new Master’s Program (view full size image). These pins were given out on a special night at the conference. I earned the Writer charm for writing two sections of the Masters in Fundamentals.
Do you know what I do on the plane flight home from a conference? I fill out a simple worksheet. It’s a nice way to reflect on everything.
I’ve done this since 2008. That’s at least ten conferences. (In some years CGOA had two conferences, a national and a regional. I’ve also attended a TNNA show here and there.) It has really come in handy so I’ve turned it into a PDF that you can download below for free.
Here’s the story on two of the six entry fields of the worksheet.
“What Got Crocheted?”
This is the first question. What it really means is “Of all the crochet supplies I packed, what did I actually get to?” Can you relate? Originally it was to help me be realistic about how many crochet projects and balls of yarn I need to stuff into my luggage! I know I’m not the only one who packs too much crochet for a trip LOL.
Nowadays I just plain enjoy reflecting on it. Sometimes I’ve even crocheted more rows on a project because I look forward to saying so on the worksheet, so it’s also motivational.
This year, what got crocheted is a swatch idea I’ve always wanted to try: to substitute the chains in a spiderweb pattern with love knots:
I also added so many more rounds to “Astrowirbel” during the 5.5 hour flight to Portland that I almost doubled its size.
“Goals Met & Unmet”
This part of the worksheet used to be more freelance minded, such as, “I finally sat down with X editor.” It has become much more, though. It’s a way to commemorate new friends I’ve made. It has also helped me see that a goal I started with wasn’t very realistic for the event, or as important in retrospect. Or, that I accomplished more than I realized while I was having so much fun.
This year, an unmet goal was to go out into Portland and see lots of roses, the Powell’s City of Books store that sounds amazing, a Peets coffeehouse, and get some supplies for my room. I was too busy teaching, or making sure I ate well between classes.
Some goals I met are: no typos in my class handouts (except a minor one in the Self-Healing Stitches class). I met and spent quality time with Dela Wilkins! I got to know CGOA’s new management company, a great group of people. I think they’re going to be a great fit with CGOA.
The class material for Creative Planned Color Pooling changed me. In fact, it’s still changing me. I’ve adjusted its title to take new developments into account (more on that below).
I’d love to have taken a color pooling class like this years ago! In fact I’d rather learn it in a class than from a pattern or blog. The next time I teach this class: July 28, 2018 in Portland, Oregon.
Crochet Rules, Questioned
Developing this topic changed me as a crocheter. It showed me what I take for granted about crochet how crochet works. I think it’s because for the first time, something else (the yarn’s color sequence) replaces crochet standards that have always worked for other kinds of crochet.
Here’s one: uniformly even stitches are beautiful. We aim to make uniform stitches to get a lovely, polished result, right? Beginners practice until they can be proud of how even their stitches are. Why would one question this?
When you’re intentionally pooling (I think of it as color directing), it’s the yarn’s colors that you aim to make uniform. The evenness of your stitches is second to that. A pretty distant second, which was shocking to me. Why? That brings me to a second way this class material changed me.
Primal Effect
On a bigger and more personal scale, my relationship to color changed! It was like watching my brain re-prioritize what it was seeing. My eyes rejoiced when the yarn’s next color stacked up the way I wanted it to. The stitches for making this happen became almost interchangeable. Even the stitch gauge could vary.
In other words, detecting a color pattern is riveting to the brain. (At least my brain. It feels primal.)
Especially when the pretty color pattern emerges from seemingly random chaos.
Especially when it’s like there’s a secret code in a multicolored ball of yarn and you’ve just cracked it.
The crochet stitch and gauge becomes a strategy: change the crocheting a bit to get a color to stick with the pattern and it works! The eye doesn’t see certain stitch irregularities. It’s too captivated by the color patterning. Also, the nearby stitches will adjust.
Recent Developments
Since my 2016 class, more crocheters have mostly been finding out from blogs about doing planned color pooling (a.k.a. intentional yarn pooling) with variegated craft store yarns. I’m seeing people make a cool argyle effect using the linen stitch (a.k.a. seed stitch, moss stitch, granite stitch): each row is [sc, ch 1, skip next st], and you crochet the sc of the next row into the ch-1 space of the completed row.
I came to this topic a completely different way, via hand dyed yarns. It’s easy to identify the dye techniques, such as hand painting and dip dyeing, because these yarns tend to be sold in the hank the dyer used, not wound into balls.
In these dyed hanks I saw “stitch games” because I’d already done other color-based and geeky experiments. For example,
When I learned from Marty Miller how hyperbolic crochet works (2006 or so), I crocheted her a hyperbolic coffee cozy secretlybased on her birthdate.
A hand dyed yarn with a vivid yellow in it made me want to set it off with love knots. “Love Games” was the result.
Earlier versions of this class were “Stitch Games for Yarns With Short Color or TextureChanges” (2016 in Charleston SC) and “Stacked Color Pooling” (2017 in Mt. Pleasant IL). Planned pooling is becoming a recognizable term for more crocheters. I suspect that only seed stitch argyles come to mind for some. Also, some folks seem to think this is math based, but it doesn’t have to be. At all.
Creative is the important part of the new title because we’re still at the early stages of what is possible. There is way more to planned pooling than seed stitch argyles. What about lace and tall stitches? Shaping? Tunisian? I want crocheters to experience the possible! And of course to be changed by it.
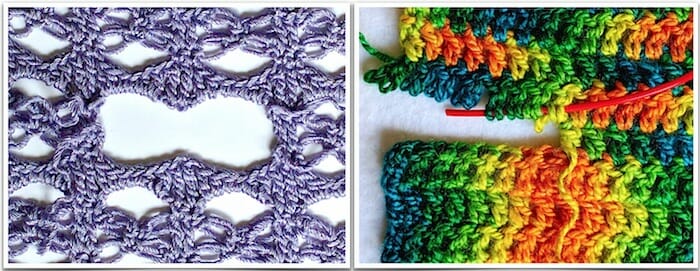
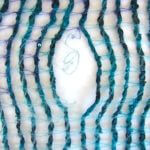
On the left is a self-healing stitch pattern. I’ve removed two rows of love knots, and the stitches left behind are fine the way they are—I have not edged them. No “lifeline” was required to prevent unraveling.
On the right, a red lifeline has been woven into the base loops of some of the double crochet stitches (dc, or in UK: tr). The nearby stitches without a lifeline are unstable and will unravel. View full size.
Nothing happened. The stitches didn’t care. Why though? (Some stitches DO care. A lot!)
The cut that launched a whole class!
At first I thought it was an odd quality of only a few kinds of Tunisian stitches. After testing why this happened, I created a class called “Steeked Tunisian Lace for Fun Fast Fashions”.
By the time I taught it (2016), I’d already discovered the same effect with some regular crochet stitches. That led to a new version of the class, “Easy to Steek Crochet Stitches” in 2017.
Self-Healing vs. “Steek”
Nowadays I’m thinking “self-healing” conveys the topic better than referring to steeks. Steek is a specialized knitting term. I see too many question marks over crocheters’ heads when I use it. Also, steeking often involves cutting across several rows whereas in my class we cut open ONE row.
Cutting a self-healing stitch is creatively liberating and empowering. For me as a designer it’s exhilarating! I think “self-healing” conveys some of the positive, low-stress feeling people have in this class.
Which Crochet Cutting Class?
My friend Pauline Turner will be teaching a class called “Cutting Crochet” at the same event on Thursday, July 26. Our two “how to cut” classes seem to be very different.
When renaming my class I briefly considered “Cutting Crochet” as a way to avoid the steek term. I worried that it would bring to mind the traditional reasons a crocheter would need to cut crochet: to fix, tailor, or repair it. My class is not traditional.
“Game Changer”?
“It’s a Game Changer” — Vashti’s mom (crocheter).
If you can add a head opening, armholes, and even decoratively shaped openings wherever you wish in a crocheted item, it means this is a distinct, different construction method. Here’s why my mom might be right:
It changes what we can do with schematics and simple shapes.
Beginners can understand and use the basic principles of it.
It simplifies the crocheting: just keep crocheting to the end. No need to make sure you start the armholes in the correct row. Stop crocheting when you want to, not when you’re a fixed distance from an opening.
The opening you add later is actually superior to crocheting it in as you go. It’s less lumpy.
It’s certainly a game changer when doing planned pooling with a variegated yarn (argyling, color stacking, etc). Crocheting a simple shape straight through is really important for this kind of crocheting. If you were to add an opening as you’re crocheting, you’d throw off your color sequence. To be able to cut open armholes, a head opening, pocket slit, and even a scarf keyhole later is ideal.
It turns out that a large number of stitch patterns are, or can be subtly tweaked to be, self-healing.
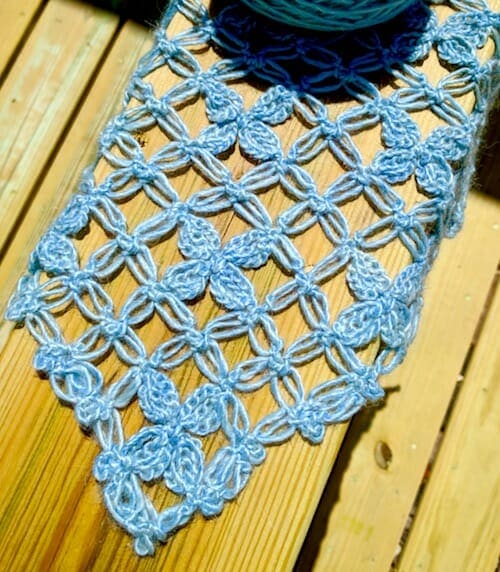
Want to see what I’m working on? This will be Flowerfall, a hanky-hem waterfall vest that I can wear when I teach 21st Century Love Knot Adventures this July in Portland, Oregon. I’m now two-thirds done.
Several Class Skills in a Vest
I’m designing Flowerfall to be a visual aid for several skill levels. I’ll also be adding the pattern to my shop for those who can’t attend the class.
Updated things you can do with this mesh, such as this waterfall vest.
How the yarn choice affects the stitch.
Another view of this diamond mesh would be the love knot sections of Lovelace. (It’s so iconic that the stitch is synonymous with the mesh in some how-to sources from the 1800’s to now.) Then, compare it with the Electra Wrap’s triangular love knot mesh.
For Students With a Bit of Experience
How to increase and decrease this mesh, and add picots as one way to finish the edges as you go.
The when, why, and the how-to: making love knots with slip stitches instead of single crochets (UK: dc).
My new favorite way to keep love knots from loosening later if the yarn is slippery.
A new way to crochet into love knots that I recommend for a project like this one.
For Those With More Experience
How to do corner to corner (C-2-C) love knot mesh in which you start in one corner and end in the opposite one.
How to sprinkle in other stitches with the classic love knot mesh to create lacy new stitch patterns!
Multi-Purpose Visual Aids = Ideal
This is my seventh year shipping teaching aids across the USA for crochet classes. I teach four to six different topics per event. Visual aids are everything! I always end up with a lot of crochet items to ship.
In the past few years I’ve started designing class items that combine several points of information in one. Not only do I cut down on the shipping this way, it’s a fun design challenge. I also love coming up with how a design for one class topic can double or triple as a visual aid for other topics I’m also teaching.
Self-Healing Stitch Alert
An example of this is I’ll be adding armholes to Flowerfall by cutting them open. Know what this means? It’ll also be a great visual aid for the Self Healing Stitches and How to Cut Them class! I might even bring it to the Tunisian on the Diagonal class if I don’t make a Tunisian one in time. Even though Flowerfall isn’t Tunisian, it’s an example of an easy shape to crochet from corner to corner in any stitch. (Flowerfall is even relevant to my slip stitch classes. It’s the first design I’ve done with slip stitch love knots.)
I’ll post again about this design so that you can see its modified diamond shape, how its armholes happen, and different ways to wear it. I’m smitten ? . Flowerfall’s Flickr album has three photos so far.
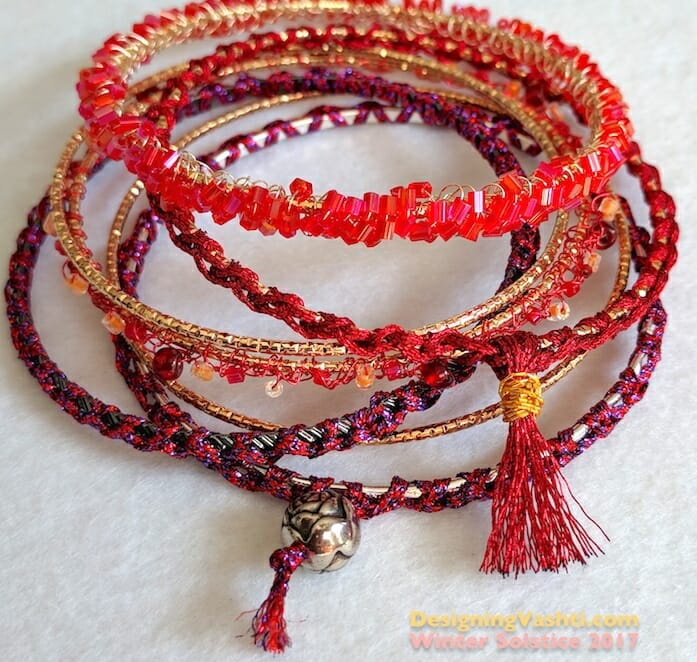
I’m crocheting these festive bangles for quick holiday gifts (Hanukkah, solstice/yule, Christmas), hostess gifts (I have five holiday parties to attend), and for myself. It’s relaxing now to make them. I’ll wear some to the parties.
Each completed bangle is costing me about 50¢ (not including labor, a.k.a. the love in every stitch ❤️).
“Solstice Bangles” Free Pattern
Below is the complete pattern for what I’ll call “Solstice Bangles” because tomorrow morning is the Winter Solstice (first day of winter). I contemplate this sometimes as I crochet around the bangles; it’s a satisfying “full circle” feeling. I’m completing another sparkly “wheel of the year”.
Skill level
The starter pattern is Beginner-friendly. So many ways to get fancy with it. Add some challenge with wire or beads.
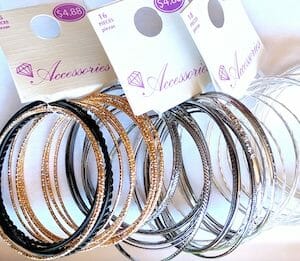
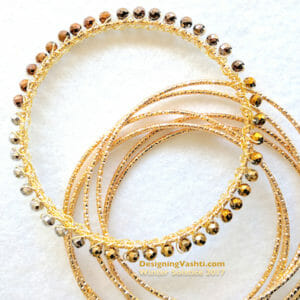
The stackable bangle sets I bought at Walmart this week.
I covered a slim gold bangle with gold wire crochet and metal beads.
Materials
This section looks long because it includes tips for substituting with items you have on hand.
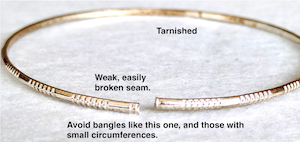
Bangle “blanks”: Look for thin, narrow, permanently closed (not hinged or locking) metal bangles. They’re often sold as a group to be worn stacked, meaning all at the same time. If they are labeled with a size, choose only “large” because any crocheting you add will reduce the final inner circumference. I don’t want any tarnishing or chipping, so I prefer to buy them exposed to air without a package wrapper. If they have soldered seams, check them for strength. This is especially important for gifts because you don’t know how much force someone will use to slide it on over their hand. I only buy them locally so that I can test the seam and finish of each one. Over the years I’ve kept an eye out for them in places like Claire’s, Wal-Mart, Target, etc. The quality varies wildly. I can recommend the ones in Wal-Mart now (pictured). They come in bunches of 15-18 bangles for $4.88.
Yarn, if you’re not adding beads: Here’s where you can use the interesting embroidery braids, flosses, and fine novelty yarns languishing in your stash. My first choice is a fancy metallic Kreinik braid type if I’m not adding beads. My little 5-meter spool can cover two, possibly three skinny bangle blanks. Some fingering and lace weight yarns would work, and any crochet thread size. Beginners: start with a sock yarn or size #3 or #5 crochet thread, and no beads. Then graduate to a fancy metallic floss/braid type, then try very fine wire without beads first (30ga to 32ga thickness).
Yarn if you’re using beads: I’ve had the best luck crocheting with wire. The wire holds the beads in place the best for me. Wire is a unique crochet experience. If you’ve never tried it, please see my newsletter issue on it, or the Embracelet pattern.
Crochet hook: This is easy. Use whatever hook size that makes it easiest for you to crochet tightly and evenly.
Beads (optional): I like very small beads for this. I don’t go much larger than “e-beads” (size 6 seed beads). Beads with small holes also work better for this so that they don’t jiggle and shift around. This means gem, chip, and pearl beads are great! You can use a larger accent bead for a tassel finish.
Sealer, stiffener, adhesive, fine yarn needle, etc. (optional): You might wish to use a fabric protectant such as Scotchgard if your yarn is an absorbent fiber. I used three coats of clear nail polish to secure a tassel of metallic embroidery floss because it doesn’t hold knots well. I may use this, or some clear fabric paint, on the inner surface of a bangle to keep the stitches from twisting around the bangle.
Pattern Abbreviations
ch = chain stitch
sc = single crochet (UK/AUS: dc)
ss = slip stitch
Crochet a Basic Solstice Bangle
Step 1: Leave a 4″ yarn end that you can crochet over it, weave in later with a needle, or leave hanging with a bead or tassel. Crochet all stitches tightly. Slip stitch around the metal bangle tightly, *ch 1, ss, repeat from * until bangle is covered.
This is up to you: use fewer stitches to cover the bangle by stretching them taut around the bangle. They’ll be less likely to twist and shift around the bangle, and you’ll see more of the metal. Or, use an excess of stitches for a different look: I love the wavy zig-zag texture of the (ch 1, ss) combo. You’ll see much less of the metal this way.
Step 2: When you’ve crocheted the number of stitches around the bangle that you like, join the last stitch to the first one. I remove my hook from the stitch loop, insert the hook in the first ss, and pull the last stitch loop through it with the hook, then fasten off.
Step 3: Decide what you want to do with those yarn ends. Weave them in. Or, string an accent bead onto both ends, knot them, and trim ends close to the bead. A third option is to tie the ends together, cut more yarn lengths, then add to the yarn ends and tie into a bundle to make a tassel.
Step 4, optional: If you add a fabric protectant, test a swatch first. You could coat the inner rim with a glue or sealer to prevent stitches from twisting around the bangle. Add a drop to knots if they might loosen with wear.
Add Challenge
The basic Solstice Bangle pattern is crazy simple, right? Add just one variable and it’s a different experience. For example:
Add other stitches or change them completely. You could try all sc. I used such a fine red wire for a beaded bangle that I had to use sc instead of ss to make them more visible. Embracelet is an example of using love knots.
Hold two different glittery strands together as you crochet, or use 6-strand embroidery floss. (Managing multiple plies as you crochet so tightly around a bangle does get tricky.)
Just add beads. That’ll keep you busy! I like to add one or more beads to the ch of the (ss, ch 1).
Use wire as the yarn. A thicker wire such as 26ga may be difficult for some people to crochet with, but it sure shows up well, and makes a statement even without beads. It also holds up nicely and is less likely to twist around the bangle. Finer wire is great for showing off beads.
Try to crochet the wire as tightly as you can. (It will still be looser than you intend.) When you’re done, tug on each bead a bit while also giving it a half-twist. This will tighten the stitch around the bead and bangle. I also compress everything by pressing and scrunching the stitch loops together into the bangle. I guess you could consider this a “blocking” method for wire jewelry?
Site-wide Search
Vashti’s Crochet Shop
Get the Newsletter
Sign up to receive Vashti’s Crochet Inspirations Newsletter in your inbox monthly.