How to Block Crochet Five Ways

An antique, translucently lacy star stitch before blocking and after.
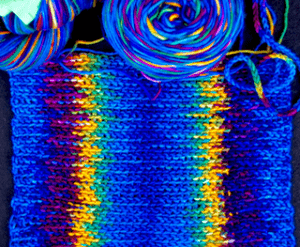
View the high-res version of the above image.

Some of us only use one or two of these five, but you may discover that you use more blocking methods than you thought. (I hope we all use at least one!)

One of the methods below could be the perfect finishing touch for your next crochet project, depending on your yarn and project type. They’re listed from the gentlest to the most aggressive. It also depends on your own preferences. I’ve found that each crocheter has a favorite method.

Special considerations for a specific stitch, technique, or project follow.

1. Dry Block (the gentlest method)

Love knot mesh crocheted in wire always needs to be "fluffed up" manually. I use a crochet hook to do this.
On the left, love knots crocheted in wire are “unblocked”. On the right I’ve manually “dry blocked” them using a fine crochet hook to open them up.

I also think of dry blocking as “hand ironing”. Crocheters do this without even knowing that it has a name. Stretch, spread out, and flatten your crochet piece on something flat. One’s knee always seems to be nearby! Using one’s knee or upper leg is not too bad for a small item, especially if you’re wearing jeans or other fabric that provides a bit of friction. (Don’t use it for measuring a gauge swatch though.) If your surface is hard and flat, such as a table, you can also press it with your hands, i.e. “hand-iron” it.

I’ve read that some crocheters prefer the softer and more handmade look of their thread lace when they dry block it only. (Wet blocking thread crochet is more common, and it can include a stiffener; see below.)

Isn’t wire crochet a great way to illustrate dry blocking?

2. Damp Block

Also known as spray blocking and blocking with mist. Spritz liberally with water, especially the edges, then spread out on a toweled surface to dry. Use a bath towel on a flat surface; the towel offers some friction that I find in most cases replaces the need for pins.

This method is my personal favorite. I blogged about it back in 2010. I also combine it with methods 3 or 4 below: usually I damp block every 6″ to 12″ of rows while I’m crocheting, and then do a final wet block when you’ve completed the project. I like damp blocking partly because it’s the most portable, and partly because it’s fast. It works great for the types of yarn I tend to work with: bamboo, rayon, and plant fibers in general; also merino and alpaca. For most of the year here in humid Florida, wet things simply take too long to dry. 

3. Wet Block

Wet blocking is when you fully immerse the crochet item in water. It’s a simple method that has several options for adding a whole range of effects to your projects. Practice wet blocking and it will develop into an art form. Try adding a fragrance, conditioner, fabric softener, or a stiffener to the water.

Depending on the yarn fibers and colorfastness, soaking can be a benefit or a liability. You can soak plant fibers like cotton, linen, hemp, rayon in warm or cool water a bit. This is Doris Chan’s favorite method.

For wools, immerse briefly in cool water to avoid fulling (felting), then remove excess water gently before spreading out on a toweled surface to dry. I like to add a little hair conditioner to the water if the yarn is wool or silk.

ShamWow super absorbent microfiber cloths are really helpful for speeding up the drying. I use them instead of, or on top of a bath towel on a table.

4. Steam Block

Steam blocking specifically uses the power of moist heat. This method can really pay off if you carefully test first. With practice you’ll develop the visual and tactile cues for how close to hold the steamer to your stitches and for how long, depending on the yarn. You’ll also develop a sense for which effects to aim for with a given yarn and stitch pattern. 

Why risk using this rather aggressive blocking method? It can give acrylic yarns the sheen and drape of silk. Steam blocking is an art that can bring out extra softness and luster in some silk, camel, and llama fibers too.

5. Pin Block

Pin blocking includes stretching an item on blocking wires while wet or steamed. The most important thing about pinning is to use rust proof pins. I don’t own blocking wires, but I sure admire the knitted lace wraps that have been blocked with them. (Personally and non-professionally, I have only ever pinned crocheted snowflakes.)

Special Blocking Considerations

You might enjoy this newsletter issue about the art of blocking crochet. 

Picots 

Tug and pinch each picot to round it out and make it visible, adding more water to them than the rest of the stitches, if necessary. Sometimes I roll each picot between my fingers to compress them and even out their roundness.

Love Knots

Most love knots are intended to be air-filled like a semi-inflated balloon. If yours are, spritz lightly with mist and damp block selectively: stretch and flatten stitches around the love knots. Gently smooth the love knots themselves so that you don’t flatten, deflate, stretch them out, nor weigh them down with too much water. You might feel like it’s not worth blocking them at all, but I tested this in my love knot classes and people could tell the difference.

Conversely, if you want yours to have the limp and collapsed look that is typical of the love knots in the tropics, feel free to wet block and perhaps even steam block them.

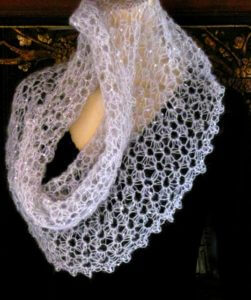
Lacy Tunisian Crochet

Class: Tunisian Eyelet Meshes (Crochet Meshes: The Weightless Wrap & Variations)
Blocking Weightless Wrap

The lacy Tunisian crochet that I’ve done responds beautifully to wet blocking. Aim for squared filet eyelets. I tug strongly on the return pass lines to straighten, flatten, and lengthen them evenly. Tug vertically on extended Tunisian stitches to fully extend them, if you used them. 

Garments

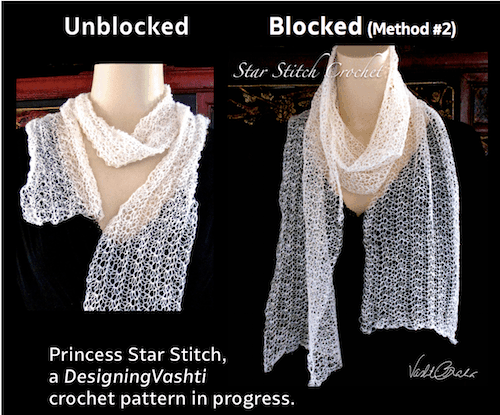
Wet blocking is the method here for the stylish fit, silhouette, and elegantly flowing, breezy movement many garments and accessories are intended to have. It’s no wonder that it’s Doris Chan‘s favorite method. Be sure to block the accessories that need to drape stylishly, such as wraps, scarves, collars, and even necklaces.

If you used acrylic yarn, steam blocking can bring out all the fashion drape and gleam, as if you used silk! 

Note that steaming some animal fibers will soften them enough to wear against the neck.

Home Decor

Home decor projects, especially doilies, snowflakes, and afghan squares (also flowers and other appliques) usually need to be as perfectly flat and square, or round, as possible. Wet blocking with pins, wires, or dowels is common with these items. Sometimes starch is added (especially for snowflakes). 

And finally…for all blocked items by all methods:

Let air dry completely, then admire your work and bask in the compliments!

This is a revised version of an earlier (October 2014) blog post at Vashti’s Crochet Pattern Companion. It also forms the basis of a chapter I wrote for the Crochet Guild of America’s Fundamentals of Crochet Masters Program.
Posted on 9 Comments

Yarn Overs, Yarn Unders (Newsletter Overflow)

If an image is missing, view it herehttp://www.flickr.com/photos/vashtirama/

Close-ups of Yarn Overs, Yarn Unders, and Yarn-to-Front.
If image is not displaying, go to https://flic.kr/p/DyV1A3.

Yesterday’s issue 88 of Vashti’s Crochet Inspirations Newsletter had only enough room for yarn over highlights. Who knew I’d discover too much material for a newsletter?

Here’s the rest of the story.

More on Yarn Over Basics

I described the basics of yarn overs and yarn unders in the issue already, but that only goes so far. Yarn overs are actually kind of tricky—at least when you think about them and watch yourself in slow motion. I see this in classes. Yarning over is one our most ingrained habits. Prefer a video to the close-ups above? I like PlanetJune’s.

“Clockwise” Depends on Your Point of View

Mixed yarn overs in a foundation chain.
This can also happen if the loop falls off the hook while crocheting the chains and twists before you place it back on the hook. If image isn’t displaying, see it at https://flic.kr/p/DyXB97

Another thing about yarn overs is the rotational movement. It would be easier to describe them if they were linear (just move your hook along a line from point A to B). Instead, we describe what the hook’s motion is, or focus on the yarn’s motion: a “yarn under” is also a “hook over”.

Some describe the motion as clockwise vs. counter (anti-)clockwise, which adds its own ambiguity. The motion your hook and yarn make for a yarn over is counterclockwise…IF you’re looking at it from the shaft end of the hook and IF you’re crocheting right-handed. The same motion suddenly appears clockwise if you watch it head on (from the head end of the hook).

Yarn Unders For Simple Stitches

I’ve swatched several kinds of familiar stitches with yarn unders instead of yarn overs. The stitch didn’t always look different, but in every case, it’s denser and tighter. I struggled at times to maintain an even gauge and to loosen up, depending on the stitch and yarn.

When I’ve preferred the feeling of using yarn unders, they seem lean and efficient, like taking a shortcut. It’s tempting to use yarn unders when finger crocheting and when completing reverse single crochets and loop/fur stitches.  I’m sure a large project with them uses up less yarn! Usually I prefer yarn overs though. I’m used to rhythm of it and the control they give me over my gauge. Sometimes they feel sort of “luxe” or fancy, compared to yarn unders.

Slip Stitches and Single Crochets

Swatch shows single crochet stitches crocheted with yarn-unders only, in rounds with no turning, and with variations: some rounds are moss stitch (chain 1, sc), some are extended sc.If you want to do the old style slip stitch crochet that is so dense it’s waterproof, use yarn unders!

The single crochet stitch (sc, or UK: dc) requires just two yarn overs and is visibly affected by changing just one of them to a yarn under. I expected to find yarn unders in Mark Dittrick’s Hard Crochet book on sculpturally stiff sc.

Change the first yarn over and you get sc with crossed or twisted fronts that look very much like my variation pictured here.The 1886 crossed stitch is significant to me because it was in the influential Complete Encyclopedia of Needlework by Thérèse de Dillmont. I’ve seen the same stitch repeated in other crochet books since. (I don’t know if it occurs before 1886.)

Change just the second yarn over and you get what Rebecca Medina‘s modified sc for tapestry crochet.

Here’s another interesting reason to use some yarn unders for your sc. In her Freeform Knitting and Crochet book, Jenny Dowde recommends alternating a yarn over with a yarn under when starting a surface sc. Doing this prevents the raised row of sc from slanting to the left or right.

Two other stitches that show off yarn unders nicely are half doubles (hdc or UK: htr) and love knots. See the issue for more on those. View the hdc swatch diagram from the issue in high resolution.

A newsletter subscriber mentioned to me that the designer Aoibhe Ni uses yarn unders for special texture effects in her lovely Tunisian crochet designs.

How Many Types of Yarn Overs?

Two crossed loops (half hitches) have been "cast on" at the end of a Tunisian forward pass row.
A method I used for the Five Peaks Shawl.

I think of yarn over types in terms of how to get more yarn on the hook for making stitches. So we have the two obvious types: wrap it one way (Yarn Over), or the other way (Yarn Under).

A third way to add loops to the hook is the crossed loop, which is a simple cast-on in knitting. It’s also a half hitch in macramé. This loop has a twist in one direction or the other, so there are actually two types of them. I used them for Tunisian crochet to increase stitches along one edge of the Five Peaks Shawl.

This kind of loop was the subject of one of my earliest newsletter issues: “A Very Different Kind of Crochet Stitch“. I love Sue Perez’ “Forward Loop Chain” blog post about them.

The yarn-to-front (ytf) shows at the top of this page with the two yarn over types even though strictly speaking it isn’t one. It’s easily confused with the yarn under.

The Yarn Over in other Languages

I found this handy information in the 1989 Vogue Dictionary of Crochet Stitches by Anne Matthews. Here are the non-English pattern equivalents listed for Yarn Over (US) and Yarn Over Hook (UK):

  • Jeté (French)
  • Umschlag (German)
  • Gettato, abbreviated gett (Italian)
  • Arrollado (Spanish)

One More Thing!

I mentioned Jane Rimmer in the issue because I want to make sure you know about her two-part article for CGOA’s Chain Link newsletter: “Yarn Over History and Technique” (Autumn 2014) and “Yarn Overs Part 2: Techniques” (Summer 2015).

Beyond Basic Crochet

"Wrap Map" schematic for the Eilanner Shawl, an Advanced-Intermediate Tunisian crochet pattern.
Above is most of the “Wrap Map” for Eilanner, a Tunisian crochet pattern rated Experienced Skill Level.

This section is for crocheters who are comfortable with the basics. (How do you know if you’re ready? Have a look at Crochet Basics in Depth.)

It feels so natural to progress along a flow of crochet experiences that it’s easy to forget how unique our own crochet skill sets become. When we attend crochet conferences, I see us as walking worlds of art: building one-of-a-kind inner “crazy quilts” of crochet experience, and following our own individualized learning plans.

Beyond the Basics Tips & Tutorials

I wrote the tutorials, tips, and tweaks for this section with an eye toward connecting them to specific basic principles, rather than to a standard skill levelWe’re all crochet specialists and beginners simultaneously, in different ways.

  1. How to Crochet Love Knots
  2. Crocheting the Love Knot Mesh
  3. Foundation Star Stitches, Step by Step
  4. How to Increase Tunisian Stitch Blocks
  5. When to Crochet BETWEEN Top Loops

Crochet Patterns by Skill Level

For Beginner- and Easy-level patterns, see the Crochet Basics, in Depth page. Note: if a pattern has more than one skill-level tag, it means the pattern includes options or variations that vary in skill level.

Read More

  • View all blog posts tagged with shaping
  • View all blog posts tagged with class
  • View all blog posts tagged with stitch tech
This linked index is self-updating so be sure to bookmark this page.

Hook-Led Gauge

Learning how to let your crochet hook determine your stitch gauge is possibly the most valuable skill a crocheter could develop.

Why is it so Important?

Starwirbel Class: Star Stitch Crochet Lace (downloadable pattern)
A hook-led gauge gave rise to Starwirbel

Crocheters traditionally fall into a habit of making their chains and slip stitches tighter than their other stitches, regardless of their hook size. Some may be taught to do this unintentionally, or because it can improve some thread crochet patterns.

Other crocheters are actually using a”yarn-led gauge”. They use the yarn as a gauge guide. Crocheters accustomed to mostly cotton yarn or thread, which is not stretchy to work with like wool, tend to do this.

Hook-led gauge is necessary for:

How Do You Do It?

Every crocheter starts out with a natural gauge, often called the “crocheter’s hand.” One person may crochet more tightly (or loosely) no matter the size of the crochet hook they’re using.

Start by watching the stitch loops as you crochet.

If the loops tighten, notice when and where. It might even be just after you complete the stitch. (I’ve seen crocheters purposely make a loose stitch, then unwittingly yank the yarn just before beginning the next stitch.) If taller stitches are consistently tight, you might be making each stitch on the tapered neck of your hook instead of the shaft, where it stops tapering nearer to the thumb rest. If you have a mixture of tight and loose loops, consider how you are holding the yarn. These are just a few things that could be happening.

How to know you’ve met your goal?

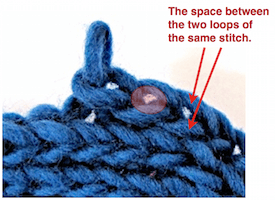
Make stitch loops that accommodate the diameter of the hook. This means use the shaft part of the hook as a guide, where its neck stops tapering before the thumb rest. Compare the girth to the space between the top two loops of your stitches. It’s a very good sign if it looks like there’s enough space for your crochet hook to fit.

Now just practice enough to update the muscle memory in your hands. Your fingers will start to feel the difference and your eyes will develop visual cues.

You’ll be well on your way to creating dramatic effects with fancy, skinny yarns and oversized crochet hooks! Sometimes I think of it as “crocheting with air” — that’s how it might feel to use a very big crochet hook with a fine or very stretchy yarn.

What if You Don’t Like Your Hook-Led Gauge?

I used an H (5 mm) crochet hook with fine sock weight yarn for a luxuriously soft Jempool Scarf.

Say you’re accustomed to being a tight crocheter, but now you can crochet with a hook-led gauge. Congratulations! BUT—you need tighter stitches for a certain project. What do you do?

The answer is the same as if you crocheted too loosely before a hook-led gauge and need looser stitches: you change the hook size, not your crocheting. Change to a smaller hook size for tighter stitches, or a larger hook size for looser stitches. This is why patterns always add “or size needed for gauge” after the stated crochet hook size.

Hook-led gauge is actually an intermediate skill that leads to advanced crocheting, although it’s not listed in any of the standard skill level descriptions.

You might feel a bit outside of your comfort zone at first. If so, just tell yourself that you’re investing in your hobby: a world of exciting new stitches and designs will open up to you.

An earlier version was published March 21, 2010 at Vashti’s Crochet Pattern Companion blog.

Vashti’s Crochet Classes

Quite the array of herringbone chain examples! From new Tunisian stitch patterns to new jewelry cords, picots, and tambour (surface) slip stitches.

Upcoming Online Class: May 18 & 19, 2022

An exciting new online crochet class is scheduled for mid-May 2022. I love creating new crochet classes! Register with CGOA.

Registration for this class closes soon: May 15!

How to Crochet Herringbone Chains – May 18 & 19, 2022

This is a two-hour class that meets twice for 1 hour each time: Wednesday May 18 & Thursday May 19, 1:00 pm –2:00pm Central Time. Registration closes May 15 or when the class is filled.

Not only is this is a new class, I don’t think anyone else has taught it either. Its Resources Page: https://www.designingvashti.com/crochet-herringbone-chains-class-resources/.


I Love Teaching Crochet.

This page is an overview of Vashti’s crochet classes and student feedback on them. Go straight to the student feedback. Be sure to check Upcoming Classes & Events. You might enjoy my class resource pages.

These topics have been presented as three-hour classes at national crochet conferences, yarn shops, and as three-day workshop formats around the USA.

Contact Vashti about teaching crochet classes and workshops for your group.

Vashti’s Crochet Classes Consistently Sell Out.

Contact Vashti about developing crochet classes and workshops tailored to your group.

Recent Class Topics

Zegue-Along: Tunisian Scrap Zapper (Project & Design) – April 27 & 28, 2022

A two-hour class that meets twice for 1 hour each time: Wednesday, April 27 & Thursday, April 28, 11:00am – 12:00pm Central Time. Registration closes on 4/24/2022 or when the class is filled.

This is a new class. Its Resources Page: https://www.designingvashti.com/zegue-along-tunisian-crochet-class-resources/.

Self-Healing Stitches and How to Cut Them – March 8 & 9, 2022

A two-hour class that met twice for 1 hour each time. This class has been held several times at in-person events since 2017. This online version is a first for this often-requested topic.

See its updated Class Resources page for plenty more.

Extending Forward and Return Tunisian Stitches – Feb. 1 & 2, 2022

A new three-hour class that met twice for 1.5 hours each time. This recent blog post and free afghan block pattern is a great example of what can happen when you extend both forward and return Tunisian stitches in a pattern.

Fancy examples of extending only some return pass stitches would be Rivuline, and Kiri. For a simple and satisfying experience of extending only the forward pass stitches, see Shakti Scarfythings.

Have a look at its Class Resources Page.

(2019–2020)

I’ve recently completed two online classes for CGOA’s first virtual Chain Link conference: Tall Stitch Virtuosity and Big Hook Slip Stitch Crochet.

(2016–2018)

Draping cowl and star stitch pattern shapes for The Starwirbel Way Crochet Class by Vashti Braha
A popular class.

Student Feedback by Class Topic

Here’s what students say about Vashti’s crochet classes (culled from anonymous class evaluations).

Slip Stitch Crochet Classes

  • I have learned more than I ever imagined possible in 3 hours. Vashti is an amazing teacher, so generous and very, very talented in the teaching department. Thank you, thank you, thank you!
  • This class was challenging – really stretched my mind to new limits. Ms. Braha is so calming and patient.
  • Excellent! So much new information! Yay!
  • More Vashti, more slip stitch!

Love Knot (Lover’s Knot, Solomon’s Knot) Classes

  • Best class ever! Thank you!
  • Vashti is a natural teacher – very organized and clear!
  • A joy of a class!
  • Excellent class! I’m a new crocheter and it was accessible and challenging.
Views of vest and its unique Love Knot stitch pattern for Flowerfall Crochet Class by Vashti Braha
Vashti’s newest crochet class topic combines a new love knot stitch pattern with easy steeking and convertible construction.
  • Loved this! Will definitely use it.
  • Well researched, plenty of resources, swatches, projects.
  • Always enjoy Vashti’s informed teaching style!
  • Love it!
  • This was a wonderful class!! I really learned many new techniques that I can’t wait to try in designing. Thanks, Vashti!

Tunisian Crochet Lace Classes

Class: Tunisian Eyelet Meshes (Crochet Meshes: The Weightless Wrap & Variations)
Award winning Weightless Wrap: The eyelet lace design that inspired the earliest Tunisian lace classes.
  • Great class! I want more!! Lots of info.
  • Vashti has brought Tunisian to the next level! I am addicted to the new technique that we learned! Great class.
  • Can’t wait to get started!
  • I loved this course! I’m excited about new Tunisian stitches and techniques – thanks!
  • Innovative, taking Tunisian to new heights! Great visuals – large swatches, projects. Awesome!
  • Great instructor and fun techniques.
  • Very detailed, learned a lot.
  • Great handouts & instructions.
  • Great website & blog. Love the designs. Thank you!
  • Terrific class – really appreciate Vashti’s historic perspective on the art!

The Beauty of Antique Love Knots Class

  • Great class! Enjoyed and learned some great new ideas.
  • Well-paced class – she was excellent!
  • History, resources, technique – can’t wait to do more.
  • I especially like introducing the historical perspective & designers of old!
  • Awesome!
  • Great class!

Creating Crochet Jewelry Class (2012)

  • Not only is Vashti very knowledgeable but her very fun and friendly character adds so much to the class and inspiration.
  • Very good class – instructor knowledgable – great teacher!

The Rave Reviews Continue…

Even MORE About the Love Knot Classes

  • Fabulous handout. Good information. Clearly Vashti knows her knot stitch.
  • Great workshop – neat samples.
  • Learned new techniques, great class.
  • Fun class, well organized.
  • This was my first crochet class. It pushed me and inspired me. I can’t wait to get to work (play).

Even MORE About the Tunisian Crochet Lace Classes

  • Really a great class! I’m already dreaming up design ideas.
  • Love the class, great teacher, great tips.
  • Learned more than I expected–very interesting class.
  • Wonderful stitches, great ideas.
  • Great techniques, inspirational.
  • Excellent class.
  • Great class – lots of info.

Even MORE About the Slip Stitch Crochet Classes

  • I have learned more than I ever imagined possible in 3 hours. Vashti is an amazing teacher, so generous and very, very talented in the teaching department. Thank you, thank you, thank you!
  • Great class! Vashti is definitely a pioneer for the “new slip stitch technique.”
  • I never knew the slip stitch could make such a beautiful fabric & that it’s so versatile.
  • Fabulous! Instructor made me feel as an equal – which was delightful. Super friendly and passionate. 
  • I left with a great appreciation for a stitch that I once didn’t value. I look forward to dreaming about all the possibilities. Thank you!
  • More slip stitch classes from Vashti–fabulous
  • Makes me want more–great class!
  • So, so great! Learned lots and had fun.
  • A joy! Learned so much. 
  • This could be very useful in garment design. Thanks Vashti!
  • Wow!
  • Very interesting! Learned some new techniques that will be fun to use in future projects.
  • Excellent class – learned a lot!
  • Instructor was very patient–she took the time the students needed. Was unfamiliar with this type of crochet so did not always understand. She was very good!
  • Enjoyed looking through all the samples that Vashti brought in. They were very inspiring.
  • Vashti was very enthusiastic when teaching the class and I think that spread throughout the class.
  • Vashti is a gentle teacher who is very patient!
  • Fabulous fabrics, great techniques, new way of looking at and thinking about a stitch that normally is rather neglected. A++
  • As a beginner, I was unsure but instructor was very good, easy to understand.
  • Very interesting. Learned a lot and will use this in my work.
  • Thanks so much for offering this wonderful class!
  • Vashti is very calm and that makes her very easy to listen to. She does an awesome job!
  • This workshop was filled with so many exciting possibilities for future projects! I enjoyed learning the history too.
  • Great history of techniques. Fascinating.
  • Vashti is really great at communicating and seeing where we go wrong (or think we do) and pointing out and explaining how to fix and when we are right.
  • This class was challenging – really stretched my mind to new limits. Ms. Braha is so calming and patient.
  • Awesome class!! Thank you.
  • Excellent! So much new information! Yay!
  • Yeah!