Today I’ll show you how to “emboss” Tunisian return pass crochet stitches step by step. The complete pattern for the blanket square is also included below. The background stitches are Tunisian extended simple stitches (TES). The starry groups are extended Tunisian Yarn Overs (TYO) in contrasting colors.
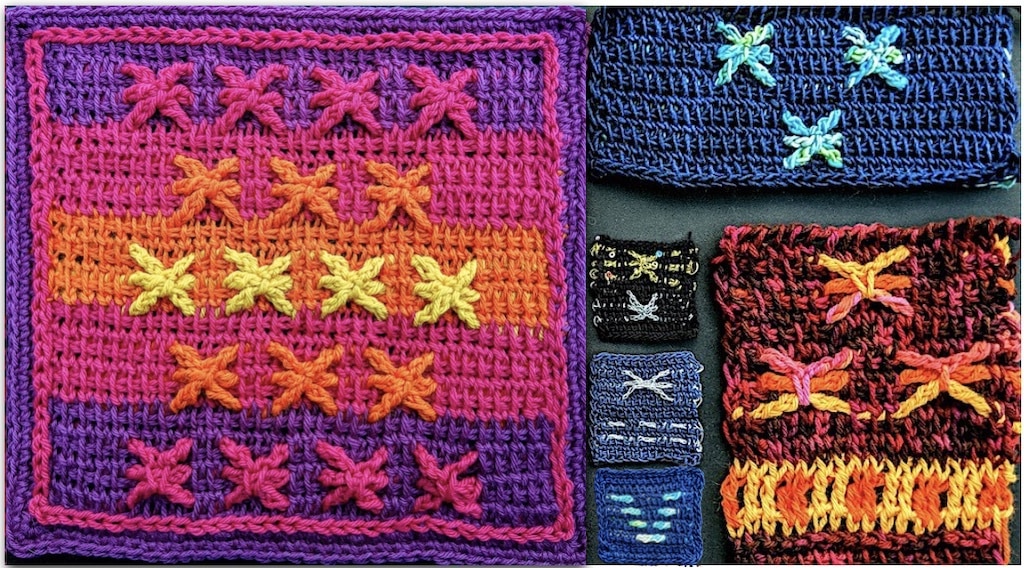
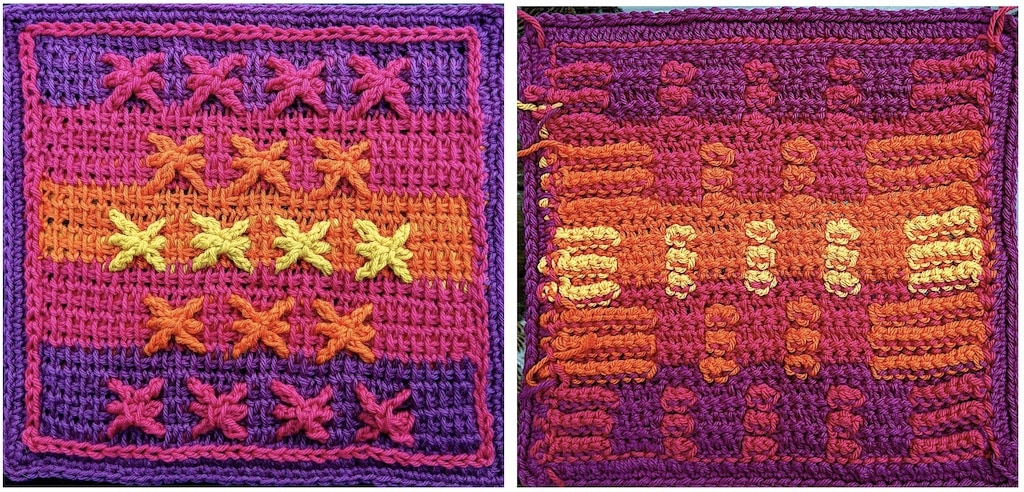
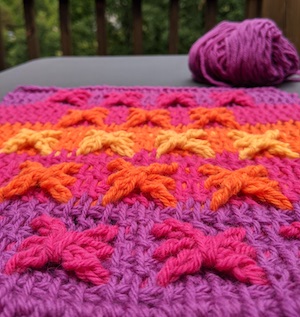
My 12-inch square for Knitter Knotter’s 2021 Tunisian Blanket Crochet-Along (CAL) features this novel color work method for Tunisian Crochet. The finished 12″ square is the one on the far left in the image above.
About the 2021 Tunisian Square CAL
I love how the CAL is going! Host Arunima Goel has created a fun way for designers to contribute a square, and for crocheters to experience new Tunisian stitches. My square is #18. By the end of 2021 there’ll be 24 fresh and free intermediate-level 12″ square patterns.
Are you a Tunisian Crochet beginner? Or just need a quick review?
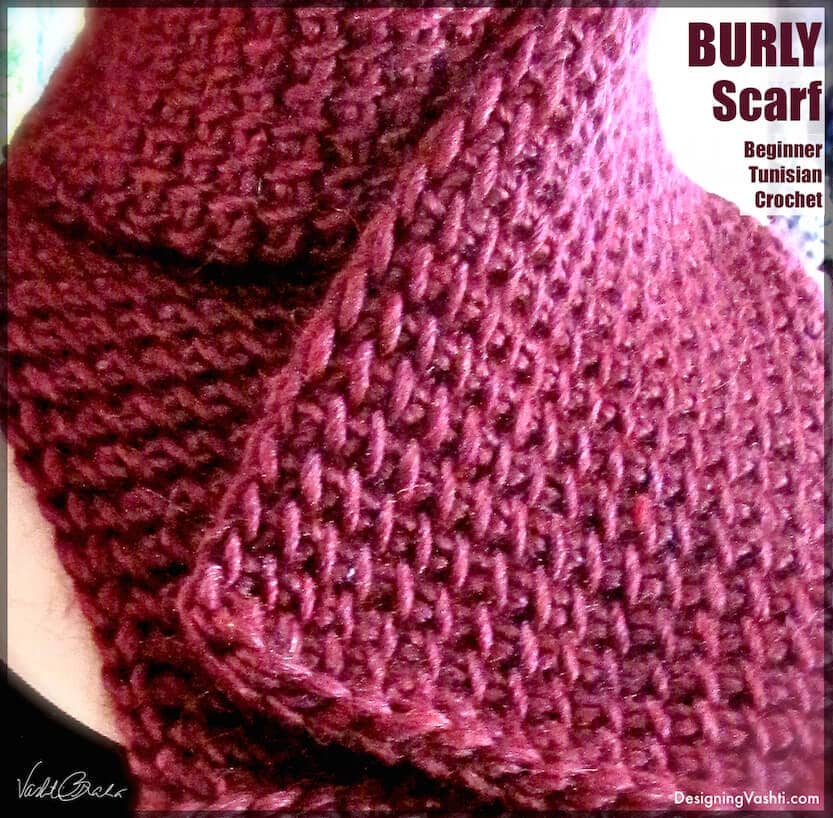
- The Burly Scarf is the simplest first project for a Tunisian crocheter. Treat yourself by using a chunky luxurious yarn!
- My ultimate overview: The New Tunisian Crochet
- A popular post: Tunisian Crochet Patterns: Five Basic Rules
- All of my Tunisian Crochet patterns in the shop
- Arunima’s 2020 CAL of beginner-level squares
This Colorwork Method
I seem to have stumbled upon a way to get a fully raised texture horizontally, and in a contrasting color. And, no lacy holes!
I wanted to test the usefulness of extending Tunisian Yarn Over (TYO) groups. Sometimes a group of several TYO can get loose and loopy, just like the yarn overs of really tall stitches tend to do in regular crochet. Extending tall stitches by adding a chain here and there while making them helps use up that slack. (For some alternatives to extending, see How to Fix Loose Loops of Tall Stitches.)
Embossing return stitches has potential.
- As a return-pass-based color work method it can be combined with existing Tunisian Mosaic, and especially Overlay methods. These are forward-pass-based methods that do fancy things vertically, with tall stitches. The possibilities boggle!
- Make other embossed shapes. Once you learn how to emboss Tunisian return stitches, you can make other shapes besides the starry groups you see here. Arrange horizontal bars in patterns. Make some longer or shorter. Modify the stars to have spokes in different lengths or amounts.
- As a fabric, it’s self-reinforcing yet lean and flexible. This is mainly thanks to the Tunisian Extended Simple Stitch (TES). If you’ve followed my newsletters and Tunisian classes over the years, you know I’m a big fan of extending Tunisian stitches. Normally TES fabric would be too thin or lacy for a blanket square. This is where the embossed rows come in.
How to Emboss Tunisian the Easy Way
For your first try, pick two colors and alternate them for each row: a main color (MC) for the background, and a contrast color (CC) for the raised embossed stitches. The colors will help you see where to put each next stitch.
Follow the practice swatch; it’s just twelve rows of ten stitches each. The instructions also explain the why’s, and pattern abbreviations as they come up.
Practice Swatch: How to Emboss Tunisian Stitches
Use two colors of wool-like medium-weight yarn and an 8 mm Tunisian crochet hook. Use your main color for every even-numbered row—its forward pass and its return pass—and a contrast color for every odd-numbered row. It means you’ll change the yarn color when you’re about to start each new forward pass.
This pattern is written for those who already know the basics of Tunisian Crochet. Please review them if necessary before continuing.
The first occurrence of an abbreviation is in bold.
Time needed: 20 minutes
Foundation chain: Chain 10 with your main color (MC).
- Row 1, Forward Pass (FP)
Skip the chain stitch nearest your hook and *insert your hook in the next stitch, yarn over, pull up a loop and leave it on your hook (two loops on your hook). Repeat from * in each remaining chain stitch: 10 loops on the hook.
Return Pass (RP): chain 1, *yarn over and pull through the next two loops on the hook, repeat from * until one loops remains on the hook. (This is a standard RP.) - Row 2
Chain 1 to begin a taller FP. Insert your hook in the next front vertical bar (vb), yarn over and pull up a loop—as if to make a Tunisian simple stitch. Then, chain 1: one Tunisian Extended Stitch (TES) made. TES in each remaining stitch of row. Standard RP. Attach contrast color (CC) and drop MC.
Note about changing color at the end of even rows only: Complete the last stitch of the RP and then switch to a different color. Leave both colors attached; keep the one you’re not using to the back of the work and out of the way. - Row 3 (CC), refer to photo #1 below.
In your swatch, look for the three return pass loops (a.k.a. horizontal bars, or hb) of the next TES. There’s a “bump” loop over the vb and two loops under the bump loop. Insert your hook in the bump loop, yarn over and pull up a loop and leave on the hook: one bump-TSS made. *Bump-TSS in the next TES, yarn over 3 times and skip the next 4 bump loops: a 3-Tunisian Yarn Over (TYO) group made. Slide the 3 loops together and tug on the yarn so they’re snug. Bump-TSS in each of the last 3 stitches: 9 loops on the hook.
Special RP: chain 1, *yarn over and pull through the next two loops on the hook* 4 times, chain 1, yarn over and pull through the next two loops, chain 1, repeat from * to * until 2 loops remain on the hook; drop CC and pick up MC, yarn over and pull through the last 2 loops on the hook.
What you just did and why: During the RP you worked off the TYO loops the same as you would any other Tunisian stitch on the hook; you also added a chain stitch after the first TYO, and after the second TYO. This stretches out the 3-TYO group to span the 4 stitches you skipped. In other words, you extended them.
Sure, you could just do 4 TYO when skipping over 4 stitches. It makes for a simpler RP if you’re new to TYO. However, a group of several TYO tends to get loopy looking, or kind of thick or lumpy. You also have less control over the extra ease the TYO groups add to the FP.
When you extend a TYO group by adding a chain stitch here and there during the RP, the texture is more streamlined, and you’re in control of the amount of ease the yarn overs add to the fabric.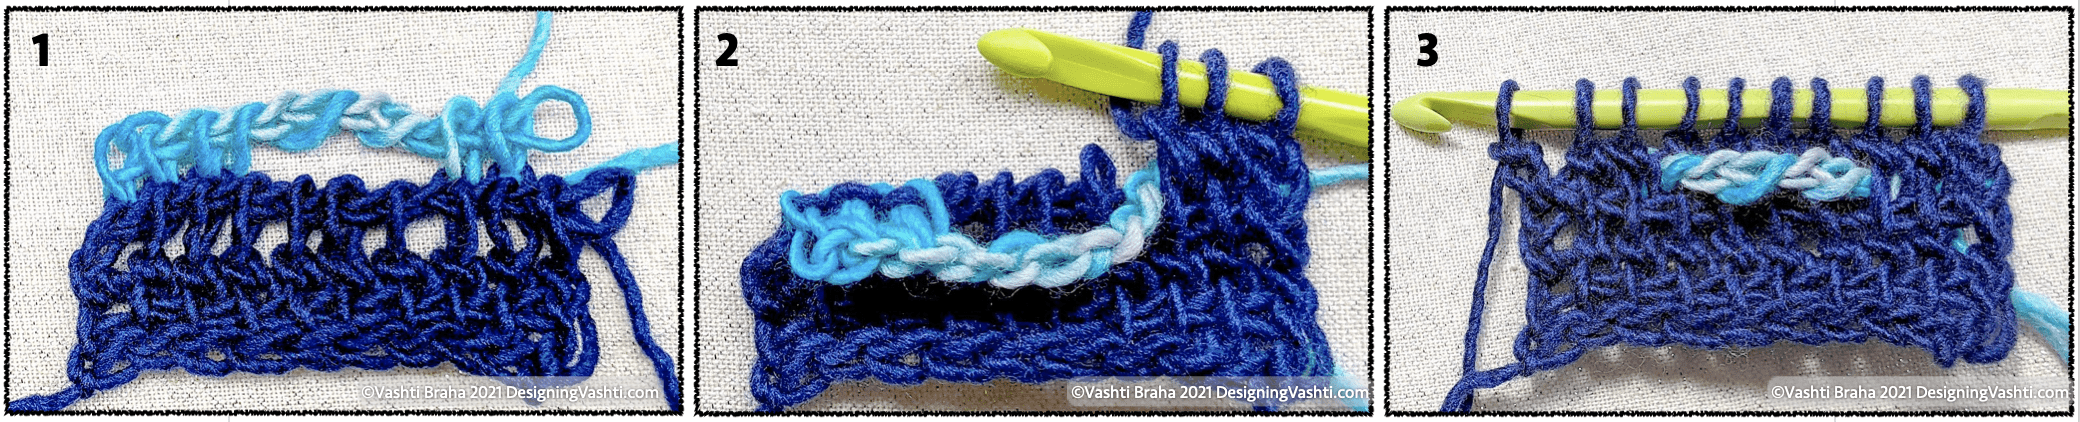
- Row 4 (MC), see photo #2 above.
All stitches will be crocheted into the row below Row 3: MC into MC. Chain 1, push Row 3 to the back and out of your way. TES in each of next 2 TES, flip Row 3 toward you and down so that you can crochet into the 4 TES behind it. TES in each of next 4 TES, flip Row 3 to the back again and TES in front of Row 3 into the last 3 TES of row: 10 loops on the hook. Standard RP. Drop MC, pick up CC.
Does your swatch look like photo #3? - Row 5 (CC), a repeat of Row 3 with fewer words:
*Bump-TSS in the next TES, 3 TYO and skip the next 4 stitches. (Remember to slide the 3 loops together and snug them up.) Bump-TSS in each of the last 3 stitches: 9 loops on the hook.
Special RP: chain 1, *yarn over and pull through the next two loops on the hook* 4 times, chain 1, yarn over and pull through the next two loops, chain 1, repeat from * to * until 2 loops remain on the hook; drop CC and pick up MC, complete last stitch. - Row 6 (MC), a repeat of Row 4 with fewer words:
Chain 1, TES in front of the contrast-colored row in each of next 2 TES of the row below, TES behind the contrast row into the next 4 TES, TES in front of the contrast row into the last 3 TES of row: 10 loops on the hook. Standard RP. Drop MC, pick up CC.
- Row 7 (CC), like Row 5 but with another chain in the RP:
Repeat Row 5 FP.
Special RP: chain 1, *yarn over and pull through the next two loops on the hook* 4 times, [chain 1, yarn over and pull through the next two loops three times, repeat from * to * until 2 loops remain on the hook; drop CC and pick up MC, yarn over and pull through the last 2 loops on the hook.
Why add a chain after the third TYO? This TYO group needs the extra length because it will be pulled up and bundled with two more TYO groups to make an Embossed Star.
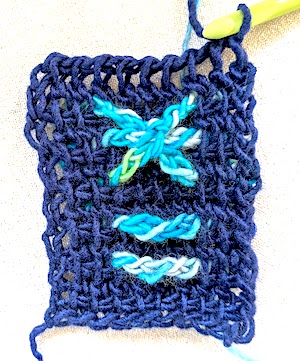
Can you spot all 3 chain stitches added after each TYO during the RP? It’s not always easy. This next photo should help:
– Red arrows point to the extra chain stitches added to a 3-TYO group during the return pass.
– Yellow stars show where the 3 TYO loops are.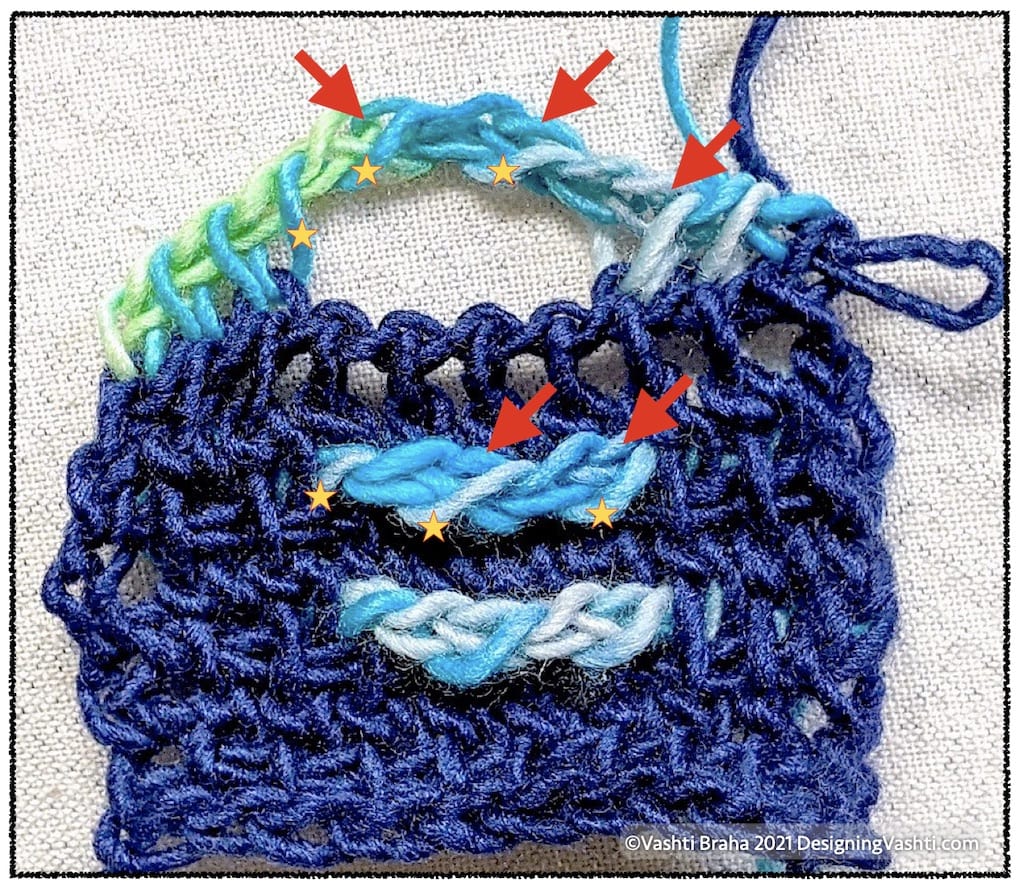
- Row 8 (MC)
Repeat Row 6.
- Row 9 (CC)
Repeat row 5.
- Row 10 (MC)
Repeat Row 6.
- Row 11 (CC), Similar to Row 7
Repeat Row 5 FP.
Special Star RP: chain 1, *yarn over and pull through the next two loops on the hook* 4 times, insert hook under both TYO-groups of Row 7 and Row 9 (first photo below), yarn over and pull through these 2 TYO groups and the next loop on your hook: you basically slip stitched the bundle together, and it counts as one of the extra chains. Yarn over and pull through the next two loops on the hook (the last of the 3 TYO loops), chain 1, repeat from * to * until 2 loops remain on the hook; drop CC and pick up MC, complete last stitch.
Second photo is what yours should now look like: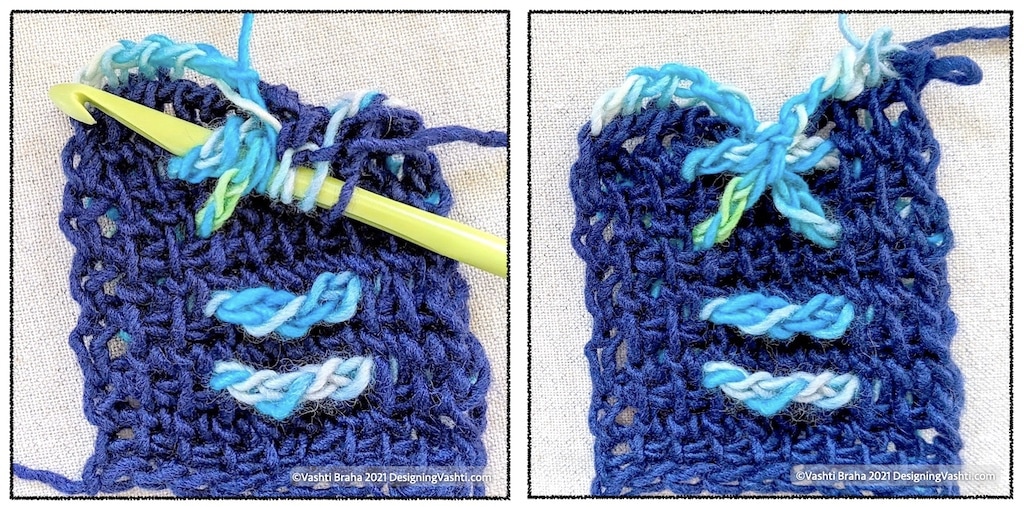
- Row 12 (MC)
Repeat Row 6, omitting color change at the end. Refer to the photo at the start of this pattern.
If you’d like to “bind off”, slip stitch or single crochet (sc) with MC in each TES of the row below and then fasten off.
Embossed Stars Blanket Square Pattern
Now that you’ve completed the Practice Swatch, above, you’re ready for the official 12″ blanket square of the 2021 Knitter Knotter CAL! I’ll be using the same pattern abbreviations explained step by step in the practice swatch.
The instructions look long due to the color changes of both background TES rows and the embossed star rows, and the fact that the stars are staggered.
Materials List
I used:
- Cascade Yarns’ Cascade 220® (100% medium weight wool) in 4 colors: purple (MC), rose (CC1), orange (CC2), and yellow (CC3).
- 8 mm Tunisian Crochet hook
Instructions
Foundation chain: Chain 34 with MC (or a multiple of 6 + 4).
Row 1 (MC): Skip the chain stitch nearest your hook and *insert your hook in the next stitch, yarn over (yo), pull up a loop and leave it on your hook (two loops on your hook). Repeat from * in each remaining chain st: 34 loops on the hook. Standard RP.
Row 2 (MC): Chain 1, TES in next stitch and in each remaining stitch of row. Standard RP. Attach CC1 and drop MC.
If you’re unsure of what to do, go back to the practice swatch earlier in this post. It’s a microcosm of this pattern, plus it explains special terms, special stitches, and the logic of the pattern.
Row 3 (CC1): Bump-TSS in each of the next 5 TES, *3 TYO, skip next 4 TES, bump-TSS in each of next 2 TES, repeat from * 3 more times, bump-TSS of each of remaining 4 TES of row: 30 loops on the hook. Special RP: chain 1, *[yo and pull through two loops on hook]*, 6 times to first yo of Tyo group, **[yo and pull through two loops, chain 1, yo and pull through two loops (the second Tyo loop), chain 1, yo and pull through two loops (the third Tyo loop)], chain 1**, [repeat from * to * twice, repeat from ** to **] 3 times, then repeat from * to * until 2 loops remain on the hook; drop CC and pick up MC, yarn over and pull through the last 2 loops on the hook.
Row 4 (MC): All stitches are worked into the TES of the row below. Chain 1, TES to the front in each of the next 5 TES of the row below, *TES to the back of the previous row into the next 4 TES, TES to the front in the next 2 TES, repeat from * three times, TES to the front in the last 4 TES: 34 loops on the hook. Standard RP. Drop MC, pick up CC1.
Row 5 (CC1): Repeat Row 3 FP. Special RP (omits one chain from each TYO group so that it’s a bit shorter): ch 1, *[yo pull through two loops on hook]* 6 times to first yo of TYO, **[yo and pull through two loops, chain 1, yo and pull through two loops (the second TYO loop), chain 1, yo and pull through two loops (the third TYO loop)]**, [repeat from * to * twice, repeat from ** to **] 3 times, then repeat from * to * until 2 loops remain on the hook; drop CC and pick up MC, complete last stitch.
Row 6 (MC): Repeat Row 4.
Row 7 (CC1): Repeat Row 3 FP. The Special Star RP creates the star bundles (refer to Row 11 of the Practice Swatch above): chain 1, *[yo pull through two loops on hook]* 6 times to first yo of TYO group, **[yo and pull through two loops, chain 1, yo and pull through two loops (the second TYO loop), insert hook under the two TYO groups below (from the bottom up), yo and pull through the next loop on your hook, yo and pull through two loops (the third TYO loop)], chain 1**, [repeat from * to * twice, repeat from ** to **] 3 times, then repeat from * to * until 2 loops remain on the hook; drop CC and pick up MC, complete last stitch.
Row 8 (MC): Repeat Row 4. Fasten off MC, attach and pick up CC2. Leave CC1 attached.
Second Group of Stars in orange:
Row 9 (CC2): Bump-TSS in each of the next 8 TES, *3 TYO, skip next 4 TES, bump-TSS of each of next 2 TES, repeat from * 2 more times, bump-TSS in each remaining 7 TES of row. RP: Ch 1, *[yo pull through two loops on hook]* 9 times to first yo of TYO, **[yo and pull through two loops, chain 1, yo and pull through two loops (the second TYO loop), chain 1, yo and pull through two loops (the third TYO loop)], chain 1**, [repeat from * to * twice, repeat from ** to **] 2 times, then repeat from * to * until 2 loops remain on the hook; drop CC2 and pick up CC1, complete last stitch.
Row 10 (CC1): Chain 1, TES to the front in each of the next 8 TES of the row below. *TES to the back of the previous row into the next 4 TES, TES to the front in the next 2 TES, repeat from * two times, TES to the front in the last 9 TES: 34 loops on the hook. Standard RP. Drop CC1, pick up CC2.
Row 11 (CC2): Repeat Row 9 FP. RP: Ch 1, *[yo pull through two loops on hook]*, 9 times to first yo of TYO, **[yo and pull through two loops, chain 1, yo and pull through two loops (the second TYO loop), chain 1, yo and pull through two loops (the third TYO loop)]**, [repeat from * to * twice, repeat from ** to **] 2 times, then repeat from * to * until 2 loops remain on the hook; drop CC2 and pick up CC1, complete last stitch.
Row 12 (CC1): Repeat Row 10.
Row 13 (CC2): FP: Repeat Row 9 FP. RP: Ch 1, *[yo pull through two loops on hook]*, 9 times to first yo of TYO group, **[yo and pull through two loops, chain 1, yo and pull through two loops (the second TYO loop), insert hook under the two TYO groups below (from the bottom up), yo and pull through the next loop on your hook, yo and pull through two loops (the third TYO loop)], chain 1**, [repeat from * to *twice, repeat from ** to **] 2 times, then repeat from * to * until 2 loops remain on the hook; drop CC2 and pick up CC1, complete last stitch.
Row 14 (CC1): Repeat Row 10. Drop both CC1 and CC2; attach and pick up CC3.
Third Group of Stars in yellow:
Rows 15 – 20: Repeat Rows 3 – 8 using CC3 (yellow) for the odd-numbered rows, and CC2 (orange) for the even-numbered rows. Then fasten off CC3.
Fourth Group of Stars in orange:
Rows 21 – 26: Repeat Rows 9 – 14 using CC2 for the odd-numbered rows, and CC1 (rose) for the even-numbered rows. Then fasten off CC2.
Fifth Group of Stars in rose:
Rows 27 – 32: Repeat Rows 3 – 8 using CC1 for the odd-numbered rows, and reattach MC (purple) for the even-numbered rows. Leave both attached to work the border.
Finishing
Round 1 (MC): Chain 1, sc in front vb of each TES of Row 32. Place 2 more sc in last stitch of the row for corner, then rotate to edge next side: 2 sc in each TES row-end and 3 sc in next corner. Continue edging last two sides with sc and join the round with a slip stitch (ss).
Round 2: Chain 1, turn, sc in each sc and 2 sc in each corner, join round with ss.
Round 3: If square is not quite 12″, add a third round of sc; otherwise, ss in each sc; fasten off MC.
Round 4, surface crochet (CC2): With right side of stitches facing, pull up a loop of CC1 from the wrong side to the front at the base of a sc of Round 1 that is near where you last dropped CC2. *Insert your hook in the base of the next Round 1 sc from the front to the wrong side to yarn over and pull up a loop to the front (two loops on your hook), then pull that loop through the loop already on the hook: surface-ss made. Note: Make these stitches as loose as possible while still appearing to match the gauge of surrounding stitches. Repeat from * in the base of each next Round 1 sc to corner. Treat each 3-sc group as one sc base and continue with surface-ss around until you reach the start of this round. Join to first surface-ss by removing loop from hook and pulling the loop through base of first sc to the wrong side with your hook. Fasten off and weave in ends.
Wet block to 12″ x 12″ dimensions.
Now that you know how to emboss Tunisian stitches…
I want to see what you do with them! I hope you’ll show them off and let me know where.
Check my Ravelry projects for items using this color work technique. Just before the pandemic I was preparing a new Tunisian Crochet class to teach for CGOA called Return Pass Hijinks. I’ll be incorporating elements from this blog post into the material for that future class.
Go see how Arunima did hers; she posts it on or before Wednesday morning, September 1, 2021. By the end of the year you can see her completed blanket with all 24 squares joined. I’m really looking forward to that.

[…] CLICK HERE FOR THE PATTERN OF SQUARE #18 BY VASHTI FROM DESIGNING VASHTI! […]
[…] types of colorwork with Tunisian get a boost from extended stitches. See my recent Embossed Stars […]