“There will be 3 other patterns available free for CGOA members only, each only for 1 week. Be sure you’ve renewed your membership or joined CGOA before you miss out!”
Today is the last day you can get this pattern for free.
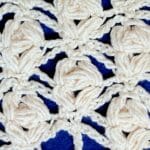
Shining Day is crocheted in a lacy stitch pattern that is flowing wonderfully off my [pink] hook. I think it flows so much because you crochet into chain spaces at an easy gauge.
A Flowing Foundation Row
This wide lacy rectangle is worked from the center out on both sides of the foundation row. You’ll have matching ends, each with a pretty picot border.
For a design like this, you wouldn’t want the foundation chains to look noticeable or feel tighter than the rest of its flowing lace. No problem! Andee uses a great type of foundation row. It’s not only stretchy, it has a nice texture that blends in.
About Yarn Amounts
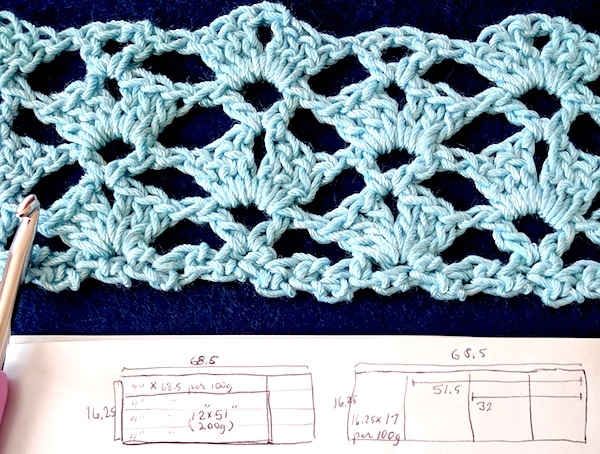
Andee used four 100g. balls of Lotus to get a wrap that is 16.25″ X 68.5″. Four balls is 1,024 yds (4 X 256 yds).
The Cone Idea
Some folks have wisely been ordering Lotus Z-Bombes, which are value-priced one-pound cones. One pound of Lotus is a bit over 1,100 yds, or about 4.5 balls. (I always allow a Z-Bombe to go a bit over a pound after subtracting the weight of the cardboard. I write the exact unique weight of each Z-Bombe on its tag.)
The Lotus Snacks Idea
One of several springtime color combos!
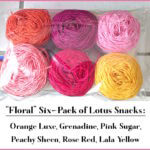
In my recent newsletter issue #90, I mentioned a multicolored Shining Day using a six-pack of Lotus Snacks. I think spring fever made me do it. I kept picturing a riot of floral colors like I do every spring.
Unfortunately I miscalculated the yarn amount for that in the newsletter. The mini Snacks are one-third the size of a regular Lotus ball: 85 yds per 33 g. Not one-half.
CORRECTION: A Six Pack O’ Snacks totals 512 yds, not the 768 yds I stated in the newsletter.
See my drawings above in that photo of my light blue swatch? That’s me figuring out that a two-ball (same as six Snacks) Shining Day would come out to 12″ X 51″ (or a bit longer).
My swatch is 11.5″ wide. I needed 46 foundation stitches to do 4 stitch pattern repeats.
Andee’s Shining Day pattern is definitely worth paying for if you miss the free version. It includes stitch charts and a photo-tutorial on making the picots.
Sure, a crocheted item can be quick and easy, but I mean producing patterns, teaching, and other business-oriented projects. For example, I completed two interesting Tunisian crochet patterns in 2017 that will appear in a 2018 book.
I should do this review every year! It’s easy to lose sight of the wins when so many projects are complex or long-term.
Favorite discoveries in 2017
Discoveries about crochet are what motivate me to design and teach!
Beaded Twisted Loop
Rosy Rosepuff swatch
Tripuff Tunic in progress
Crocheting a twisted loop fringe edging at the start of a row is so promising! Make it any length. Add beads to it without stringing them on first. I discovered this with Aquarienne. It was also the perfect thing for the border of Graven.
Discovering which crochet stitches are “self-healing” when you cut them (and why) is a game changer! See Zumie. Scroll down to see Lovatar.
My experimental yoke worked! The yoke of the Tripuff Tunic is just a draped scarf.
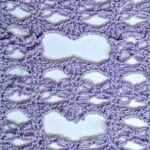
Rosepuff inspired new clustered puff swatches that make me swoon, like the one above.
I made too many discoveries that are too technical to go into while covering bangles with crochet in December and January! It was completely inspiring and rejuvenating.
When I matched my yarn stash to a favorite silk skirt I discovered two things. First, using the skirt’s colors is a tribute to a favorite thing that can inspire me indefinitely (past the life of the skirt). Second, I also matched my yarn colors to a favorite painting and realized chances are good that the yarns you add to your stash also correspond to the colors of favorite items because you are the common denominator.
DesigningVashti 2017 by the Numbers
Our Lotus yarn in magazines: Morning Dew Wrap by Kristin Lynn and I Do Shawl by Cindy Adams, both in Crochet!Magazine. I published two of my new Lotus patterns, Rosepuff Shawlette and Aquarienne. Two new Tunisian designs coming out in a 2018 book will also feature Lotus yarn.
12 blog posts in 2017 (monthly is ok but my overall average is 17.5 posts per year and I’d like it higher than that).
6 newsletters, so they came out bimonthly in 2017. Originally (2010) they came out every other Thursday. Overall, the average frequency is monthly. The six topics in 2017 were Hidden Pictures in Cut Stitches, Crocheted Ruffles, New/Favorite Stitch Patterns, Edgings That Multitask, Announcing a Ruana DAL-CAL, and Yarn Overs & Yarn Unders.
Posted 18 different crochet tips for new crocheters in Facebook and Twitter. One of them became a full blog post.
Favorite Designs in Development
These favorites link to their project pages in Ravelry if I haven’t blogged about them yet.
Lovatar, almost ready for steeking!
Love knot pattern I’m using for Lovatar.
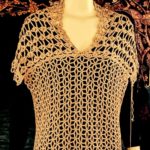
Laluna Lotus at an early stage.
Mamruana, Lovatar, Laluna (and the Tripuff Tunic and Graven mentioned above) are all crocheted in our Lotus yarn.
Renovated a seven years old website. I’m still cleaning up broken links and stuff. This 2017 project is spilling over into 2018.
Found someone who makes wonderfully intuitive stitch diagrams for my patterns. An easy win!
Acquired what we affectionately call a ‘warehouse’ for my shop yarns and hooks (it’s a small Rubbermaid shed). Did important maintenance on my Lotus yarn equipment myself. Got some helpful IKEA office items.
Taught a weekend crochet workshop at Mosaic Yarn Studio and got up to speed using Airplay instead of an overhead projector. I loved using that set up.
Videos -deep breath- learned how to edit footage, and what filming equipment I wish I had, so I’m further along than in 2016; a hurricane put a dent in that momentum. For 2018 I figure I’ll try again keeping it simple, short, casual. Otherwise I’ll never get anywhere! Ellen Gormley and Mary Beth Temple inspire me.
Digitized crochet archives: In 2017 I started a process that works for me. (It also helped me during Hurricane Irma!) Here are my stats: I have 4 or 5 shelves of stuff to digitize; each shelf is 20″ wide. If I’m getting 15 to 18 images per shelf inch, I’ll need 4.5 to 8 gigabytes of storage.
A Year’s Worth of Crochet
I can see why bloggers do a year-end review now that I’ve done it. It feels good to see a year’s worth of highlights–you’ve always done more than you remember. I appreciate everything more. It’s easier to be objective about what is significant. I can see what obstacles I overcame, and what it took to do so, instead of expectations I had at the time that I didn’t meet.
I love to see the glimmerings of 2018 crochet in 2017.
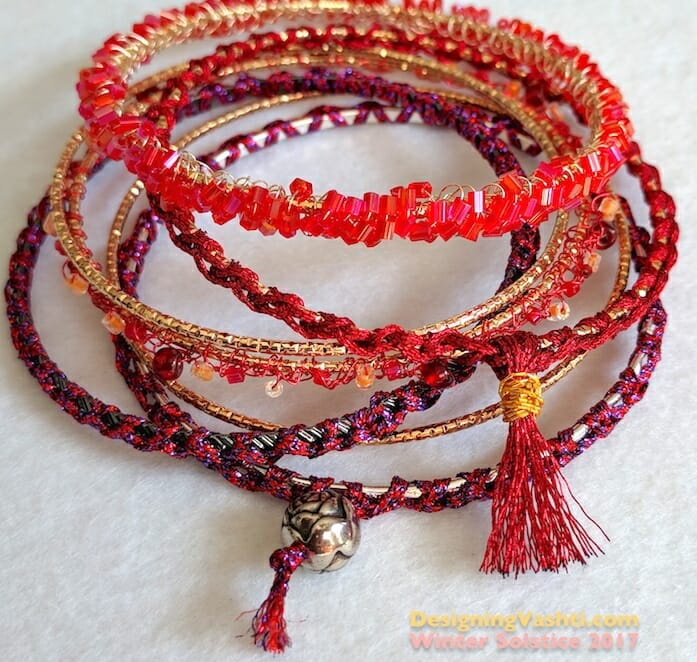
I’m crocheting these festive bangles for quick holiday gifts (Hanukkah, solstice/yule, Christmas), hostess gifts (I have five holiday parties to attend), and for myself. It’s relaxing now to make them. I’ll wear some to the parties.
Each completed bangle is costing me about 50¢ (not including labor, a.k.a. the love in every stitch ❤️).
“Solstice Bangles” Free Pattern
Below is the complete pattern for what I’ll call “Solstice Bangles” because tomorrow morning is the Winter Solstice (first day of winter). I contemplate this sometimes as I crochet around the bangles; it’s a satisfying “full circle” feeling. I’m completing another sparkly “wheel of the year”.
Skill level
The starter pattern is Beginner-friendly. So many ways to get fancy with it. Add some challenge with wire or beads.
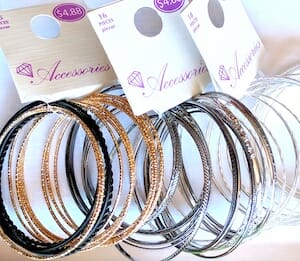
The stackable bangle sets I bought at Walmart this week.
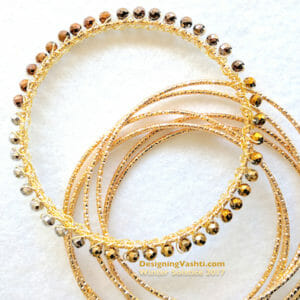
I covered a slim gold bangle with gold wire crochet and metal beads.
Materials
This section looks long because it includes tips for substituting with items you have on hand.
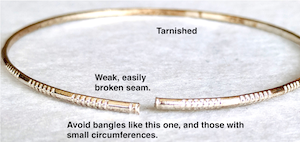
Bangle “blanks”: Look for thin, narrow, permanently closed (not hinged or locking) metal bangles. They’re often sold as a group to be worn stacked, meaning all at the same time. If they are labeled with a size, choose only “large” because any crocheting you add will reduce the final inner circumference. I don’t want any tarnishing or chipping, so I prefer to buy them exposed to air without a package wrapper. If they have soldered seams, check them for strength. This is especially important for gifts because you don’t know how much force someone will use to slide it on over their hand. I only buy them locally so that I can test the seam and finish of each one. Over the years I’ve kept an eye out for them in places like Claire’s, Wal-Mart, Target, etc. The quality varies wildly. I can recommend the ones in Wal-Mart now (pictured). They come in bunches of 15-18 bangles for $4.88.
Yarn, if you’re not adding beads: Here’s where you can use the interesting embroidery braids, flosses, and fine novelty yarns languishing in your stash. My first choice is a fancy metallic Kreinik braid type if I’m not adding beads. My little 5-meter spool can cover two, possibly three skinny bangle blanks. Some fingering and lace weight yarns would work, and any crochet thread size. Beginners: start with a sock yarn or size #3 or #5 crochet thread, and no beads. Then graduate to a fancy metallic floss/braid type, then try very fine wire without beads first (30ga to 32ga thickness).
Yarn if you’re using beads: I’ve had the best luck crocheting with wire. The wire holds the beads in place the best for me. Wire is a unique crochet experience. If you’ve never tried it, please see my newsletter issue on it, or the Embracelet pattern.
Crochet hook: This is easy. Use whatever hook size that makes it easiest for you to crochet tightly and evenly.
Beads (optional): I like very small beads for this. I don’t go much larger than “e-beads” (size 6 seed beads). Beads with small holes also work better for this so that they don’t jiggle and shift around. This means gem, chip, and pearl beads are great! You can use a larger accent bead for a tassel finish.
Sealer, stiffener, adhesive, fine yarn needle, etc. (optional): You might wish to use a fabric protectant such as Scotchgard if your yarn is an absorbent fiber. I used three coats of clear nail polish to secure a tassel of metallic embroidery floss because it doesn’t hold knots well. I may use this, or some clear fabric paint, on the inner surface of a bangle to keep the stitches from twisting around the bangle.
Pattern Abbreviations
ch = chain stitch
sc = single crochet (UK/AUS: dc)
ss = slip stitch
Crochet a Basic Solstice Bangle
Step 1: Leave a 4″ yarn end that you can crochet over it, weave in later with a needle, or leave hanging with a bead or tassel. Crochet all stitches tightly. Slip stitch around the metal bangle tightly, *ch 1, ss, repeat from * until bangle is covered.
This is up to you: use fewer stitches to cover the bangle by stretching them taut around the bangle. They’ll be less likely to twist and shift around the bangle, and you’ll see more of the metal. Or, use an excess of stitches for a different look: I love the wavy zig-zag texture of the (ch 1, ss) combo. You’ll see much less of the metal this way.
Step 2: When you’ve crocheted the number of stitches around the bangle that you like, join the last stitch to the first one. I remove my hook from the stitch loop, insert the hook in the first ss, and pull the last stitch loop through it with the hook, then fasten off.
Step 3: Decide what you want to do with those yarn ends. Weave them in. Or, string an accent bead onto both ends, knot them, and trim ends close to the bead. A third option is to tie the ends together, cut more yarn lengths, then add to the yarn ends and tie into a bundle to make a tassel.
Step 4, optional: If you add a fabric protectant, test a swatch first. You could coat the inner rim with a glue or sealer to prevent stitches from twisting around the bangle. Add a drop to knots if they might loosen with wear.
Add Challenge
The basic Solstice Bangle pattern is crazy simple, right? Add just one variable and it’s a different experience. For example:
Add other stitches or change them completely. You could try all sc. I used such a fine red wire for a beaded bangle that I had to use sc instead of ss to make them more visible. Embracelet is an example of using love knots.
Hold two different glittery strands together as you crochet, or use 6-strand embroidery floss. (Managing multiple plies as you crochet so tightly around a bangle does get tricky.)
Just add beads. That’ll keep you busy! I like to add one or more beads to the ch of the (ss, ch 1).
Use wire as the yarn. A thicker wire such as 26ga may be difficult for some people to crochet with, but it sure shows up well, and makes a statement even without beads. It also holds up nicely and is less likely to twist around the bangle. Finer wire is great for showing off beads.
Try to crochet the wire as tightly as you can. (It will still be looser than you intend.) When you’re done, tug on each bead a bit while also giving it a half-twist. This will tighten the stitch around the bead and bangle. I also compress everything by pressing and scrunching the stitch loops together into the bangle. I guess you could consider this a “blocking” method for wire jewelry?
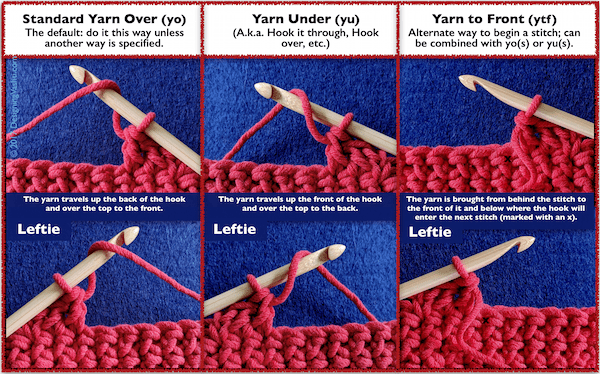
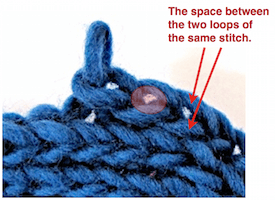
I described the basics of yarn overs and yarn unders in the issue already, but that only goes so far. Yarn overs are actually kind of tricky—at least when you think about them and watch yourself in slow motion. I see this in classes. Yarning over is one our most ingrained habits. Prefer a video to the close-ups above? I like PlanetJune’s.
“Clockwise” Depends on Your Point of View
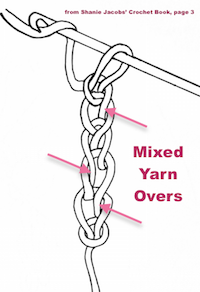
This can also happen if the loop falls off the hook while crocheting the chains and twists before you place it back on the hook. If image isn’t displaying, see it at https://flic.kr/p/DyXB97
Another thing about yarn overs is the rotational movement. It would be easier to describe them if they were linear (just move your hook along a line from point A to B). Instead, we describe what the hook’s motion is, or focus on the yarn’s motion: a “yarn under” is also a “hook over”.
Some describe the motion as clockwise vs. counter (anti-)clockwise, which adds its own ambiguity. The motion your hook and yarn make for a yarn over is counterclockwise…IF you’re looking at it from the shaft end of the hook and IF you’re crocheting right-handed. The same motion suddenly appears clockwise if you watch it head on (from the head end of the hook).
Yarn Unders For Simple Stitches
I’ve swatched several kinds of familiar stitches with yarn unders instead of yarn overs. The stitch didn’t always look different, but in every case, it’s denser and tighter. I struggled at times to maintain an even gauge and to loosen up, depending on the stitch and yarn.
When I’ve preferred the feeling of using yarn unders, they seem lean and efficient, like taking a shortcut. It’s tempting to use yarn unders when finger crocheting and when completing reverse single crochets and loop/fur stitches. I’m sure a large project with them uses up less yarn! Usually I prefer yarn overs though. I’m used to rhythm of it and the control they give me over my gauge. Sometimes they feel sort of “luxe” or fancy, compared to yarn unders.
Slip Stitches and Single Crochets
If you want to do the old style slip stitch crochet that is so dense it’s waterproof, use yarn unders!
The single crochet stitch (sc, or UK: dc) requires just two yarn overs and is visibly affected by changing just one of them to a yarn under. I expected to find yarn unders in Mark Dittrick’s Hard Crochet book on sculpturally stiff sc.
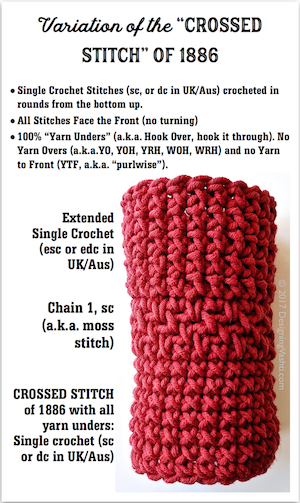
Change the first yarn over and you get sc with crossed or twisted fronts that look very much like my variation pictured here.The 1886 crossed stitch is significant to me because it was in the influential Complete Encyclopedia of Needlework by Thérèse de Dillmont. I’ve seen the same stitch repeated in other crochet books since. (I don’t know if it occurs before 1886.)
Change just the second yarn over and you get what Rebecca Medina‘s modified sc for tapestry crochet.
Here’s another interesting reason to use some yarn unders for your sc. In her Freeform Knitting and Crochet book, Jenny Dowde recommends alternating a yarn over with a yarn under when starting a surface sc. Doing this prevents the raised row of sc from slanting to the left or right.
Two other stitches that show off yarn unders nicely are half doubles (hdc or UK: htr) and love knots. See the issue for more on those. View the hdc swatch diagram from the issue in high resolution.
A newsletter subscriber mentioned to me that the designer Aoibhe Ni uses yarn unders for special texture effects in her lovely Tunisian crochet designs.
How Many Types of Yarn Overs?
A method I used for the Five Peaks Shawl.
I think of yarn over types in terms of how to get more yarn on the hook for making stitches. So we have the two obvious types: wrap it one way (Yarn Over), or the other way (Yarn Under).
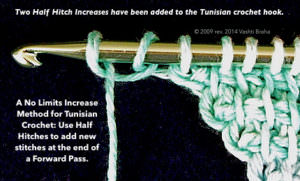
A third way to add loops to the hook is the crossed loop, which is a simple cast-on in knitting. It’s also a half hitch in macramé. This loop has a twist in one direction or the other, so there are actually two types of them. I used them for Tunisian crochet to increase stitches along one edge of the Five Peaks Shawl.
This kind of loop was the subject of one of my earliest newsletter issues: “A Very Different Kind of Crochet Stitch“. I love Sue Perez’ “Forward Loop Chain” blog post about them.
The yarn-to-front (ytf) shows at the top of this page with the two yarn over types even though strictly speaking it isn’t one. It’s easily confused with the yarn under.
The Yarn Over in other Languages
I found this handy information in the 1989 Vogue Dictionary of Crochet Stitches by Anne Matthews. Here are the non-English pattern equivalents listed for Yarn Over (US) and Yarn Over Hook (UK):
Jeté (French)
Umschlag (German)
Gettato, abbreviated gett (Italian)
Arrollado (Spanish)
One More Thing!
I mentioned Jane Rimmer in the issue because I want to make sure you know about her two-part article for CGOA’s Chain Link newsletter: “Yarn Over History and Technique” (Autumn 2014) and “Yarn Overs Part 2: Techniques” (Summer 2015).
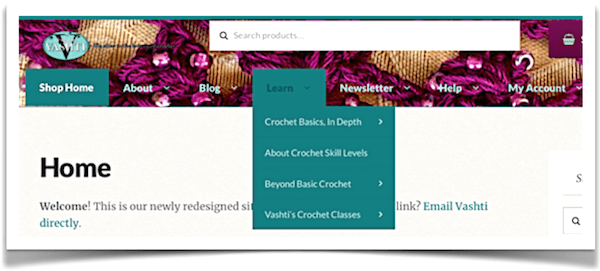
I set up a permanent home for my crochet tutorials and tips. Over the years I’ve posted some crochet how-to stuff on one blog and some on another. Still more are tucked away in newsletters, pattern PDFs, and class handouts. Eventually I’ll get all ten years of them under the “Learn” tab, which you can find at the top of every page of this new website. Huzzah! It feels so good to do this.
Crochet Tutorial Categories So Far
As you can see in the photo above, the Learn menu now has these two major categories:
Crochet Basics in Depth–For newer crocheters and anyone who likes a more thorough treatment of all things crochet. (My goal is always to write what I haven’t already read elsewhere.)
Beyond Crochet Basics–If it’s something that might be considered an Intermediate skill or beyond, it goes here. Newer crocheters are welcome to use this section too. I try to connect each advanced or specialized topic directly to a basic crochet skill so that adventurous beginners can use some of it too.
Each category has a few how-to topics in them so far. Some will sound familiar to you if you’ve used my patterns or read my newsletters, such as “Hook-Led Gauge” in the Crochet Basics section and “When to Crochet BETWEEN Top Loops” in the Beyond Basics section.
Newly Updated
I’m rewriting each one—a little or a lot! Even if I’ve already posted a topic somewhere else. (I enjoy writing but it’s slow-going if I have to find the original images and optimize them.)
Please let me know if you use one of my crochet tutorials here and the images are not clear enough. I’m still adjusting the image optimizing settings of this new site to get them truly…optimal.
Three More Tutorial Categories
I’ll be bringing back the Tunisian and Slip Stitch crochet sections that my old site had, but they had not been updatable for seven years. By the time I’m done revising them and adding lots of juicy tutorials, they might have nothing in common with the old ones! These will also be housed in the Learn menu:
The New Tunisian Crochet
Fun With Slip Stitch Crochet
Crocheting Jewelry
All three* are technique based unlike the first two that are purely skill based. The standard crochet skill level model tends to default to regular crochet, so these Tunisian and Slip Stitch categories should complement the skill categories neatly enough.
*Even though the jewelry crochet group is project based, I think of its tutorials as having a technique focus because it’s a specialized application of mostly regular crochet. (I don’t think my old site even had a page for crochet jewelry.)
Site-wide Search
Vashti’s Crochet Shop
Get the Newsletter
Sign up to receive Vashti’s Crochet Inspirations Newsletter in your inbox monthly.