Posted on Leave a comment

Last Minute Crochet Jewelry Gift–How to

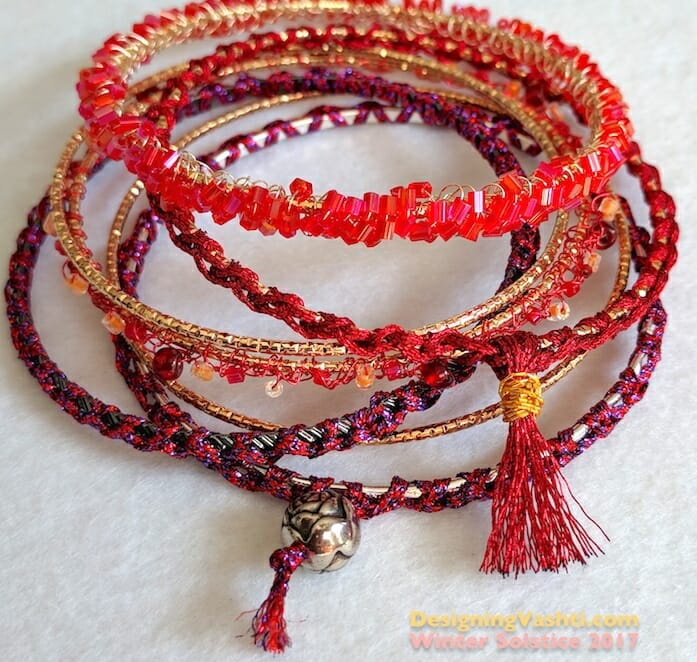
I’m crocheting these festive bangles for quick holiday gifts (Hanukkah, solstice/yule, Christmas), hostess gifts (I have five holiday parties to attend), and for myself. It’s relaxing now to make them. I’ll wear some to the parties.

Each completed bangle is costing me about 50¢ (not including labor, a.k.a. the love in every stitch ❤️).

“Solstice Bangles” Free Pattern

Below is the complete pattern for what I’ll call “Solstice Bangles” because tomorrow morning is the Winter Solstice (first day of winter). I contemplate this sometimes as I crochet around the bangles; it’s a satisfying “full circle” feeling. I’m completing another sparkly “wheel of the year”.

Skill level

The starter pattern is Beginner-friendly. So many ways to get fancy with it. Add some challenge with wire or beads.

Materials

This section looks long because it includes tips for substituting with items you have on hand.

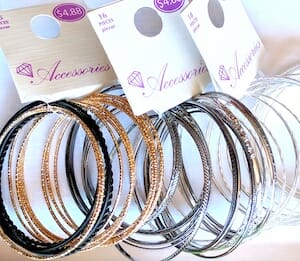
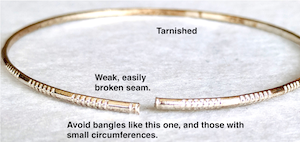
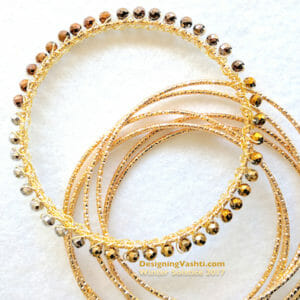
  1. Bangle “blanks”: Look for thin, narrow, permanently closed (not hinged or locking) metal bangles. They’re often sold as a group to be worn stacked, meaning all at the same time. If they are labeled with a size, choose only “large” because any crocheting you add will reduce the final inner circumference. I don’t want any tarnishing or chipping, so I prefer to buy them exposed to air without a package wrapper. If they have soldered seams, check them for strength. This is especially important for gifts because you don’t know how much force someone will use to slide it on over their hand. I only buy them locally so that I can test the seam and finish of each one. Over the years I’ve kept an eye out for them in places like Claire’s, Wal-Mart, Target, etc. The quality varies wildly. I can recommend the ones in Wal-Mart now (pictured). They come in bunches of 15-18 bangles for $4.88.
  2. Yarn, if you’re not adding beads: Here’s where you can use the interesting embroidery braids, flosses, and fine novelty yarns languishing in your stash. My first choice is a fancy metallic Kreinik braid type if I’m not adding beads. My little 5-meter spool can cover two, possibly three skinny bangle blanks. Some fingering and lace weight yarns would work, and any crochet thread size. Beginners: start with a sock yarn or size #3 or #5 crochet thread, and no beads. Then graduate to a fancy metallic floss/braid type, then try very fine wire without beads first (30ga to 32ga thickness).
  3. Yarn if you’re using beadsI’ve had the best luck crocheting with wire. The wire holds the beads in place the best for me. Wire is a unique crochet experience. If you’ve never tried it, please see my newsletter issue on it, or the Embracelet pattern.
  4. Crochet hook: This is easy. Use whatever hook size that makes it easiest for you to crochet tightly and evenly.
  5. Beads (optional): I like very small beads for this. I don’t go much larger than “e-beads” (size 6 seed beads). Beads with small holes also work better for this so that they don’t jiggle and shift around. This means gem, chip, and pearl beads are great! You can use a larger accent bead for a tassel finish.
  6. Sealer, stiffener, adhesive, fine yarn needle, etc. (optional): You might wish to use a fabric protectant such as Scotchgard if your yarn is an absorbent fiber. I used three coats of clear nail polish to secure a tassel of metallic embroidery floss because it doesn’t hold knots well. I may use this, or some clear fabric paint, on the inner surface of a bangle to keep the stitches from twisting around the bangle.

Pattern Abbreviations

  • ch = chain stitch
  • sc = single crochet (UK/AUS: dc)
  • ss = slip stitch

Crochet a Basic Solstice Bangle

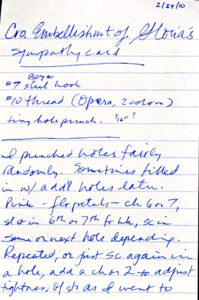
Step 1: Leave a 4″ yarn end that you can crochet over it, weave in later with a needle, or leave hanging with a bead or tassel. Crochet all stitches tightly. Slip stitch around the metal bangle tightly, *ch 1, ss, repeat from * until bangle is covered.

This is up to you: use fewer stitches to cover the bangle by stretching them taut around the bangle. They’ll be less likely to twist and shift around the bangle, and you’ll see more of the metal. Or, use an excess of stitches for a different look: I love the wavy zig-zag texture of the (ch 1, ss) combo. You’ll see much less of the metal this way.

Step 2: When you’ve crocheted the number of stitches around the bangle that you like, join the last stitch to the first one. I remove my hook from the stitch loop, insert the hook in the first ss, and pull the last stitch loop through it with the hook, then fasten off.

Step 3: Decide what you want to do with those yarn ends. Weave them in. Or, string an accent bead onto both ends, knot them, and trim ends close to the bead. A third option is to tie the ends together, cut more yarn lengths, then add to the yarn ends and tie into a bundle to make a tassel.

Step 4, optional: If you add a fabric protectant, test a swatch first. You could coat the inner rim with a glue or sealer to prevent stitches from twisting around the bangle. Add a drop to knots if they might loosen with wear.

Add Challenge

The basic Solstice Bangle pattern is crazy simple, right? Add just one variable and it’s a different experience. For example:

Add other stitches or change them completely. You could try all sc. I used such a fine red wire for a beaded bangle that I had to use sc instead of ss to make them more visible. Embracelet is an example of using love knots.

Hold two different glittery strands together as you crochet, or use 6-strand embroidery floss. (Managing multiple plies as you crochet so tightly around a bangle does get tricky.)

Just add beads. That’ll keep you busy! I like to add one or more beads to the ch of the (ss, ch 1).

Use wire as the yarn. A thicker wire such as 26ga may be difficult for some people to crochet with, but it sure shows up well, and makes a statement even without beads. It also holds up nicely and is less likely to twist around the bangle. Finer wire is great for showing off beads.

Try to crochet the wire as tightly as you can. (It will still be looser than you intend.) When you’re done, tug on each bead a bit while also giving it a half-twist. This will tighten the stitch around the bead and bangle. I also compress everything by pressing and scrunching the stitch loops together into the bangle. I guess you could consider this a “blocking” method for wire jewelry?

Posted on 1 Comment

Picot Crochet Card Edge (Free Pattern)

I found my old notes!

The other day I posted a photo of a freeform crochet card edge I did over four years ago. In that post I described how to crochet it, to the best of my memory. Back then I mailed off the card right away. I have no memory of having written down any how-to info.

Well, I just now I found the notes to myself about it (pictured at right). I’ve been going through lots of old files, boxes, CD roms, etc. so I’m finding all kinds of things.

Below I’ve typed in everything from that paper to be readable. I suppose you could say this is a…

Picot Crochet Card Edge Free Pattern

Supplies Needed:

  • Size #7 Boye steel crochet hook (or size that will pull the thread you’re using through the holes punched in the card).
  • Size #10 cotton crochet thread: Coats Opera (100% mercerized cotton, 230m per 50g ball), 2 colors.
  • Greeting card: the thicker the card stock, the better. Glossy card stock is even stronger.
  • Single hole paper punch: 1/16″ diameter holes. (Look for one in the scrapbooking section of a craft store.)

Stitches and Abbreviations Used:

  • ch = chain
  • sc = single crochet
  • sl st = slip stitch
  • st(s) = stitch(es)

Begin Picot Petals Crochet Card Edge

Step One: I punched holes fairly randomly. Sometimes I filled in with additional holes later.

Step Two: With pink thread for flower petals, *ch 6 or 7, sl st in the 6th or 7th ch from your crochet hook, sc in the same or next hole, depending. (Depending on how it looks and how far away the next hole is. Bunching them here and there brings out the petal look.) Repeat from the *, or just sc again in a hole; add a ch or two to adjust the tension of the sts as you edge the card.

Step Three: With green thread for leaves, ch 6 or 7, sl st in 4th or 5th ch from your hook. Space these out a bit more than the petals were. I spaced them with only just enough chs to sc in the next hole gracefully.

I ended the pattern notes with, “I like how the bunched pink petals look next to the more spread out green sts.”

Posted on 1 Comment

Greeting Card Crochet with Picot Petals

Greeting Card Crochet with Picot Petals

Isn’t this greeting card crochet experiment lovely?

I made it about four years ago. The recipient was touched by it. I’m glad I took a photo before I gave it away—I smile whenever I see it.


My goal was to try crocheting a fine irregular edge in a freeform way. (I had already crocheted chunky, evenly-spaced borders into other things, such as with the Venus Flytrap Action Toy, and the Cheerful Chores.) tablecloth

The first step was to punch tiny holes randomly spaced along a portion of the card’s irregular edges. Instead of poking holes with a needle, I found a 1/16″ single hole paper punch at my local craft store. I’m glad I did. The holes are clean-edged and look like the card came with them.

Inside of Greeting Card Crochet with Picot Petals


Randomly spaced holes can vary in distance from each other, and from the edge of the card. When you’re crocheting into these holes, you just have to chain more to get to a hole that’s farther away, and chain fewer to get to a closer hole.

In standard pattern language, this is eyeballing (i.e. freeform), because it’s adjustable instead of being a fixed pattern. This automatically puts it in the Intermediate Skill Level category.

Sometimes I slip stitched (sl st) into a new hole, then chained one (ch 1) so that I could sl st again into the same hole.

The picot petals are just long picots. I added extra chains before the sl st or single crochet that closes the picot.

Greeting card crochet is a useful Intermediate Level skill to know for other kinds of crochet too.

I have a Pinterest board with lots of examples: http://www.pinterest.com/vashtibraha/crochet-mixed-media/

I’ve listed a few other links below to other crocheters’ blog posts about greeting card crochet edgings. Each blogger describes a similar step of adjusting the number of chains to accommodate the space between the holes.

http://onesheepishgirl.com/2012/01/adding-a-crochet-edge-to-paper-valentines-frames.html

http://vimeo.com/11981377

http://thimbleanna.com/projects/valentinecard.html

http://www.thriftyfun.com/tf95779670.tip.html

http://dutchsister-s.blogspot.com/2011/11/tutorial-recycled-christmas-card-with.html

Posted on 2 Comments

The Two Free Victorian Crochet Pattern Books I Love!

Of course, ALL free Victorian crochet pattern books are lovable. After I researched crochet stitches for my classes, though, I keep these two close by and bookmarked. Both of these antique crochet books were published in 1891. (Click each image for the free download information and link.)

Last year I searched in literally hundreds of crochet books and booklets. I love researching crochet. Lots of antique, public domain crochet sources are keepers. Perhaps these two stand out in particular because of the specific stitches I was looking for.

  • The Art of Crocheting. By Butterick Publishing Co., Ltd., 1891 (London and New York).
  • Home Work, A Choice Collection of Useful Designs for the Crochet and Knitting Needle… By A. M., Rose Publishing Co. Ltd. (Toronto).

I recorded all occurrences of star stitches, love knots (“knot stitches” to the Victorians), and lacy Tunisian crochet patterns. I was surprised to discover that in many of the publications ranging from the 1840’s to the 2010’s, these stitches often didn’t appear at all. These two 1891 gems were especially fun for creative star stitch patterns.

Researching crochet stitches in free Victorian crochet pattern books offers lots of insight into crochet’s development. It’s fascinating to see how crochet is explained, illustrated, and promoted. Exciting, too! By 1891 the public demand for crochet patterns and stitch how-tos was very strong.

Free Victorian crochet pattern books date from the 1840’s to shortly before World War I. Please support the Antique Pattern Library. It’s one of my favorite sources for some obscure early indie crochet designer booklets too. I hope you will help their cause by donating scans or funds.

The Home Work book was the focus of an ambitious crochet pattern project by the Cyber Chapter of the Crochet Guild of America (CGOA). Members crocheted actual swatches and projects from the book. The exhibit of them at CGOA’s annual Chain Link conference was a highlight of the event!

Also see my Antique Crochet Stunners board in Pinterest.

Posted on Leave a comment

I Fixed Adjustable Straps of a Bra Top with Crochet

This easy crochet fix for adjustable straps wins a five year test.

The adjustable straps of my bra tops usually loosen. They should just stay where I put them! Some of these straps are slippery or satiny. My thinking was to use crochet to add more friction to the strap, but still be adjustable when and if I choose. Can I have it my way? The answer turns out to be YES!

I took the first two photos in December 2008 – over five years ago. (I thought I might want to blog about it.) These were a few hurried shots with my new camera, while also making Christmas and Hanukkah gifts. In the holiday rush I forgot about the photos until…yesterday. Meanwhile, I wore this hard working garment almost daily for about five years.

After these three photos (click each to enlarge and see more info) I list the steps of how I did this fix.

The simple steps I took to improve these adjustable straps with crochet:

I chose a size #10 cotton crochet thread in a matching color. In this case, a light blue Coats Opera thread. You can see it in this photo.

With a #7 steel crochet hook, I chained about 50 and then fastened off.

Applied a layer of any fabric glue to the relevant area of the strap. Before it dried I arranged the crochet chain in the wavy pattern you see here. Note: it stays in place best if the bottom of the chain stitches is facing up. The top loops of the chains form the flattest side of the chain. So if you look closely at these strap photos, you might see that you’re looking at the “bump” loops of the chain stitches (At this blog it’s called the “back ridge.”)

When dry enough, I sewed along each edge of the strap with the zigzag setting of my sewing machine. Using the glue first made this step super quick and low-stress. That’s it!

The zigzag stitch is very important. You need to include flex in your stitches because the straps need to retain their elastic range. Otherwise you risk breaking the sewing thread during wear.

This is another benefit of using crochet chains. The crochet stitches build in just a bit of flex, especially when arranged the way they are here.

I’m 100% pleased with this diy crochet fix. I would do this again with the adjustable straps of my other tops. (Did you notice the paws of my kitten in the first photo? I didn’t until today.)