Posted on Leave a comment

Hand Chaining, a Straddler of Worlds

Hand chaining is when you crochet chain stitches with your hands and fingers instead of with a crochet hook. It’s also called finger crocheting. Hand chaining is so easy! Kindergartners do it. It’s a popular way to crochet trendy necklace-scarves with fancy yarns in under 30 minutes.

Trendy Hand Chaining Trendy Necklace Scarves long
Love it! “Poseidon Scarf Kit” at loopymango.com

You might have learned hand chaining as a child in kindergarten, at camp, or from a babysitter. It’s often taught as a stand alone activity rather than as an introduction to the larger world of crochet, knot tying, or knitting. I don’t even remember how I learned it. I just already knew how by the time I officially learned how to crochet with a hook at the age of nine.

For the next blog post I viewed several videos that show how to do hand chaining as a crocheter, a knitter, or a knot tyer. It left me with a new way of thinking about the origins of crochet.

Not Just for Beginners

Hand chaining is so fun to do that even experienced crocheters are at risk of getting “hooked” (if they remember to try it). It’s often forgotten as a crochet method even though it offers nuanced control over unusual yarn combinations for edgy, artsy effects. I get new, deeper insights into simple stitches when I hand crochet them, thanks to the intimate, tactile experience of crocheting.

Hand chaining a special subset of crochet that merits a closer look than it usually gets.

Hand Chaining vs. Hook Chaining

Hand chaining (finger crocheting) loosely and tightly in 3 different fibers: sain cord, wool tube yarn, suede lacing.
Hand Chaining loosely vs. tightly. L to R: Satin cord, wool knit tube yarn, suede lacing.

Hand chaining cuts out the middleman (er, the crochet hook). This is perfect for crochet beginners! Learning to use a new tool with yarn loops for the first time takes the focus off of the stitch. Shouldn’t getting to know a stitch be the most important part of learning to crochet? Especially when that stitch—the chain stitch— is the foundational core of all crochet? I think so.

The crochet hook is the one central tool of crochet. When researchers encounter an unfamiliar fabric, they consider the tool used to create it. An item made with a crochet hook is usually classified as crocheted. I wonder how hand-chained items are classified.

Earliest Crochet Roots?

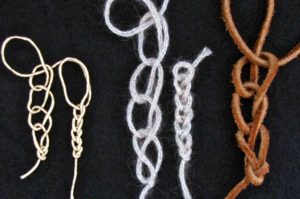
Hand chaining straddles two worlds: Crochet, and Knot Tying. The same basic crochet stitches can be made with hand chaining as with a crochet hook: Chain Stitch, Slip Stitch, and Single Crochet. (Other stitches are more of a struggle without a hook.) The fingers or the whole hand simply take the place of the crochet hook. Perhaps hand chaining came first, at least in some early cultures, and the crochet hook evolved to substitute for hands and fingers.

Among knot tying aficionados, hand chaining is called many other things: Drummer Boy’s Sinnet, Zipper Sinnet, Monkey Braid, Sea Chains, Chain Knots, Caterpillar Sinnet, and Daisy Chains. Boys and men may have encountered hand chaining via knot tying. Some practical uses among knot tyers include:

  1. To quickly neaten long lengths of rope or electrical wire for storage. (To this linked video, a commenter added, “This is used by riggers [who set up e.g. the ceiling on stages for rock concerts] as a cool way of shortening and storing several long ropes in a hurry.”)
  2. Launder climbing rope so that it can be easily machine washed, allowed to dry, and then “unzipped” for use afterwards.
  3. Watch James Dean absent-mindedly finger crochet with a rope while doing an interview in 1955! (Video starts as the camera is about to pan down to the rope he’s holding.)

-:———:-

Even if you already know how to crochet, I think Chain Stitch In Depth and other posts about crochet basics offer some new ways to think about our most basic and important crochet stitch of all, the Chain Stitch.

Updated November 2018. It’s part of an experimental blog post series: Vashti’s How to Crochet Book. Next post: Hand Chaining How-To’s.
Posted on 2 Comments

DesigningVashti Lotus Yarn: Magazine Gallery

Two new crochet top patterns by Doris Chan and two by Jennifer Ryan (an Irish knot wrap and a multicolored tote)

Our Yarn in the Magazines!

Crochet pattern magazines have been awesome for DesigningVashti Lotus Yarn. It’s like getting a surprise Valentine each time I hear that a designer or magazine editor has chosen to use it for a design.

Patterns for the designs you see above are published in the following crochet magazines, listed as shown from left to right:

  1. Interweave Crochet, Spring 2015: Sapphire Sweater. Designer: Doris Chan.
  2. Crochet! Magazine, Spring 2015: Harmony Bamboo Tank. Designer Doris Chan.
  3. Crochet! Magazine, Summer 2015: Féileacán Shawl. Designer Jennifer E. Ryan.
  4. Crochet! Magazine, Spring 2015: Fabric Fusion Tote. Designer Jennifer E. Ryan.

It’s a slow and steady roll out, and that’s good. Here’s why. Crochet designers started requesting DesigningVashti Lotus yarn to swatch with in 2014. A designer has two professional directions to go with a swatch:

1) Create a design proposal with it.

Designers submit their proposals when a magazine editor sends out a call for designs. These calls go out several months in advance of a magazine issue’s publication, especially the print magazines. For example, a call for winter designs might go out in the spring. A digital-only magazine can sometimes have faster production times than print magazines, but speed isn’t everything. There’s nothing like holding a print magazine in your hands or rolling it up in your tote and dashing out the door. I leisurely page through mine several times and save them all.

2) Self publish the design online as a downloadable pattern.

This can be in Ravelry or on one’s own site, for example. Doris Chan and I both tried to get indie (self published) patterns out quickly for our Lotus yarn this way. It’s often the fastest route, depending on the design and the designer.

DesigningVashti Lotus Patterns & Project Galleries

As a designer and also as a yarn company owner, I think a combination of digital and print magazine designs, and quick pattern downloads, is perfect support for a young yarn.

A Young Yarn Design-Wise

As I’ve journaled over at another blog, our yarn celebrated its first birthday a few months ago. I have to remind myself that it’s still a new one, considering that many of the those first months of its life happen behind the scenes. Designs for it are being swatched, submitted, written and edited, photo styled, etc.

Shortening the Lead Time

Yarn companies can sometimes shorten this lead time. The yarn company might be able to get a small advance shipment of a new yarn. Then they get it into the hands of a few designers as soon as possible. This way, the designers can be:

  • Answering calls for designs with swatches of it
  • Crocheting up complete projects for photo styling, or for industry trade show displays.

I experienced this as a designer a few times back when I worked primarily with magazines and yarn companies. It was exciting. One brand-new yarn didn’t even have a label yet!  The color was whatever the company could get a hold of quickly. Sometimes it was also a little confusing. For example, the design was accepted—great!—but the yarn took longer to ship from the mill than expected. The production deadlines had to be readjusted and squeezed in. Occasionally a design contract had to be deferred, or canceled, or a different yarn substituted at the last minute.

After these experiences, when I hear from magazine staff that they’ve chosen to include our yarn in a future issue, I immediately ship it to the lucky designer!

Posted on 5 Comments

Crochet Cable Boot Cuff Pattern in Progress

Lucky Twist Bootslip folded over boot top

New Crochet Cable Boot Cuff Pattern!

The Lucky Twist Boot Cuff in action!

A few days ago I sent out issue #65 of my Crochet Inspirations newsletter: “Mock Cables in Slip Stitch Crochet.” I’m getting questions from readers about the dark brown crochet cable boot cuff photo (shown below). I crocheted that one in November 2012. The gray striped one is fresh off the hook.

The 2012 brown one is actually a prototype of the new crochet slip stitch Lucky Twist Mitts. It’s my newest downloadable pattern. A matching Lucky Twist crochet cable boot cuff pattern is almost finished.

Update: The boot cuff pattern is done!

The early brown Lucky Twist swatch helped me test lots of things. For example, how stretchy the limp five-ply merino yarn would be as a mitt (not enough). How much to taper the ribbed edge with short rows. I wondered about the speckled dyeing and overall dark brown tones.

As I mentioned in the newsletter, I had to dramatically brighten these photos just so that the cabled stitch textures would show up! So in real life I’d need to be standing in full sunshine to see the cabled surface texture in a dark brown yarn. The short amber color flecks are pretty, but they distract a bit from the cables.

First swatch of Lucky Twists Boot Cuffs pattern

This was also the first boot cuff prototype I’d ever crocheted. So I learned about:

  • Finished dimensions for a good crochet cable boot cuff pattern.
  • Stitch surface textures and yarn colors that show up well on that area of the body. (Lighter colors help.)
  • Should one or both edges of a boot cuff taper? (I prefer it tapered at one end only.)
  • How much yarn and time does it take to crochet boot cuffs? (About as long as crocheting just 14 inches of a scarf!)
  • Thickness of yarn and of stitches that fit inside the boot top. (Medium weight yarn seems fine for the boots I own.)
  • Folded, unfolded, scrunched. All ways are fun!

Crochet Boot Cuffs, 2012 and beyond

Back in 2012, crochet boot cuffs were such a new trend that they might have just been a one-season fad. That November I traveled to northern Illinois to teach a crochet retreat. It was a boot-wearing opportunity that I don’t often get here in Florida.

It was in Illinois that I started the brown crochet cable boot cuff pattern prototype. I’d be able to test how much warmth they add, and if I enjoy wearing them.

I discovered that crochet boot cuffs feel great! I wore them over dark tights with skirts. They stayed put. I enjoyed wearing them all ways – scrunched, folded over the boot, and unfolded. Down low into the boot or up near the knee. I did find that I wanted longer ones that covered more of my legs for warmth.

Posted on 3 Comments

Customized Tank Top with Crochet: Update

I customized a tank top with crochet edgings and a peplum. Looks great on my mannequin.

Remember I started to customize a tank top with crochet?

I cut a tank top to crop it and to give it a deep V-neck. Then I added crochet to it to customize it.

It’s mostly done now, and I like it. This is a size Medium tank top on a Small-size mannequin. In standard sizing, Lindsay the mannequin is on the Extra-Small side of Small. I’m on the Large side of Medium. On me, the waistline of the top sits higher, like an Empire-waist top. Also, on me there is no ruffling where the crochet meets the cut hem.

I uploaded a bunch of photos of this project to its Ravelry project page. (If I take a selfie I’ll add it there too. Maybe even here on the blog if I’m not too shy.)

This is my first attempt at a customized tank top with crochet. Thank goodness for a timely email I received from designer Sue Perez! She shared with me her sewing experience: a V-shaped neckline needs special reinforcing. I took that into account when I chose the crochet stitches and gauge for the neckline.

This experience of refashioning store bought clothes answered lots of questions I had. For example:

The Yarn Thickness Worked Out

It’s standard sport weight, very smooth, and is a cotton mixed with rayon for drape. In crochet thread sizing this would be a Size #3.

I wouldn’t want to go with a yarn that’s any thicker than this, or that has any fleecy loft or friction on the yarn’s surface.

A thinner yarn (a.k.a. a crochet thread Size #5 or #10) would work great, especially for fancier, fussier garments. This sport weight thickness works for the casual nature of a daytime tank top, or for a tee shirt. It also gave me the feeling of making progress quickly enough to stick with it.

Amount of yarn

I’d say it took up to 1.5 balls of Lotus yarn; that’s 325-375 yds.

Method of Attaching the Crochet

Seems fine so far. It will also have to hold up to washing and wear. Crocheting right onto tee shirt fabric like this? Yes, it can be done. I used a needle-sharp steel crochet hook. It was the largest I have and was not quite large enough for the yarn. A larger one might have left noticeably big holes in the fabric though.

I didn’t loooove doing the first row. Funny thing about crochet – that’s often the case. Crocheting into the foundation chains isn’t my favorite thing either, nor is crocheting foundation stitches. I usually want to get whatever the first row is over with. Same with this top.

Holes Where Stitches Meet Fabric

I mostly don’t want to look at the holes where the crochet stitches meet the fabric. When I wear it I don’t notice it at the hem. It stands out in this photo to me because it’s rippling a bit. At the neckline, though, I added a surface crochet row that covers the holes.

A customized tank top with crochet looks pretty nice, doesn’t it? I super love the hem. Those are split clusters of triple trebles.

Posted on Leave a comment

I Fixed Adjustable Straps of a Bra Top with Crochet

This easy crochet fix for adjustable straps wins a five year test.

The adjustable straps of my bra tops usually loosen. They should just stay where I put them! Some of these straps are slippery or satiny. My thinking was to use crochet to add more friction to the strap, but still be adjustable when and if I choose. Can I have it my way? The answer turns out to be YES!

I took the first two photos in December 2008 – over five years ago. (I thought I might want to blog about it.) These were a few hurried shots with my new camera, while also making Christmas and Hanukkah gifts. In the holiday rush I forgot about the photos until…yesterday. Meanwhile, I wore this hard working garment almost daily for about five years.

After these three photos (click each to enlarge and see more info) I list the steps of how I did this fix.

The simple steps I took to improve these adjustable straps with crochet:

I chose a size #10 cotton crochet thread in a matching color. In this case, a light blue Coats Opera thread. You can see it in this photo.

With a #7 steel crochet hook, I chained about 50 and then fastened off.

Applied a layer of any fabric glue to the relevant area of the strap. Before it dried I arranged the crochet chain in the wavy pattern you see here. Note: it stays in place best if the bottom of the chain stitches is facing up. The top loops of the chains form the flattest side of the chain. So if you look closely at these strap photos, you might see that you’re looking at the “bump” loops of the chain stitches (At this blog it’s called the “back ridge.”)

When dry enough, I sewed along each edge of the strap with the zigzag setting of my sewing machine. Using the glue first made this step super quick and low-stress. That’s it!

The zigzag stitch is very important. You need to include flex in your stitches because the straps need to retain their elastic range. Otherwise you risk breaking the sewing thread during wear.

This is another benefit of using crochet chains. The crochet stitches build in just a bit of flex, especially when arranged the way they are here.

I’m 100% pleased with this diy crochet fix. I would do this again with the adjustable straps of my other tops. (Did you notice the paws of my kitten in the first photo? I didn’t until today.)