Posted on 1 Comment

New Tunisian Crochet Pattern PDF: What Takes So Long?

Both sides of Tunisian crochet often look nice if it's a lacier pattern.
           —-:—-
This blog post is the second part of a short series about the birth of a new crochet pattern pdf. The third is here.
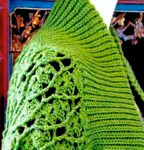
Update: Downloadable PDF for the new Tunisian crochet Warm Aeroette Scarf is officially in the shop.


Behind the scenes of a new Tunisian crochet pattern

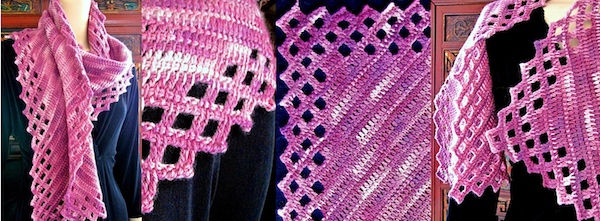
Pictured is draft #4 of Warm Aeroette Tunisian Crochet Scarf.

I’m a slow, deliberate pattern publisher.

Draft 4 of Warm Aeroette Tunisian Crochet Scarf. Almost done!

I love crocheting and so I think I chronically underestimate how much work it really is! Not only does a step almost always take longer than expected, I don’t always know when I need to recharge. (Each of these is a “step”: a stitch diagram, a photo tutorial, pattern testing, sizing, tech editing, etc.)

The Aeroette pattern has a longer title because this is a downloadable single pattern. The title needs to tell crocheters (and search engines) as much as possible in one line.

Three things can slow down new Tunisian crochet patterns for me:

Each design seems to bring unique issues!

For Aeroette, starting the scarf in one corner is a biggie. It merits a nice step by step photo tutorial. It’s a rare construction method for Tunisian crochet. Also, the best pattern wording evolves slowly sometimes. For Aeroette I’ve revised the wording of how and where the beginning and ending picots go a few times for clarity. Tunisian crochet pattern language has its own conventions.

Temptation of creative design details.

Doris is the same way and we laugh about this. Maybe optimize X, or add Y feature? What about this or that variation? I’d better swatch it in a very different yarn to make sure the design is not dependent on the yarn I’m using.

How educational it is. 

Aeroette started out originally as a practice project for a class on the Aero Tunisian Filet Lace Wrap. My goal with Aeroette is that it serve as a new Tunisian crochet skill building experience.

Sometimes I print a 2-to-a-page draft like you see here, to save paper. To save printer ink, the photos and captions are temporarily tiny. Most images are step-by-step tutorial photos that will all go on a back page. That will make printing them optional to save everyone’s printer ink.

Posted on 2 Comments

Answers: The Electra Wrap Love Knot Pattern

Banner of Love Knot 'Flowers'

I’m seeing new questions in new places about my Electra Wrap love knot pattern.

Electra, a crochet design, continues to attract attention and I’m really happy about that. I’ve blogged questions and answers about Electra here so that people can find them easily when they Google the pattern.

Q: What is this design? I’m having trouble figuring it out!

A: Maybe you’re seeing only a photo with no source (such as in Pinterest or Tumblr). Probably it’s one of the photos below. This is the Electra Wrap love knot pattern. It was designed by Vashti Braha (me) in 2012, and published in Interweave Crochet Magazine in 2013. I released a newly updated version of the Electra pattern in September, 2014.

Maybe you mean that you’re having trouble figuring out how it was crocheted. Well, the Electra Wrap is all about visual illusions. It’s actually just a simple rectangular wrap. The stitch pattern is 100% crochet love knots. A big reason for the Electra effect is the triangular grid structure. It’s an uncommon look for love knots. A square mesh grid of love knots, on the other hand, is so common that it’s practically a cliché. My newsletter issue #62 contrasts these two basic types of crochet lace grids.

Q: Yes but it looks like more than just that! Why?

A: Three reasons:

  1. The flowery stars. A beautiful feature of triangular lace grids is how triangles tile into hexagonal six-spoked shapes.
  2. This starry flowery lace is love knots. You can crochet triangular lace grids with many different stitches. Love knots bring their own unique magic. They also show off special yarns…see #3.
  3. I used yarn that is so elegant it dazzles the eye. I’m serious! I’ve worn the Electra Wrap in conferences, guild meetings, yarn shops, and love knot classes. Even when a person is familiar with crocheting triangular lace grids – and the love knot stitch, and sees it up close in person, Electra is still a bit mysterious. The yarn’s a factor.

Q: How did you add all those tiny sequins?

A: I paid the yarn to do that! Tiny sequins were spun right into the yarn for me. (I’d personally never add the sequins by hand because this would interrupt how quick love knots are to crochet.)

Here’s the deal with the yarn. A mystery-enhancing effect of this Electra Wrap love knot pattern is it’s crocheted double-stranded. Each love knot shows off two yarn strands. Each strand plumps up and doubles the 3-D loft.

I held one strand of fine mohair yarn together with one sequined strand while I crocheted. Electra’s yarn specs:

  • Glossy sequined strand: S. Charles Collezione Crystal (85% polyester, 15% cotton; 144 yd {131 m} per .88 oz {25 g}; CYC “#0 Lace Weight”): color #11, 3 skeins.
  • Glittery mohair strand: S. Charles Collezione Luna (71% super kid mohair, 20% silk, 9% lurex; 232 yd {212.5 m} per .88 oz {25 g}; CYC “#0 Lace Weight”): color #25, 2 skeins.

Even the tiniest sequins can be hard to crochet with. They catch on yarn strands as you pull loops through loops. The solution is to buffer the sequins with fibers. Mohair is great for this.

Q: I need to use different yarn, though. Can I? Should I?

A: YES you can, absolutely. The proof is in all the different yarns people have used for their lovely Electras. See this Electra project gallery in Ravelry.

I can think of lots of reasons why one should use a different yarn, and why one should not.

Definitely use the yarns I used if:

  • …You want that ethereal, fairy godmother, fashion couture mystique. I can’t imagine a better yarn combination for this. The yarns I used are top of the line fashion yarns from a venerable Italian mill. They are pricy and yet they’re a bargain. Their high quality is clearly evident in the finished Electra Wrap. It’s part of the mystique. (Hint: it’s the ultimate gift.)
  • …You’re susceptible to swooning while you’re crocheting. I’m not exaggerating when I say that crocheting Electra kept taking my breath away. I finished two of them quickly. I didn’t want to set down my crochet hook! I fantasized about Electra when I was away from it! If you’ve ever “pined” for a crochet project you’ve fallen for, then you know what I mean. The rest of you might be laughing at me right now 🙂
  • …You want practical warmth as well as maximum magic and weightlessness. The mohair in this yarn combo gives other practical benefits, too. (I wrote a newsletter issue about this.)

Use different yarns if:

  • …You’re allergic to mohair. Mohair and love knots have a special affinity. Both add a weightless magical something. One way to get a mohair effect is with a brushed synthetic yarn. Other natural fibers can also add a halo. Angora is an obvious example. Halo is a lace-weight brushed baby alpaca yarn.
  • …You’ve stashed some skinny yarns and bling threads that are difficult to crochet with by themselves. Electra can be a great stashbuster project for these. See this blog post about fun with double stranding.
  • …You want more of a casual daytime layer. Use thicker yarns – two strands held together, or singly. Maybe you want more of a boho artsy look. Try artisan space-dyed torn silk ribbon yarns, or irregular hand spun textures.

Q: I’m confused about the Electra Wrap love knot pattern in the magazine. Can you help me with that?

A. If you have the 2013 magazine version of the pattern and need help with it:

  1. Contact the magazine. The company has pattern support staff for their patterns. They also have a forum called Crochet me.
  2. Ask a question any time in Vashti’s Crochet Lounge – lots of friendly, helpful crocheters there. It’s a Ravelry group. Chances are good that your question has already been answered there. Interweave Crochet magazine fans also have a Ravelry group.
  3. I urge you to buy & download my expanded 2014 edition of this Electra Wrap love knot pattern from the DesigningVashti shop, or my Ravelry shop. It has a stitch diagram, how-to photos, and other details that help students in my love knot classes.

A stitch diagram is essential for this design. Due to space limitations of printed magazines, the 2013 Electra pattern version is missing a stitch diagram and other helpful info. A stitch diagram reveals how simple the construction really is. It breaks the spell (those multiple visual illusions I’ve described above).

Be sure to subscribe to my newsletter where I announce discount codes for new patterns and yarns. Get your feet wet with my three-part series on Love Knot basics and tweaks. (Link goes to the third in the series, and links to the first two are at the top of the entry.)

Posted on 2 Comments

Tunisian Crochet Lace Scarf Pattern Preview

New Corner-to-corner Warm Tunisian scarf with filet border

Fresh off the hook: Warm Aeroette Lace Scarf. Just uploaded these photos. I’m very proud of it. My goal was to take the popular Aero Tunisian Wrap design, which is crocheted in fine silk, and make a warm wool version with a filet-style border. I used a fingering weight (sock weight) merino wool.

And Two More Goals

The second goal was to do a stepping-stone version of Aero. Originally, Aeroette was going to be a Tunisian crochet lace scarf pattern for a class.

It’s a simpler combination of Tunisian crochet stitches that are put together like filet crochet lace, the same way as Aero. This makes it a great way to understand a more dramatic filet-like Tunisian crochet lace scarf pattern. Like, Aero. The Ennis Wrap, also.

C2C and P2P Shapes

The third goal was to take the start-in-one-corner Aero and make it a rectangle instead of a triangle. In other words, corner-to-corner or C2C. Both Aero and Ennis are “P2P” (crocheted point to point.) I love making P2P and C2C lace shawls with Tunisian crochet! You increase steadily along one edge, then decrease steadily to end up at the far corner of the triangle.

The rectangular Aeroette is a similar crocheting experience. You start at the first of four corners (instead of three). Steadily increase, and then decrease, like with Aero and Ennis. End up at the final fourth corner and you’re done: it’s already edged!

Posted on Leave a comment

Free Slip Stitch Crochet Scarf Patterns and Answers

It’s fall! That’s when my two free slip stitch crochet scarf patterns are downloaded a lot, and I get questions about them.

I have nine slip stitch crochet scarf patterns published so far. These two are free downloads: Slip Slope Crochet Short Rows Scarf, and Eva’s Ribs Slip Stitch Scarf 101.

Molly asked me, “I am wondering if you allow our finished items to be sold if you are given credit as the designer?” The answer is yes I do, and thanks for including designer credit. I’m honored when my design inspires a crocheter to make several items. As a crocheter I love it when I’m making something and I start thinking, “Ooo… I could see making one of these for everyone on my gift list this winter.” Or, like Molly: I can imagine so many other people wanting the scarf I crocheted.

When I keep using the same pattern, I can try different yarns or color combinations. I find ways to perfect little things or increase my speed, like how I finish the edges or something. Another thing that happens is that I start naturally memorizing most or all of the pattern. That’s when I really pick up speed.

For more questions and answers, see this list of Slip Stitch Crochet FAQs students ask me in my slip stitch crochet classes. Scroll down for a slip stitch short row photo tutorial.

If you’re new to slip stitch crochet, try the free Eva’s Ribs scarf first. It makes for good TV crocheting, or while listening to an audiobook. The free Slip Slope scarf is the next step after Eva. It’s a lot like Eva with one new skill added (the short rows). A different next step after Eva is the Shamlian Weltie.

After the Slip Slope scarf, a bunch of my other slip stitch crochet scarf patterns will make perfect sense! For example, Undaria, Notch, and Slip Tectonics.


Posted on 3 Comments

Customized Tank Top with Crochet: Update

I customized a tank top with crochet edgings and a peplum. Looks great on my mannequin.

Remember I started to customize a tank top with crochet?

I cut a tank top to crop it and to give it a deep V-neck. Then I added crochet to it to customize it.

It’s mostly done now, and I like it. This is a size Medium tank top on a Small-size mannequin. In standard sizing, Lindsay the mannequin is on the Extra-Small side of Small. I’m on the Large side of Medium. On me, the waistline of the top sits higher, like an Empire-waist top. Also, on me there is no ruffling where the crochet meets the cut hem.

I uploaded a bunch of photos of this project to its Ravelry project page. (If I take a selfie I’ll add it there too. Maybe even here on the blog if I’m not too shy.)

This is my first attempt at a customized tank top with crochet. Thank goodness for a timely email I received from designer Sue Perez! She shared with me her sewing experience: a V-shaped neckline needs special reinforcing. I took that into account when I chose the crochet stitches and gauge for the neckline.

This experience of refashioning store bought clothes answered lots of questions I had. For example:

The Yarn Thickness Worked Out

It’s standard sport weight, very smooth, and is a cotton mixed with rayon for drape. In crochet thread sizing this would be a Size #3.

I wouldn’t want to go with a yarn that’s any thicker than this, or that has any fleecy loft or friction on the yarn’s surface.

A thinner yarn (a.k.a. a crochet thread Size #5 or #10) would work great, especially for fancier, fussier garments. This sport weight thickness works for the casual nature of a daytime tank top, or for a tee shirt. It also gave me the feeling of making progress quickly enough to stick with it.

Amount of yarn

I’d say it took up to 1.5 balls of Lotus yarn; that’s 325-375 yds.

Method of Attaching the Crochet

Seems fine so far. It will also have to hold up to washing and wear. Crocheting right onto tee shirt fabric like this? Yes, it can be done. I used a needle-sharp steel crochet hook. It was the largest I have and was not quite large enough for the yarn. A larger one might have left noticeably big holes in the fabric though.

I didn’t loooove doing the first row. Funny thing about crochet – that’s often the case. Crocheting into the foundation chains isn’t my favorite thing either, nor is crocheting foundation stitches. I usually want to get whatever the first row is over with. Same with this top.

Holes Where Stitches Meet Fabric

I mostly don’t want to look at the holes where the crochet stitches meet the fabric. When I wear it I don’t notice it at the hem. It stands out in this photo to me because it’s rippling a bit. At the neckline, though, I added a surface crochet row that covers the holes.

A customized tank top with crochet looks pretty nice, doesn’t it? I super love the hem. Those are split clusters of triple trebles.