Posted on 3 Comments

Why “Self-Healing” Crochet Stitches?

Love knots removed on the left; row of double crochet on the right, which need a lifeline (in red).
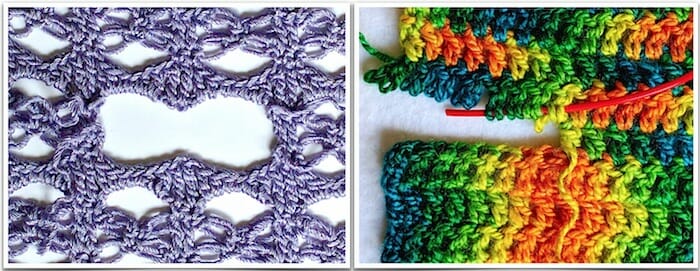
On the left is a self-healing stitch pattern. I’ve removed two rows of love knots, and the stitches left behind are fine the way they are—I have not edged them. No “lifeline” was required to prevent unraveling.
On the right, a red lifeline has been woven into the base loops of some of the double crochet stitches (dc, or in UK: tr). The nearby stitches without a lifeline are unstable and will unravel. View full size.


The Self-Healing Crochet Stitches and How to Cut Them class is thanks to an accidental discovery I made in 2013. A rectangular wrap kept sliding off of my shoulders. It has interesting edges, so I added (cut open) armholes to wear it as a vest.

I held my breath, cut a stitch, and…

Nothing happened. The stitches didn’t care. Why though? (Some stitches DO care. A lot!)

The first armhole is being opened to turn this Tunisian Mesmer Veil stole into a waterfall Maze Vest.
The cut that launched a whole class!

At first I thought it was an odd quality of only a few kinds of Tunisian stitches. After testing why this happened, I created a class called “Steeked Tunisian Lace for Fun Fast Fashions”.

By the time I taught it (2016), I’d already discovered the same effect with some regular crochet stitches. That led to a new version of the class​​, “Easy to Steek Crochet Stitches” in 2017.

Self-Healing vs. “Steek”

Nowadays I’m thinking “self-healing” conveys the topic better than referring to steeks. Steek is a specialized knitting term. I see too many question marks over crocheters’ heads when I use it. Also, steeking often involves cutting across several rows whereas in my class we cut open ONE row.

Cutting a self-healing stitch is creatively liberating and empowering. For me as a designer it’s exhilarating! I think “self-healing” conveys some of the positive, low-stress feeling people have in this class.

​Which Crochet Cutting Class?​

My friend ​Pauline Turner will be teaching a class​ called “Cutting Crochet” at the same event on ​Thursday, ​July 26.​ Our two “how to cut” classes seem to be very different​.

When renaming my class I briefly considered “Cutting Crochet” as a way to avoid the steek term. I worried that it would bring to mind the traditional reasons a crocheter would need to cut crochet: to fix, tailor, or repair it. My class is not traditional.

“Game Changer”?

“It’s a Game Changer” — Vashti’s mom (crocheter).

If you can add a head opening, armholes, and even decoratively shaped openings wherever you wish in a crocheted item, it means this is a distinct, different construction method. Here’s why my mom might be right:

  • It changes what we can do with schematics and simple shapes.
  • Beginners can understand and use the basic principles of it.
  • It simplifies the crocheting: just keep crocheting to the end. No need to make sure you start the armholes in the correct row. Stop crocheting when you want to, not when you’re a fixed distance from an opening.
  • The opening you add later is actually superior to crocheting it in as you go. It’s less lumpy.
  • It’s certainly a game changer when doing planned pooling with a variegated yarn (argyling, color stacking, etc). Crocheting a simple shape straight through is really important for this kind of crocheting. If you were to add an opening as you’re crocheting, you’d throw off your color sequence. To be able to cut open armholes, a head opening, pocket slit, and even a scarf keyhole later is ideal.

It turns out that a large number of stitch patterns are, or can be subtly tweaked to be, self-healing.

Self-Healing Crochet Stitches and How to Cut Them has a 2018 class resources page.
Posted on 4 Comments

Starwirbel Class Resources

Crochet class image for Starwirbel webby veil-like star stitch lace
Updated on 7/18/18View full size Starwirbel images. This is a conveniently clickable group of things I mention in The Starwirbel Way: Lacy Star Stitches classes. I teach the next one on July 26, 2018 in Portland OR. See student feedbackI show a lots of published and unpublished star stitch designs in this class and try new things with the stitch for each class! Each illustrates the stitches and techniques learned.   — Vashti Braha


Thinking of signing up for this class? I wrote this post for you.

Crochet Patterns & Crochet Alongs

Recommended Issues of Vashti’s Crochet Inspirations Newsletter

Starwirbel Class, Blogged

Inspiration Boards for this Class

  • Star Stitch Crocheting (Featured by Pinterest: “We think your board is amazing, and it really demonstrates what Pinterest is all about!”)
  • My Star Stitches Flickr album since 2013. Note that newer images display last (chronologically), the default in Flickr. Almost 600 images so far.

Any Books on Star Stitch Crochet?

Yes! Learn Star Stitch Crochet by Jenny King (2014, Annie’s)

Posted on 2 Comments

A Crochet Class in a Vest

The first corner of a hanky-hem love knot mesh vest in spring sunshine.
View full size image.

Want to see what I’m working on? This will be Flowerfall, a hanky-hem waterfall vest that I can wear when I teach 21st Century Love Knot Adventures this July in Portland, Oregon. I’m now two-thirds done.

Several Class Skills in a Vest

I’m designing Flowerfall to be a visual aid for several skill levels. I’ll also be adding the pattern to my shop for those who can’t attend the class.

Love Knot Beginner Skills

Another view of this diamond mesh would be the love knot sections of Lovelace. (It’s so iconic that the stitch is synonymous with the mesh in some how-to sources from the 1800’s to now.) Then, compare it with the Electra Wrap’s triangular love knot mesh.

For Students With a Bit of Experience

  • How to increase and decrease this mesh, and add picots as one way to finish the edges as you go.
  • The when, why, and the how-to: making love knots with slip stitches instead of single crochets (UK: dc).
  • My new favorite way to keep love knots from loosening later if the yarn is slippery.
  • A new way to crochet into love knots that I recommend for a project like this one.

For Those With More Experience

  • How to do corner to corner (C-2-C) love knot mesh in which you start in one corner and end in the opposite one.
  • How to sprinkle in other stitches with the classic love knot mesh to create lacy new stitch patterns!

Multi-Purpose Visual Aids = Ideal

This is my seventh year shipping teaching aids across the USA for crochet classes. I teach four to six different topics per event. Visual aids are everything! I always end up with a lot of crochet items to ship.

In the past few years I’ve started designing class items that combine several points of information in one. Not only do I cut down on the shipping this way, it’s a fun design challenge. I also love coming up with how a design for one class topic can double or triple as a visual aid for other topics I’m also teaching.

Self-Healing Stitch Alert

An example of this is I’ll be adding armholes to Flowerfall by cutting them open. Know what this means? It’ll also be a great visual aid for the Self Healing Stitches and How to Cut Them class! I might even bring it to the Tunisian on the Diagonal class if I don’t make a Tunisian one in time. Even though Flowerfall isn’t Tunisian, it’s an example of an easy shape to crochet from corner to corner in any stitch. (Flowerfall is even relevant to my slip stitch classes. It’s the first design I’ve done with slip stitch love knots.)

I’ll post again about this design so that you can see its modified diamond shape, how its armholes happen, and different ways to wear it. I’m smitten ? . Flowerfall’s Flickr album has three photos so far.

Posted on 6 Comments

Love Knot Crochet Class Resources

Official 2018 image for the 21st Century Love Knot Adventures class.
Updated on 7/18/18. View the above image full sizeThis is a conveniently clickable group of things I mention in 21st Century Love Knot Adventures classes. I teach the next one on July 25, 2018 in Portland OR. See student feedbackI show a huge amount of published and unpublished crochet designs in this class and I try new love knots for each class! Each illustrates the stitches and techniques learned.   — Vashti Braha

Thinking of signing up for this class? I wrote the Crochet Class in a Vest blog post with you in mind.

21st Century Love Knot Adventures

In crochet, the Love Knot is also known as Lover’s Knots and Solomon’s Knots. Before 1950 it was most commonly known as “Knot Stitch” and occasionally “Hail Stone Stitch.”

Downloadable Love Knot Crochet Patterns

Vashti’s Forthcoming Love Knot Patterns

As of 7/18/18.

Crochet Inspirations Newsletter Archive

​Love knots serve as important examples for several different newsletter topics!

Online Love Knot Collections

Love Knot How-To’s

Any Books on Crocheting Love Knots?

Yes! Jenny King wrote one: Crochet with Love Knots (Annie’s Crochet 2014).

Non-English Terms (notes)

Beaded Love Knots

Ravelry gallery of my 17 beaded love knot projects

Love Knot Links Miscellany

Older sources were first compiled for the 2012 class. All links work as of 4/05/18.

Posted on 2 Comments

Crochet Beginners’ Tip: Slip Stitch Fake Facts

Beginner Crochet tip: tune out the fake facts still being circulated about our most basic and versatile crochet stitch, the slip stitch!

About Today’s Tip for Crochet Beginners

I’m going to unpack that “outdated advice” part in the tip pictured above.

For reasons I still haven’t figured out, misconceptions and outright errors (“alternative facts”?) about slip stitches are still repeated uncritically in English-language crochet books.

This has been going on for decades. Think about how it affects whole generations of crocheters. It’s the only reason it took me 30 years to try crocheting a whole swatch of just slip stitches. I was immediately smitten. My first slip stitch design was the 2004 Pullover Shrug (the cropped purple top I’m wearing in the tip above).

I have distilled every fake fact about slip stitches into the following four sentences, below. I begin my Slip Stitch Crochet 101 classes with them so that we can deal with them head on.

Can you spot all the unhelpful advice?

  1. There is one kind of slip stitch and you crochet it tightly.
  2. It is useful only occasionally, for a few things, such as joining a round, closing a picot, or seaming.
  3. Don’t bother trying to make anything with it, it has no height.
  4. It doesn’t really count as a stitch at all; it’s a nonstitch

(I underlined the fake facts to help you.) This false information discourages crochet beginners and all crocheters from exploring only slip stitches, not other basic stitches. Why? It’s not because slip stitches are tricky for beginners. It’s the most basic crochet stitch of all, along with the chain stitch! In my classes, the experienced crocheters struggle more—but that’s just due to the years of misinformation.

The more I explore slip stitch crocheting, the more insight I get into all crochet. This is why I want every crocheter to know about it. (The things you can make are also awesome.)

New Rules About Slip Stitches

1. Think of slip stitches as a group of stitches.

Lattice textured border of a 100% slip stitch crochet mobius "Bosnian" style (in rounds with no turning).
“Bosnian” crochet: slip stitches crocheted in the round with no turning.

Slip Stitch Crochet is actually a whole technique. When you know this, you can retain what you learn about them easier. It also spurs innovation, and aids pattern writing. I use the abbreviation SSC, as do others in the international SSC community.

Slip stitches look, feel, and behave very differently when crocheted with turning or without (“Bosnian”), and in just the front or back loop or both (or between stitches!). Invert them or twist their loops for more slip stitch types.

2. Go up at least two crochet hook sizes to crochet them loosely. 

Big-hook slip stitch is especially fun! Start with your bounciest wool yarns. 

3. Slip stitches are exceedingly versatile, useful, and pleasing for many of the things crocheters make.

In fact, slip stitches are often preferable to other stitches, such as for ribbing, or for a thin, supple fabric that conserves yarn.

A slip stitch may also be fine for joining a round, closing a picot, or seaming, but not always. For example, slipping a loop through to join is more invisible than a slip stitch. A single crochet sometimes closes a picot better with some yarns or for certain patterns. For seaming, sometimes alternating a slip stitch or single crochet with a chain-1 is better. (I also like to use inverted slip stitches for seams.)

4. Slip stitches clearly have height.

How odd that it needs to be stated. The simple evidence is the heaps of very wearable scarves and sweaters. You should see the overflowing table of them that I bring to classes!

Not only does a slip stitch have height, the height varies depending on the type of slip stitch. As a starting point, expect front-loop types to be taller than back-loop types. (This is the case for single crochet too.) 

Yes, you can even crochet around the post of a slip stitch.

Please Don’t Wait Like I Did.

I learned about crocheting slip stitch projects decades after learning how to crochet everything else. There’s no reason for crochet beginners to wait decades like I did!