Posted on Leave a comment

New Angle on Diagonal Tunisian

A diagonal corner of the Four Peaks scarf.

I put off writing about the Tunisian on the Diagonal class because I kept feeling like I had nothing to say, but also too much! Here’s another paradox: I feel like I’ve been teaching this class since 2010 and yet I never have, exactly. How can all of this be true?

I figured it out after writing the section about its 2009 roots below. Crocheting Tunisian diagonally is a huge topic based upon simple and powerful principles. Vary one thing a little, factor in some momentum, and everything ends up dramatically different.

I’ve taught big sections of this. The 2018 class will be the master class. (It’s great for all skill levels, thanks to the “simple principles” part I just mentioned.)

For contrast, travel back to 2009 with me for a bit.

2009 Tunisian Increase Methods

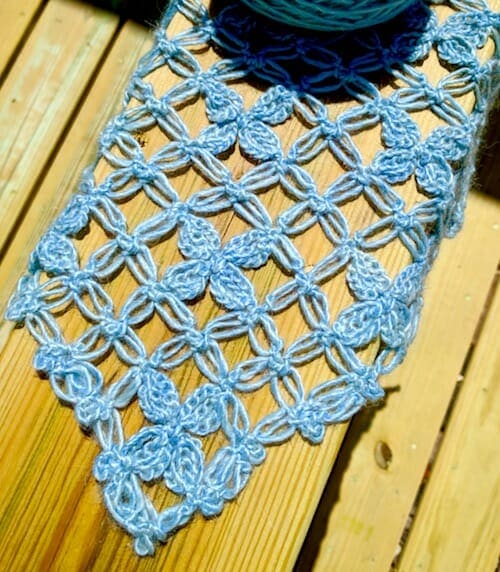
Nine years ago my first diagonal crochet design happened: the Five Peaks Shawl prototype. (The pattern was published in 2010 in Interweave Crochet Magazine).

Left triangular swatch is starting to curl along one edge. Other triangle is symmetrical with nice drape.
Effect of the “squeeze-it-in” method shows in the left swatch. Not recommended for a shawl.

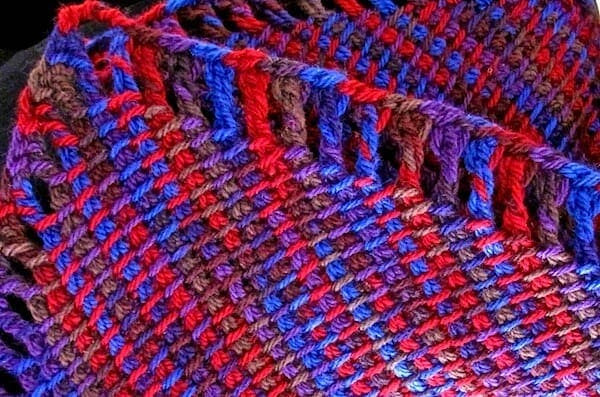
 There was almost nothing on diagonal Tunisian crochet from corner to corner, or “C2C”. With C2C you increase steadily along both row ends to widen, then decrease steadily until you end at the opposite corner.

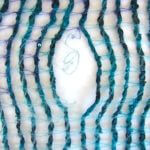
The default increase method back then didn’t have a symmetrical, polished drape. I blogged about it (and the photo at right) in June 2009 because that’s when I was working out the increase method for the Five Peaks Shawl.

2009 Tunisian Hook Choices

Tunisian crochet hooks larger than size 6.0 mm (J) were scarce in any style and length, whether straight, flexible, double-ended, short, or long. When you found one, you put up with whatever its material, surface finish, and hook shape was. Remember that?

My options were either a long straight 6.5 mm (K) or a discontinued 9 mm (“M/N”) flexible hook from eBay. I needed a size between these two. Too bad!

Back then, publishers needed designers to use crochet hooks that were commonly available in stores. I worried that I wouldn’t be able to sell the Five Peaks pattern to a magazine. Fortunately, Tunisian hook choices were improving. Only three months later I blogged “Heaven is a Crochet Hook for Every Need”. Nowadays I keep a range of Tunisian hook sizes and lengths.

The Evolving Tunisian Crocheter

We Tunisian crocheters have been enjoying a renaissance for our craft! It had barely started in 2009. Back then, most crocheters still assumed the nature of Tunisian crochet was to be thick, kind of stiff, and with a stubborn curl. Not something that could cascade and swing from the shoulders like a waterfall, or look like a lacy weightless veil.

Each time I’ve taught a Tunisian crochet class since 2010, the students bring more skills and experience to the room. Newer Tunisian crocheters understand things faster. This became really noticeable around 2013. 

Five Peaks classes were the first I taught on diagonal Tunisian crochet. It was ahead of its time in 2009. Since then I’ve learned to start every Tunisian topic with a quick review of the relevant basics. People of all skill levels seem to welcome this. It seems to pull together and standardize the new things everyone is learning from different designers. 

For 2018 I’m excited to be starting out with a review of a different set of basics because when we crochet Tunisian on the diagonal, there are clues we can be looking for but may not recognize for awhile. Things may look wrong for awhile and yet be so, so right. 

Posted on Leave a comment

Color Pooling Developments

Some works in progress for the 2017 color pooling class.

The class material for Creative Planned Color Pooling changed me. In fact, it’s still changing me. I’ve adjusted its title to take new developments into account (more on that below).

I’d love to have taken a color pooling class like this years ago! In fact I’d rather learn it in a class than from a pattern or blog. The next time I teach this class: July 28, 2018 in Portland, Oregon. 

Crochet Rules, Questioned

Developing this topic changed me as a crocheter. It showed me what I take for granted about crochet how crochet works. I think it’s because for the first time, something else (the yarn’s color sequence) replaces crochet standards that have always worked for other kinds of crochet.

One ball of hand painted yarn, its colors intentionally "pooled" into two stitch patterns (popcorns and seed/moss/linen st) to create this "Florida Peaches Handbag"
These popcorn stitches vary but it doesn’t matter.

Here’s one: uniformly even stitches are beautiful. We aim to make uniform stitches to get a lovely, polished result, right? Beginners practice until they can be proud of how even their stitches are. Why would one question this?

When you’re intentionally pooling (I think of it as color directing), it’s the yarn’s colors that you aim to make uniform. The evenness of your stitches is second to that. A pretty distant second, which was shocking to me. Why? That brings me to a second way this class material changed me.

Primal Effect

On a bigger and more personal scale, my relationship to color changed! It was like watching my brain re-prioritize what it was seeing. My eyes rejoiced when the yarn’s next color stacked up the way I wanted it to. The stitches for making this happen became almost interchangeable. Even the stitch gauge could vary.

In other words, detecting a color pattern is riveting to the brain. (At least my brain. It feels primal.)

Especially when the pretty color pattern emerges from seemingly random chaos.

Especially when it’s like there’s a secret code in a multicolored ball of yarn and you’ve just cracked it.

The crochet stitch and gauge becomes a strategy: change the crocheting a bit to get a color to stick with the pattern and it works! The eye doesn’t see certain stitch irregularities. It’s too captivated by the color patterning. Also, the nearby stitches will adjust.

Recent Developments

Since my 2016 class, more crocheters have mostly been finding out from blogs about doing planned color pooling (a.k.a. intentional yarn pooling) with variegated craft store yarns. I’m seeing people make a cool argyle effect using the linen stitch (a.k.a. seed stitch, moss stitch, granite stitch): each row is [sc, ch 1, skip next st], and you crochet the sc of the next row into the ch-1 space of the completed row.

See this stitch in the colorful Aquarienne edging, Peaches handbag opening & handle, and Quailfeather. Accidental argyling happened with Barista. From a distance you can see a soft (but intentional!) argyle in this tweedy swatch and an argyle effect getting going in this swatch.

Colorful sock yarns custom dyed for my local yarn shop in coral reef colors.I came to this topic a completely different way, via hand dyed yarns. It’s easy to identify the dye techniques, such as hand painting and dip dyeing, because these yarns tend to be sold in the hank the dyer used, not wound into balls.

In these dyed hanks I saw “stitch games” because I’d already done other color-based and geeky experiments. For example,

  • When I learned from Marty Miller how hyperbolic crochet works (2006 or so), I crocheted her a hyperbolic coffee cozy secretly based on her birthdate.
  • A hand dyed yarn with a vivid yellow in it made me want to set it off with love knots. “Love Games” was the result.
  • I even sold a coffee cozy to a yarn company back in 2006 because I referred to it as a game.

Why “Creative Planned Color Pooling”?

Earlier versions of this class were “Stitch Games for Yarns With Short Color or Texture Changes” (2016 in Charleston SC) and “Stacked Color Pooling” (2017 in Mt. Pleasant IL). Planned pooling is becoming a recognizable term for more crocheters. I suspect that only seed stitch argyles come to mind for some. Also, some folks seem to think this is math based, but it doesn’t have to be. At all.

Creative is the important part of the new title because we’re still at the early stages of what is possible. There is way more to planned pooling than seed stitch argyles. What about lace and tall stitches? Shaping? Tunisian? I want crocheters to experience the possible! And of course to be changed by it.

The class resources page for this topic is updated as of 4/16/18.
Posted on 3 Comments

Why “Self-Healing” Crochet Stitches?

Love knots removed on the left; row of double crochet on the right, which need a lifeline (in red).
On the left is a self-healing stitch pattern. I’ve removed two rows of love knots, and the stitches left behind are fine the way they are—I have not edged them. No “lifeline” was required to prevent unraveling.
On the right, a red lifeline has been woven into the base loops of some of the double crochet stitches (dc, or in UK: tr). The nearby stitches without a lifeline are unstable and will unravel. View full size.


The Self-Healing Crochet Stitches and How to Cut Them class is thanks to an accidental discovery I made in 2013. A rectangular wrap kept sliding off of my shoulders. It has interesting edges, so I added (cut open) armholes to wear it as a vest.

I held my breath, cut a stitch, and…

Nothing happened. The stitches didn’t care. Why though? (Some stitches DO care. A lot!)

The first armhole is being opened to turn this Tunisian Mesmer Veil stole into a waterfall Maze Vest.
The cut that launched a whole class!

At first I thought it was an odd quality of only a few kinds of Tunisian stitches. After testing why this happened, I created a class called “Steeked Tunisian Lace for Fun Fast Fashions”.

By the time I taught it (2016), I’d already discovered the same effect with some regular crochet stitches. That led to a new version of the class​​, “Easy to Steek Crochet Stitches” in 2017.

Self-Healing vs. “Steek”

Nowadays I’m thinking “self-healing” conveys the topic better than referring to steeks. Steek is a specialized knitting term. I see too many question marks over crocheters’ heads when I use it. Also, steeking often involves cutting across several rows whereas in my class we cut open ONE row.

Cutting a self-healing stitch is creatively liberating and empowering. For me as a designer it’s exhilarating! I think “self-healing” conveys some of the positive, low-stress feeling people have in this class.

​Which Crochet Cutting Class?​

My friend ​Pauline Turner will be teaching a class​ called “Cutting Crochet” at the same event on ​Thursday, ​July 26.​ Our two “how to cut” classes seem to be very different​.

When renaming my class I briefly considered “Cutting Crochet” as a way to avoid the steek term. I worried that it would bring to mind the traditional reasons a crocheter would need to cut crochet: to fix, tailor, or repair it. My class is not traditional.

“Game Changer”?

“It’s a Game Changer” — Vashti’s mom (crocheter).

If you can add a head opening, armholes, and even decoratively shaped openings wherever you wish in a crocheted item, it means this is a distinct, different construction method. Here’s why my mom might be right:

  • It changes what we can do with schematics and simple shapes.
  • Beginners can understand and use the basic principles of it.
  • It simplifies the crocheting: just keep crocheting to the end. No need to make sure you start the armholes in the correct row. Stop crocheting when you want to, not when you’re a fixed distance from an opening.
  • The opening you add later is actually superior to crocheting it in as you go. It’s less lumpy.
  • It’s certainly a game changer when doing planned pooling with a variegated yarn (argyling, color stacking, etc). Crocheting a simple shape straight through is really important for this kind of crocheting. If you were to add an opening as you’re crocheting, you’d throw off your color sequence. To be able to cut open armholes, a head opening, pocket slit, and even a scarf keyhole later is ideal.

It turns out that a large number of stitch patterns are, or can be subtly tweaked to be, self-healing.

Self-Healing Crochet Stitches and How to Cut Them has a 2018 class resources page.
Posted on 2 Comments

A Crochet Class in a Vest

The first corner of a hanky-hem love knot mesh vest in spring sunshine.
View full size image.

Want to see what I’m working on? This will be Flowerfall, a hanky-hem waterfall vest that I can wear when I teach 21st Century Love Knot Adventures this July in Portland, Oregon. I’m now two-thirds done.

Several Class Skills in a Vest

I’m designing Flowerfall to be a visual aid for several skill levels. I’ll also be adding the pattern to my shop for those who can’t attend the class.

Love Knot Beginner Skills

Another view of this diamond mesh would be the love knot sections of Lovelace. (It’s so iconic that the stitch is synonymous with the mesh in some how-to sources from the 1800’s to now.) Then, compare it with the Electra Wrap’s triangular love knot mesh.

For Students With a Bit of Experience

  • How to increase and decrease this mesh, and add picots as one way to finish the edges as you go.
  • The when, why, and the how-to: making love knots with slip stitches instead of single crochets (UK: dc).
  • My new favorite way to keep love knots from loosening later if the yarn is slippery.
  • A new way to crochet into love knots that I recommend for a project like this one.

For Those With More Experience

  • How to do corner to corner (C-2-C) love knot mesh in which you start in one corner and end in the opposite one.
  • How to sprinkle in other stitches with the classic love knot mesh to create lacy new stitch patterns!

Multi-Purpose Visual Aids = Ideal

This is my seventh year shipping teaching aids across the USA for crochet classes. I teach four to six different topics per event. Visual aids are everything! I always end up with a lot of crochet items to ship.

In the past few years I’ve started designing class items that combine several points of information in one. Not only do I cut down on the shipping this way, it’s a fun design challenge. I also love coming up with how a design for one class topic can double or triple as a visual aid for other topics I’m also teaching.

Self-Healing Stitch Alert

An example of this is I’ll be adding armholes to Flowerfall by cutting them open. Know what this means? It’ll also be a great visual aid for the Self Healing Stitches and How to Cut Them class! I might even bring it to the Tunisian on the Diagonal class if I don’t make a Tunisian one in time. Even though Flowerfall isn’t Tunisian, it’s an example of an easy shape to crochet from corner to corner in any stitch. (Flowerfall is even relevant to my slip stitch classes. It’s the first design I’ve done with slip stitch love knots.)

I’ll post again about this design so that you can see its modified diamond shape, how its armholes happen, and different ways to wear it. I’m smitten ? . Flowerfall’s Flickr album has three photos so far.

Posted on Leave a comment

Conference Prep Crazy Zone

Sorting class materials into a box per class topic (total of 5) on a big white sheet.

Conference Prep Frenzy: A Two-Week Zone

For Future Vashti‘s reference: I shifted into conference prep frenzy at a specific time three days ago: end of the night on Monday, June 27th. It’s like stepping into the cockpit of an airliner, flicking on all switches and activating ‘all systems go’. (Like in the movies, anyway.) It’s obvious when it starts.

The next morning I did my teacher’s conference prep ritual: put on a pot of coffee, spread a big white sheet on the floor (because it helps me focus), lined up a row of empty boxes, and labeled each with a class topic.

Completing the Teacher’s Conference Prep

I rounded up everything to bring: first the completed designs, then the handouts, yarn and other materials for students to use, optional materials like printed patterns, key newsletter issues, visual aids like class swatches etc., topic-related teaching aids like a “blocking demo kit” for the Weightless class, and a “beading demo kit” for the love knots class.

Doesn’t it seem like with a pot of fresh coffee, one could just whip through this? The reality is that it does start this way, but my completed designs are spread all over the house and I forget about some. Not only that, each of the five class topics is distinctly different. It takes focus to keep all five in my mind at once.

It’s as if the white sheet cordons off an area of the house (and my brain) for 24-36 hours. That’s what makes it a ritual, really. I get through the first layer so that I can see the next layer.

After that time I can condense it all into 1 or 2 shipping boxes. That’s the quick and easy part.

More Show Booth Conference Prep

Here’s what else got done since I blogged 2 days ago:

  • Wound new Lotus colors in a few 100 gram balls—so that I could label and take photos of them—so that I can add them to the website. (This automatically means I committed to color names for them, too: Carbonite, Lavender Ice, Orange Luxe, and Emerald Deep.)
  • We build our booth with grid panels. Found out how hundreds of them will get to the show floor! Thanks to Linda Dean whom I can’t wait to finally see again.
  • Placed final order for crochet hooks I’ll need for the booth and classes.
  • Finalized arrangements and logistics for how everything and everybody gets there and gets back!
  • Formatted several crochet patterns for kits, classes, etc (printed):
    • a fun new one-ball pattern for Lotus that Doris designed for the booth (a printed crochet pattern). More on that later.
    • My Mesmer patterns (scarf, stole, sized vest variations on a steeky theme and with double-ended hook option) as one printed pattern set for the class, and extras for booth.
    • Did the same with my Starwirbel pattern.
    • Still have 3 more patterns to do if I can.
  • Back-&-forths with tech editor on edits of class handouts and patterns formatted for printing and kits.
  • Delegated my distress to my husband over both of our home office printers breaking within weeks of each other! He’s got that now.

?I know from last year that there will come a point when I won’t be able to focus on pattern formatting or class handouts, so I’ve done as many as possible these past few weeks.

Woke up the next morning to emails from others who were now also ‘all systems go’ with their conference prep too. And now today is Thursday June 30: twelve days from lift off. I predict these blog updates will get posted more erratically but I’ll keep trying. It forces me to find a peaceful moment to collect my thoughts.