I’ve moved to WordPress hosting with layered security and a WooCommerce-driven shop. For me it’s like the self-parking Lexus of websites, and I’m saving about $500 a year in operating costs. Also, blogging is fun again!
Features of the ✨ New DesigningVashti.com ✨
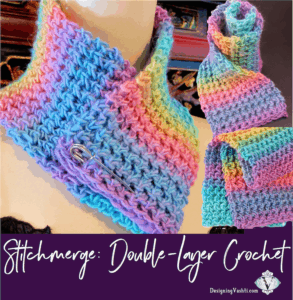
It’s now free. Use it to make any thick, dense, soft, strong rectangular item (cowl, afghan square, tote, hot pad, etc).
It’s a partial list—I keep discovering more features.
I can easily host free crochet patterns now! I’ve marked down some patterns to free.(They’re not marked down in Ravelry). You can see them in the Bargain Bin but wait: try registering an account here first (you don’t have to buy anything).I think it’s a really nice experience, especially after you download something and then use your updated account.
Subscribe to the blog or its RSS in the footer (scroll to the bottom of this page).
Two search boxes: The Search Products box is in the header at the very top of every page. The Site-wide Search box is always in the right sidebar and searches this entire blog, all the way back to 2011. I think the search boxes are found at the bottom of your screen if you’re using the mobile version. (I’m seeing older posts that have their original image captions, but the image didn’t transfer over. I’ll be updating groups of posts as time allows.)
Lots of clickable tags on each product page for any little feature you might want to see. For example, “Gift idea: men“, patterns that work for any type and/or amount of yarn, one ball projects, etc. Scroll to the bottom of any page to see the product tag cloud.
Helpful things in the right sidebar on every page. On mobile I think these are behind a menu button in the top right corner.
The expanded help page is a mini temporary version of the real FAQ page that I’m working on.
If you’re already familiar with my patterns, it’s not your imagination: most images and descriptions are also freshened up.
Features Still in Development
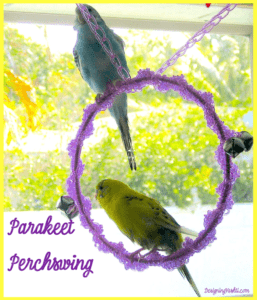
Another simple crochet pattern, now free. I used Jelly Yarn® and I would do it again—with the glow in the dark type!
I need to:
Work out how to add more types of kits to the shop.
Learn how to include optional add-ons, like gift wrap or a crochet hook to go with a pattern.
Add remaining patterns from my old shop, mostly toys and bags. I also haven’t finished adding free patterns.
Choose the best way to organize/nest all the crochet tutorials and other resource pages. I’m eyeing the “Learn” tab in the header.
Learn how to do gift cards.
Find a good way to do online classes and other events.
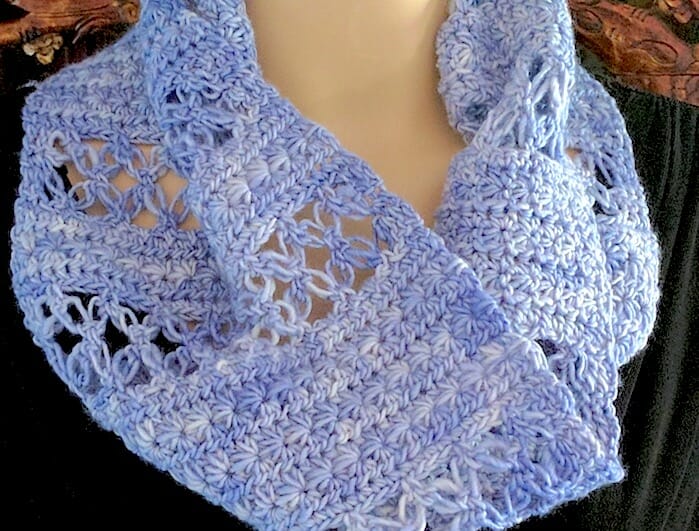
A star stitch crochet scarf with love knots? (About as common as a love knot scarf with star stitches.) So beautiful together! I’m calling it Lovelace Ring Scarf.
Two years later a visitor to the DesigningVashti Facebook page requested the pattern. Again in deep crochet class prep mode, I had to put it off until after teaching and a series of seven crochet tutorials I’d agreed to do for the Cut Out & Keep site.
Alternate yarn idea: Love knots and star stitches both benefit when crocheted with two yarn strands held together. This is Satin Grey Lotus yarn with a lace weight metallic mohair.
By then the US election had just taken place. I appreciated the sweet, loving patterns crochet and knit designers were spontaneously posting. I returned to the 2014 attempts to blend stars and love knots in one pattern. It was a pleasure to finally polish it up into a fun, versatile, balanced stitch pattern. I hoped the idea of harmonizing and unifying two popular stitches of very different traditions might lift others’ spirits.
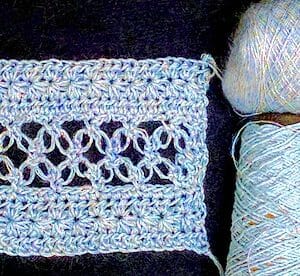
The basic stitch pattern is available here. I used it to make a 6.5″ square block with DK weight yarn and a G7/4.5 mm hook. A border would probably turn it into a 7″ block.
The Lovelace Ring Scarf design happened next because I needed a self-edging version. It came to me during Thanksgiving. As I lay there contemplating the stitch pattern I’d sent off to Cut Out & Keep, I wondered about giving the basic stitch pattern a selvage (no need to edge it later).
The start and end of the love knot section always looked a bit stringy and unstable to me. I also wanted to vary the texture bands and widen it for a lush, romantic ring scarf.
This is how Lovelace came to be.
Is a Love-Knot-to-Star-Stitch Scarf…Challenging?
Both are Intermediate-level crochet stitches but that doesn’t mean they’re difficult. I include tips and visual aids in the pattern that have worked in my classes. Most of Lovelace is rows of easy, familiar stitches like single and half double crochets (sc and hdc, or as they say in the UK: dc and htr).
These easy stitches are a backdrop to the fancy stitches. Like peacekeeping diplomats they harmonize relations between the two iconic, culturally powerful, individualistic “diva” stitches.
My experience of crocheting star stitches (stars) and love knots (LK) in the same pattern is that I get some comfort zone rows of simple stitches, then a spicy row or two, then more comfort zone.
Dramatic Differences Between Stars & Love Knots
I researched both of these two unique stitches deeply. I don’t recall ever seeing them combined in one stitch pattern. If you have, please let me know in the comments.
Love knots are reversible, star stitches are not. It was an issue with my early swatches.
Love knots are more independent than the usual crochet stitch, and star stitches are the other extreme. This shows in lots of ways. Add Love Knots anywhere like a chain stitch because it’s a type of foundation stitch. Each LK is distinct, complete, and recognizable from a distance.
Star stitches require context. The stitch just before it, after it, and often above it determine how recognizable each star is!
Love knots likely originated as a southern lace, star stitches as a northern thermal fabric. LK were almost always crocheted in very fine cotton and silk threads for delicate and summery edgings, baby bonnets, and petite “opera bags”.
Stars have been used most often for making thick, dense coats and blankets in wool. Even when early stars looked like fine spidery lace, wool was the fiber of choice. (That’s why my unofficial name for the original swatch is “North and South stitch pattern“.)
Interesting Similarities Between Them
Both LK and stars are romantic, iconic, classic/old-fashioned, popular, and beloved.
Both originated in the early to mid-1800’s.
Both have long been favored for baby things. (Stars: baby blankets and coats; LK: sacques, bonnets, layette edgings.)
Both can be lacy. When star stitches are lacy, you’re looking at pulled loops, just like with LK.
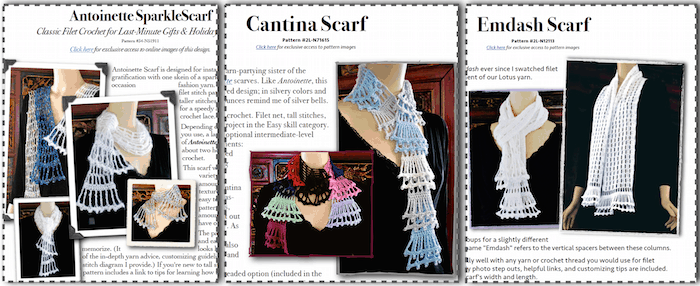
In honor of (Inter-)National Crochet Month, I’ve added a lacy spring scarf pattern to my Ravelry shop: the double-flounced Emdash Scarf. It’s free for one week.
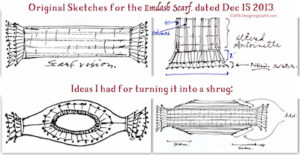
I thought I’d show you Emdash’s crochet story in pictures. National Crochet Month is for crochet stories, right? Especially about lacy spring scarves. First, the design sketches:
There they are all together at the top of this post. It’s easier to show some alternate views of them this way. Antoinette is the eldest (I published her popular pattern in Nov. 2011). She loves lace weight metallic mohair with sequins and other holiday party yarns. Cantina is the youngest, even though her pattern was published before Emdash’s (in Dec. 2015). Cantina is a freewheeling hippie girl who likes color parties, scrap yarns, and beads.
How did Emdash get her name?
While I was exploring special characters on my keyboard, I kept seeing the scarf draped on my mannequin. The columns of tall stitches are grouped with vertical spacers. (I like the slightly different crocheting rhythm of it.) They started reminding me of emdashes, yes—a type of punctuation. It shortens so nicely to “Emmy.”
The last part of her design story is that I learned how to format and print out kit patterns with the Emdash Scarf, for the show booth I had last summer. This means Emdash is also available as a printed pattern while they last.
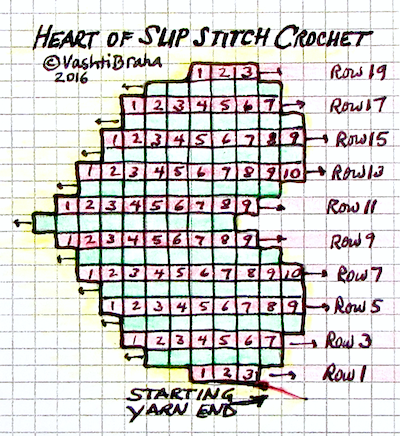
This blog post is an overflow page for issue #76 of my crochet newsletter. Scroll down to see the heart shape chart, and then the full text of the Slip Stitch Crochet Hearts Free Pattern. To print, click on the little printer icon at the end of this post.
We Need to Talk: Slip Stitch Skill Levels
I rate this pattern Intermediate for slip stitch crocheters, and Advanced if you’re new to Slip Stitch Crochet. A good free crochet pattern for slip stitch beginners would be Eva’s Ribs Scarf. After that, Slip Tectonics or Undaria would bring novices solidly up to speed for these hearts.
Seriously.
These crochet hearts were originally used for a three-hour intermediate-level class on slip stitch shaping methods. “Slip Stitch Crochet 101” class was a prerequisite. After crocheting this heart, students would be equipped to crochet fitted sleeve caps and gracefully shaped armholes!
You’ll be adding or subtracting only a stitch or two to make this heart. Not a big deal if you’ve ever increased and decreased with single crochets. It takes practice, though, to shape every row of slip stitches.
Consider that even if you’ve already completed some slip stitch projects, most existing slip stitch crochet patterns involve only occasional shaping, if any. (If you’ve crocheted a slip stitch pattern with a significant amount of shaping, please tell me about it in the comments.)
For a slip stitch beginner, the biggest challenge is recognizing what the stitches are doing to avoid increasing or decreasing by accident. It’s like learning to crochet all over again—and that’s humbling if you don’t expect it, but what a beautiful thing! How many of us long-time crocheters remember what it was like to learn how to crochet for the first time? If you’ve crocheted for at least ten years already, you can revisit this life changing moment.
Challenge Accepted? Great!
Welcome to the “heart” of slip stitch country. Start with a thick smooth yarn and a big hook.
Cross off each row when you complete it to easily keep track of where you are. (I have to. For these crochet hearts it’s easier to count stitches, not rows.) For pattern help, visit my fabulous forum.
This heart shape is crocheted from side to side. Use any yarn. Image missing? See this album.
Chain 4.
Row 1: Skip ch nearest your hook, ss in any loop of each remaining ch, turn: 3 ss. Easy, right?
Notice that every odd-numbered row ends at the top of the heart and every even-numbered row ends at the bottom of it. The yarn end (called “tail” from now on) is at the top of the heart, so when you crochet toward the tail end, you must be on an odd-numbered row.
Row 2: Ch 2, ss in 2nd ch from your hook (an increase of one st), Fss in first ss, 2 Fss in each of next 2 ss, turn: 6 ss.
No row will ever have more than 10 sts in it. If you have trouble seeing which loops to crochet into:
It will get easier after 3 rows or so. You won’t see the heart shape develop until you’re halfway there (Row 9).
The st count matters more than choosing the correct loop. Count as you crochet and add a st in a good enough loop if need be. The most common problem for slip stitchers is identifying which st is the last one of the row. Counting as you go helps and you won’t need to use a stitch marker.
I don’t count my rows. As I complete each row I put a check mark next to it on the pattern. I also rely heavily on the yarn tail to know whether I’m crocheting a row toward the tail or away from it.
Row 3: Ch 2, ss in 2nd ch from your hook, Fss in each ss, turn: 7 ss.
Rows 4 & 5: Repeat Row 3. At the end of Row 5 you’ll have 9 ss.
Row 6: Ch 1, Fss in each ss, turn: 9 ss.
Row 7: Repeat Row 3: 10 ss.
Row 8: Ch 1, skip first ss (a decrease of one st), Fss in each remaining ss, turn: 9 ss.
Row 9: Ch 2, ss in 2nd ch from your hook, Fss in each ss to last st, turn leaving last st unworked: 9 ss.
Row 10: Ch 1, skip first ss, Fss in each ss to last st, 2 ss in last st, turn: 9 ss.
Row 11: Repeat Row 10: 9 ss.
Row 12: Repeat Row 9: 9 ss.
Row 13:Ch 1, Fss in each ss to last st, 2 ss in last st, turn: 10 ss.
Row 14:Ch 1, Fss in each ss to last st, turn leaving last st unworked: 9 ss.
Row 15:Repeat Row 6: 9 ss.
Row 16-18: Repeat Row 14. At the end of Row 18 you’ll have 6 ss.
Row 19: Ch 1, skip first ss, Fss in next ss, [skip next ss, Fss in next ss] twice, turn: 3 ss.
This is how it looks after a quick blocking, and before edging it with a round of slip stitches. (If image is missing, see this album.)
Round 1 (add a border of ss): Fss in each ss of Row 19, ss in one loop at the end of each row to bottom point of heart, [ss, ch 1, ss] in it, continue edging row ends to first row, ss in each of the 3 foundation chs, ss in remaining row ends, join to start of round with a ss.
Note: Edging these crochet hearts is not as laborious as it might seem. Even though it’s not easy to identify the same loop of each each row end, this needn’t slow you down. I mostly just estimate where to put my next stitch, and it comes out fine.
Finishing: Fasten off, or add another round of ss, or reverse sc. Be sure to damp block: stretch all edges in every direction then let it settle into a smooth, symmetrical-enough heart shape and let dry. Make another like the first so that you can seam them together with a ss seam, add a bit of stuffing and hide the ends.
Experiment Freely with this Free Heart Chart
The grid rows of the chart match Fss stitch height, but why impose limits on your heart? Try using single crochets instead; the heart shape may widen or narrow a bit. Or, try back-loop slip stitches (Bss) after you’ve made a few crochet hearts in all front-loop slip stitches (Fss). (The back loops of slip stitches are trickier to find than front loops for some folks at first.)
I hope you’ll show us your crochet hearts in my forum.
Site-wide Search
Vashti’s Crochet Shop
Get the Newsletter
Sign up to receive Vashti’s Crochet Inspirations Newsletter in your inbox monthly.