This clickable list of slip stitch crochet resources is mainly to aid students of my classes in exploring more about Slip Stitch Crochet at their leisure. (If you have not yet taken any of my slip stitch classes, I hope someday I’ll meet you in one of them!) You’re welcome to enjoy the links below whether you’ve taken the classes or not. They represent the extra information that doesn’t fit into a standard three-hour class. Some are the names of designers, books, other types of slip stitch crochet, etc., that I may have mentioned in a class.
Dee Stanziano’s “Pushmi-Pullyu“: Pushmi Pullyu: Coined by me (Dee Stanziano) in 2008, Pushmi Pullyu is the crochet technique of making crochet stitches forwards (Pushmi) and backwards (Pullyu) within the same row, or by alternating hands for each row without the need to turn work. This creates a unique look in the fabric, almost like Illusion Crochet. In 2011 Hazel Furst coined this as “Back to Front Crochet.”
Slip Stitch Crochet Books of Interest
Tanja Osswald’s Kettmaschen (in German)
Nancy Nehring’s Learn Slip Stitch Crochet and Slip Stitch Caps
Bendy Carter’s Knit 1 Purl 2 in Crochet.
Dora Ohrenstein’s designs and articles inInterweave Crochet magazine, Fall 2010 and Winter 2011 issues.
There’s more than one way to crochet two rows at once. You can also crochet three or more rows as one. I’ve only seen other people combine two rows with plain and fairly dense stitches, like rows of all single crochet or double crochet (in UK & AUS that’s doubles and trebles). I’m going to show you how I did it with a lacy stitch pattern.
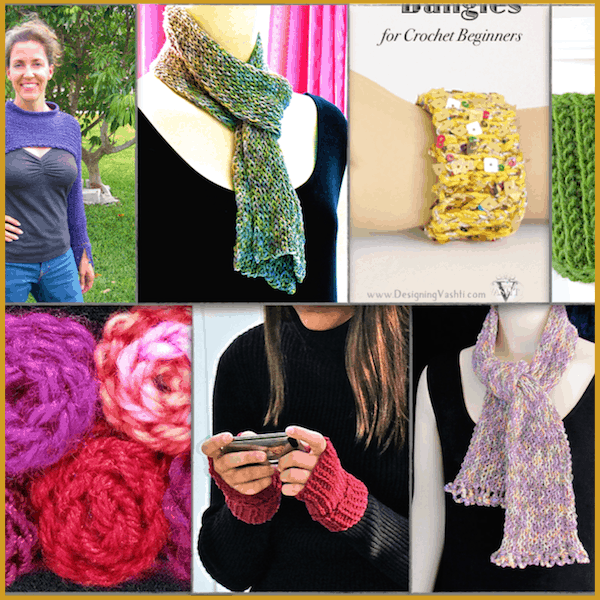
The green swatches below are from my newsletter, issue #102: “Wild Whys of Y-Stitches”. I didn’t have room to include the lavender ones shown above. That means this post also qualifies as newsletter overflow, woo-hoo!
Crocheting two rows as one is a tall stitch “hack” that I stumbled on while researching X- and Y-shaped stitches with my upcoming online class in mind, Tall Stitch Virtuosity. In this post I’ll break it down, ending with actual row-by-row instructions for a 2-row stitch pattern, and for my one-row version of it.
Linked Stitches: Classic & Beyond
First, we all need to be on the same page about linked stitches if we’re going to crochet two rows at once.
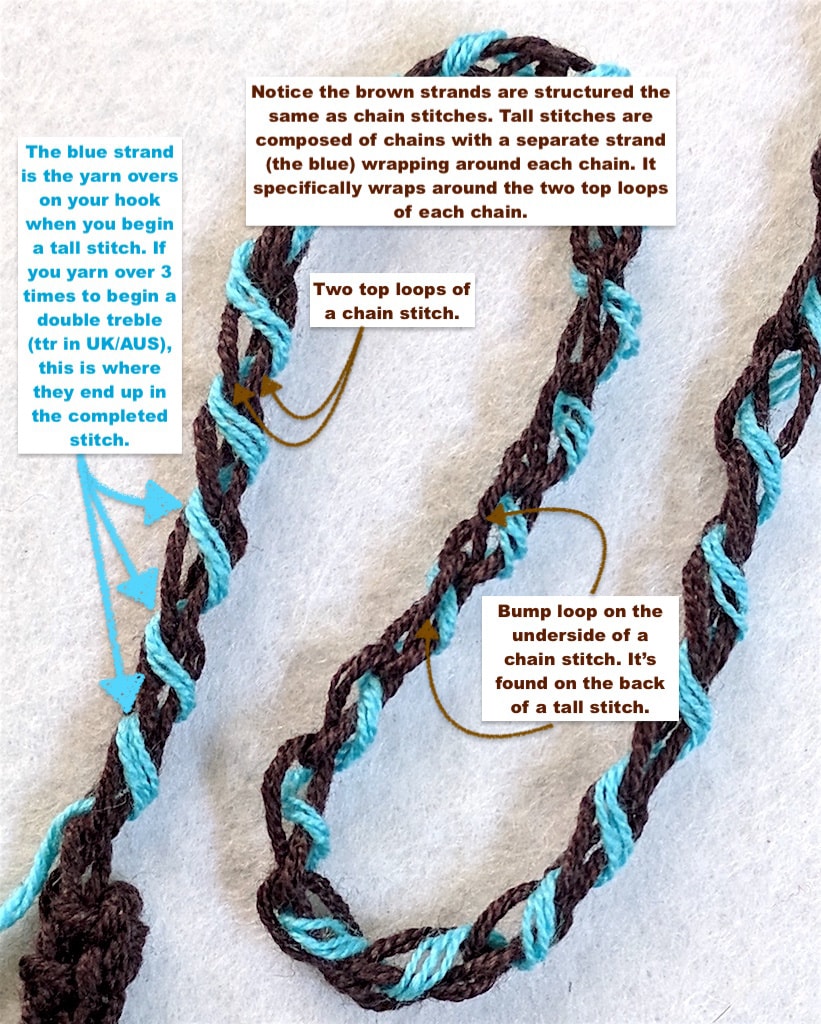
A world of special effects with linking opens up when you can identify the individual strands of a tall stitch. I’m surprised how long it took for my eyes to distinguish what goes on in tall stitches, structurally. I used to think they were like bundles of muscles and ligaments.
So, let’s dig in to what each strand is doing in the post (a.k.a. stem) of an astonishingly tall 2-color stitch. I loaded yarn overs onto my hook with blue yarn. Then I worked them all off the standard way (two by two) with brown yarn. I crocheted it loosely so you can see through the stitch:
I used this image in issue #94 of my newsletter, “Stitch Parts: Where We’re At” to compare Tunisian crochet similarities.
Find the Yarn Over Strands
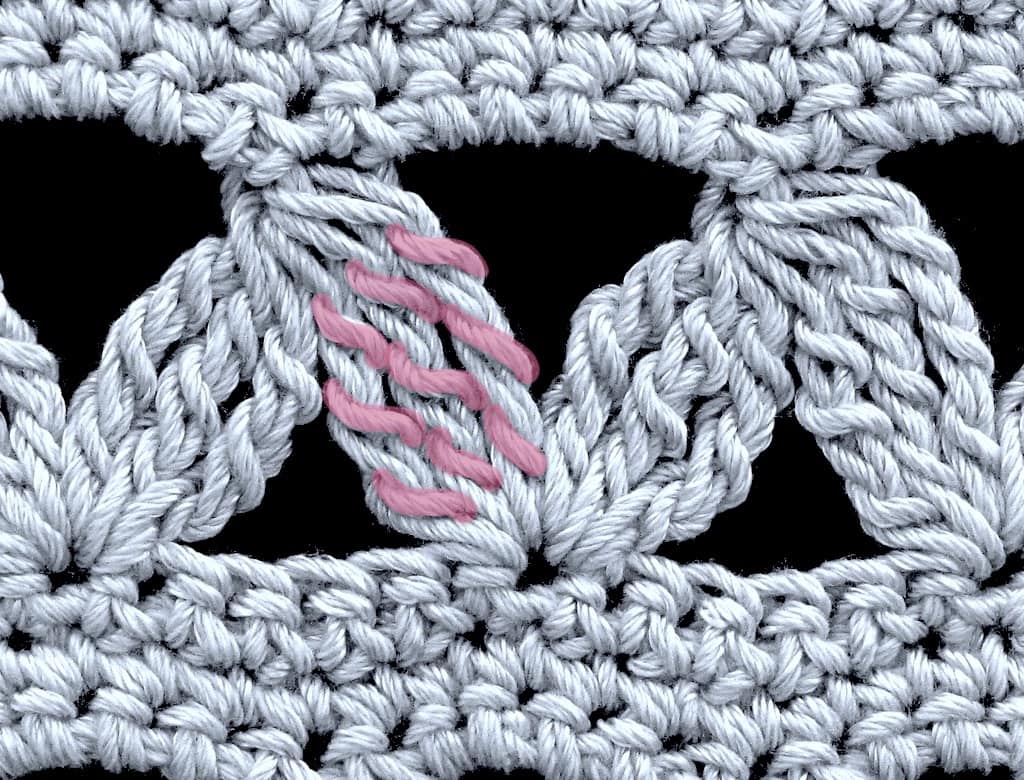
Here’s a row of 6-dtr split clusters (dtr = double treble; in the UK/AUS it’s ttr). I yarned over 3 times to begin each dtr. The tinting shows where the three yarn overs end up in each stitch post.
Tip: Just count the yarn overs in a stitch post and you know which tall stitch was used…as long as it’s not a variation, such as an extended stitch.
Linking the Classic Way
A classic linked stitch is a tall stitch that is linked all along its post to the yarn over strands of the stitch just before it. I call this “classic” because it seems to be the default or expected way to do a linked stitch, even though in actuality the ways to link them are infinite.
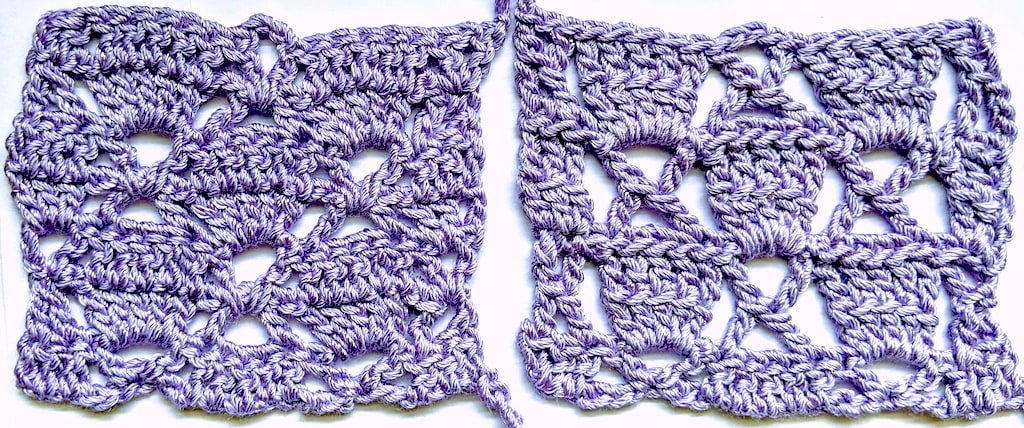
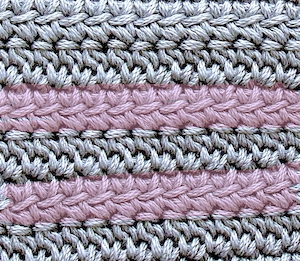
The classic method welds them together from top to bottom. In photo A below, all of the tall stitches are linked in three places. The right cluster is “classic”: all 3 yarn overs link to the 3 yarn overs of the previous stitch. In photo B, this is what you get when you link the yarn over of each double crochet of every row.
In photo C, I forgot to link the clusters in the middle row. The clusters in the bottom and top rows are linked only with the middle yarn over. Can you see the horizontal strands where they’re linked? It causes the cluster to flatten just a bit and to move as one unit, almost like a coin. I like their surface texture. They’d probably become stiff and a bit concave if I linked them the classic way, with all three of their yarn overs.
A) Left Cluster: linked in vertical strands of posts.
B) Linked dc (UK/AUS: tr). Rows facing the front are tinted pink.
C) Middle row of clusters has NO linking.
I’ve used classic linked stitches as borders for Tunisian designs like Liebling and Graven. The pros and cons of classic linked stitches resemble those of Tunisian simple stitch (Tss):
It eliminates gaps between tall stitches. This may be its most common use. It also tightens the gauge a bit. It’s a great fabric for a bag (Sterling).
It changes the surface texture to the flatter woven look of Tss.
The fabric feels thinner. It has less stretch and less drape. Stitch fronts may bend slightly inward in a concave way. (Akin to the “Tunisian curl”.)
Selective Linking
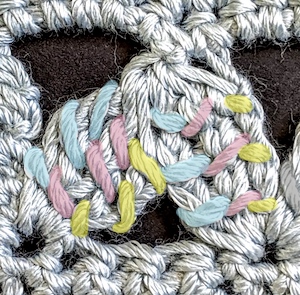
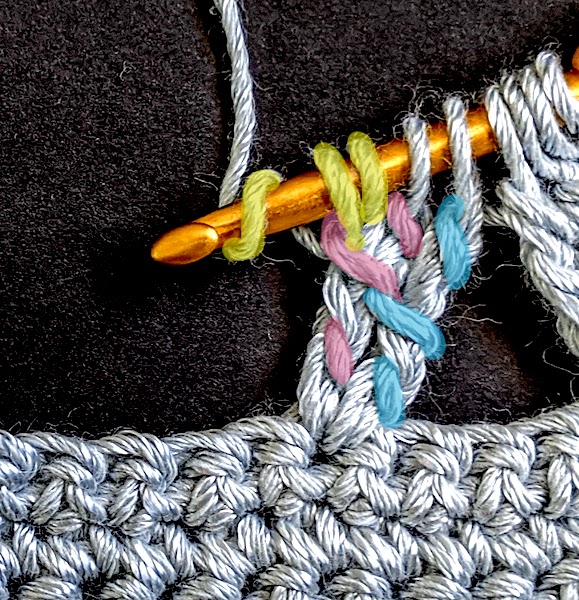
Here’s a row of 3-dtr clusters in progress; I’m linking only their middles. The 3 initial yarn overs of each dtr are tinted. See how the middle pink and blue yarn overs are linked? The other blue and pink ones are not.
Yellow-tinted yarn overs for a new dtr are on the hook. See that the 2nd yellow one is linked to the 2nd pink one? Here’s how:
Yarn over (counts as 1st of 3 initial yarn overs in yellow); insert hook down through the top of the the 2nd (pink) yarn over of the previous dtr, yarn over and pull up a loop in it (counts as 2nd of 3 initial yarn overs); yarn over (counts as 3rd of these yarn overs). To complete stitch, insert hook in same stitch of row as the previous two dtr, *yarn over and pull up a loop, yarn over and pull through two loops on hook, repeat from * twice. In this case for a cluster, yarn over and pull through the remaining loops on the hook.
Crochet Two Rows at Once, Creatively
I hope you’ll explore what you can do with linked stitches. Here are some that need future blog posts.
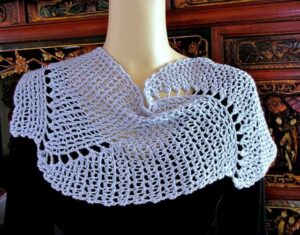
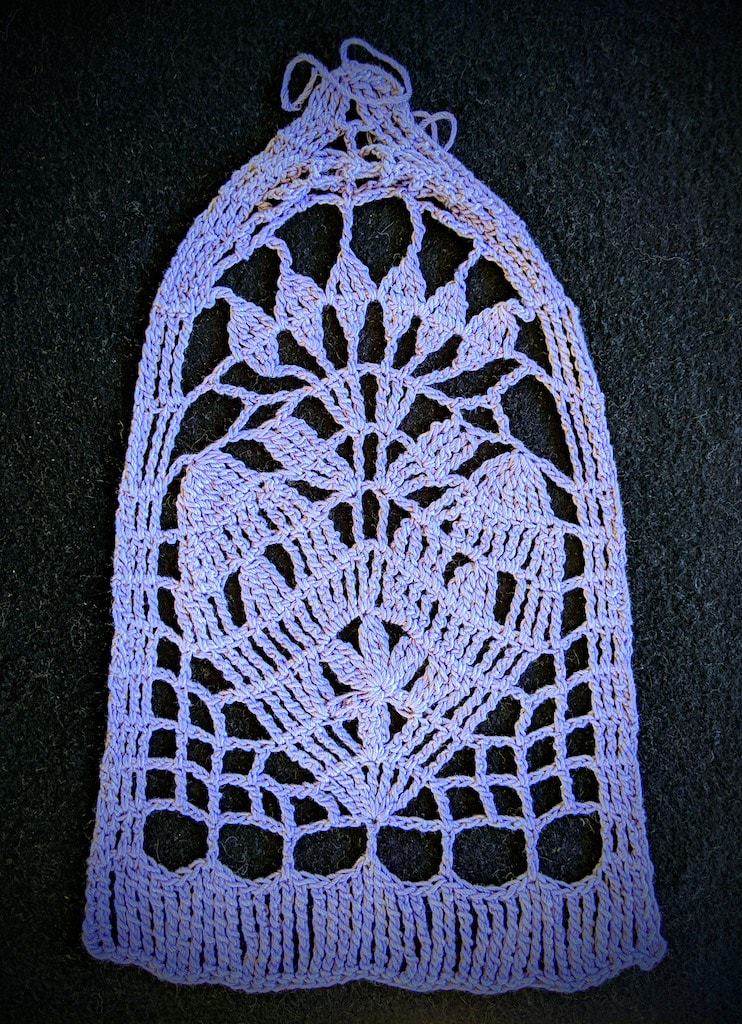
X- and Y-stitches are very much like linked stitches; the main difference is the next stitch is started in the side of the stitch post, not just linked to it. For an X or Y shape, the next stitch is shorter, like a branch crocheted onto the “trunk” of a taller stitch. I needed X-stitches for the lavender swatch (top of the page) to be able to crochet two rows at once. The two-row version has a V-stitch crocheted into an inverted V-stitch. Isn’t that a two-row X?
I’ve discussed where to link, and how many times to link in the same stitch. What about how you might link. The equivalent of a slip stitched link is where you insert your hook in a strand of the previous stitch and leave it on the hook (don’t yarn over and pull up a loop in it). The opposite would be to start a taller stitch there: it worked for me when I crocheted a letter A-shape.
A Sample Two-Rows-as-One Pattern
The one-row example has more supple drape without the usual horizontal grid-like connections between stitches of a row.
Pattern abbreviations: ch = chain stitch, dc = double crochet (UK/AUS tr), dtr = double treble (UK/AUS ttr), sc = single crochet (UK/AUS dc), st(s) = stitch(es), yo = yarn over hook
Special Stitches:
Shell = [2-dc cluster, dc, 2-dc cluster] all into designated stitch
2-dc cluster = *yo, pull up loop in designated stitch, yo and pull through two loops on hook, repeat from * in same stitch, yo and pull through all loops on hook.
Split Cluster = [*yo, pull up loop in first st of Shell, yo and pull through two loops on hook, repeat from * in same stitch], [yo, pull up loop in 2nd st of Shell, yo and pull through two loops on hook], [*yo, pull up loop in 3rd st of Shell, yo and pull through two loops on hook, repeat from * in same stitch], yo and pull through all 6 loops on hook.
Coin-Cluster = Yo 3 times, insert hook in next st, *yo and pull up a loop, [yo and pull through 2 loops on hook] 3 times, yo, insert hook in 2nd yo strand of previous st, yo and pull up a loop, yo, insert hook in same st of row, repeat from * four times, [yo and pull through 2 loops on hook] 3 times, yo and pull through all 6 loops on hook.
Original Two-Row Stitch Pattern
Chain 20 for a swatch. (Multiple of 6 stitches + 5.)
Row 1: Dc in 8th ch from your hook, *ch 1, skip next 2 sts of row, Shell, ch 1, skip next 2 sts of row, dc in next st, repeat from *. Ch 5, turn.
Row 2: Skip next 2 ch, *dc in next dc, ch 2, skip next ch, Split Cluster over next 3 sts of Shell, ch 2, repeat from *, dc in next dc, ch 2, dc in 2nd ch of turning ch.
Repeat Rows 1 and 2 for pattern. Or, for Row 3 put Shells where the dc are, and dc where the Shells are to stagger the pattern.
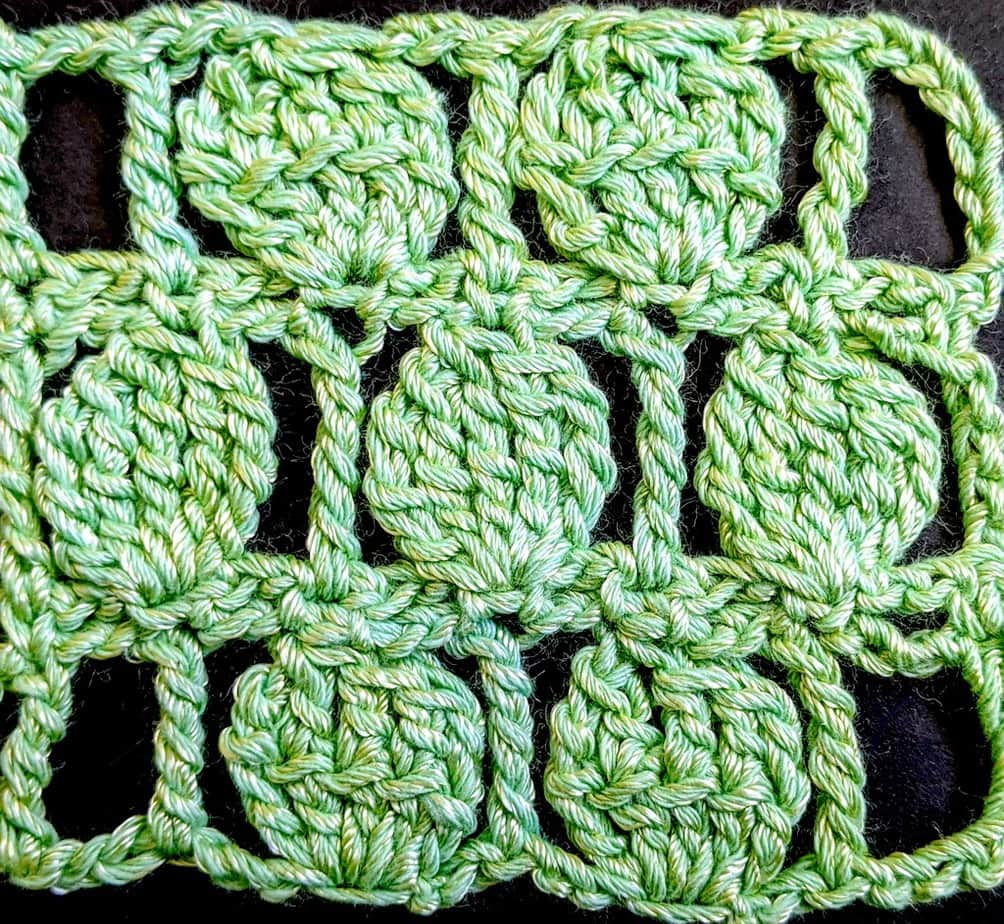
The One-Row Version
Chain 23 for a swatch. (Multiple of 6 stitches + 7.)
Row 1: Dtr in 11th ch from your hook, *ch 2, skip next 2 sts of row, Coin-Cluster, ch 2, skip next 2 sts of row, dtr in next st, repeat from *.
If you don’t mind having the wrong side of Coin-Clusters facing every other row, repeat Row 1. To have them all face the right side, work this pattern in the round with no turning. Or, use this Row 2 as shown in the swatch: Ch 1, turn. Sc in first dtr, *ch 2, skip next 2 ch, sc in next st, repeat from * to the end of the row, placing last sc in the next turning ch after you skip 2 of them.
Repeat Rows 1 and 2 for pattern. Or, for Row 3 put Coin-Clusters where the dtr are, and dtr where the Coin-Clusters are to stagger the pattern.
So I’d like to hear from you if you’ve had linking adventures, or troubles.
Want to crochet two rows at once of a favorite stitch pattern? I think some probably can’t be done, while with others there could be several ways to combine rows.
I’m eyeing a pattern right now that has 3 rows of single crochet, then 1 row of clusters. I’m mulling how I could turn its 4-row repeat into 2: turn a sc row + cluster row + sc row into one row, and have the sc row that separates them be the one row that faces the wrong side!
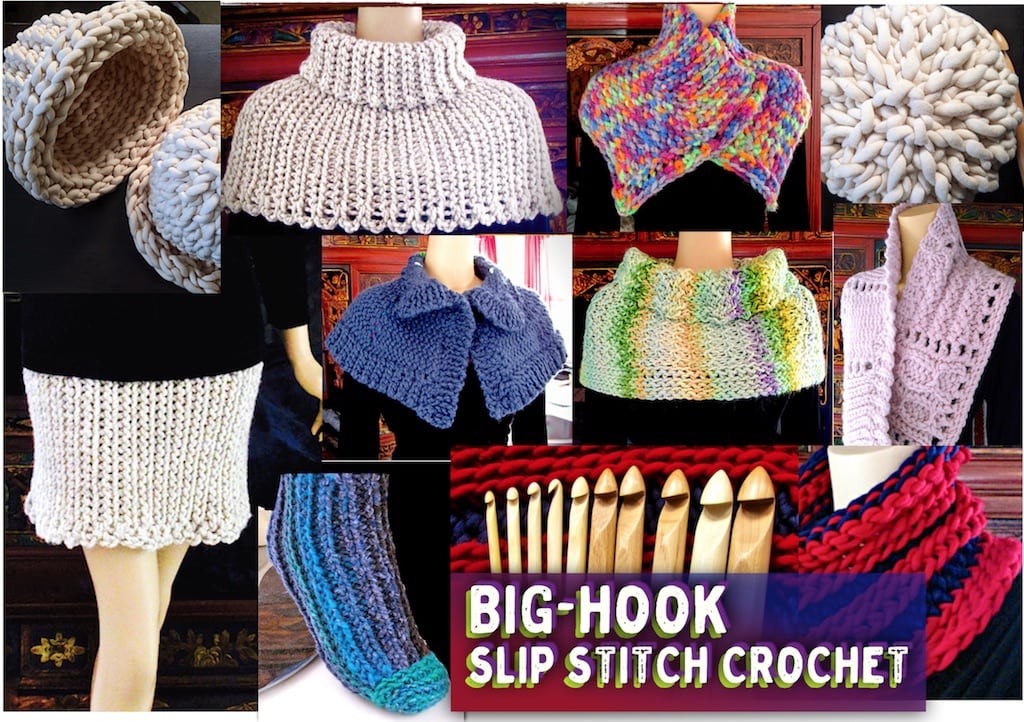
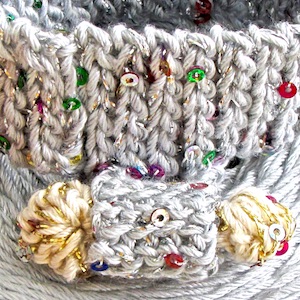
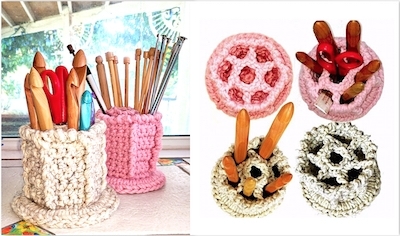
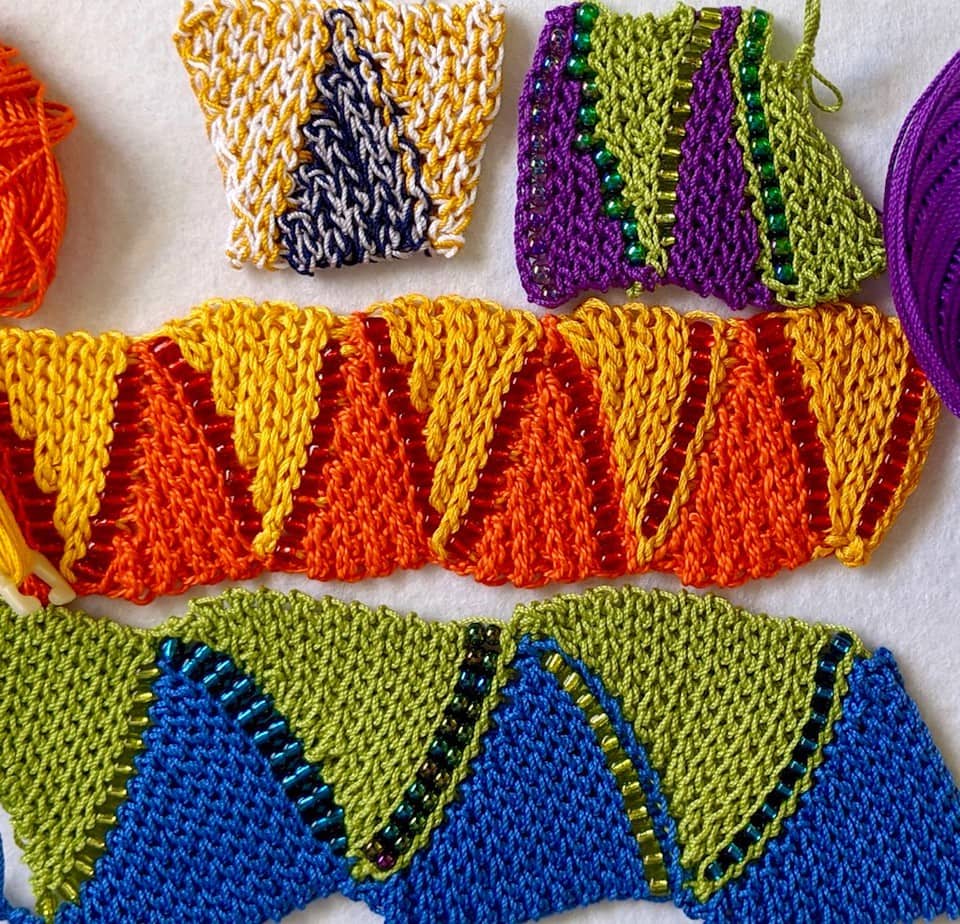
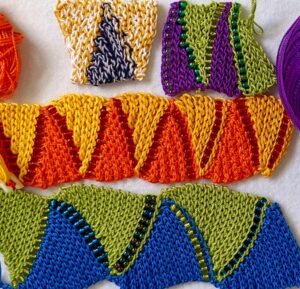
These four swatches test beads, threads, and stitches for my upcoming jewelry class, “Bivector Bangle, The Class”. I’ve specified flat bead crochet in this blog post for two reasons.
First, I photographed them flat before seaming into a stretchy tube. Slip stitch crochet makes it easy to slip it on the wrist with a good fit; that’s the “bangle” part.
Not the Rope Kind
Second and maybe more important, they’re not crocheted in the round. I’ve learned that this is unusual. Crocheted ropes of seed beads, a.k.a. “tubular bead crochet”, are the most common kind of crochet jewelry I’ve seen; my Candied Pony Beads pattern is a humble example of the art. Slip stitches are the preferred stitch, but some use single crochets.
Crocheters in English-speaking countries have enjoyed making bead ropes for a long time. (Oddly, this hasn’t prevented crochet how-to books from claiming whole projects shouldn’t be made from slip stitches.) In the world of Slip Stitch Crochet “Bosnian” distinguishes slip stitches in the round from the ones crocheted flat, in rows.
Instead of crocheting in constantly spiraling rounds, I crocheted these swatches in rows, and turned to begin each new row. So, flat bead crochet!
Other Kinds of Flat Bead Crochet?
Here’s another curious thing. Although bead crochet ropes are popular examples of Bosnian crochet, plenty of other Bosnian crochet items aren’t beaded at all. Compare this with flat slip stitch crochet: I almost never see beaded examples.
I crocheted these beaded slip stitches flat:
Test Results of Swatches
As for my test swatches, here’s what I learned. Too much to write here! Some quick highlights though.
Threads
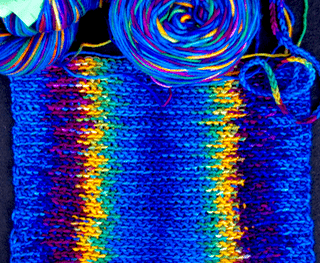
Here’s the photo again.
For the yellow wedges (middle row) I used cotton embroidery floss. It worked fine even though I used all six strands. It could have been too thick.
Six strands of floss are roughly equivalent to sport weight yarn and to size #3 crochet thread. I need it to be closer to fingering weight yarn and size #5 crochet thread. It felt a bit thick while crocheting it, but it was ok. It comes out slightly more raised than the orange wedges, in an interesting way.
I tested two strands of size #10 thread held together throughout. (This is the small heathered sample in the top row.) It works fine. Two strands of size 10 are equivalent to one strand of size 5 for this pattern. (For a full project I’d use two strands of the same color so that the beads stand out well.)
Beads, Stitches
I tested different wedge widths. The green and purple one (top row) is the only one that matches the way I crocheted the wedges of the original two Bivectors I made ten years ago. I still prefer them. In class I’ll explain wedge variations.
Lastly, I tested different ways to add the beads. I also revisited doubling them up in wee stacks, which I’d flirted with doing years ago. You can see some bead stacks in the bottom row. The major lesson for me here is, Japanese seed beads for this design are a shortcut to easy happiness, as a general rule.
I swatched a fancy tall stitch pattern recently. It’s actually a section that I isolated from a larger all-over pattern in issue #187 of Duplet magazine (September 2016). Each of its nineteen rows is unique. This is a first-time-puzzling-through swatch, so please ignore the uppermost rows which need re-doing. I worked exclusively from the symbol diagram because I don’t know how to read Ukrainian or Russian.
I added turning chains and opted to link the first tall stitch to them. It’s easier to see this in the extreme close up further down. Also, the first row of very tall stitches (quadruple trebles) along the bottom is not in the Duplet pattern; I started off by testing very tall foundation stitches.
Tall Stitch Pattern Symbols
Something I love about symbols for very tall stitches is that the initial yarn overs required show as small lines crossing the long vertical line of the stitch post. You just count the wee hashes. Even nicer for UK and Australian crocheters, the number of them also tells you the name of the stitch. (American crocheters: just use the name for the next shorter stitch.)
Below is a sampling of Duplet’s symbols for the very tall stitches. Notice the four longest vertical lines at the far right edge, with five little hash marks: it means you yarn over five times to begin the stitch. These are quintuple trebles in the UK & AUS, or call them quadruple trebles in the US.
According to the symbols, crochet these four very tall stitches into four tall stitches that have only two hash marks: they are double trebles in UK/AUS or just trebles in US terminology.
An Upside Down Y-Stitch
Duplet 187
See that symbol in the upper left that looks like an upside-down Y with hash marks ? See how its right leg stands over a sort of horizontal line? That line is some number of chains (4 in my swatch). The other leg skips some stitches that are mostly outside of the picture. This symbol means you begin with five yarn overs, then insert the crochet hook into a chain or the chain space. Work two of the five yarn overs off of your hook, as if to make a treble (UK/AUS dtr). Then, yarn over twice to begin the other leg of the stitch while the 3 unused yarn overs are still waiting on the hook. Work the treble of the other leg into another chain space, and then finish working the remaining 3 yarn overs off of the hook.
A variety of clusters and shell stitches flow into each other to give the crocheting an undulating feeling. It’s exciting to see it take shape, and it kept me on my toes. I’d do a few things differently if I swatch it again. Duplet and Zhurnal magazines offer many expressive patterns and innovative ways to use very tall stitches.
As Class Material
This particular tall stitch pattern is mainly research for me. It’s too involved for the Tall Stitch Virtuosity class, but of course I’ll bring the swatch and magazine with me. When there’s time in class we can take a closer look at examples like this.
It’s not too involved, however, for…my Pinterest board called Tall Stitch Artistry!
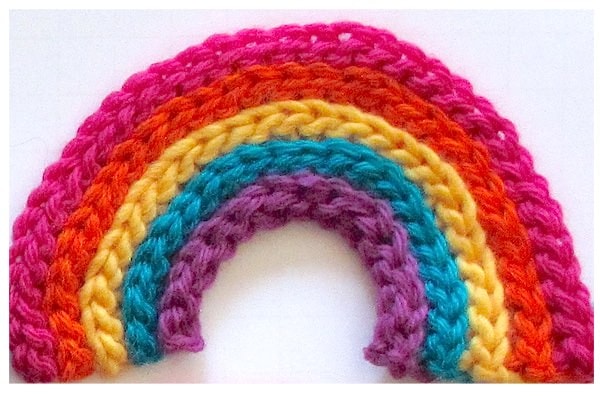
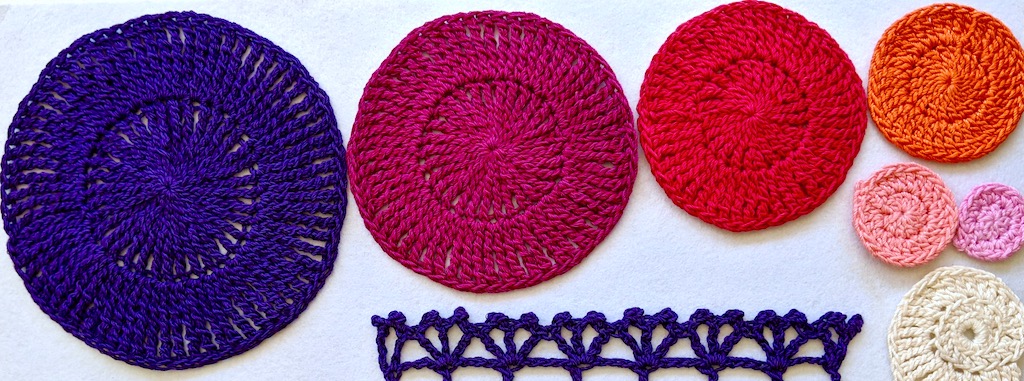
Have a look at these simple flat circles I swatched last month. This is research for my Tall Stitch Virtuosity crochet class. Each circle has a closed center and just two rounds of a tall stitch. The yarn is my own Lotus yarn. Lots of things to notice.
Formula for Tall Stitch Circles
A consistent mathematical pattern developed, and I’m going to trust it from now on. From left to right (see above):
Purple circle: chain 7 to begin each round; 36 quadruple trebles in round 1 (see Closed Centers note below), 72 in round 2. For a US quadruple treble (quadtr), yarn over 5 times to begin stitch.
Magenta circle: chain 6 to begin each round; 30 triple trebles in round 1 (see Closed Centers note below), 60 in round 2. For a US triple treble (ttr), yarn over 4 times to begin stitch.
Red circle: chain 5 to begin each round; 24 double trebles in round 1 (see Closed Centers note below), 48 in round 2. For a US double treble (dtr), yarn over 3 times to begin stitch.
Orange circle: chain 4 to begin each round; 18 trebles in round 1, 36 in round 2. For a US treble (tr or tc), yarn over 2 times to begin stitch.
Peach circle: chain 3 to begin each round; 12 double crochets in round 1, 24 in round 2. For a US double crochet (dc), yarn over once to begin stitch.
Pink circle: chain 2 to begin each round; 8 half doubles in round 1, 16 in round 2. For a US half double (hdc), yarn over once to begin stitch.
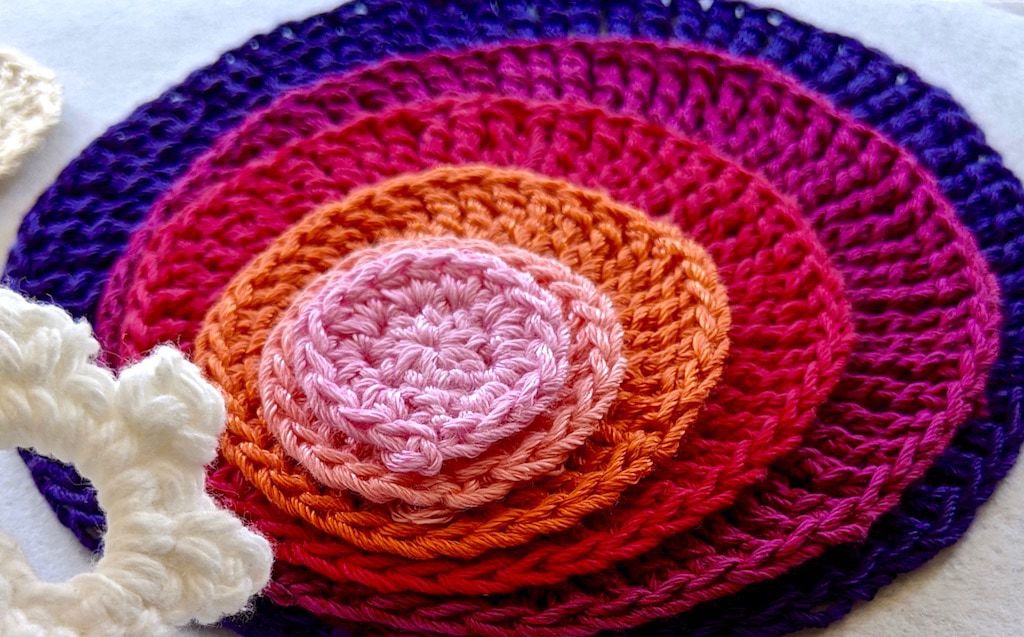
It’s thanks to the really tall stitches that I understand where I’ve gone wrong with crocheting circles (of any stitch) in the past. I couldn’t actually tell if they were going to come out alright while I crocheted these. They didn’t seem like they were going to lie flat, but they did, beautifully and consistently, once I gently blocked them.
This means the ol’ 1970’s advice to wing it (instead of using a formula)— to add stitches when it looks like you need to as you crochet each round? That way lies madness, for me anyway.
Closed Centers (note)
I used the magic ring (PlanetJune has good explanation) for all of them. I was unable to fit more than 18 stitches in the ring and still be able to close it completely. So, when the tall stitch circles are made with double trebles or taller (the red, magenta, and purple ones shown), I put 18 stitches in the ring plus the necessary amount of Y-stitches distributed evenly around.
This means the red circle of double trebles required 6 Y-stitches, for a total of 24 stitches in Round 1 (18 dtr + 6 Y-sts = 24). The magenta circle of triple trebles needed 12 Y-stitches in addition to the 18 ttr to total 30 stitches for Round 1 (18 ttr + 12 Y-sts = 30). For the purple circle, Round 1 needs to have 36 stitches in it, so 18 quadruple trebles plus 18 Y-stitches (18 quadtr + 18 Y-sts = 36).
Y-Stitch? Huh?
I don’t have step-outs at hand for showing how to do a Y-stitch for this. Have a look at Tamara’s over at Moogly—except that I don’t chain between the tall stitch and the Y-stitch that is linked to it.
Why Really Tall Stitch Circles?
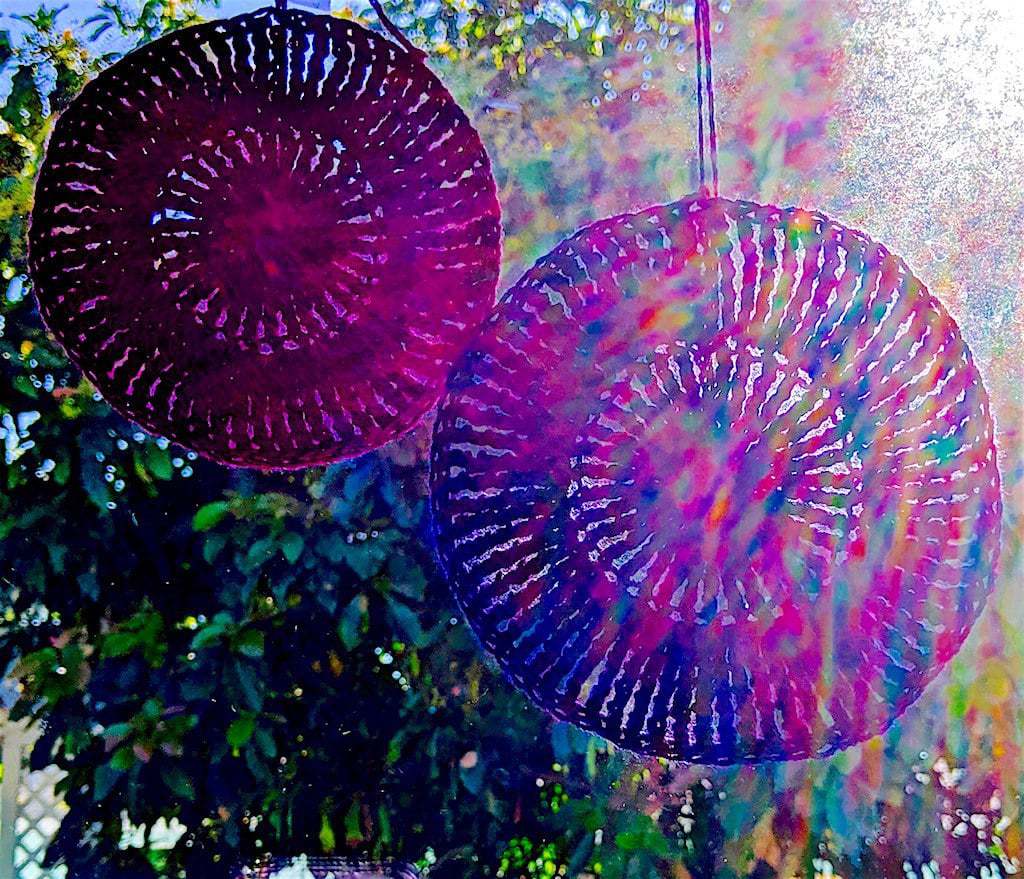
They’re surprisingly beautiful. A simple architecture that one somehow never sees—I found no circles of really tall stitches anywhere. You could accent them with surface crochet in contrast colors, or alternate with rounds of shorter stitches. That would make for a nice future blog post.
A triple-treble circle and a quadruple-treble circle with rainbow light filtered through them.
Site-wide Search
Vashti’s Crochet Shop
Get the Newsletter
Sign up to receive Vashti’s Crochet Inspirations Newsletter in your inbox monthly.