Posted on 5 Comments

Crochet Cable Boot Cuff Pattern in Progress

Lucky Twist Bootslip folded over boot top

New Crochet Cable Boot Cuff Pattern!

The Lucky Twist Boot Cuff in action!

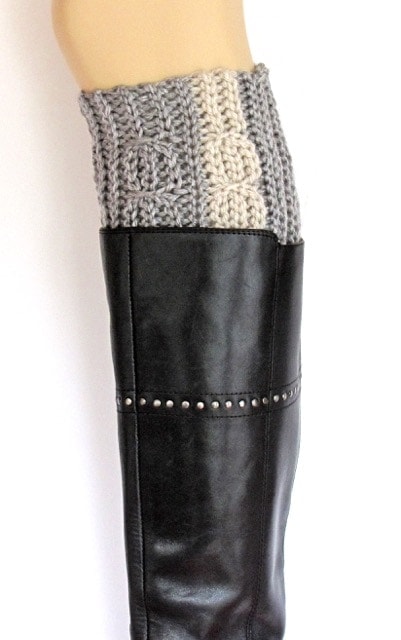
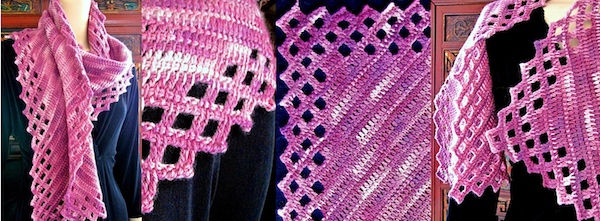
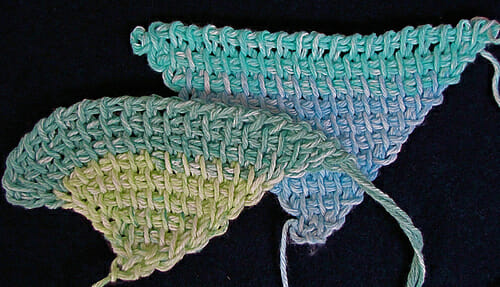
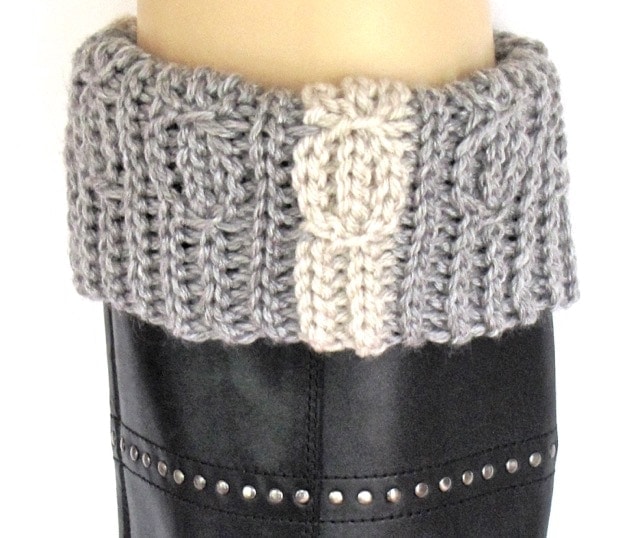
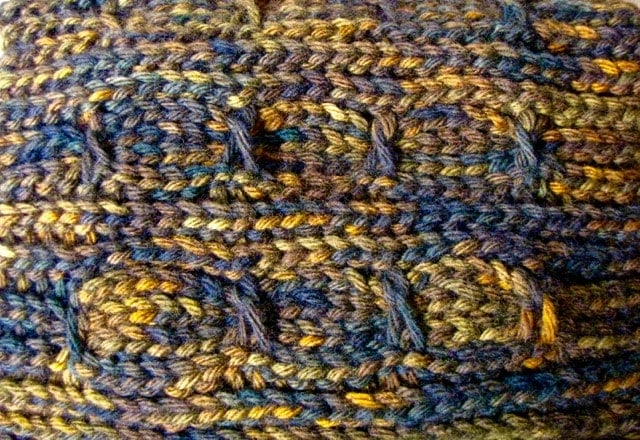
A few days ago I sent out issue #65 of my Crochet Inspirations newsletter: “Mock Cables in Slip Stitch Crochet.” I’m getting questions from readers about the dark brown crochet cable boot cuff photo (shown below). I crocheted that one in November 2012. The gray striped one is fresh off the hook.

The 2012 brown one is actually a prototype of the new crochet slip stitch Lucky Twist Mitts. It’s my newest downloadable pattern. A matching Lucky Twist crochet cable boot cuff pattern is almost finished.

Update: The boot cuff pattern is done!

The early brown Lucky Twist swatch helped me test lots of things. For example, how stretchy the limp five-ply merino yarn would be as a mitt (not enough). How much to taper the ribbed edge with short rows. I wondered about the speckled dyeing and overall dark brown tones.

As I mentioned in the newsletter, I had to dramatically brighten these photos just so that the cabled stitch textures would show up! So in real life I’d need to be standing in full sunshine to see the cabled surface texture in a dark brown yarn. The short amber color flecks are pretty, but they distract a bit from the cables.

First swatch of Lucky Twists Boot Cuffs pattern

This was also the first boot cuff prototype I’d ever crocheted. So I learned about:

  • Finished dimensions for a good crochet cable boot cuff pattern.
  • Stitch surface textures and yarn colors that show up well on that area of the body. (Lighter colors help.)
  • Should one or both edges of a boot cuff taper? (I prefer it tapered at one end only.)
  • How much yarn and time does it take to crochet boot cuffs? (About as long as crocheting just 14 inches of a scarf!)
  • Thickness of yarn and of stitches that fit inside the boot top. (Medium weight yarn seems fine for the boots I own.)
  • Folded, unfolded, scrunched. All ways are fun!

Crochet Boot Cuffs, 2012 and beyond

Back in 2012, crochet boot cuffs were such a new trend that they might have just been a one-season fad. That November I traveled to northern Illinois to teach a crochet retreat. It was a boot-wearing opportunity that I don’t often get here in Florida.

It was in Illinois that I started the brown crochet cable boot cuff pattern prototype. I’d be able to test how much warmth they add, and if I enjoy wearing them.

I discovered that crochet boot cuffs feel great! I wore them over dark tights with skirts. They stayed put. I enjoyed wearing them all ways – scrunched, folded over the boot, and unfolded. Down low into the boot or up near the knee. I did find that I wanted longer ones that covered more of my legs for warmth.

Posted on 3 Comments

How to Increase Tunisian Crochet Stitch Blocks

New Corner-to-corner Warm Tunisian scarf with filet border

Three ways to add stitches at the end of a Forward Pass

It’s good to know how to increase Tunisian crochet stitches more than one way because every project is different. These first two methods are my favorite because they don’t limit how many stitches you can increase at a time. This means I can smoothly add big lacy spaces and whole blocks of solid stitch repeats, when and where I wish, in Tunisian crochet. This is something I’ve always loved about regular crochet.

Have a favorite method of your own? Please let me know in the comments!

Method #1. How to Add Tunisian Stitches with Half Hitches

Each of the two loops added to the crochet hook are loosened to make it easy to see that they're simple loops with a bit of twist before adding to the hook.
A half hitch is simply a loop with a twist in it.

In my original 2009 blog post about this method, I use a pair of half hitches as one increase. This pair is well known to those who do macramé as the double half hitch (dhh). As far as I know, I’m the first to use it as an edge increase.

A single half hitch can also be used for adding a new stitch, and I’ve since found it mentioned for this in a few older books on Tunisian crochet. I add them to a timeline in this half hitch resource post as I find out about them.

The half hitch is also well known in knitting as the simple/single/backwards loop cast on in knitting. This video shows half hitches being added to a knitting. This is how I do it and I’ve really picked up speed.

How to Do the Double Half Hitch Increase (DHH)

3-step diagram of how to increase Tunisian Crochet stitches.
Two crossed loops, or half hitches, have been added to the crochet hook. The pink bar indicates which loops are the half hitches. In Step 3, the two have been crocheted off of the hook together. It’s a mini-limpet!

Method #2. Use Tunisian Foundation Slip Stitches as Increases

Tunisian foundation slip stitch: at the end of a Forward Pass, chain, remove last loop from hook, insert hook in a ch loop, then put live loop back onto hook. An increase of one stitch.
Feel free to choose a loop other than the tinted ones shown.

At the end of your Forward Pass, insert hook in one side loop of the end stitch, yarn over and pull up a loop. Then chain the number of stitches you wish to add. (I chained four in this photo.) Then take the last loop off of your hook; your chain stitches should resemble those in the photo.

Then, insert your hook under one loop of the first chain (tinted pink) and leave on your hook. Repeat with each remaining chain; then put the live loop back on your hook, as described in the caption.

I discovered this Tfslst method after I designed the Five Peaks Shawl with half hitch increases. Tfslsts is the method of choice in the Four Peaks Scarf pattern and in the Warm Aeroette Scarf (pictured at the top).

I love having both of these methods to choose from, depending on the project.

They are probably interchangeable enough that you could use the one you prefer. (More on that in the newsletter.)

The most important thing is to choose a method that doesn’t impose a limit! Especially when you’re crocheting something that has a diagonal edge and needs to drape nicely, like a triangular shawl or an asymmetrical scarf. Compare the triangles below.

Often when someone asks in a forum how to increase Tunisian crochet stitches, the advice is to squeeze them in. Typically this means adding a stitch in another loop just behind or next to another stitch. This method is fine if you’re replacing a stitch that you accidentally decreased in an earlier row. If you think of basic Tunisian crochet fabric as a grid, space was already reserved for the missing stitch, and you’re just filling it back in.

Method #3. The “Squeeze-It-In” (my least favorite shaping method).

Left triangular swatch is starting to curl along one edge. Other triangle is symmetrical with nice drape.
Effect of the “squeeze-it-in” method shows in the left swatch. Not recommended for something like a shawl.

The Squeeze-it-in method has limits. It’s okay for just a rare stitch here and there, and away from the edges. In other words, as an “internal” shaping method. I don’t mean to impose rigid rules. Depending on the project, yarn type, and hook size, squeezing in new stitches when you wish may come out fine.

For me, this shaping method often interferes with my goal of a languid, swaying drape for Tunisian crochet accessories. When I consider how to increase Tunisian crochet edges for a new design, Squeeze-it-in is last on my list.

Posted on 1 Comment

More on Double Strand Crocheting

Still quite inspired by the whole double strand crocheting topic.

It’s way too big for a measly newsletter issue! Double strand crocheting is a whole world of fun. It tames wild yarn textures. It welcomes glitzy bling threads. It speeds up big projects, recycles yarn scraps, and adds warmth to winter accessories. All this, plus it comes with its own specialized gadgets and filaments. You can get exotic reeling stands to manage multiple threads. Reflective filaments can turn a crocheted beanie into nighttime safety garb.

If you’re just coming in on this topic, be sure to also see the newsletter issue that launched it, “Fun With Double Stranding.” Then see the gallery of overflow images I blogged here yesterday.

In the past 24 hours I created a new Pinterest board.

I’m so glad I did. It already has 55 pins! (I’m holding myself back from pinning everything I see.) Visit it here: “Double Strand Crochet.” Also, here are a few more images I found today in my hard drive. They would have been included in yesterday’s overflow gallery:

It’s really the perfect way to do lots of timely things:

  1. Double stranding says, “I’m ready for the fall crochet season!” Hats and scarves are instantly thicker and warmer.
  2. I’m thinking multi-strand slip stitch crochet could be pretty interesting.
  3. My old yarn stash is too big. As mentioned in the newsletter, tinting and “upcycling” a plain yarn with a fancy one is a creative way to make old stash new again. Crocheting two or more strands of yarn together is a classic way to use up scrap yarns.
  4. Double strand crocheting is perfect for winter holiday BLING! I can’t imagine an easier way to throw in all kinds sparkle. Some of the fanciest yarns are designed to be carry along threads. They may be unpleasant to crochet with by themselves, but dreamy to crochet along with another yarn.

 It makes sense that double strand crocheting is lighting up my weekend, now that I think about it.

Posted on 3 Comments

Double Strand Crochet: Oh, The Overflow

I found too many double strand crochet images to show in issue #63 of my newsletter!

The topic is crocheting with two (or more) strands of yarn held together. Here’s a gallery of my double strand crochet projects and designs over the years:

Please leave a comment, I love comments! Especially as I tinker with new upgrades to this blog.

To scroll through more recent posts, click here: Quickposts.

Posted on Leave a comment

Beaded “Delta” Types of Crochet Lace

I have some fun photos of beaded crochet swatches to share: overflow from newsletter issue #62, “Delta-Type” Crochet/Hexagonal Lace Types. Click on each photo to enlarge it and see comments.

Note: I’m using “delta crochet” to refer to a category, not for a single kind of stitch pattern, and not for triangular items such as shawls. I mean geometrically a type of lace grid. In the four-sided lacy net category we have the filet type (square/rectangular spaces that stack up in columns), and the fishnet or diamond mesh type, which have diamond-shaped spaces that are offset/staggered. “Delta” is pretty well known to mean triangle, whereas a term like “isometric” might be less helpful. If you have a better term to suggest than “delta,” please leave a comment, thanks  🙂

The gist of the newsletter is: Crochet nets of three-sided triangular lacy holes (or “spaces”) have a fundamentally different kind of lace structure, or grid. You can create them with several different kinds of crochet stitches, and they all differ from nets with four-sided spaces in looks, stretch/drape properties, and the experience of crocheting them.

When I experimented with beading delta laces, interesting things happened. Adding beads to love knots is in some ways very similar to beading chain stitches. I haven’t even tried several more ways to add beads to the ones shown here. Adding beads to the classic tall-stitch delta type, though, is more limited. It would be super tricky* to add beads to a whole post of a tall stitch.

*By “super tricky” I mean unpleasant and perhaps impossible LOL.

Check back, I’m swimming in swatches and blogging them all – my goal is a short blog post most days per week. I love comments!