Subscribe for free.
Vashti’s Crochet Inspirations Newsletteroverflow includes new crochet swatches, projects, and designs—stitch tweaks and techniques—back issues—and professional crochet tips.
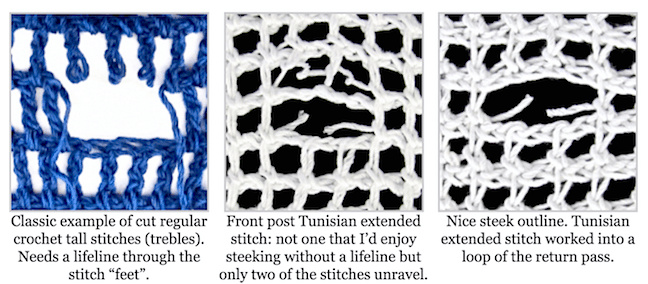
These three images didn’t make it into the newsletter I sent out yesterday on steeking crochet.
Not sure if it’s obvious in the middle photo: I removed two stitches in the forward pass. It freed up the return pass AND the stitches above them in the next row. This is because I crocheted these stitches around the post of the stitches, not into a base (i.e. into any return pass loops).
Without a lifeline, these post stitches just dissolve into messy loops. It’s not as bad as Tks or Tfs (as mentioned in the newsletter). The unraveling is contained.
My friend arrived last night from Kentucky! So glad I got the newsletter sent off. I hope you enjoyed my exploration of steeking crochet. My next critical conference prep task is to complete my last class handout (Starwirbel Way). After that milestone, I’ll add corrections to all handouts as I receive them from my editor, and direct my mental energies toward writing patterns.
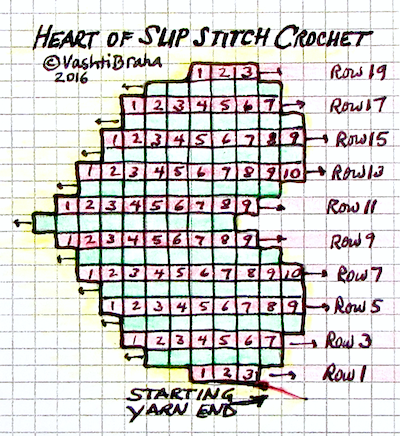
This blog post is an overflow page for issue #76 of my crochet newsletter. Scroll down to see the heart shape chart, and then the full text of the Slip Stitch Crochet Hearts Free Pattern. To print, click on the little printer icon at the end of this post.
We Need to Talk: Slip Stitch Skill Levels
I rate this pattern Intermediate for slip stitch crocheters, and Advanced if you’re new to Slip Stitch Crochet. A good free crochet pattern for slip stitch beginners would be Eva’s Ribs Scarf. After that, Slip Tectonics or Undaria would bring novices solidly up to speed for these hearts.
Seriously.
These crochet hearts were originally used for a three-hour intermediate-level class on slip stitch shaping methods. “Slip Stitch Crochet 101” class was a prerequisite. After crocheting this heart, students would be equipped to crochet fitted sleeve caps and gracefully shaped armholes!
You’ll be adding or subtracting only a stitch or two to make this heart. Not a big deal if you’ve ever increased and decreased with single crochets. It takes practice, though, to shape every row of slip stitches.
Consider that even if you’ve already completed some slip stitch projects, most existing slip stitch crochet patterns involve only occasional shaping, if any. (If you’ve crocheted a slip stitch pattern with a significant amount of shaping, please tell me about it in the comments.)
For a slip stitch beginner, the biggest challenge is recognizing what the stitches are doing to avoid increasing or decreasing by accident. It’s like learning to crochet all over again—and that’s humbling if you don’t expect it, but what a beautiful thing! How many of us long-time crocheters remember what it was like to learn how to crochet for the first time? If you’ve crocheted for at least ten years already, you can revisit this life changing moment.
Challenge Accepted? Great!
Welcome to the “heart” of slip stitch country. Start with a thick smooth yarn and a big hook.
Cross off each row when you complete it to easily keep track of where you are. (I have to. For these crochet hearts it’s easier to count stitches, not rows.) For pattern help, visit my fabulous forum.
This heart shape is crocheted from side to side. Use any yarn. Image missing? See this album.
Chain 4.
Row 1: Skip ch nearest your hook, ss in any loop of each remaining ch, turn: 3 ss. Easy, right?
Notice that every odd-numbered row ends at the top of the heart and every even-numbered row ends at the bottom of it. The yarn end (called “tail” from now on) is at the top of the heart, so when you crochet toward the tail end, you must be on an odd-numbered row.
Row 2: Ch 2, ss in 2nd ch from your hook (an increase of one st), Fss in first ss, 2 Fss in each of next 2 ss, turn: 6 ss.
No row will ever have more than 10 sts in it. If you have trouble seeing which loops to crochet into:
It will get easier after 3 rows or so. You won’t see the heart shape develop until you’re halfway there (Row 9).
The st count matters more than choosing the correct loop. Count as you crochet and add a st in a good enough loop if need be. The most common problem for slip stitchers is identifying which st is the last one of the row. Counting as you go helps and you won’t need to use a stitch marker.
I don’t count my rows. As I complete each row I put a check mark next to it on the pattern. I also rely heavily on the yarn tail to know whether I’m crocheting a row toward the tail or away from it.
Row 3: Ch 2, ss in 2nd ch from your hook, Fss in each ss, turn: 7 ss.
Rows 4 & 5: Repeat Row 3. At the end of Row 5 you’ll have 9 ss.
Row 6: Ch 1, Fss in each ss, turn: 9 ss.
Row 7: Repeat Row 3: 10 ss.
Row 8: Ch 1, skip first ss (a decrease of one st), Fss in each remaining ss, turn: 9 ss.
Row 9: Ch 2, ss in 2nd ch from your hook, Fss in each ss to last st, turn leaving last st unworked: 9 ss.
Row 10: Ch 1, skip first ss, Fss in each ss to last st, 2 ss in last st, turn: 9 ss.
Row 11: Repeat Row 10: 9 ss.
Row 12: Repeat Row 9: 9 ss.
Row 13:Ch 1, Fss in each ss to last st, 2 ss in last st, turn: 10 ss.
Row 14:Ch 1, Fss in each ss to last st, turn leaving last st unworked: 9 ss.
Row 15:Repeat Row 6: 9 ss.
Row 16-18: Repeat Row 14. At the end of Row 18 you’ll have 6 ss.
Row 19: Ch 1, skip first ss, Fss in next ss, [skip next ss, Fss in next ss] twice, turn: 3 ss.
This is how it looks after a quick blocking, and before edging it with a round of slip stitches. (If image is missing, see this album.)
Round 1 (add a border of ss): Fss in each ss of Row 19, ss in one loop at the end of each row to bottom point of heart, [ss, ch 1, ss] in it, continue edging row ends to first row, ss in each of the 3 foundation chs, ss in remaining row ends, join to start of round with a ss.
Note: Edging these crochet hearts is not as laborious as it might seem. Even though it’s not easy to identify the same loop of each each row end, this needn’t slow you down. I mostly just estimate where to put my next stitch, and it comes out fine.
Finishing: Fasten off, or add another round of ss, or reverse sc. Be sure to damp block: stretch all edges in every direction then let it settle into a smooth, symmetrical-enough heart shape and let dry. Make another like the first so that you can seam them together with a ss seam, add a bit of stuffing and hide the ends.
Experiment Freely with this Free Heart Chart
The grid rows of the chart match Fss stitch height, but why impose limits on your heart? Try using single crochets instead; the heart shape may widen or narrow a bit. Or, try back-loop slip stitches (Bss) after you’ve made a few crochet hearts in all front-loop slip stitches (Fss). (The back loops of slip stitches are trickier to find than front loops for some folks at first.)
I hope you’ll show us your crochet hearts in my forum.
This post is being revised and updated. Please check back.
A Guide to Star Stitches in Patterns
All right. Here’s the thing: star stitches are beautiful, and also tricky sometimes. This is a solidly intermediate level stitch that requires from 5 to 12 steps to complete, depending on the stitch variation.
Most of us use patterns when crocheting this stitch, so most crocheters will encounter star stitch types that vary a little, or a lot. Toward the end of this post I use colored dots to give you a heads-up on some variations you might encounter.
This is still a “basic” start stitch how-to, though! The stitch variations complicate it, but you need to know about them because we’re all equally likely to encounter a variation any time we use a new star stitch crochet pattern.
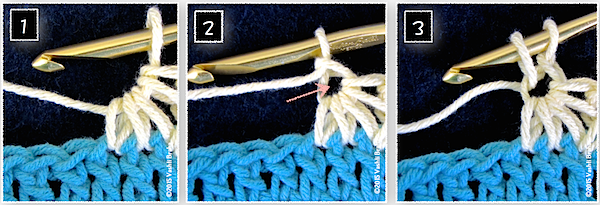
Want to follow along with hook and yarn? With blue (or a dark color) yarn, chain 15, double crochet (dc) in the 4th chain (ch) from your hook and in each remaining ch: 11 dc; 12 dc if you count the 3 chs you skipped. Change to white (or a light color) yarn. Chain 3 and turn.
It may look like image #1 skipped some steps, but read the directions above and below.
Basic Star Stitch How-to:
Pull up a loop in the second white ch from your hook, in the top of the first blue dc, and in each of the next two blue dc. Yarn over (yo) and pull through all 5 loops on hook. Your stitches should look like image #1 above.
Ch 1 to form the eye. This completes one star stitch. The arrow is pointing to the eye of the star.
To begin another star stitch, insert your crochet hook in that eye, yarn over, and pull up a loop.
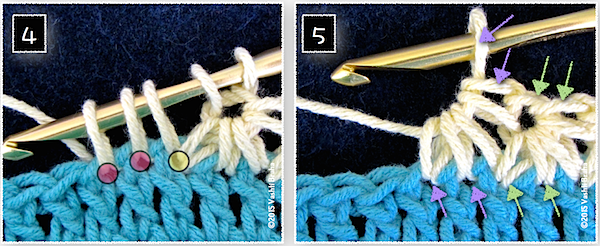
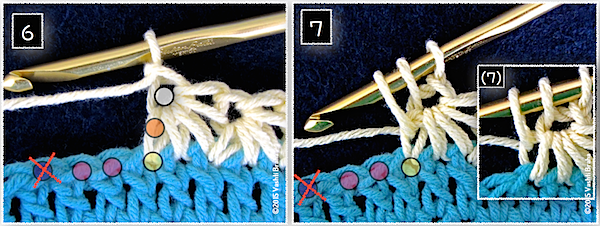
Really Look At the Loops
In image #4, we see the two loops on the hook from image #3, plus three more loops. One of the loops was pulled up in the same blue dc as the completed star. I marked that with a yellow dot. Notice the two pink dots. Those are the two next blue dc of the row. I’ll come back to these dots later.
These two images illustrate how to avoid accidentally increasing or decreasing along the row.
When you yarn over and pull the yarn through all 5 loops on your hook, you get image #5. Here’s what those arrows are all about: The two pairs of green arrows point out that the base of that completed star take up two blue dc; the top of that star counts as two stitches (the eye and what is called its top in most patterns). Each star counts as a two-stitch group.
The two lower purple arrows point out the same thing about this new star-in-progress: the base of it takes up only two new blue dc of the row.
The purple arrow pointing to the loop on the hook will become the star’s eye the minute we chain 1 to complete the star.
Common “Side of Star” Option
Pay attention to just the ORANGE dot for now.
Image #6: More colored dots! The orange dot indicates the side of the star. The side of the star has a front loop and a back loop. In many star stitch patterns, you pull up a loop in the side of the star. Sometimes it doesn’t matter which loop, other times the front or the back loop is specified.
In image #7 you can see that a loop has been pulled up in the side of the star. In the smaller inset (7), the loop was pulled up in only the back loop of the side.
Loop Priorities
The two most important places to pull up loops while making star stitches are:
the eye (the white dot in image #6), and
one of the two new stitches of the row (the pink dot that’s furthest from the star).
All of the other loops you pull up between these two places are flexible and variable, meaning you can omit pulling up a loop in one, or opt to add a loop in one. You needn’t have five loops on your hook before completing a star stitch; for example, you can ignore the place indicated with the yellow dot, or the orange dot in image #6. Or include both.
You’ll likely develop a favorite way to make your star stitches. Most likely you can substitute the star you want in a pattern you’re using, but of course swatch to make sure. (Occasionally the stitch or row gauge will change slightly.)
It’s like picots: most experienced crocheters have their own favorite way to make a picot and freely use their own where they wish.
The blue dot with the red X signals an error (image #6 & 7). If you pull up a loop past the two pink dots, you’ll start decreasing. Your star will take up 3 stitches of the row, but still only give back only 2 stitches in its top loops. Does that make sense? And that is what my newsletter issue #73 is about.
(Note: There’s a star stitch out there that does take up 3 stitches of a row instead of 2. The stitch count is adjusted in the next row.)
Issue #72 of my Crochet Inspirations Newsletter is about “long tail crochet”: crocheting with a long yarn end instead of just weaving in a shorter one to make it disappear. As promised in that issue, below is the full size comparison chart of crochet foundations in order of stretchiness. All but the first two and last two examples can be considered long tail crochet foundations.
I’ve greatly expanded this page since first posting it in 2015, when it was a follow up to newsletter issue 71, “Beyond Crochet Hook Debates”. It’s also now part of an ongoing Crochet Basics series.
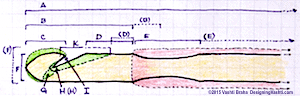
At first glance the crochet hook is a very simple tool, so why are there so many different kinds? What makes crocheters fiercely devoted to some and not others? You could make your own crochet hook by carving a notch into the end of a stick or dowel and sanding it smooth. I realized how carefully designed hooks really are when I reshaped a store-bought one.
Creating a crochet hook diagram also helped me tease out the finer elements that make all the difference between one hook and another. My first sketch grew into a comprehensive map! It brings together terms from several different sources.
How Many Crochet Hooks?
How many crochet hook sizes should there be? How many crochet hooks does a crocheter need? It turns out the answer is different for every crocheter because it depends on about five factors, below.
Consider the yarn you like to crochet with.
Some crocheters are very partial to one or two yarn thicknesses, called weights. Medium or worsted weight is a crowd-pleaser, for example. If you like to crochet with yarn of any weight, from cobweb to roving, you need a few different hook sizes for each of the eight yarn weight categories (#0 Lace to #7 Jumbo)!
How about fiber types?
I’m still surprised sometimes when a crochet hook gets along much better with one yarn than another. If you like to experience the full menu of fibers and fiber blends, from the fuzziest to the slipperiest all spun in different ways, you’re going to need hooks with different head shapes and surface finishes.
I really notice this when I crochet with a non-yarn like wire, jewelry cords, and fabric strips.
I can pick up a lot of speed with a hook that has a glossy aluminum finish except with very glossy silk yarn. That’s when a brushed matte finish is better.
When a fluffy microfiber (synthetic) yarn drags on a giant plastic hook because of static electricity, I switch to a wood hook.
When a yarn is dense and round like spaghetti (Jelly Yarn, rayon-wrap cordé, wire, tubing, leather lacing, etc.), a crochet hook with a roomy “bowl”[see diagram] is much better than one with a slit-style bowl.
What kinds of things?
Want to try every possible kind of project, from beaded jewelry to exploded lace to sturdy totes to thick blankets to…so many more kinds of things!? Projects can require very particular crochet hook sizes, styles, and finishes.
Situations, events, and physical conditions.
I have favorite hooks for marathon crocheting (when I have a big crochet deadline to meet). You might like to have a hook set just for traveling like I do; for plane flights I try to avoid metal hooks. Plastic and wood hooks are lighter in my bag, and less quick to slide down between seats to be lost forever.
For those crocheters with hands that are particularly small or large, sensitive to cold, tire easily, are arthritic or in recovery from surgery, and so on, there are crochet hooks specially designed for you. Look for hooks in ergonomic shapes. You can also add your own ergonomic handle with clay, pencil grippers, wrapped fabric, and other materials.
What if you need to crochet in a low- or no-light situation? Light-up hooks, and those that don’t match the color of your yarn are best.
Any special techniques or stitches?
Like to try dramatically different stitches like bullions, split clusters, and picking out that bump loop of single crochets? Tunisian and double-ended crochet? Crochet along the edge of fabric? Cro-tatting? The right crochet hook for the job sure makes a big difference with these.
“Loop Picking”: Hooks with a pointier head are very helpful when trying to pick specific loops to crochet into. Camel crochet is a classic case. I usually reach for one when I do Tunisian or slip stitch crochet. Some brands are naturally pointier. I like how easy it is to file the heads of my inexpensive bamboo hooks in different shapes to learn what works best for me.
Beading: I need to have steel crochet hooks of several sizes on hand. You’ll need some with hook heads that are small and streamlined enough to pull a loop of thread or yarn through bead holes. Tulip has done this with their bead crochet hooks.
Tunisian: (Projects can really vary, so I’m going to do a separate post on Tunisian hooks.) Generally I need the length of the hook head to be as short as possible [see diagram], and I need the surface to be frictionless with the particular yarn.
“Hard Crochet”: The 1970’s crocheter Mark Dittrick emphasized the difference a large steel hook (size 0 or 1: 2.35–3.25 mm) makes for his ultra tight and stiff sculptural crocheting.
Crochet Hooks as Treasure
Did a family member teach you how to crochet? My mother taught me. I treasure her crochet hooks and the brown moiré jewelry wrap that she used as a hook case.
When you teach a family member, you create a future where your favorite crochet hooks will be cherished!
If you know someone who would like this detailed crochet hook diagram, please be kind and send them to this blog post so that they can download their own copy directly. Right-click this direct link to copy it: https://www.designingvashti.com/crochet-hook-diagram-free-download. Thanks!
The next post in this series is on the surprisingly rich topic of crochet hook sizing.
Site-wide Search
Vashti’s Crochet Shop
Get the Newsletter
Sign up to receive Vashti’s Crochet Inspirations Newsletter in your inbox monthly.