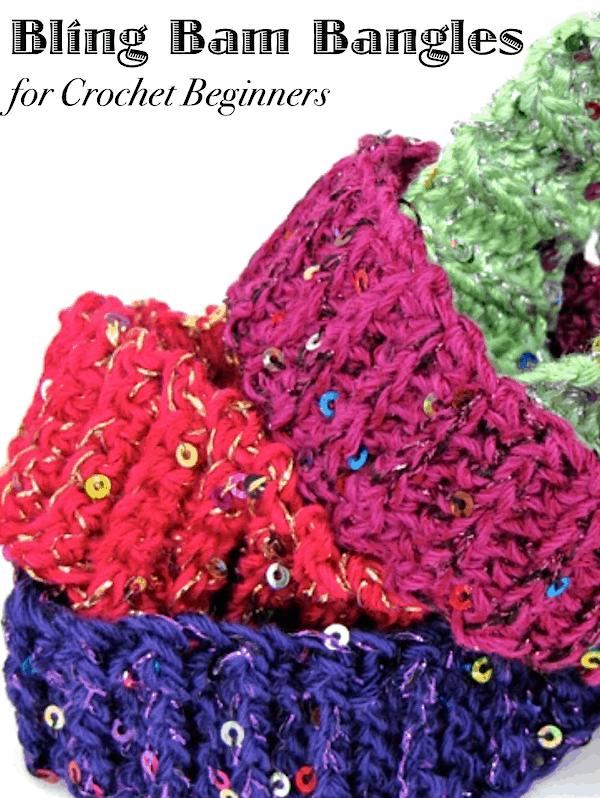
Bling Bam Bangles

Story Time!

Bling Bam Bangle began as a test of ribbing stitches for a simple crochet bangle. At the time (September 2012), I was preparing to teach a crochet jewelry class at a CGOA conference in Reno, Nevada.

My goal was to start with a comfortable crochet bracelet that doesn’t require a clasp. A stretchy ribbed one would slide on and off the wrist for a soft crochet bangle. 

I originally planned to make two and then compare them: a single crochet rib one, and a slip stitch rib one. Instead, I amused myself by adding a mock clasp. It reminds me of Bamm-Bamm Rubble, the baby boy who hit everything with a stone club in the The Flintstones cartoon.

Two years later (December 2014) I found the Flintstone one and tried a quick holiday version with a sequined strand held together with my Lotus yarn. I couldn’t stop! I made a dozen, and tried seven different kinds of ribbed stitches. 

This pattern offers four stretchy versions, in keeping with the original goal of a simple, stretchy ribbed “bangle.” For details on all other variations, see the Flickr photo set link that is clickable within the pattern. (Also see my newsletter, “Crochet Ribs, Old & New Grooves” on the stretch factor of different ribbed crochet stitches.)

The quirky Bam-Bam clasp is just for bang (impact). It’s crocheted last, and you can leave it off altogether as I often did. Pattern includes customizing notes.

Skill Level

Advanced BeginnerThe ribbed cuff part of the bracelet is Beginner level. A Beginner may find crocheting a sequined strand held together with a smooth yarn challenging at first.

This pattern uses minimal pattern abbreviations. UK and Australian equivalents for American measurements, yarn weights, and stitch terms are in brackets { }. After using this pattern you will know (if you didn’t already):

  • How to crochet four different kinds of crochet ribbing. 
  • How to crochet a simple ribbed bracelet, and how to count the rows easily.
  • How to customize the width and fit of the bangle.
  • How to crochet a decorative loop-and-post clasp.

Finished Dimensions

Approximately 1.25″ {3.18 cm} wide with a 6″ {15.25 cm} circumference. The selected rib stitches used in this pattern give the bangle enough stretch to slide comfortably onto the wrist. Exact gauge is not important, and many large sequins in some yarns can affect one’s stitching gauge, so the dimensions may vary a bit.

Materials

Crochet Hook: Size F/US-5/3.75 mm hook or size needed for gauge.
Yarn used for Bling Bam Bangles:

DesigningVashti.com Lotus Snacks (52% Cotton, 48% Rayon; 85 yd/78 m per 1.16oz/33 g skein): one ball is enough for three bracelets. (A ball of the large 256-yd ball of Lotus would yield at least nine bracelets.)

To substitute a yarn, choose a #2 Fine Weight yarn with a recommended crochet hook size range of US E/4 {3.5 mm} to US G/6 {4.0 mm}. These yarns may also be called Sport, Heavy Sock {Light DK, 5-Ply}. Figure on approx. 11 g or 29 yds, or less, per bracelet. This bracelet is also a fun way to play with color changes and a self-striping or space dyed yarn.

One strand of Lotus was held together with one strand of a sequined novelty thread:

  • Premier Yarns Enchant (76% Metallic, 24% Other; 429 yd/392 m per .88 oz/25 g skein): approx. 29 yds per bracelet. Colors used: King’s Crown and Jewelry Box.
  • Yarn Bee Bejeweled Sequin (40% Metallic Polyester, 30% Sequin Polyester, 30% Polyester; 328 yd/300 m per .88 oz/25 g skein): approx. 29 yds per bracelet. Colors used: Mulberry Multi, Gray Multi and Purple Multi.
  • Berroco Mirror FX (100% Polyester; 60 yd/55 m per .35 oz/10 g): approx. 29 yds per bracelet. Color 9001, square gold sequins on white thread.
  • Berroco Lazer (100% Polyester; 70 yd/64 m per .35 oz/10 g): approx. 29 yds per bracelet. Color 6004, silver sequins on black thread.

Yarn needle for weaving in ends.
Posted on 5 Comments

Crochet Cable Boot Cuff Pattern in Progress

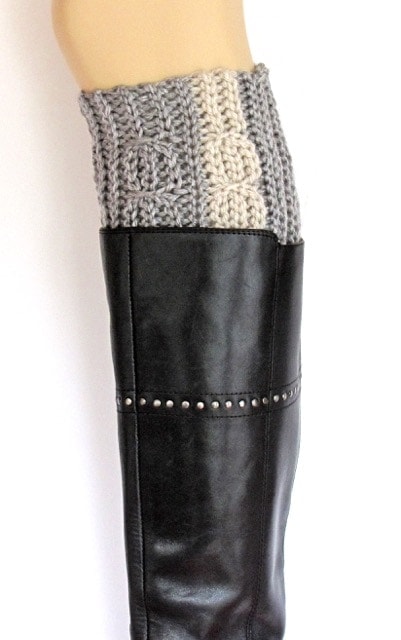
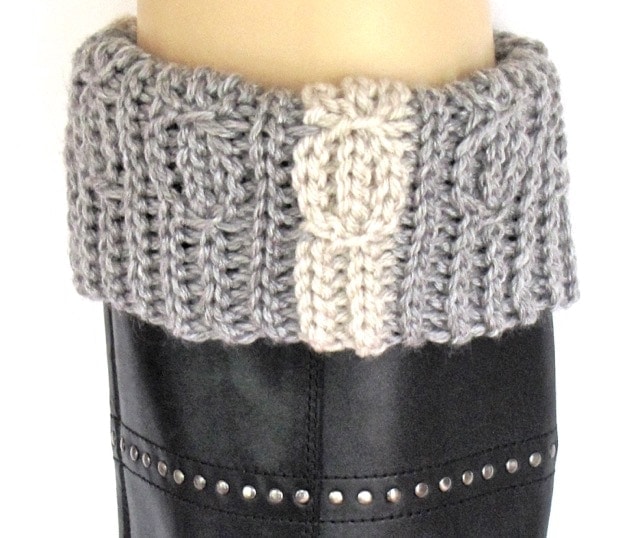
Lucky Twist Bootslip folded over boot top

New Crochet Cable Boot Cuff Pattern!

The Lucky Twist Boot Cuff in action!

A few days ago I sent out issue #65 of my Crochet Inspirations newsletter: “Mock Cables in Slip Stitch Crochet.” I’m getting questions from readers about the dark brown crochet cable boot cuff photo (shown below). I crocheted that one in November 2012. The gray striped one is fresh off the hook.

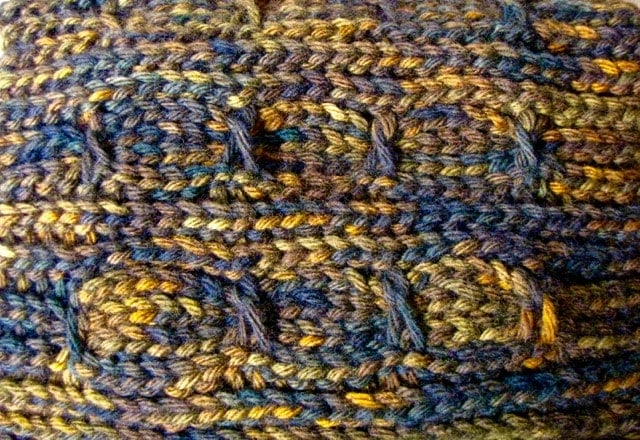
The 2012 brown one is actually a prototype of the new crochet slip stitch Lucky Twist Mitts. It’s my newest downloadable pattern. A matching Lucky Twist crochet cable boot cuff pattern is almost finished.

Update: The boot cuff pattern is done!

The early brown Lucky Twist swatch helped me test lots of things. For example, how stretchy the limp five-ply merino yarn would be as a mitt (not enough). How much to taper the ribbed edge with short rows. I wondered about the speckled dyeing and overall dark brown tones.

As I mentioned in the newsletter, I had to dramatically brighten these photos just so that the cabled stitch textures would show up! So in real life I’d need to be standing in full sunshine to see the cabled surface texture in a dark brown yarn. The short amber color flecks are pretty, but they distract a bit from the cables.

First swatch of Lucky Twists Boot Cuffs pattern

This was also the first boot cuff prototype I’d ever crocheted. So I learned about:

  • Finished dimensions for a good crochet cable boot cuff pattern.
  • Stitch surface textures and yarn colors that show up well on that area of the body. (Lighter colors help.)
  • Should one or both edges of a boot cuff taper? (I prefer it tapered at one end only.)
  • How much yarn and time does it take to crochet boot cuffs? (About as long as crocheting just 14 inches of a scarf!)
  • Thickness of yarn and of stitches that fit inside the boot top. (Medium weight yarn seems fine for the boots I own.)
  • Folded, unfolded, scrunched. All ways are fun!

Crochet Boot Cuffs, 2012 and beyond

Back in 2012, crochet boot cuffs were such a new trend that they might have just been a one-season fad. That November I traveled to northern Illinois to teach a crochet retreat. It was a boot-wearing opportunity that I don’t often get here in Florida.

It was in Illinois that I started the brown crochet cable boot cuff pattern prototype. I’d be able to test how much warmth they add, and if I enjoy wearing them.

I discovered that crochet boot cuffs feel great! I wore them over dark tights with skirts. They stayed put. I enjoyed wearing them all ways – scrunched, folded over the boot, and unfolded. Down low into the boot or up near the knee. I did find that I wanted longer ones that covered more of my legs for warmth.

Lucky Twist Mitts

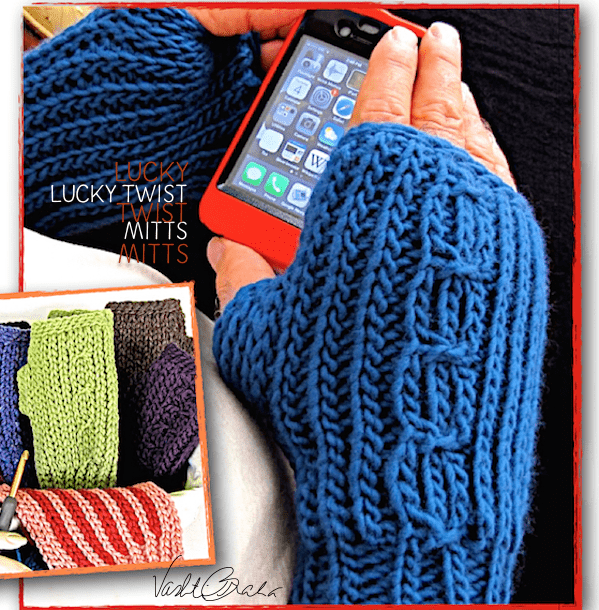
Lucky Twist Mitts is based on everything I love about the original Luckyslips Mitts pattern: the right kind of stretchy in the right places. Slip stitch ribbing is perfect for comfortably snug and warm texting mitts.

These mitts feature a mock cable accent. This entry-level “luckytwist” method is promising; see issue #65 of my newsletter, “Mock Cables for Slip Stitches). Slip stitching below the working row is the first step in creating this simple mock cable texture. Add that “luckytwist” to the stitch loop to enhance the cabled look.

Each step of the first mitt is designed as a roll out of skills in a gradual progression. There’s a complete photo tutorial for the Twisted Slip Stitch Spike Mock Cable on a printer-friendly page. Customizing tips for both Luckywomen’s and Luckymen’s sizes are included along the way for more experienced slip stitchers.

Skill Level

Advanced Intermediate. You may find it challenging to combine these three skills in this pattern: short row shaping, twisted spike stitches, and crocheting slip stitches with a consistently looser gauge. If you haven’t crocheted a project in slip stitch ribbing yet, I recommend starting with the free Eva’s Ribs Scarf (or if you’re easily bored, try a quick Bling Bam Bangle, or the free Slip Slope Scarf). The skill-building Luckyslips Mitts pattern is the ultimate introduction because it started out as a class project for slip stitch crochet beginners. Also see Slip Stitch Crochet FAQ.

I’ve kept pattern abbreviations to a minimum. UK and Australian equivalents are included with American terms.

After using this pattern you will know (if you didn’t already):

  • How to crochet a mock cable with twisted spike slip stitches.
  • How to use the foundation row, seaming row, and turning chains in slip stitch crochet.
  • How to begin and end ribbed rows, and how to count them accurately.
  • How to determine the front and back of this reversible ribbing.
  • How to shape slip stitch ribbing into a fitted cuff that retains its stretch.
  • How to adjust both width and length of this type of fingerless glove.
  • How to edge the ribbing with a Bosnian slip stitch.

Finished Dimensions

You can customize the cuff-to-finger opening length, the placement of the thumb opening, and the width across the palm; tips for doing this are indented and italicized within the pattern. Sizes are given for a luckywomen’s size with changes for the luckymen’s size in parentheses:

  • Length of mitt from cuff to finger opening: 6.5 (7.5)” {16.5 (19) cm}
  • Circumference of palm of mitt, unstretched: 12 (15)” {30.48 (48) cm}; nearly doubles when stretched.
  • Circumference of finger opening, unstretched: 5.25 (6)” {13.3 (15.25) cm}; stretches to approximately 7 (8)” {17.75 (20.3) cm}
  • Circumference of wrist cuff opening, unstretched: 5″ {12.75 cm}; nearly doubles when stretched.
  • Circumference of thumb opening: 2.5 to 4″ {6.3 to 10 cm} depending on your finishing rounds.
  • Distance from thumb opening to top (finger opening) of mitt: 1.25 (2)” {3.18 (5.0) cm}
  • Distance from thumb opening to cuff of mitt: 3 (3.75)” {7.6 (9.5) cm}

Materials

  • Crochet Hook: Size K/US10.5/6.5 mm hook or size needed for gauge.
  • Yarn: Choose a #4 medium-weight wooly blend that lists a crochet hook size range from US H/8/5mm to J/10/6mm on its label. These yarns may also be referred to as Heavy Worsted, Aran, Afghan, and “Light Chunky” Weight.

Each luckywomen’s mitt takes approx. 24g of yarn, so a 100g ball should yield two pairs. Each luckymen’s mitt takes approx. 50g of yarn, so a 100g ball should be enough for one pair.

Yarn Shown for luckywomen’s light green mitts: Briggs & Little Softspun (100% Wool; 240yd/219m per 4oz/113g skein).This thick two-ply yarn feels soft, light, and sort of felted.

Yarn Shown for luckymen’s blue mitts: DesigningVashti Treat Medium-Z (discontinued; 100% Merino wool; 218yd/200m per 3.5oz/100g skein). This yarn feels like cashmere.

  • Recommended: 3 stitch markers (until you can recognize the last slip stitch of each row), plus 10 for the Lucky Twist cable row.
  • Yarn needle for weaving in ends.
Warm Aeroette

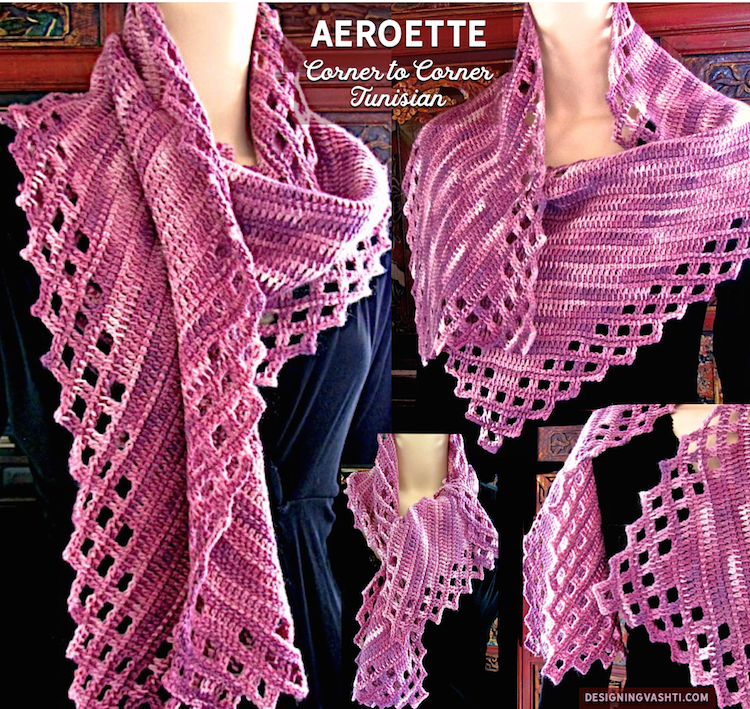
Crocheting a rectangular scarf on the bias in Tunisian filet is rare for Tunisian crochet. Aeroette features the Tunisian foundation slip stitch increase method for this. 

Starting this scarf in one corner and finish at the opposite corner means you can easily make it wider for a wrap. Use any yarn; the special filet lace edging is crocheted as you go, and this makes it easy to predict how much yarn you’ll need to finish.

I originally designed Aeroette to be a practice pattern for a crochet class on the popular Aero WrapLike Aero, the scarf length and width are easy to adapt to the amount of yarn you have on hand.

Skill Level

Intermediate. Includes a stitch diagram and printer-friendly photo step-outs, for for lefties too. See Burly Bias (rated Advanced Beginner) and Tunisian Shakti Scarfythings (rated Easy) for good introductions to Tunisian biasing

?After using this pattern, you will know (if you didn’t already): 

  • How to start a Tunisian crochet project in one corner, build a rectangular scarf on the diagonal by increasing along the edges, and then decrease along both edges to complete it.
  • How to increase with the Tunisian Foundation Slip Stitch so that both shaped edges match.
  • How to understand this type of Tunisian crochet design in light of traditional filet crochet.
  • How to edge Tunisian crochet with lacy filet spaces as you go.
  • How to square up Tunisian filet edges with lean picots.

Finished Dimensions 

44″ x 10.5″ {111.76 x 26.67 cm} for a one-skein scarf; width and length are easily customized.

Materials

  • Tunisian Crochet Hook: Size US G/7 {4.5 mm}, minimum 10″ long, or size required for gauge.
  • Yarn: Abuelita Yarns Merino 3 Ply (100% fine imported merino wool; 420 yds {384 m} per 3.5 oz {100 g} skein): 1 skein.

To substitute a yarn of the same thickness: Choose a #1 Super Fine Weight yarn with a recommended hook size range of US C/2 {2.25 mm} to US E/4 {3.5 mm}. These yarns may also be called Fingering, Sock, Light Sport, Baby {3-Ply}. 

To substitute a thicker or thinner yarn, try a crochet hook size that is 2 to 3 sizes larger than usual for the yarn. The stitch diagram and basic pattern instructions will work for the yarn type, yarn amount, and hook size you decide to use.

Posted on 1 Comment

New Tunisian Crochet Pattern PDF: What Takes So Long?

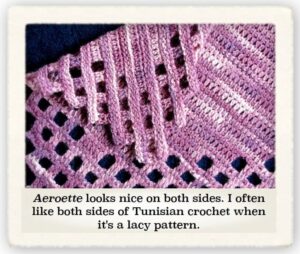
Both sides of Tunisian crochet often look nice if it's a lacier pattern.
           —-:—-
This blog post is the second part of a short series about the birth of a new crochet pattern pdf. The third is here.
Update: Downloadable PDF for the new Tunisian crochet Warm Aeroette Scarf is officially in the shop.


Behind the scenes of a new Tunisian crochet pattern

Pictured is draft #4 of Warm Aeroette Tunisian Crochet Scarf.

I’m a slow, deliberate pattern publisher.

Draft 4 of Warm Aeroette Tunisian Crochet Scarf. Almost done!

I love crocheting and so I think I chronically underestimate how much work it really is! Not only does a step almost always take longer than expected, I don’t always know when I need to recharge. (Each of these is a “step”: a stitch diagram, a photo tutorial, pattern testing, sizing, tech editing, etc.)

The Aeroette pattern has a longer title because this is a downloadable single pattern. The title needs to tell crocheters (and search engines) as much as possible in one line.

Three things can slow down new Tunisian crochet patterns for me:

Each design seems to bring unique issues!

For Aeroette, starting the scarf in one corner is a biggie. It merits a nice step by step photo tutorial. It’s a rare construction method for Tunisian crochet. Also, the best pattern wording evolves slowly sometimes. For Aeroette I’ve revised the wording of how and where the beginning and ending picots go a few times for clarity. Tunisian crochet pattern language has its own conventions.

Temptation of creative design details.

Doris is the same way and we laugh about this. Maybe optimize X, or add Y feature? What about this or that variation? I’d better swatch it in a very different yarn to make sure the design is not dependent on the yarn I’m using.

How educational it is. 

Aeroette started out originally as a practice project for a class on the Aero Tunisian Filet Lace Wrap. My goal with Aeroette is that it serve as a new Tunisian crochet skill building experience.

Sometimes I print a 2-to-a-page draft like you see here, to save paper. To save printer ink, the photos and captions are temporarily tiny. Most images are step-by-step tutorial photos that will all go on a back page. That will make printing them optional to save everyone’s printer ink.