Ennis Revelation

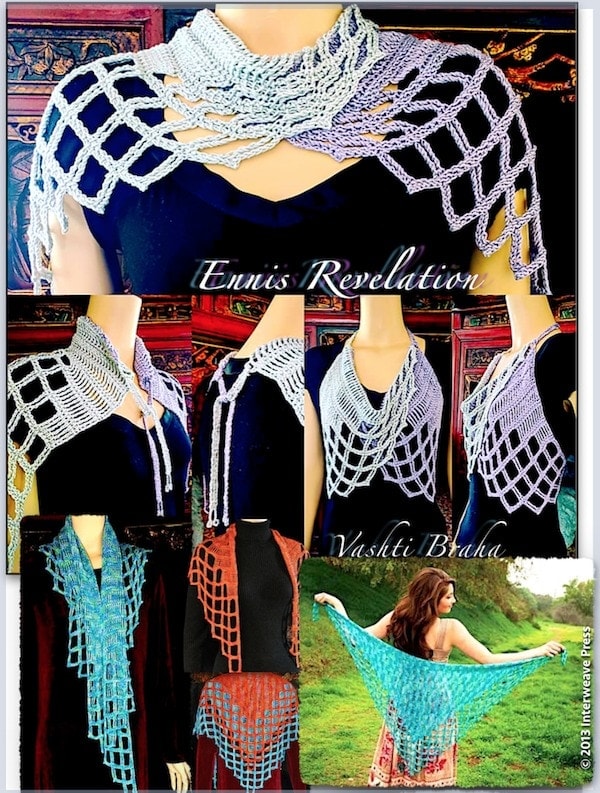
The triangular Ennis shawl in this two-pattern set is my first and most dramatic Tunisian filet design. The four-sided lavender Diamond Ennis is the most recent. Triangular Ennis was originally designed for Interweave Crochet Magazine, Summer 2013 issue.

Also new for this set is a complete stitch diagram, schematics and plenty of extra information—for lefties too.

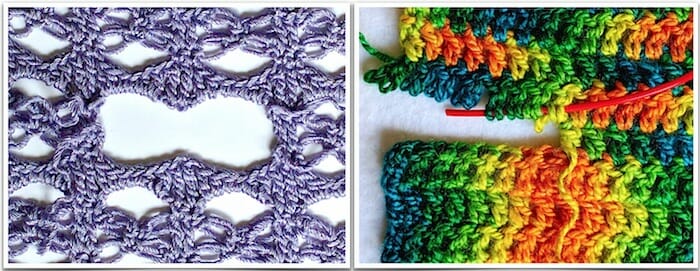
Back in 2010 I couldn’t find examples of filet lace done with Tunisian crochet. The original Ennis was my confirmation and encouragement—a revelation. I remember the liberating “Yes, it can be done!” feeling. It inspired the Aero series: Aero, Warm Aeroette, Aery Faery, and Aquarienne, as well as more designs, classes, newsletters, and blog posts over the years. I’ve added links to some of these in the patterns.

They’re lovely on both sides, which I find is typical of Tunisian crochet that is very lacy. Another nice feature of Tunisian lace is that it doesn’t eat up yarn. Even the orange one-skein Ennis can be tied around my medium-size waist on a carefree summer day. I used two skeins for the larger blue one, and two of my Lotus Snack mini-balls for Diamond Ennis. The pattern works with any yarn amount and weight.

Skill Level

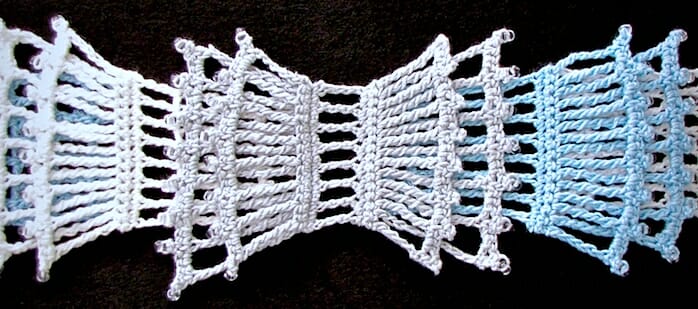
Tunisian Intermediate. With this pattern you’ll learn how to crochet a triangular shawl side to side (a.k.a. point to point or P2P), and a diamond shape from the center out. You’ll either increase or decrease along only the starting edge of the forward passes. The dramatic filet border is created as you complete each row, so a long-striping yarn would work well for this.

I’ve kept abbreviations to a minimum.

?After using this pattern, you will know (if you didn’t already):

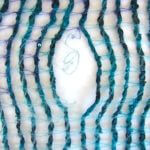
  • How to apply principles of filet crochet to Tunisian stitches for a strikingly lacy net.
  • How to manage different kinds of loops held on the Tunisian crochet hook: temporary vs. Tunisian yarn overs, and completed stitches.
  • How to crochet a triangle shawl by starting and ending at the upper corners.
  • How to create a versatile diamond variation using just the gauge swatch.
  • How to edge Tunisian crochet with filet spaces as you go.
  • How to crochet beaded-fringe removable ties.

Materials & Sizes

Straight or Flexible Tunisian crochet hook at least 13″ {33.0 cm} long: Size G/6 {4 mm} or size needed to match gauge.

Yarn DesigningVashti.com Lotus (52% Cotton, 48% Rayon; 256 yds/235 m per 3.5 oz/100 g skein): use one ball for the smaller orange wrap and 2 balls for the larger blue one. It’s currently available and substitutes perfectly for the (possibly discontinued) orange and blue yarn I used for the original triangle shawls:

  • Diamond-Ennis (170–240 yds): 38 (41.5, 45)” {96.5 (105.4, 114.3) cm} long and 12 (13, 14)” {30.5 (33.0, 35.6) cm} wide. For the one shown, I used only 1 (2) balls each of DesigningVashti.com Lotus Snack mini-balls (52% Cotton, 48% Rayon; 85 yds/77.7 m per 1.16 oz/33 g skein), Satin Grey and Lavender Ice.
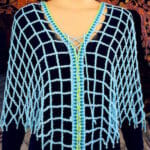
  • Halter Vest: Torso circumference is 38 (41.5, 45)” {96.5 (105.4, 114.3) cm}. Each solid-stitch bra cup section spans approx. 7.5 (8.5, 9.5)” {19.1 (21.6, 24.1) cm} in height and width.  Neckline drop is 12 (13, 14.5)”. The ties add range to these final dimensions. Dimensions are given for sizes X-Small/Small, with Medium and Large in parentheses. See p. 9 for customizing the dimensions and yarn amounts.

    Shoulder Drape: 38 (41.5, 45)” long x 12 (13, 14.5)” wide {105.4 (114.3) cm x 33.0 (36.8) cm}.

Yarn: Southwest Trading Company Bamboo (100% bamboo; 250 yd [229 m]/3.53 oz [100 g]): 1 (#411 Tequila) or 2 (#128 Ocean Life) skeins, possibly discontinued:

  • Two-skein (500 yds) blue shawl: About 62” {157.5 cm} wide from point to point and 25” {63.5 cm} long at deepest point of triangle.
  • One-skein (250 yds) orange shoulder wrap: About 50” {127.0 cm} wide from point to point and 20” {50.8 cm} long at deepest point of triangle.
  • Substituting: Pattern works the same if you use one color throughout. Choose a yarn with a recommended crochet hook size range of E/4–G/7 {3.5 mm–4.5 mm}. Or use any yarn weight and a hook size that is appropriate for it.

Large Seed Beads and a steel hook (optional for ties): 18 seed beads per tie. Capelet style needs two ties (36 beads) and the halter style needs four (72 beads). The bead holes need to be large enough for a loop of your yarn to be pulled through with a steel crochet hook. For the Lotus yarn I used size 6° “e-beads” and a size 10 {1.3 mm} steel hook.

Notions: Two stitch markers. Scissors. Yarn needle.

Burly Bias

Three of many beginner-level diagonal Tunisian crochet scarves in this pattern: skinny pointed tie, star-seamed asymmetrical cowl, Fibonacci scarf.

First Steps in Diagonal Tunisian Crochet

Tunisian crochet stitches have built-in dynamic energy. Wake them up by setting them on an angle!

Burly Bias takes Burly, a popular pattern for beginners, in a fresh direction. Like Burly, its chunky stitch texture makes a great men’s scarf, and beginners see results faster with big stitches. 

Choose from three exciting color play options and five finished scarf shapes. All use beginner-level shaping only. Angled crocheting is so versatile.

“Burly Self-Striper” is a one-ball asymmetrical neck warmer with a star stitch seam. “Tri-Color Burly” skinny scarf-tie alternates three attached colors. For the “Burly Fibonacci” classic rectangular scarf, two contrasting yarns alternate in a mirrored sequence of stripes.

Start with a ball of a chunky self-striping or other variegated yarn. Thanks to a handy discovery about the foundation row, you can decide later how you’ll finish yours: straight or slanted ends? Seamed into a cowl or loop scarf?

Skill Level: Tunisian Advanced Beginner

This diagonal version of the original Burly scarf adds simple increasing and decreasing to a Tunisian Simple Stitch (TSS) pattern. It drapes evenly and has a nicely finished edge.

Tunisian rows tend to lean toward the starting edge of the forward passes. (This is the right edge of the scarf if you’re crocheting it right-handed). Burly Bias goes with this lean to keep it easy: you’ll only increase at the start of forward passes. A clever trick makes it possible to appear to have increased at the other end! 

After this pattern, learn different ways to increase at the ends of forward passes, instead of decreasing, with Four PeaksWarm Aeroette, and the free Symmetrical Diamonds 101.

After using this pattern, you will know (if you didn’t already)

  • How to finish each slanted scarf end with a polished straight edge.
  • How to turn a long parallelogram into a cowl, asymmetrical neck warmer, loop scarf, rectangular scarf, or wrap.
  • How to crochet the Tunisian Simple Stitch (TSS) in offset rows.
  • How to crochet on both sides of the foundation edge, invisibly.
  • How to seam diagonal edges two ways for different shapes.
  • How to do three-color Tunisian on the diagonal, and add stripes in a Fibonacci sequence. 

Finished Dimensions

The two-ball “Burly Fibonacci” (black rectangular scarf) is approximately 48″ x 7.25″ {121.9 x 18.4 cm}. As a ring scarf seamed diagonally, it has a 38″ circumference {96.5 x 18.4 cm}. 

The one-ball “Burly Self-Striper” (pastel asymmetrical neck warmer) has a 23″ circumference widening to 33″ at the shoulders x 7″ at the back neck {58.4 to 83.8 x 17.8 cm}.

“Tri-Color Burly” (skinny scarf-tie in sport weight yarn) is approx. 68″ long and 3.5″ wide {172.7 x 8.9 cm}, based on three mini 85-yd. “Lotus Snack” balls.

Materials 

Straight or Flexible Tunisian crochet hook at least 9″ {22.9 cm} long: Size L/11 {8 mm} or size needed for the chunky yarn projects. I used a size I/9 {5.5 mm} regular crochet hook for the Tri-Color Burly (skinny scarf-tie).

Notions: A stitch marker. Scissors. Yarn needle. Small scale (optional). 

Chunky Yarn used for Asymmetrical Neck Warmer

Universal Yarn Deluxe Chunky LP (100% Wool; 120 yds/109.7 m per 3.5 oz/100 g skein): 1 skein for a cowl size; color shown is Elegant Baby.

Chunky Yarn used for Rectangular Scarf

Color A: Berroco Borealis™ (60% Acrylic, 40% Wool; 108 yds/100 m per 3.5 oz/100 g skein): 1 full skein, color shown is #5011.

Color B: Lion Brand Kool Wool (50% Acrylic, 50% Merino; 60 yds/55 m per 1.75 oz/50 g skein): 2 full skeins, color shown is #153 Black.

To Substitute a Chunky Yarn

The chunky yarns I used have been discontinued. Most variegated colorways will work great, especially if they have longer color sequences (a.k.a. “self-striping”). Choose a #5 Bulky Weight yarn or one with a recommended crochet hook size range of K/10.5 {6.5 mm} to US M/12 {9 mm}. Some #6 Super Bulky yarns will work too.

Thinner Yarn used for Skinny Scarf-Tie

Designing Vashti Lotus Snack (52% Cotton, 48% Rayon; 85 yds/77.7 m per 1.16 oz/33 g per ball): 1 ball each of Emerald Deep, Teal Glimmer, Sapphire. (This is a standard #2 Light/sport weight yarn, usually paired with a crochet hook size range of E/4 {3.5 mm} to G/7 {4.5 mm}. Besides being much thinner than the chunky yarn examples, it also drapes more because of the summery fiber content.)

Posted on Leave a comment

Color Pooling Developments

Some works in progress for the 2017 color pooling class.

The class material for Creative Planned Color Pooling changed me. In fact, it’s still changing me. I’ve adjusted its title to take new developments into account (more on that below).

I’d love to have taken a color pooling class like this years ago! In fact I’d rather learn it in a class than from a pattern or blog. The next time I teach this class: July 28, 2018 in Portland, Oregon. 

Crochet Rules, Questioned

Developing this topic changed me as a crocheter. It showed me what I take for granted about crochet how crochet works. I think it’s because for the first time, something else (the yarn’s color sequence) replaces crochet standards that have always worked for other kinds of crochet.

One ball of hand painted yarn, its colors intentionally "pooled" into two stitch patterns (popcorns and seed/moss/linen st) to create this "Florida Peaches Handbag"
These popcorn stitches vary but it doesn’t matter.

Here’s one: uniformly even stitches are beautiful. We aim to make uniform stitches to get a lovely, polished result, right? Beginners practice until they can be proud of how even their stitches are. Why would one question this?

When you’re intentionally pooling (I think of it as color directing), it’s the yarn’s colors that you aim to make uniform. The evenness of your stitches is second to that. A pretty distant second, which was shocking to me. Why? That brings me to a second way this class material changed me.

Primal Effect

On a bigger and more personal scale, my relationship to color changed! It was like watching my brain re-prioritize what it was seeing. My eyes rejoiced when the yarn’s next color stacked up the way I wanted it to. The stitches for making this happen became almost interchangeable. Even the stitch gauge could vary.

In other words, detecting a color pattern is riveting to the brain. (At least my brain. It feels primal.)

Especially when the pretty color pattern emerges from seemingly random chaos.

Especially when it’s like there’s a secret code in a multicolored ball of yarn and you’ve just cracked it.

The crochet stitch and gauge becomes a strategy: change the crocheting a bit to get a color to stick with the pattern and it works! The eye doesn’t see certain stitch irregularities. It’s too captivated by the color patterning. Also, the nearby stitches will adjust.

Recent Developments

Since my 2016 class, more crocheters have mostly been finding out from blogs about doing planned color pooling (a.k.a. intentional yarn pooling) with variegated craft store yarns. I’m seeing people make a cool argyle effect using the linen stitch (a.k.a. seed stitch, moss stitch, granite stitch): each row is [sc, ch 1, skip next st], and you crochet the sc of the next row into the ch-1 space of the completed row.

See this stitch in the colorful Aquarienne edging, Peaches handbag opening & handle, and Quailfeather. Accidental argyling happened with Barista. From a distance you can see a soft (but intentional!) argyle in this tweedy swatch and an argyle effect getting going in this swatch.

Colorful sock yarns custom dyed for my local yarn shop in coral reef colors.I came to this topic a completely different way, via hand dyed yarns. It’s easy to identify the dye techniques, such as hand painting and dip dyeing, because these yarns tend to be sold in the hank the dyer used, not wound into balls.

In these dyed hanks I saw “stitch games” because I’d already done other color-based and geeky experiments. For example,

  • When I learned from Marty Miller how hyperbolic crochet works (2006 or so), I crocheted her a hyperbolic coffee cozy secretly based on her birthdate.
  • A hand dyed yarn with a vivid yellow in it made me want to set it off with love knots. “Love Games” was the result.
  • I even sold a coffee cozy to a yarn company back in 2006 because I referred to it as a game.

Why “Creative Planned Color Pooling”?

Earlier versions of this class were “Stitch Games for Yarns With Short Color or Texture Changes” (2016 in Charleston SC) and “Stacked Color Pooling” (2017 in Mt. Pleasant IL). Planned pooling is becoming a recognizable term for more crocheters. I suspect that only seed stitch argyles come to mind for some. Also, some folks seem to think this is math based, but it doesn’t have to be. At all.

Creative is the important part of the new title because we’re still at the early stages of what is possible. There is way more to planned pooling than seed stitch argyles. What about lace and tall stitches? Shaping? Tunisian? I want crocheters to experience the possible! And of course to be changed by it.

The class resources page for this topic is updated as of 4/16/18.
Posted on 3 Comments

Why “Self-Healing” Crochet Stitches?

Love knots removed on the left; row of double crochet on the right, which need a lifeline (in red).
On the left is a self-healing stitch pattern. I’ve removed two rows of love knots, and the stitches left behind are fine the way they are—I have not edged them. No “lifeline” was required to prevent unraveling.
On the right, a red lifeline has been woven into the base loops of some of the double crochet stitches (dc, or in UK: tr). The nearby stitches without a lifeline are unstable and will unravel. View full size.


The Self-Healing Crochet Stitches and How to Cut Them class is thanks to an accidental discovery I made in 2013. A rectangular wrap kept sliding off of my shoulders. It has interesting edges, so I added (cut open) armholes to wear it as a vest.

I held my breath, cut a stitch, and…

Nothing happened. The stitches didn’t care. Why though? (Some stitches DO care. A lot!)

The first armhole is being opened to turn this Tunisian Mesmer Veil stole into a waterfall Maze Vest.
The cut that launched a whole class!

At first I thought it was an odd quality of only a few kinds of Tunisian stitches. After testing why this happened, I created a class called “Steeked Tunisian Lace for Fun Fast Fashions”.

By the time I taught it (2016), I’d already discovered the same effect with some regular crochet stitches. That led to a new version of the class​​, “Easy to Steek Crochet Stitches” in 2017.

Self-Healing vs. “Steek”

Nowadays I’m thinking “self-healing” conveys the topic better than referring to steeks. Steek is a specialized knitting term. I see too many question marks over crocheters’ heads when I use it. Also, steeking often involves cutting across several rows whereas in my class we cut open ONE row.

Cutting a self-healing stitch is creatively liberating and empowering. For me as a designer it’s exhilarating! I think “self-healing” conveys some of the positive, low-stress feeling people have in this class.

​Which Crochet Cutting Class?​

My friend ​Pauline Turner will be teaching a class​ called “Cutting Crochet” at the same event on ​Thursday, ​July 26.​ Our two “how to cut” classes seem to be very different​.

When renaming my class I briefly considered “Cutting Crochet” as a way to avoid the steek term. I worried that it would bring to mind the traditional reasons a crocheter would need to cut crochet: to fix, tailor, or repair it. My class is not traditional.

“Game Changer”?

“It’s a Game Changer” — Vashti’s mom (crocheter).

If you can add a head opening, armholes, and even decoratively shaped openings wherever you wish in a crocheted item, it means this is a distinct, different construction method. Here’s why my mom might be right:

  • It changes what we can do with schematics and simple shapes.
  • Beginners can understand and use the basic principles of it.
  • It simplifies the crocheting: just keep crocheting to the end. No need to make sure you start the armholes in the correct row. Stop crocheting when you want to, not when you’re a fixed distance from an opening.
  • The opening you add later is actually superior to crocheting it in as you go. It’s less lumpy.
  • It’s certainly a game changer when doing planned pooling with a variegated yarn (argyling, color stacking, etc). Crocheting a simple shape straight through is really important for this kind of crocheting. If you were to add an opening as you’re crocheting, you’d throw off your color sequence. To be able to cut open armholes, a head opening, pocket slit, and even a scarf keyhole later is ideal.

It turns out that a large number of stitch patterns are, or can be subtly tweaked to be, self-healing.

Self-Healing Crochet Stitches and How to Cut Them has a 2018 class resources page.

How to Fix Loose Loops of Tall Stitches

Pictured above: Cantina in beaded Lotus. Also see triple trebles in the Dessert Party Apron.

When tall stitches look very different from each other, or lumpy, stringy, loose, or too short, we just need to take more control of them. Especially vexing is when the top loops look loose and loopy! My solutions below will help you crochet even the very tall stitches that look downright handsome. First, some basics of crochet.

Tall & Taller Crochet Stitches

A basic rule of crochet is if you already know how to do the double crochet stitch (US: dc, UK/AUS: tr), it’s easy to understand how to make the taller ones. Here’s how to crochet the dc into a row of stitches:

Yarn over and insert your crochet hook under the top two loops of the next stitch of the row. Yarn over and pull up a loop; you now have three loops on your hook. *Yarn over and pull the loop through two of the loops on your hook, then repeat from the * once: only one loop remains on your hook.

An amazing feature of crochet is there’s no limit to a stitch’s height. Start with the double crochet stitch as the model for crocheting any taller stitch. Here’s how to make a treble, the next taller stitch:

Yarn over two times (instead of once for a dc). Insert your crochet hook under the top two loops of the next stitch of the row like you would for a dc, yarn over and pull up a loop; you now have four loops on your hook. *Yarn over and pull the loop through two of the loops on your hook, repeat from the * until only one loop remains on your hook—for a treble, that’s twice more.

With each taller stitch (double trebles and so on) you yarn over more times and then work the loops off of the hook in pairs, just like you do to make a dc and tr. The only difference is that you have more pairs of loops to work off.

What About Tall Stitch Variations?

Aquarienne Beach Cover Up breaks the usual Tunisian crochet pattern conventions
Aquarienne has very tall Tunisian crochet stitches.

Note that I’m sticking closely to the basic stitches here. That means I’m leaving out:

  • other types of tall stitches, such as the extended ones of half-step heights,
  • other ways to add loops to the hook, and
  • more ways to crochet them into other stitches.
  • Also, tall Tunisian stitches.

These non-basic stitches have the same problems with loose top loops. My tips below will help.

A Better Start

Our goal is no slack in our loops beyond what’s needed for crocheting at our normal smooth and easy gauge. This is not about crocheting tighter. It’s about identifying where we let extra yarn creep in.

Buff your crochet hook surface.

Even slight, imperceptible residue will cause you to need a bit more slack in your loops. For a few seconds I vigorously rub the whole stitch-making zone of the hook with a soft cloth (preferably microfiber or chamois). I do this when I start a new project, resume crocheting one after a long break, or daily during peak summer humidity.

Adjust the initial loops.

The loop that’s already on your hook will become the top two loops of the new stitch. I tug on it gently to tighten. The loop should still slide freely along the main part of the hook (not the narrower tapered neck of it).

Let’s start a triple treble (US: trtr, UK/AUS: quadtr). I yarn over four times and immediately slide all the loops together while tugging a bit on my yarn. This removes unnecessary slack. They should still slide well on the hook as a neat, snug group. Keep your thumb or forefinger on the group so that they don’t loosen as you start crocheting.

It’s easy to overlook how much extra yarn we add to a stitch if the yarn overs spread out along the hook. (Keep this in mind for lacy Tunisian crochet too!) This will become a quick automatic movement after a while.

Better Stitch Making

While working the loops off of my hook in pairs, I pull up a bit on the loops. This has two benefits.

Lifting adds elegance.

If you think of the base of a stitch as having two “feet” planted in a stitch, then pulling up a bit higher while working the stitch creates longer “ankles” and a streamlined body. I first learned this about the dc from Pauline Turner in her Crocheted Lace book (Martingale, 2003). She explains why even experienced crocheters can have trouble getting a doily to lie flat if their stitch heights vary from the designer’s.

Lifting while making your tall stitches will help you get row gauge for filet lace projects. Feel free to add a chain to your turning chains if lifting makes your row a whole chain taller.

Use the “reserve” yarn.

Not all of the yarn is coming from the ball of yarn to complete the stitch. Some comes from the “reserve” yarn that’s wrapped around the hook. As I crochet I’m almost miserly about the yarn coming from the ball as I pull up a bit, yarn over, and pull through two loops at a time.

Try it: go slowly and watch how more yarn gets pulled off of your hook if you restrict the flow of yarn from the ball.

Part of this motion is that I’m also tilting my hook at a sharp angle. The head is pointing almost straight down as I pull a loop through the next two loops on the hook. This helps the yarn slip from hook and into the stitch at a pretty angle.

The stitches comes out uniformly neat and orderly looking. These subtle crocheting adjustments will become automatic and feel natural.

The Yarn Matters

Crocheting a tall stitch involves a lot of wrapping. A right-handed crocheter wraps the yarn around the hook in a counter-clockwise direction. It either untwists a yarn, or adds more twist, depending on whether the yarn starts out with a clockwise or counterclockwise twist (a.k.a. “S-twist” or “Z-twist”).

This is really noticeable sometimes. The tall stitches look stringy or uneven for several reasons:

  1. It’s hard to work the loops off the hook evenly without splitting the plies of yarn.
  2. A yarn flattens when it loses twist. This affects how the stitch looks.
  3. Separated yarn plies add a stringy look to the surface of a completed stitch.

The fiber blend matters. Slippery yarns add challenge, and so do yarns with uneven bumps. Sometimes trying different crochet hooks helps (remember to buff them first).

When you’ve tried everything, it’s not you. Occasionally, tall stitches are going look looser no matter what you do! Blocking might help.

Tall stitches love a good blocking.

Close up of an edging of tall stitches along the diagonal edge of a triangular Tunisian shawl.
Tunisian Islander Wrap with a lattice edging of tall stitches.

This probably sounds about as fresh and exciting as “take time to check your gauge” but the transformation is so worth it.

Tall crochet stitches are structurally complex. Blocking gives the yarn strands a chance to absorb the energy you added with all the wrapping and looping, and to meld evenly into a stable column.

Your tall stitches will respond even more handsomely to blocking if your yarn does. Natural fiber content helps because it responds so readily, but you can also block some 100% acrylic yarns with steam very carefully.

Crochet’s lacy beauty really shines through with the tall stitches, doesn’t it? I fall in love with crochet all over again when I use them.

Inspired by the release of the Tokyo Jacket, an earlier version of this material was posted October 2, 2009 at an older blog.