Posted on 4 Comments

Tall Stitch Circles

Six crochet circles in graduated sizes of tall stitches from half double crochets up to quadruple trebles.

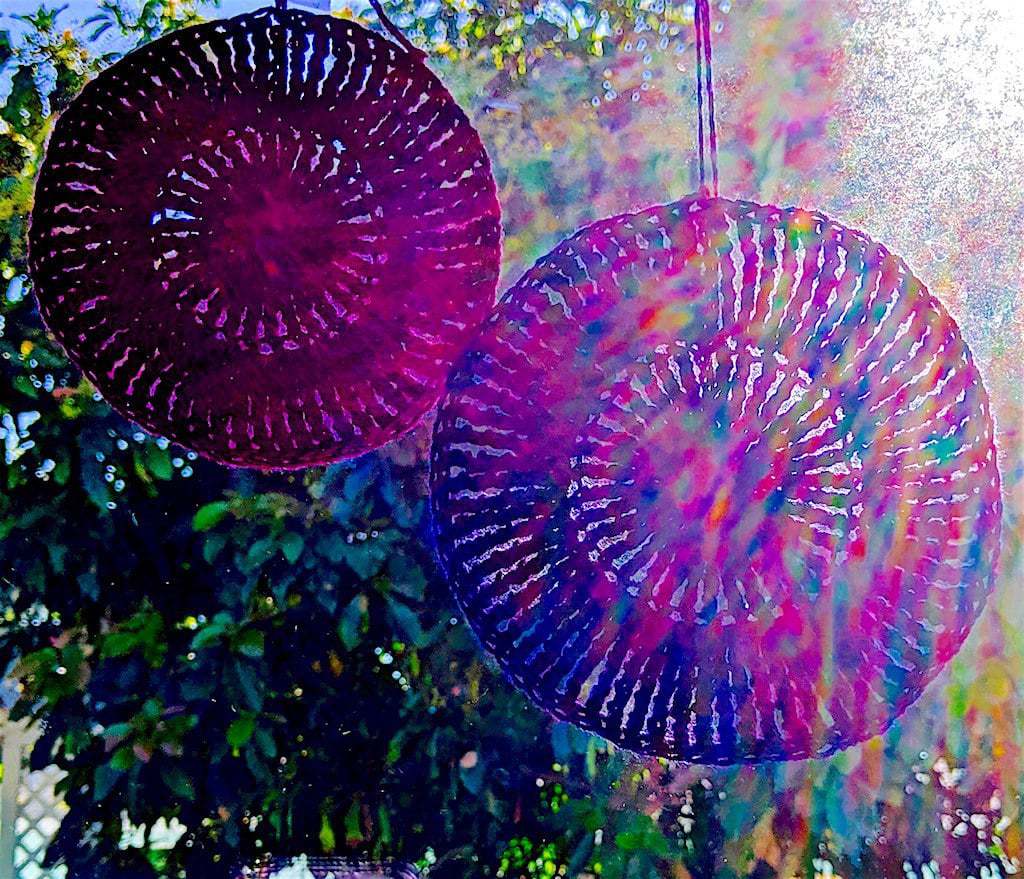
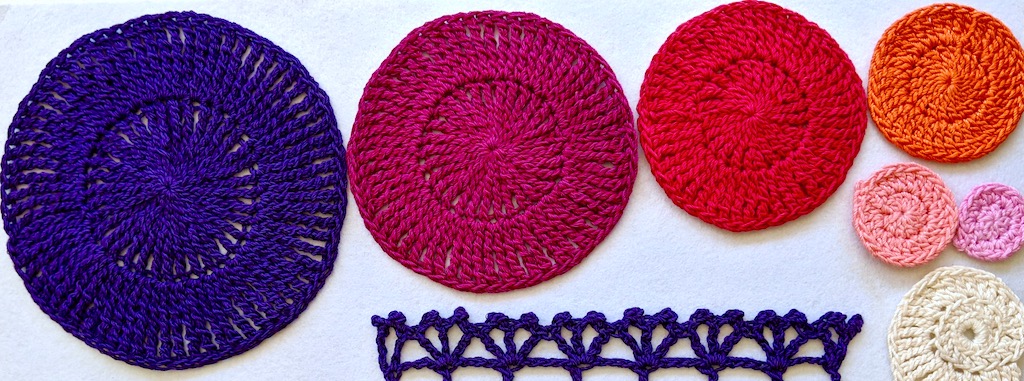
Have a look at these simple flat circles I swatched last month. This is research for my Tall Stitch Virtuosity crochet class. Each circle has a closed center and just two rounds of a tall stitch. The yarn is my own Lotus yarn. Lots of things to notice.

Formula for Tall Stitch Circles

A consistent mathematical pattern developed, and I’m going to trust it from now on. From left to right (see above):

  • Purple circle: chain 7 to begin each round; 36 quadruple trebles in round 1 (see Closed Centers note below), 72 in round 2. For a US quadruple treble (quadtr), yarn over 5 times to begin stitch.
  • Magenta circle: chain 6 to begin each round; 30 triple trebles in round 1 (see Closed Centers note below), 60 in round 2. For a US triple treble (ttr), yarn over 4 times to begin stitch.
  • Red circle: chain 5 to begin each round; 24 double trebles in round 1 (see Closed Centers note below), 48 in round 2. For a US double treble (dtr), yarn over 3 times to begin stitch.
  • Orange circle: chain 4 to begin each round; 18 trebles in round 1, 36 in round 2. For a US treble (tr or tc), yarn over 2 times to begin stitch.
  • Peach circle: chain 3 to begin each round; 12 double crochets in round 1, 24 in round 2. For a US double crochet (dc), yarn over once to begin stitch.
  • Pink circle: chain 2 to begin each round; 8 half doubles in round 1, 16 in round 2. For a US half double (hdc), yarn over once to begin stitch.
Six different tall stitch circles in a stack

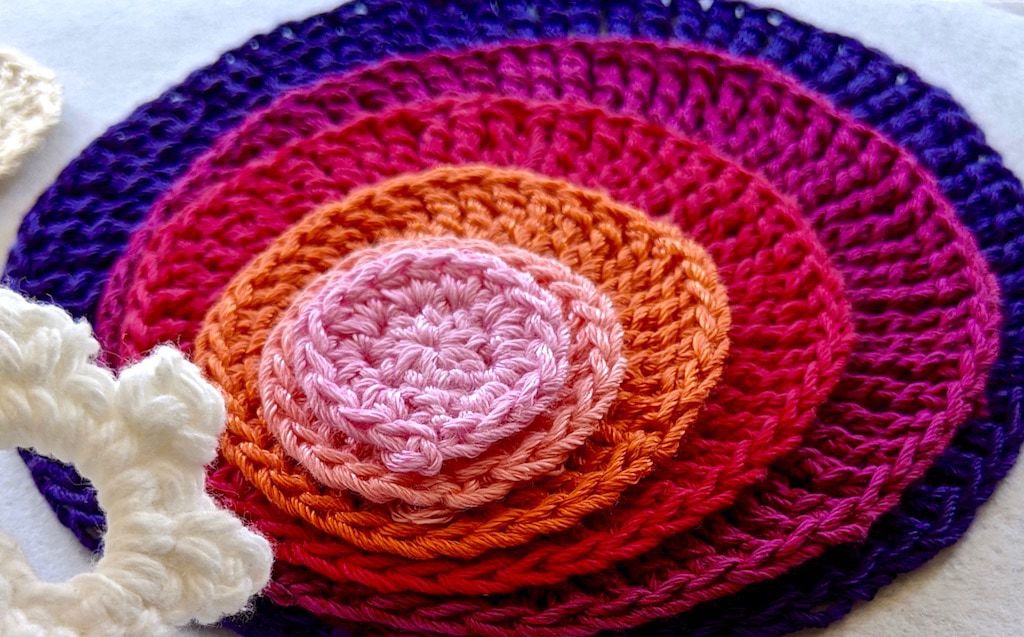
It’s thanks to the really tall stitches that I understand where I’ve gone wrong with crocheting circles (of any stitch) in the past. I couldn’t actually tell if they were going to come out alright while I crocheted these. They didn’t seem like they were going to lie flat, but they did, beautifully and consistently, once I gently blocked them.

This means the ol’ 1970’s advice to wing it (instead of using a formula)— to add stitches when it looks like you need to as you crochet each round? That way lies madness, for me anyway.

Closed Centers (note)

I used the magic ring (PlanetJune has good explanation) for all of them. I was unable to fit more than 18 stitches in the ring and still be able to close it completely. So, when the tall stitch circles are made with double trebles or taller (the red, magenta, and purple ones shown), I put 18 stitches in the ring plus the necessary amount of Y-stitches distributed evenly around.

This means the red circle of double trebles required 6 Y-stitches, for a total of 24 stitches in Round 1 (18 dtr + 6 Y-sts = 24). The magenta circle of triple trebles needed 12 Y-stitches in addition to the 18 ttr to total 30 stitches for Round 1 (18 ttr + 12 Y-sts = 30). For the purple circle, Round 1 needs to have 36 stitches in it, so 18 quadruple trebles plus 18 Y-stitches (18 quadtr + 18 Y-sts = 36).

Y-Stitch? Huh?

I don’t have step-outs at hand for showing how to do a Y-stitch for this. Have a look at Tamara’s over at Mooglyexcept that I don’t chain between the tall stitch and the Y-stitch that is linked to it.

Why Really Tall Stitch Circles?

They’re surprisingly beautiful. A simple architecture that one somehow never sees—I found no circles of really tall stitches anywhere. You could accent them with surface crochet in contrast colors, or alternate with rounds of shorter stitches. That would make for a nice future blog post.

Tirple treble circle and Quadruple treble circle shown in a window with rainbow light filtered through them
A triple-treble circle and a quadruple-treble circle with rainbow light filtered through them.
Posted on 3 Comments

Crochet Stitch Equivalents (Issue 2)

Close up of seam that joins two crochet motifs with stitch equivalents: linked bent tall stitches match chains and slip stitches.

I seamed with stitch equivalents in this 2019 image. It was not in the original 2011 newsletter issue #2, A Super Crochet Maneuver. It’s explained at the end.

A screenful of the original2-column newsletter with teal border, pale teal background, logo in header.
How it looked in 2010.

First, the original newsletter issue, below. It went out to a few more than 300 subscribers in September 2010. That’s nine years ago! I’ve removed the original two-column formatting, colored backgrounds, and especially the outdated links. I’ve refrained from revising the original text, except for light edits.

This stitch equivalents topic looks different to me now. I’ve added my current (September 2019) thoughts at the end.

From the Archives: A Super Crochet Maneuver

Vashti’s Crochet Inspirations Newsletter, Issue #2 (September 2010)

Welcome to issue #2.

Subscriptions have doubled since the first issue was sent out 14 days ago, so welcome to all of you new subscribers!

The “super crochet maneuver” I’ve been thinking about lately is not only a big problem-solver for designers, it can single-handedly put the “free” in freeform! It’s not a big secret, but I get the feeling it’s not common knowledge either.

Continue reading Crochet Stitch Equivalents (Issue 2)
Posted on Leave a comment

Rosebud Argyle Color Pooling Stitch

Moss Stitch (linen, granite, seed stitch) modified for longer crochet thread color sequences.
Size 10 variegated Lizbeth cotton thread, color #10-104 Spring Garden. I created a “Color Eater” variation of the moss stitch for it. Row by row pattern below.
View hi-res size.


Have you seen the planned color pooling crocheters are doing to get a cool argyle or plaid look with variegated afghan yarns? You can use lots of different stitches for this, but the height of single crochets (sc, or in UK/AUS: dc) is great, especially with moss stitch (a.k.a. linen, granite, seed stitch).

Planned Pooling with Cotton Thread

I pooled the colors of a size 10 crochet thread into an argyle and “Rosebud Argyle” is the result. It’s 3.5″ x 3.5″ and dense because I used a color-gobbling stitch pattern, so I added a border and turned it into a “mug mat” (coaster). I’ll be bringing it to the Creative Planned Color Pooling class.

If I had used the classic moss stitch pattern of [sc in next ch-space, skip next sc, ch 1], my swatch would have come out more than double that size: over 7″ x 7″ (I ripped it out before measuring exactly how much smaller it is with my stitch variation).

Even the 3.5″ size is bigger than I expected! My original goal was only 1″ or 2″. New lesson learned: the color changes in variegated thread look short until you start crocheting with it. The stitches just don’t take up much thread.

Stitches Change the Color Width

I really wanted the experience (and general look) of a moss stitch pooled argyle, so I needed to substitute with stitches that eat up a lot more thread. Why? The length of each color in a variegated thread or yarn is fixed. When the colors repeat, their sequence is also fixed. The total length of one whole sequence is your fixed width. The way you alter this fixed width is with the stitches you use. (There are other options but not for this post.)

Each row of moss stitch is [sc in next chain-space, skip next sc, ch 1]. With each new row, the sc’s are over the ch’s and the ch’s are over the sc’s. It is common to use half double crochets (hdc, or UK/AUS: htr) instead of sc. I haven’t seen much of it lately, though. I hope crocheters are feeling free to alter the moss stitch, especially if you’re doing planned pooling.

Below I’ve written up the stitch pattern instructions for my color-gobbling moss stitch variation. It’s the one I used for the swatch pictured above. I wrote it as if you’re using a solid colored yarn or thread.

Vashti’s “Color Eater Stitch”

Pattern Notes

  1. The “color eater stitch” is [slip stitch, 2-hdc puff] in the next ch-space. The slip stitch is to keep the hdc puff closer to the height of a sc and puffy (rosebud-like). It also helps keep the color changes distinct when you’re pooling.
  2. Like moss stitch, each row is [color-eating sc substitute in next ch-space, skip next color-eating sc substitute, ch 1]. With each new row, the color eaters are over the ch’s and the ch’s are over the color eaters.
  3. It’s easy to fine tune how much you use of a color when you’re pooling with it. For example, sometimes I did a 3-hdc puff instead of 2 to eat up more color. Or, a tighter ch-1 and shorter puff to eat less color. I got better at this with the later rows. Maybe you can tell in the swatch.
  4. When color pooling with it, do whatever you need to at the row ends: just a ss and hdc to use less color, or even a 4-hdc puff to use much more.

Abbreviations

  • ch – chain stitch
  • hdc – half double crochet (hdc, or UK/AUS: htr)
  • 2-hdc puff – [yarn over, pull up a loop] twice in the same designated stitch, yarn over and pull loop through all 5 loops on hook.
  • ss – slip stitch

How to Crochet It

Foundation chain: With a solid colored thread or yarn for your first swatch, chain an even number.

Row 1: Skip 3 chs, *[ss, 2-hdc puff] in next ch, ch 1, skip next ch, repeat from * until one ch remains, [ss, 2-hdc puff] in last ch, ch 2, turn.

Row 2: Skip first puff and ss, *[ss, 2-hdc puff] in next ch-space, ch 1, skip next puff and ss, repeat from * for rest of row, [ss, 2-hdc puff] in space of turning-ch 2, turn.

Repeat Row 2 for pattern.

For more on planned pooling, you might like this recent blog post: Color Pooling Developments.
Posted on Leave a comment

Hand Chaining, a Straddler of Worlds

Hand chaining is when you crochet chain stitches with your hands and fingers instead of with a crochet hook. It’s also called finger crocheting. Hand chaining is so easy! Kindergartners do it. It’s a popular way to crochet trendy necklace-scarves with fancy yarns in under 30 minutes.

Trendy Hand Chaining Trendy Necklace Scarves long
Love it! “Poseidon Scarf Kit” at loopymango.com

You might have learned hand chaining as a child in kindergarten, at camp, or from a babysitter. It’s often taught as a stand alone activity rather than as an introduction to the larger world of crochet, knot tying, or knitting. I don’t even remember how I learned it. I just already knew how by the time I officially learned how to crochet with a hook at the age of nine.

For the next blog post I viewed several videos that show how to do hand chaining as a crocheter, a knitter, or a knot tyer. It left me with a new way of thinking about the origins of crochet.

Not Just for Beginners

Hand chaining is so fun to do that even experienced crocheters are at risk of getting “hooked” (if they remember to try it). It’s often forgotten as a crochet method even though it offers nuanced control over unusual yarn combinations for edgy, artsy effects. I get new, deeper insights into simple stitches when I hand crochet them, thanks to the intimate, tactile experience of crocheting.

Hand chaining a special subset of crochet that merits a closer look than it usually gets.

Hand Chaining vs. Hook Chaining

Hand chaining (finger crocheting) loosely and tightly in 3 different fibers: sain cord, wool tube yarn, suede lacing.
Hand Chaining loosely vs. tightly. L to R: Satin cord, wool knit tube yarn, suede lacing.

Hand chaining cuts out the middleman (er, the crochet hook). This is perfect for crochet beginners! Learning to use a new tool with yarn loops for the first time takes the focus off of the stitch. Shouldn’t getting to know a stitch be the most important part of learning to crochet? Especially when that stitch—the chain stitch— is the foundational core of all crochet? I think so.

The crochet hook is the one central tool of crochet. When researchers encounter an unfamiliar fabric, they consider the tool used to create it. An item made with a crochet hook is usually classified as crocheted. I wonder how hand-chained items are classified.

Earliest Crochet Roots?

Hand chaining straddles two worlds: Crochet, and Knot Tying. The same basic crochet stitches can be made with hand chaining as with a crochet hook: Chain Stitch, Slip Stitch, and Single Crochet. (Other stitches are more of a struggle without a hook.) The fingers or the whole hand simply take the place of the crochet hook. Perhaps hand chaining came first, at least in some early cultures, and the crochet hook evolved to substitute for hands and fingers.

Among knot tying aficionados, hand chaining is called many other things: Drummer Boy’s Sinnet, Zipper Sinnet, Monkey Braid, Sea Chains, Chain Knots, Caterpillar Sinnet, and Daisy Chains. Boys and men may have encountered hand chaining via knot tying. Some practical uses among knot tyers include:

  1. To quickly neaten long lengths of rope or electrical wire for storage. (To this linked video, a commenter added, “This is used by riggers [who set up e.g. the ceiling on stages for rock concerts] as a cool way of shortening and storing several long ropes in a hurry.”)
  2. Launder climbing rope so that it can be easily machine washed, allowed to dry, and then “unzipped” for use afterwards.
  3. Watch James Dean absent-mindedly finger crochet with a rope while doing an interview in 1955! (Video starts as the camera is about to pan down to the rope he’s holding.)

-:———:-

Even if you already know how to crochet, I think Chain Stitch In Depth and other posts about crochet basics offer some new ways to think about our most basic and important crochet stitch of all, the Chain Stitch.

Updated November 2018. It’s part of an experimental blog post series: Vashti’s How to Crochet Book. Next post: Hand Chaining How-To’s.
Posted on 1 Comment

How to Crochet Slip Knot Variations

Steps to do a slip knot with more wraps when you need a decorative one.
View the above image full size.


Here’s the follow-up how-to for yesterday’s “Pros & Cons of the Starting Slip Knot” post. I’ve created photo step outs for two promising alternatives to the basic starting slip knot. The first is what I call the Buff Slip Knot, shown above. The second is the Three-Loop Starting Slip Knot.

Special Slip Knots for Crochet

The Buff Slip Knot

Like our general-purpose slip knot, the Buff version offers a slip loop that you adjust by tugging on the longer yarn end. Unlike many other knots I tested, the longer yarn end is waiting for you up where the slip loop is rather than down at the bottom of the knot near the short yarn end. Stays tidy-looking this way.

Tying it is like tying a basic slip knot that has more wraps. A crochet beginner might wish to come back to this one later. Follow the four steps shown above. (View the high-resolution image).

I listed ten possible functions crocheters might need from the starting slip knot in yesterday’s post. The Buff Slip Knot variation is an especially good candidate for advantages #6 and #10 on the list. Try it when you need or want a visible crochet slip knot that is nice looking. It’s symmetrical in more than one way. It’s also beefier if you wish to start with a large-holed bead accent.

The Three-Loop Slip Knot

This one may seem odd. Why would anyone want a crochet slip knot with three starting loops? This one is a great way to start right off crocheting with a finished, usable button loop, hanging loop, or other handy use for a secure loop. Think jewelry, cords and straps, and how about potholders?

Chained loops look less delicate than the satiny fine-grained texture of the puffpearls.
Puff stitches look finer than the chain stitches of the clasp loop!

Normally we’d start with a basic slip knot, crochet some chain stitches, then slip stitch them together to form a loop of chains. These work great for most things. Occasionally, chain stitches are too thick or textured for what I need. This tends to happen for me with jewelry projects. I’d like a slim loop to fit under a button clasp. The chained loops of these Puffpearl necklaces look unnecessarily chunky to me.

Another example is when a crocheted charm or pendant is designed to dangle. I’m thinking the Three-Loop one would have been a sleeker choice for the tops of the Lovebud Vines.

Three-Loop: How to Do It

The Three-Loop Slip Knot variation is similar to making a basic slip knot except: take the first 16″ or so* of your starting yarn end and fold it in half first. Use the fold to make the slip knot. Don’t pull the folded end all the way through.

3 steps to making a standard slip knot with a doubled length of yarn to result in 3 loops, not 1.
View higher-res image.

*Use a longer length than 16″ if you’ll be crocheting both ends together throughout, like I did in image #6 below. It’ll depend completely on each project. (It’s a great way to avoid weaving in the end.)

Adjust and tweak the final desired size of the loops first before tightening completely. Then, pull the knot tight enough to give it a streamlined look.

Starting slip knot variation: this one has 3 loops. One goes on your crochet hook; after crocheting, two loops are left.
How the 3-loop slip knot looks with a simple foundation chain. View full size.

Here again is a feature I appreciate: the long yarn end is waiting close to the loop that goes on the crochet hook. This means you won’t have to see a stringy strand of yarn traveling over the knot, which would look messy, asymmetrical, and unnecessary.

Updated November 2018. It’s part of an experimental blog post series: Vashti’s How to Crochet Book. Next post: Hand Chaining, a Straddler of Worlds.