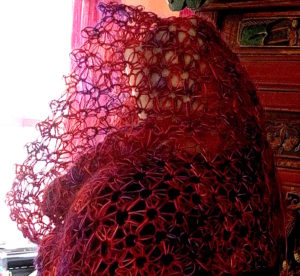
It’s a short update today. Checkout this pretty photo I took this morning of a brand-new star stitch class swatch. This is what the Starwirbel Cowl stitch pattern looks like when it’s done in flat spiraling rounds. (It still has the scrap yarn marking the spiraling rounds.) I’m testing the shaping information in the Starwirbel Way class handout.
Thanks for joining me as I blog the 50 days of preparation for the crochet conference this summer! It’s Day 11 which means I’ve blogged one-fifth of the 50 days.
Have I completed one-fifth of my tasks? Frankly, I don’t know. There are so many little things to do that they’re hard to count accurately. If my gut says I’m moving through things at a good pace, I’ve learned I can trust that and enjoy the constant river of details that get done as they flow through me. I’m halfway through my list of things to do for the Starwirbel star stitch class.
It was my gut that said, “For the 2016 conference you’ll have from half to two-thirds of 2015’s river of show booth details to manage. After several years of teaching you’ll have slightly less than half of a river of teaching details, so GO FOR IT! DO BOTH!”
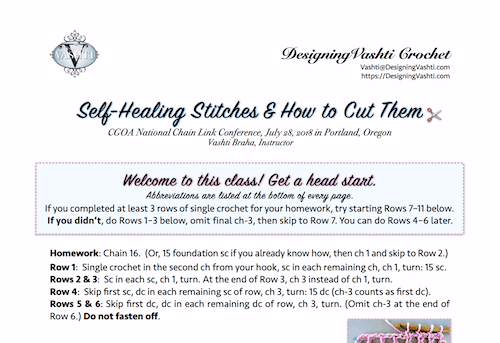
Updated in 2018. Above is a 2018 example of something I mentioned trying in 2016, below. Now most of my crochet class handouts begin with “Welcome to this class! Get a head start.” (Is image missing? View it here.)
It Happened This Morning.
When a crochet class handout “clicks” it’s like getting a crystal-clear vision of how the class will begin and then smoothly unfold for its 3 hours. It becomes a map for the teacher too, and then I can relax.
The feeling is so distinct that I tell my husband each time, “The _ class handout clicked into place!”
I’d forgotten about the phenomenon until it happened today with The Starwirbel Wayclass, so I’ll blog it here for my future self. I wonder if other teachers experience something similar.
[Hi 2016-Vashti. It’s 2018-Vashti, and yes, it happened with the Tunisian on the Diagonal handout.]
Crochet Class Handouts: Many Requirements!
This year (2016) I’m adding a few initial sentences that describe how to get a head start while waiting for the class to begin. [See a 2018 example above.] People come to crochet classes with a dramatic range of skill levels; some like to explore the topic independently, and some like to arrive early.
Many people also bring a range of different yarns, and need to try a few before they can settle in with one. Most people need to warm up with a row or two of a familiar stitch.
[2018-Vashti is really glad you started doing this. It’s been working out great.]
Some illustrations need to be shown reversed for those who are crocheting left-handed. Starting in 2018 I print a separate sheet, usually a half-sheet, of the reversed images. I’ve added a fresh example of one on my Classes page.
Ideally the handout makes a great first impression in that first five minutes of the class! Generous margins and small blocks of text help, and the font shouldn’t be too small.
It’s an Assistant Teacher.
A crochet class handout is an extension of the teacher. It stays with every student while I’m helping someone else on the other side of the room. If someone were to ask a question that requires a demo, and two or three other people say they wonder the same thing, I love when I can answer, “Look at the photo on page 2 of your handout, and try it out while I come around to each of you individually.” So a big priority is for a handout to help me while I’m helping other students.
Like some images, certain kinds of text are best in a handout. Row-by-row instructions for a practice swatch, for example. Also good is a list that summarizes and distills many details. This morning I created a sidebar of all the ways to make star stitches starrier, and bolded the ones used for Starwirbel.
Sometimes a class topic is a series of specific skills that build on each other in a specific order. Checkpoints after each skill are great. They sum up what makes the step important. I love when I can also include a panel of “You Know How to Make This Now” designs! The little thumbnails are a visual reference for all the examples I show in class.
Any hands-on activity needs some side-by-side demonstrating. This is especially the case with crochet because of how 3D-spatial it is: we’re constantly rotating hooks, turning rows, and going in rounds, while adding big lacy holes at times which add more fields of vision! Each bit of key information in a crochet class usually needs to be shown different ways.
This is why people travel to take crochet classes in person. Nothing beats it, not even videos, sometimes. It’s great when a close up photo or diagram in a handout can save time or prevent confusion about a key step. Sometimes demonstrating a key stitching motion in front of the room with a gigantic hook and yarn works great; often it’s best shown up close to just a few people at a time.
Over the years teachers develop a sense for which things can be nailed with a demo, diagram, swatch, or a close up of stitches done in contrasting colors.
I abbreviate it Fstar in keeping with how other crochet foundation stitches tend to be abbreviated in patterns.
Starwirbel could be started with the foundation star, but it’s not part of pattern or the class description, so it’s an extra feature. (I’ll be happy to demonstrate how to do it in class if anyone asks.)
2018 Update! The Starwirbel pattern now includes the Foundation Star and a stitch diagram.
My other wish was to try a new yarn or two for the design. Schulana Kid-Paillettes is the stunning yarn I used a few years ago for Starwirbel. I found no close substitutes for it back then. I’m excited about the one shown here: Alchemy Yarns’ Tweedy. The way it’s hand dyed gives this foundation star stitch a fiery look! One of the strands that shows up well in the photo is silk raffia. The play of light is unique.
2017 Update! The Alchemy Yarn grew up to become Firewirbel.
I also found another special yarn that I’m waiting to swatch: Mohair Luxe Paillettes by Lang.
These are just wishes–not critical requirements to be ready to teach this topic, but crossing these off the wish list makes me happy. And now I’m off to tell my friend Marty Miller, goddess of foundation stitches!
This post is being revised and updated. Please check back.
A Guide to Star Stitches in Patterns
All right. Here’s the thing: star stitches are beautiful, and also tricky sometimes. This is a solidly intermediate level stitch that requires from 5 to 12 steps to complete, depending on the stitch variation.
Most of us use patterns when crocheting this stitch, so most crocheters will encounter star stitch types that vary a little, or a lot. Toward the end of this post I use colored dots to give you a heads-up on some variations you might encounter.
This is still a “basic” start stitch how-to, though! The stitch variations complicate it, but you need to know about them because we’re all equally likely to encounter a variation any time we use a new star stitch crochet pattern.
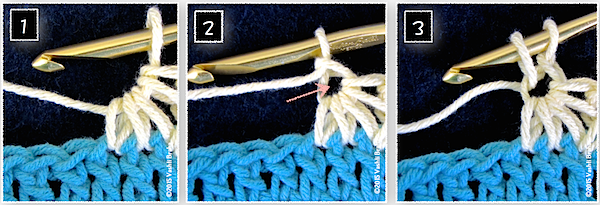
Want to follow along with hook and yarn? With blue (or a dark color) yarn, chain 15, double crochet (dc) in the 4th chain (ch) from your hook and in each remaining ch: 11 dc; 12 dc if you count the 3 chs you skipped. Change to white (or a light color) yarn. Chain 3 and turn.
It may look like image #1 skipped some steps, but read the directions above and below.
Basic Star Stitch How-to:
Pull up a loop in the second white ch from your hook, in the top of the first blue dc, and in each of the next two blue dc. Yarn over (yo) and pull through all 5 loops on hook. Your stitches should look like image #1 above.
Ch 1 to form the eye. This completes one star stitch. The arrow is pointing to the eye of the star.
To begin another star stitch, insert your crochet hook in that eye, yarn over, and pull up a loop.
Really Look At the Loops
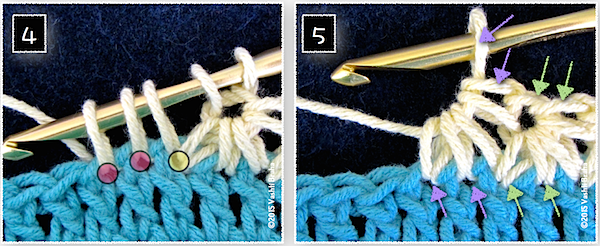
In image #4, we see the two loops on the hook from image #3, plus three more loops. One of the loops was pulled up in the same blue dc as the completed star. I marked that with a yellow dot. Notice the two pink dots. Those are the two next blue dc of the row. I’ll come back to these dots later.
These two images illustrate how to avoid accidentally increasing or decreasing along the row.
When you yarn over and pull the yarn through all 5 loops on your hook, you get image #5. Here’s what those arrows are all about: The two pairs of green arrows point out that the base of that completed star take up two blue dc; the top of that star counts as two stitches (the eye and what is called its top in most patterns). Each star counts as a two-stitch group.
The two lower purple arrows point out the same thing about this new star-in-progress: the base of it takes up only two new blue dc of the row.
The purple arrow pointing to the loop on the hook will become the star’s eye the minute we chain 1 to complete the star.
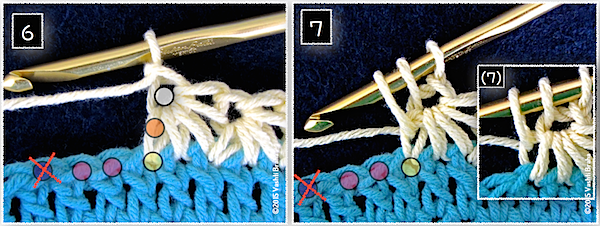
Common “Side of Star” Option
Pay attention to just the ORANGE dot for now.
Image #6: More colored dots! The orange dot indicates the side of the star. The side of the star has a front loop and a back loop. In many star stitch patterns, you pull up a loop in the side of the star. Sometimes it doesn’t matter which loop, other times the front or the back loop is specified.
In image #7 you can see that a loop has been pulled up in the side of the star. In the smaller inset (7), the loop was pulled up in only the back loop of the side.
Loop Priorities
The two most important places to pull up loops while making star stitches are:
the eye (the white dot in image #6), and
one of the two new stitches of the row (the pink dot that’s furthest from the star).
All of the other loops you pull up between these two places are flexible and variable, meaning you can omit pulling up a loop in one, or opt to add a loop in one. You needn’t have five loops on your hook before completing a star stitch; for example, you can ignore the place indicated with the yellow dot, or the orange dot in image #6. Or include both.
You’ll likely develop a favorite way to make your star stitches. Most likely you can substitute the star you want in a pattern you’re using, but of course swatch to make sure. (Occasionally the stitch or row gauge will change slightly.)
It’s like picots: most experienced crocheters have their own favorite way to make a picot and freely use their own where they wish.
The blue dot with the red X signals an error (image #6 & 7). If you pull up a loop past the two pink dots, you’ll start decreasing. Your star will take up 3 stitches of the row, but still only give back only 2 stitches in its top loops. Does that make sense? And that is what my newsletter issue #73 is about.
(Note: There’s a star stitch out there that does take up 3 stitches of a row instead of 2. The stitch count is adjusted in the next row.)
Of course, ALL free Victorian crochet pattern books are lovable.After I researched crochet stitches for my classes, though, I keep these two close by and bookmarked. Both of these antique crochet books were published in 1891. (Click each image for the free download information and link.)
Last year I searched in literally hundreds of crochet books and booklets. I love researching crochet. Lots of antique, public domain crochet sources are keepers. Perhaps these two stand out in particular because of the specific stitches I was looking for.
The Art of Crocheting. By Butterick Publishing Co., Ltd., 1891 (London and New York).
Home Work, A Choice Collection of Useful Designs for the Crochet and Knitting Needle… By A. M., Rose Publishing Co. Ltd. (Toronto).
I recorded all occurrences of star stitches, love knots (“knot stitches” to the Victorians), and lacyTunisian crochet patterns. I was surprised to discover that in many of the publications ranging from the 1840’s to the 2010’s, these stitches often didn’t appear at all. These two 1891 gems were especially fun for creative star stitch patterns.
Researching crochet stitches in free Victorian crochet pattern books offers lots of insight into crochet’s development. It’s fascinating to see how crochet is explained, illustrated, and promoted. Exciting, too! By 1891 the public demand for crochet patterns and stitch how-tos was very strong.
Free Victorian crochet pattern books date from the 1840’s to shortly before World War I. Please support the Antique Pattern Library. It’s one of my favorite sources for some obscure early indie crochet designer booklets too. I hope you will help their cause by donating scans or funds.
The Home Work book was the focus of an ambitious crochet pattern project by the Cyber Chapter of the Crochet Guild of America (CGOA). Members crocheted actual swatches and projects from the book. The exhibit of them at CGOA’s annual Chain Link conference was a highlight of the event!