Posted on 3 Comments

Not Tunisian Crochet Stitches: a Converted Filet Swatch

This is the first of 3 blog posts on the release of a new Tunisian crochet pattern. The 2nd is here and the third is here.

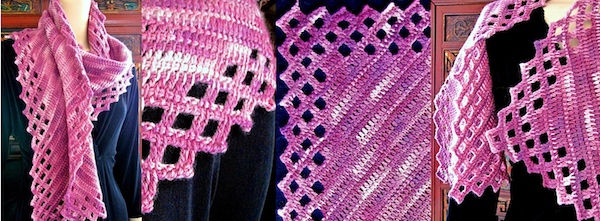
I used no Tunisian crochet stitches for the swatch on the left only.

Instead, I used single crochet, double crochets, and chains. (US abbreviations: sc, dc, and ch. Outside of the US: dc, tr, ch). The chs and dcs create lacy open spaces in the style of filet crochet. I alternated each filet row with a row of sc. Not traditional for filet crochet, but it does follow filet logic. (This is one reason I wanted to swatch it; see this newsletter issue about a similar experiment.)

Not Tunisian crochet stitches vs Tunisian crochet (filet-style Aeroette Scarf)
No Tunisian crochet stitches at left, converted from the Tunisian crochet Aeroette scarf at right.

The sc rows give the spaces thicker top and bottom “walls” around the spaces. This matches the thicker side “walls” created by the dc pairs.

This stitch pattern is converted from the Warm Aeroette Scarf on the right, which is 100% Tunisian crochet stitches. I was curious to see how much these two would differ in looks, surface texture, and drape.

Single Crochets versus Tunisian Crochet Stitches

The first thing I notice about the left swatch is the single crochets. Specifically, the backs of them. They’re raised, bumpy, and have a distinctive look. To me they emphasize a horizontal grain of the left swatch.

Unlike the rows of Tunisian crochet stitches on the right, I turned after every row of the left swatch. We’re looking at the right side of a dc row alternated with a wrong side of a sc row. The bumpy sc backs also cause the dc rows to recede a bit. This adds to the effect of the sc rows standing out, almost ridge-like.

This effect is mostly absent from the Tunisian swatch on the right. Its surface is uniformly flatter. Tunisian crochet stitches do have their own horizontal texture. They get it from the return passes – that second part of a complete Tunisian row when you crochet the loops off of the hook. In this pattern, the return pass textures are no more raised than the vertical stitch textures created during the forward passes.

Differences I’m Not Seeing

I expected to see a difference in how the yarn’s color changes look, but I don’t really. Maybe the swatch on the left needs to be much bigger. I also expected the Tunisian one to drape more. Perhaps it doesn’t because this is wool, and the hook size is smaller than I usually use for lacy Tunisian crochet stitches. I used a G-7 (4.5 mm) hook. For the non-Tunisian swatch I used a G-6 (4 mm) crochet hook.

The Warm Aeroette Scarf on the right is the next pattern I’ll be adding to the shop. I’ll announce it in my newsletter. You can also track its project page in Ravelry.

Posted on 2 Comments

Tunisian Crochet Lace Scarf Pattern Preview

New Corner-to-corner Warm Tunisian scarf with filet border

Fresh off the hook: Warm Aeroette Lace Scarf. Just uploaded these photos. I’m very proud of it. My goal was to take the popular Aero Tunisian Wrap design, which is crocheted in fine silk, and make a warm wool version with a filet-style border. I used a fingering weight (sock weight) merino wool.

And Two More Goals

The second goal was to do a stepping-stone version of Aero. Originally, Aeroette was going to be a Tunisian crochet lace scarf pattern for a class.

It’s a simpler combination of Tunisian crochet stitches that are put together like filet crochet lace, the same way as Aero. This makes it a great way to understand a more dramatic filet-like Tunisian crochet lace scarf pattern. Like, Aero. The Ennis Wrap, also.

C2C and P2P Shapes

The third goal was to take the start-in-one-corner Aero and make it a rectangle instead of a triangle. In other words, corner-to-corner or C2C. Both Aero and Ennis are “P2P” (crocheted point to point.) I love making P2P and C2C lace shawls with Tunisian crochet! You increase steadily along one edge, then decrease steadily to end up at the far corner of the triangle.

The rectangular Aeroette is a similar crocheting experience. You start at the first of four corners (instead of three). Steadily increase, and then decrease, like with Aero and Ennis. End up at the final fourth corner and you’re done: it’s already edged!

Posted on 3 Comments

Customized Tank Top with Crochet: Update

I customized a tank top with crochet edgings and a peplum. Looks great on my mannequin.

Remember I started to customize a tank top with crochet?

I cut a tank top to crop it and to give it a deep V-neck. Then I added crochet to it to customize it.

It’s mostly done now, and I like it. This is a size Medium tank top on a Small-size mannequin. In standard sizing, Lindsay the mannequin is on the Extra-Small side of Small. I’m on the Large side of Medium. On me, the waistline of the top sits higher, like an Empire-waist top. Also, on me there is no ruffling where the crochet meets the cut hem.

I uploaded a bunch of photos of this project to its Ravelry project page. (If I take a selfie I’ll add it there too. Maybe even here on the blog if I’m not too shy.)

This is my first attempt at a customized tank top with crochet. Thank goodness for a timely email I received from designer Sue Perez! She shared with me her sewing experience: a V-shaped neckline needs special reinforcing. I took that into account when I chose the crochet stitches and gauge for the neckline.

This experience of refashioning store bought clothes answered lots of questions I had. For example:

The Yarn Thickness Worked Out

It’s standard sport weight, very smooth, and is a cotton mixed with rayon for drape. In crochet thread sizing this would be a Size #3.

I wouldn’t want to go with a yarn that’s any thicker than this, or that has any fleecy loft or friction on the yarn’s surface.

A thinner yarn (a.k.a. a crochet thread Size #5 or #10) would work great, especially for fancier, fussier garments. This sport weight thickness works for the casual nature of a daytime tank top, or for a tee shirt. It also gave me the feeling of making progress quickly enough to stick with it.

Amount of yarn

I’d say it took up to 1.5 balls of Lotus yarn; that’s 325-375 yds.

Method of Attaching the Crochet

Seems fine so far. It will also have to hold up to washing and wear. Crocheting right onto tee shirt fabric like this? Yes, it can be done. I used a needle-sharp steel crochet hook. It was the largest I have and was not quite large enough for the yarn. A larger one might have left noticeably big holes in the fabric though.

I didn’t loooove doing the first row. Funny thing about crochet – that’s often the case. Crocheting into the foundation chains isn’t my favorite thing either, nor is crocheting foundation stitches. I usually want to get whatever the first row is over with. Same with this top.

Holes Where Stitches Meet Fabric

I mostly don’t want to look at the holes where the crochet stitches meet the fabric. When I wear it I don’t notice it at the hem. It stands out in this photo to me because it’s rippling a bit. At the neckline, though, I added a surface crochet row that covers the holes.

A customized tank top with crochet looks pretty nice, doesn’t it? I super love the hem. Those are split clusters of triple trebles.

Posted on Leave a comment

I Fixed Adjustable Straps of a Bra Top with Crochet

This easy crochet fix for adjustable straps wins a five year test.

The adjustable straps of my bra tops usually loosen. They should just stay where I put them! Some of these straps are slippery or satiny. My thinking was to use crochet to add more friction to the strap, but still be adjustable when and if I choose. Can I have it my way? The answer turns out to be YES!

I took the first two photos in December 2008 – over five years ago. (I thought I might want to blog about it.) These were a few hurried shots with my new camera, while also making Christmas and Hanukkah gifts. In the holiday rush I forgot about the photos until…yesterday. Meanwhile, I wore this hard working garment almost daily for about five years.

After these three photos (click each to enlarge and see more info) I list the steps of how I did this fix.

The simple steps I took to improve these adjustable straps with crochet:

I chose a size #10 cotton crochet thread in a matching color. In this case, a light blue Coats Opera thread. You can see it in this photo.

With a #7 steel crochet hook, I chained about 50 and then fastened off.

Applied a layer of any fabric glue to the relevant area of the strap. Before it dried I arranged the crochet chain in the wavy pattern you see here. Note: it stays in place best if the bottom of the chain stitches is facing up. The top loops of the chains form the flattest side of the chain. So if you look closely at these strap photos, you might see that you’re looking at the “bump” loops of the chain stitches (At this blog it’s called the “back ridge.”)

When dry enough, I sewed along each edge of the strap with the zigzag setting of my sewing machine. Using the glue first made this step super quick and low-stress. That’s it!

The zigzag stitch is very important. You need to include flex in your stitches because the straps need to retain their elastic range. Otherwise you risk breaking the sewing thread during wear.

This is another benefit of using crochet chains. The crochet stitches build in just a bit of flex, especially when arranged the way they are here.

I’m 100% pleased with this diy crochet fix. I would do this again with the adjustable straps of my other tops. (Did you notice the paws of my kitten in the first photo? I didn’t until today.)

Posted on 1 Comment

More on Double Strand Crocheting

Still quite inspired by the whole double strand crocheting topic.

It’s way too big for a measly newsletter issue! Double strand crocheting is a whole world of fun. It tames wild yarn textures. It welcomes glitzy bling threads. It speeds up big projects, recycles yarn scraps, and adds warmth to winter accessories. All this, plus it comes with its own specialized gadgets and filaments. You can get exotic reeling stands to manage multiple threads. Reflective filaments can turn a crocheted beanie into nighttime safety garb.

If you’re just coming in on this topic, be sure to also see the newsletter issue that launched it, “Fun With Double Stranding.” Then see the gallery of overflow images I blogged here yesterday.

In the past 24 hours I created a new Pinterest board.

I’m so glad I did. It already has 55 pins! (I’m holding myself back from pinning everything I see.) Visit it here: “Double Strand Crochet.” Also, here are a few more images I found today in my hard drive. They would have been included in yesterday’s overflow gallery:

It’s really the perfect way to do lots of timely things:

  1. Double stranding says, “I’m ready for the fall crochet season!” Hats and scarves are instantly thicker and warmer.
  2. I’m thinking multi-strand slip stitch crochet could be pretty interesting.
  3. My old yarn stash is too big. As mentioned in the newsletter, tinting and “upcycling” a plain yarn with a fancy one is a creative way to make old stash new again. Crocheting two or more strands of yarn together is a classic way to use up scrap yarns.
  4. Double strand crocheting is perfect for winter holiday BLING! I can’t imagine an easier way to throw in all kinds sparkle. Some of the fanciest yarns are designed to be carry along threads. They may be unpleasant to crochet with by themselves, but dreamy to crochet along with another yarn.

 It makes sense that double strand crocheting is lighting up my weekend, now that I think about it.