Crochet how-tos (and the whys) for advanced crocheters as well as beginners. Stitch tweaks and special FX; skill refining help, and geeky in-depth explanations.
There’s more than one way to reinforce a cut made into crochet stitches because there’s more than one kind of steek, and use for that steek. Here are just two kinds of projects made in the same stitch pattern.
Example #1: Keyhole
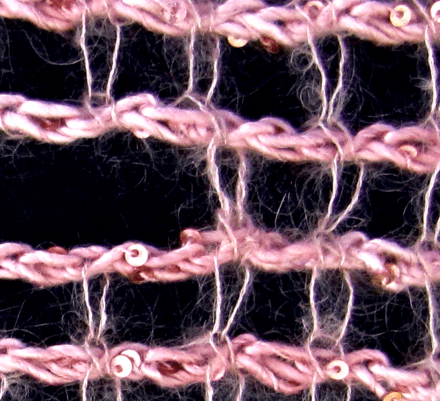
I added a keyhole to a pink Mesmer scarf. The two yarns in this first stitch close up are a lace weight mohair and a worsted weight sequined silk.
I used the cut yarn end to reinforce the opening.
Both of the projects are part of the Mesmer Tunisian Veils pattern. If you steek crochet stitches the easy way—within one row—you have at minimum two yarn ends to fasten securely and then weave in. Some Tunisian stitches will cause you to have more (see newsletter #79 about that).
The more stitches you unravel, the larger the hole and the longer the yarn ends will be. I only unraveled 3 of the pink stitches and that left me with yarn ends that were just long enough to work with comfortably.
If the steeked crochet hole won’t be getting a lot of direct wear and tear, use those yarn ends to reinforce just the stitch at each end of the slit. See where I’ve woven the fine mohair yarn in and around the stitch? It will get light wear.
An armhole needs more reinforcement because of the constant pressure it supports in a garment. I switched to a double-ended circular crochet hook to crochet a few rounds of the same Tunisian stitch. It has a nice cap sleeve look when it’s worn. In the future I’d love to try longer sleeves this way.
This post is part of my blogging goal of 50 posts for these 50 days of epic crochet conference prep. I’ve missed a day here and there lately because my dear friend from college is here for the week! We’re about to leave for the day to see the mermaids of Weeki Watchee. It’s a spring fed lake and water park.
While I was crocheting Jempool, I wondered if I should complete it as a traditional rectangular scarf. Maybe it would like to be something different?
I quickly discovered that when you stack each color of a variegated yarn, you can’t just increase or decrease stitches to shape a sleeve or neckline. The color repeat sequence becomes the pattern repeat.
Below are some sketches from when I was working this out. I needed colored pencils to help me see if there might be a 2-skein version I’d prefer even more than the simple 1-skein scarf.
A few ideas for shaping with a fixed-width rectangle.
If one complete color sequence gave me a 9″ (22.86 cm)-wide scarf, that 9″ is a fixed pattern repeat. That means I could double it (or triple, etc). In this case the colors are symmetrical, so I could also halve it; a 4.5″ pattern repeat is easier to design with.
So as part of the crochet along, if you try a Jempool and you’re loving it but you don’t need to end up with a scarf, you could think of it as a repeatable motif. A handy seam here or there could yield a ruana, poncho, shrug, etc.
Jempool is reversible, so it could easily be turned into a möbius. I’d just need to add a half twist then seam together the two ends.
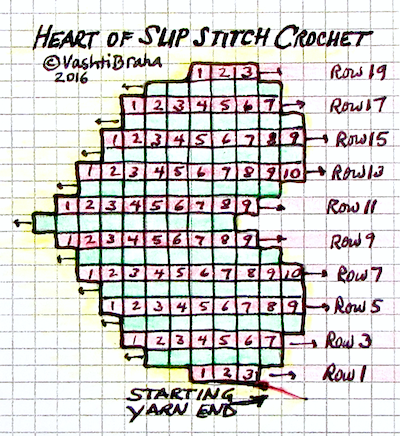
This blog post is an overflow page for issue #76 of my crochet newsletter. Scroll down to see the heart shape chart, and then the full text of the Slip Stitch Crochet Hearts Free Pattern. To print, click on the little printer icon at the end of this post.
We Need to Talk: Slip Stitch Skill Levels
I rate this pattern Intermediate for slip stitch crocheters, and Advanced if you’re new to Slip Stitch Crochet. A good free crochet pattern for slip stitch beginners would be Eva’s Ribs Scarf. After that, Slip Tectonics or Undaria would bring novices solidly up to speed for these hearts.
Seriously.
These crochet hearts were originally used for a three-hour intermediate-level class on slip stitch shaping methods. “Slip Stitch Crochet 101” class was a prerequisite. After crocheting this heart, students would be equipped to crochet fitted sleeve caps and gracefully shaped armholes!
You’ll be adding or subtracting only a stitch or two to make this heart. Not a big deal if you’ve ever increased and decreased with single crochets. It takes practice, though, to shape every row of slip stitches.
Consider that even if you’ve already completed some slip stitch projects, most existing slip stitch crochet patterns involve only occasional shaping, if any. (If you’ve crocheted a slip stitch pattern with a significant amount of shaping, please tell me about it in the comments.)
For a slip stitch beginner, the biggest challenge is recognizing what the stitches are doing to avoid increasing or decreasing by accident. It’s like learning to crochet all over again—and that’s humbling if you don’t expect it, but what a beautiful thing! How many of us long-time crocheters remember what it was like to learn how to crochet for the first time? If you’ve crocheted for at least ten years already, you can revisit this life changing moment.
Challenge Accepted? Great!
Welcome to the “heart” of slip stitch country. Start with a thick smooth yarn and a big hook.
Cross off each row when you complete it to easily keep track of where you are. (I have to. For these crochet hearts it’s easier to count stitches, not rows.) For pattern help, visit my fabulous forum.
This heart shape is crocheted from side to side. Use any yarn. Image missing? See this album.
Chain 4.
Row 1: Skip ch nearest your hook, ss in any loop of each remaining ch, turn: 3 ss. Easy, right?
Notice that every odd-numbered row ends at the top of the heart and every even-numbered row ends at the bottom of it. The yarn end (called “tail” from now on) is at the top of the heart, so when you crochet toward the tail end, you must be on an odd-numbered row.
Row 2: Ch 2, ss in 2nd ch from your hook (an increase of one st), Fss in first ss, 2 Fss in each of next 2 ss, turn: 6 ss.
No row will ever have more than 10 sts in it. If you have trouble seeing which loops to crochet into:
It will get easier after 3 rows or so. You won’t see the heart shape develop until you’re halfway there (Row 9).
The st count matters more than choosing the correct loop. Count as you crochet and add a st in a good enough loop if need be. The most common problem for slip stitchers is identifying which st is the last one of the row. Counting as you go helps and you won’t need to use a stitch marker.
I don’t count my rows. As I complete each row I put a check mark next to it on the pattern. I also rely heavily on the yarn tail to know whether I’m crocheting a row toward the tail or away from it.
Row 3: Ch 2, ss in 2nd ch from your hook, Fss in each ss, turn: 7 ss.
Rows 4 & 5: Repeat Row 3. At the end of Row 5 you’ll have 9 ss.
Row 6: Ch 1, Fss in each ss, turn: 9 ss.
Row 7: Repeat Row 3: 10 ss.
Row 8: Ch 1, skip first ss (a decrease of one st), Fss in each remaining ss, turn: 9 ss.
Row 9: Ch 2, ss in 2nd ch from your hook, Fss in each ss to last st, turn leaving last st unworked: 9 ss.
Row 10: Ch 1, skip first ss, Fss in each ss to last st, 2 ss in last st, turn: 9 ss.
Row 11: Repeat Row 10: 9 ss.
Row 12: Repeat Row 9: 9 ss.
Row 13:Ch 1, Fss in each ss to last st, 2 ss in last st, turn: 10 ss.
Row 14:Ch 1, Fss in each ss to last st, turn leaving last st unworked: 9 ss.
Row 15:Repeat Row 6: 9 ss.
Row 16-18: Repeat Row 14. At the end of Row 18 you’ll have 6 ss.
Row 19: Ch 1, skip first ss, Fss in next ss, [skip next ss, Fss in next ss] twice, turn: 3 ss.
This is how it looks after a quick blocking, and before edging it with a round of slip stitches. (If image is missing, see this album.)
Round 1 (add a border of ss): Fss in each ss of Row 19, ss in one loop at the end of each row to bottom point of heart, [ss, ch 1, ss] in it, continue edging row ends to first row, ss in each of the 3 foundation chs, ss in remaining row ends, join to start of round with a ss.
Note: Edging these crochet hearts is not as laborious as it might seem. Even though it’s not easy to identify the same loop of each each row end, this needn’t slow you down. I mostly just estimate where to put my next stitch, and it comes out fine.
Finishing: Fasten off, or add another round of ss, or reverse sc. Be sure to damp block: stretch all edges in every direction then let it settle into a smooth, symmetrical-enough heart shape and let dry. Make another like the first so that you can seam them together with a ss seam, add a bit of stuffing and hide the ends.
Experiment Freely with this Free Heart Chart
The grid rows of the chart match Fss stitch height, but why impose limits on your heart? Try using single crochets instead; the heart shape may widen or narrow a bit. Or, try back-loop slip stitches (Bss) after you’ve made a few crochet hearts in all front-loop slip stitches (Fss). (The back loops of slip stitches are trickier to find than front loops for some folks at first.)
I hope you’ll show us your crochet hearts in my forum.
This post is being revised and updated. Please check back.
A Guide to Star Stitches in Patterns
All right. Here’s the thing: star stitches are beautiful, and also tricky sometimes. This is a solidly intermediate level stitch that requires from 5 to 12 steps to complete, depending on the stitch variation.
Most of us use patterns when crocheting this stitch, so most crocheters will encounter star stitch types that vary a little, or a lot. Toward the end of this post I use colored dots to give you a heads-up on some variations you might encounter.
This is still a “basic” start stitch how-to, though! The stitch variations complicate it, but you need to know about them because we’re all equally likely to encounter a variation any time we use a new star stitch crochet pattern.
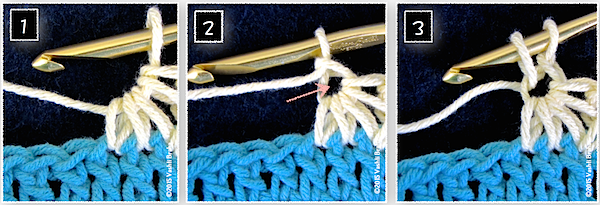
Want to follow along with hook and yarn? With blue (or a dark color) yarn, chain 15, double crochet (dc) in the 4th chain (ch) from your hook and in each remaining ch: 11 dc; 12 dc if you count the 3 chs you skipped. Change to white (or a light color) yarn. Chain 3 and turn.
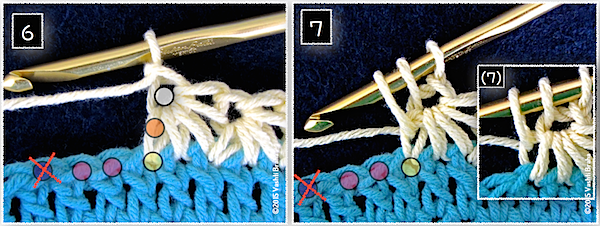
It may look like image #1 skipped some steps, but read the directions above and below.
Basic Star Stitch How-to:
Pull up a loop in the second white ch from your hook, in the top of the first blue dc, and in each of the next two blue dc. Yarn over (yo) and pull through all 5 loops on hook. Your stitches should look like image #1 above.
Ch 1 to form the eye. This completes one star stitch. The arrow is pointing to the eye of the star.
To begin another star stitch, insert your crochet hook in that eye, yarn over, and pull up a loop.
Really Look At the Loops
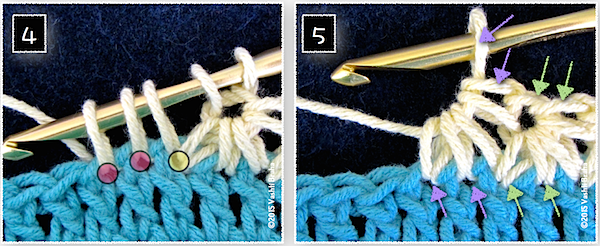
In image #4, we see the two loops on the hook from image #3, plus three more loops. One of the loops was pulled up in the same blue dc as the completed star. I marked that with a yellow dot. Notice the two pink dots. Those are the two next blue dc of the row. I’ll come back to these dots later.
These two images illustrate how to avoid accidentally increasing or decreasing along the row.
When you yarn over and pull the yarn through all 5 loops on your hook, you get image #5. Here’s what those arrows are all about: The two pairs of green arrows point out that the base of that completed star take up two blue dc; the top of that star counts as two stitches (the eye and what is called its top in most patterns). Each star counts as a two-stitch group.
The two lower purple arrows point out the same thing about this new star-in-progress: the base of it takes up only two new blue dc of the row.
The purple arrow pointing to the loop on the hook will become the star’s eye the minute we chain 1 to complete the star.
Common “Side of Star” Option
Pay attention to just the ORANGE dot for now.
Image #6: More colored dots! The orange dot indicates the side of the star. The side of the star has a front loop and a back loop. In many star stitch patterns, you pull up a loop in the side of the star. Sometimes it doesn’t matter which loop, other times the front or the back loop is specified.
In image #7 you can see that a loop has been pulled up in the side of the star. In the smaller inset (7), the loop was pulled up in only the back loop of the side.
Loop Priorities
The two most important places to pull up loops while making star stitches are:
the eye (the white dot in image #6), and
one of the two new stitches of the row (the pink dot that’s furthest from the star).
All of the other loops you pull up between these two places are flexible and variable, meaning you can omit pulling up a loop in one, or opt to add a loop in one. You needn’t have five loops on your hook before completing a star stitch; for example, you can ignore the place indicated with the yellow dot, or the orange dot in image #6. Or include both.
You’ll likely develop a favorite way to make your star stitches. Most likely you can substitute the star you want in a pattern you’re using, but of course swatch to make sure. (Occasionally the stitch or row gauge will change slightly.)
It’s like picots: most experienced crocheters have their own favorite way to make a picot and freely use their own where they wish.
The blue dot with the red X signals an error (image #6 & 7). If you pull up a loop past the two pink dots, you’ll start decreasing. Your star will take up 3 stitches of the row, but still only give back only 2 stitches in its top loops. Does that make sense? And that is what my newsletter issue #73 is about.
(Note: There’s a star stitch out there that does take up 3 stitches of a row instead of 2. The stitch count is adjusted in the next row.)
How to videos are a great way to learn hand chaining. I viewed several this past week. My favorites are listed below.
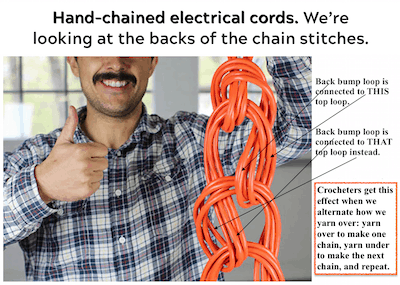
Here’s an example of a knot tying approach to hand chaining. Image is from artofmanliness.com; text is mine. For a front-facing view of chains with mixed yarn overs, see my Yarn Overs, Yarn Unders post.
After watching so many hand chaining videos, I found that only some show how to do it the crochet way. Other videos show a knitting style, or as a form of knot tying. I’ve chosen a few video links for each approach so that you can try them and see which you like best.
Hand Chaining the Crochet Way
This is the chenille yarn that Kathleen Sams shows in her crochet video (see link below).
Hand chaining the crochet way means you’re using your fingers or whole hand the same way that you’d use a crochet hook. In crochet, if we put a loop on the crochet hook by winding the yarn around it, it’s called a yarn over. It’s also possible to just “grab” the yarn with the hook and pull it through with no actual yarn over. This has sometimes been called a yarn under. The yarn over is the standard, correct one.
Watch for when a hand chaining video shows the yarn over, or the yarn under, or mixes them. It’s tempting to use the yarn under when hand chaining because you can just reach through a loop, pinch the yarn, and pull it through. The simple pull-through of the yarn under makes for very quick hand chaining! However, if you plan to do most of your crocheting with a crochet hook, the yarn over is a very good habit to establish.
Three videos that show yarn overs:
Amy Kleinpeter of Swellamy Crochet demonstrates arm crocheting with true yarn overs. At 1:04 in the video, she specifies how to yarn over: “Notice my hand is going under the yarn, and pulling it through.” This is a true crochet yarn over. The hand moves the same way as a crochet hook would.
Donna Wolfe of Naztazia.com starts off her video showing hand chaining by pinching the yarn with her two fingers to pull it through a loop: a yarn under. When she shows how to do the same thing with a crochet hook, she uses a standard yarn over.
Watch Kathleen Sams make hand chaining look so fast and easy with yarn unders and the thickest chenille yarn ever!
ThePreschoolMommy adds adorable sound effects to her yarn unders: “The fingers go ‘Hel-LOO’ and bite the yarn and pull it through.”
By the way, in most of these the adjustable slip knot is made instead of the locking one. Donna Wolfe uses the locking slip knot. Now try some of the other videos below for contrast. Whichever one you enjoy the most is the best one for you!
Hand Chaining the Knitting Way
Hand chaining with a knitting approach means that a finger or hand is held like a knitting needle while a loop is worked off of it. A possible advantage is that one tends to work at a smaller scale, keeping the loops closer to the fingers. This can help one to control the size of each chain stitch.
This video is a good example of a knitting style of hand chaining. She keeps a loop on her left finger, wraps the yarn over it with her right hand, then pulls the loop over the new loop and off the finger. (It reminds me of spool knitting, if the spool had only one peg.).
Here’s a variation by Beadaholique. She uses beads and beading thread for making a necklace.
Hand Chaining the Knot Tying Way
The most noticeable thing to me about a knot tying approach is the terminology. A rope is bent, which is called a “bight,” and then pushed through a loop. Terms like “sinnet” or “knot” are used; never “stitch.”
There are a few other differences too. The purpose of hand chaining in these videos seems to be of practical interest mainly to men who need to make long lengths of heavy rope more manageable for storage, cleaning, or for a “quick deploy” survival bracelet. It’s also called a “zipper sinnet” and “chain shortening” because it quickly unravels when the rope is needed. It ranks as one of the Four Knots You Need to Know.
Here are a few knot tying videos on hand chaining: