Posted on 1 Comment

Starting End of Yarn: No Small Thing!

Which starting yarn end is the ball end or feed line? labeled diagram.
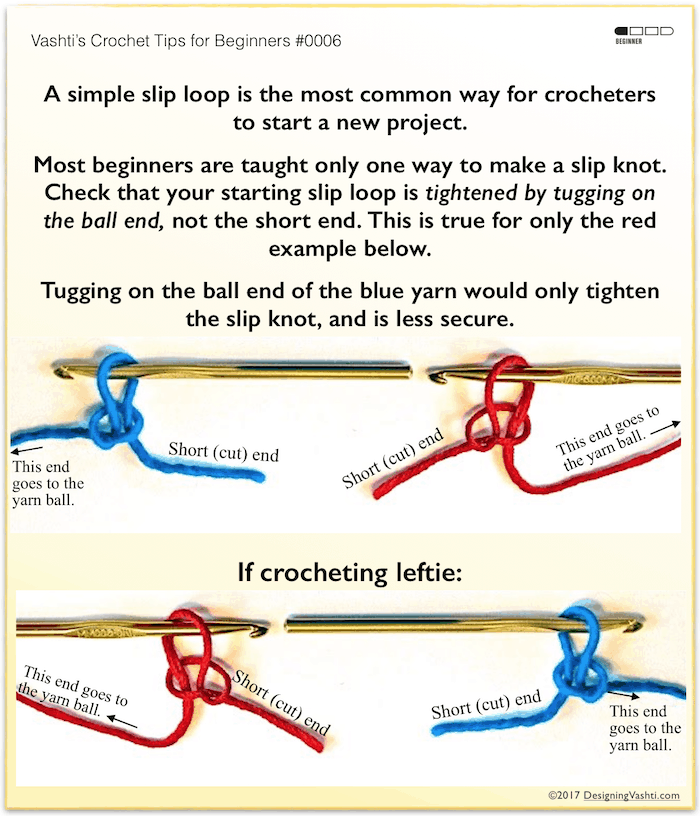
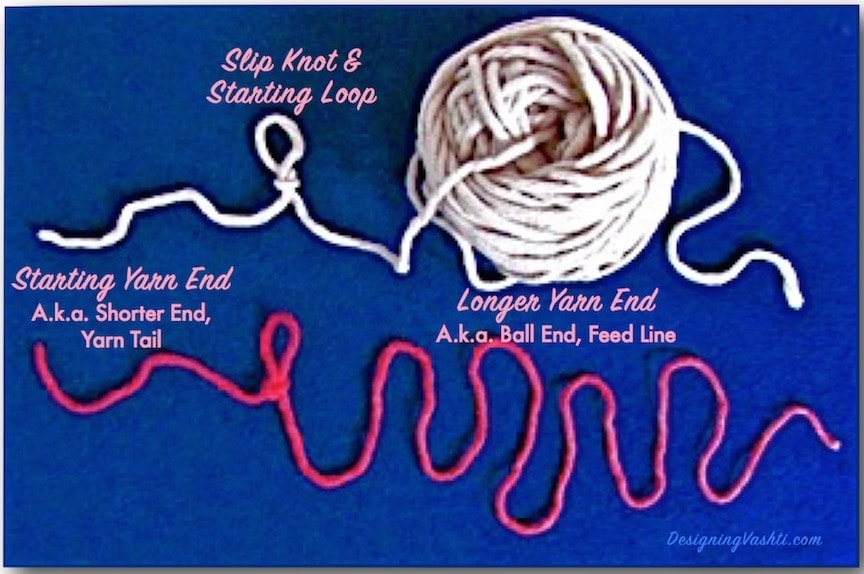
Some folks call the short end the “yarn tail” and the other end the “supply end” or “the yarn coming from the ball”. View full size.

More to It Than it Seems

Crochet beginners need to know how to leave a long enough one (see #2 below) when they making their basic slip knot. Of course the other thing to know is which end to start crocheting with, and if beginner chooses the shorter end they figure it out soon enough!

Very little is usually written or said about the starting yarn end. What else is there to know? The starting yarn end comes with built in decisions—decisions we non-beginners may not realize we’re making. I’ve listed five below. If you’re a new crocheter, just read through them for now.

In addition, we could be putting the starting yarn end to work for us. I’ve listed six ways at the end of this post. That humble starting yarn end may be the most underestimated part of a crochet project!

New to Using Yarn?

If you’re new to using yarn as well as new to crocheting, keep the yarn simple for now: use a 36″ or so {91 cm} piece (I mentioned it previously). A shorter yarn length like this avoids unnecessary yarn-based issues, like whether the yarn is in a hank or other difficult-to-use form, or how to even find the yarn end when it’s tucked away well.

This will also make it easy for you to keep both ends of the yarn in sight at all times. The first end we use is the starting end (or occasionally a yarn tail), and the other end is called the longer endball end (because it leads to the rest of the yarn), feed line (feeding from the ball), working endsupply end.

Five Hidden Decisions

We make five decisions (maybe more) with the starting yarn end every time. They’re hidden because most of them are made automatically, or are not seen as having options.

1. Which End?

Every ball of yarn has two ends. Depending on how it’s wound, you may have easy access to both: one wound around the outside of the ball, the other coming from its center. (See example in the upper photo). The end in the center can be surprisingly hard to find! When you do it will be wrinkled. The outer end is smoother and easier to find.

The first decision we make is which end we choose as our starting yarn end. Sometimes it matters (that’s for a future post); often it doesn’t. The center end is my first choice because the ball won’t roll around as I pull more yarn from it.

2. How Close to the End?

The next decision is how close to this end we make the starting slip knot. In other words, how long should the starting end of yarn be for a crochet project?

A starting yarn end that is too short vs. just right.
Making the slip knot too close to the yarn end results in a yarn tail (starting end) shorter than at least 4 in (10 cm). Full size.

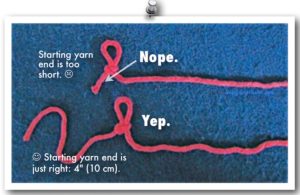
The standard guideline is 4″/10 cm long. Why? It’s just long enough to be threaded onto a yarn needle later and woven in (sewn securely into nearby stitches so that it stays invisible). It’s not too long to waste yarn or get in your way.

A common exception to the default 4″-long starting end of yarn is 6“/15 cm long, for example when the yarn is especially slippery. Some yarns need more weaving in to stay put.

⚠️Never snip the yarn end close to the knot unless you’re specifically, rarely, directed to in a pattern for a certain effect, such as for stubby fringe. It otherwise looks poorly finished. Worse, it could loosen and cause seams or other stitches to unravel.

3. Which Kind of Slip Knot?

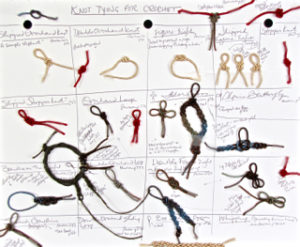
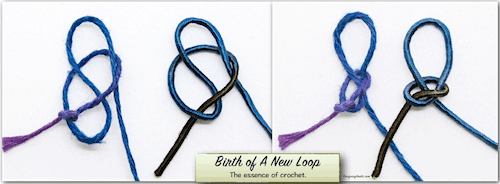
Most crocheters always use one of two types they learned as a beginner, so this counts as a hidden decision. Knot tyers know several more, and some offer extra features. More experienced crocheters avoid the knot part and just wrap a loop around the hook for their starting loop. (A chain stitch is self-knotting at its base, so a starting knot is optional.)

4. Adding Beads?

If you wish to have beads strung on your yarn so that you can slide them up and into stitches as you crochet them, string them onto the yarn before you make that slip knot. You could cut the yarn later to string beads on, but the knot you’d add would be pretty inconvenient with beads. (There are alternate ways to add beads, which is for another post.)

5. Assign a Special Task?

Give the starting yarn end some odd jobs to do. A few of these tasks below count as beginner-level, especially the first two. Some may take a bit of planning ahead, so once you make that slip knot, you’ve essentially made a decision against certain special tasks.

Special Tasks

The starting end is already securely attached, so you can use it to hold extra yarn in reserve for later. If you had to attach a new piece of yarn later for the same tasks, you’d have three yarn ends to weave in instead of just one. Keep this list in mind and you won’t underestimate the starting end of yarn as your skills grow.

⚠️When a starting end of yarn is very long, beginners are especially at risk of confusing the ends. Make sure you don’t crochet with the starting end instead of the ball end.

1. Sew/String on Buttons and Beads

A moderately long starting yarn end (12″ to 24″/30–61 cm) is helpful in case I might wish to:

  • Sew on a button.
  • String on a big accent bead.
  • Create beaded chain fringe. (I’d still be attaching more yarn if I decide to add a fringe edging, but at least I wouldn’t have to weave in the starting end of yarn that’s too short.)

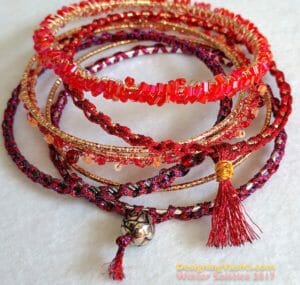
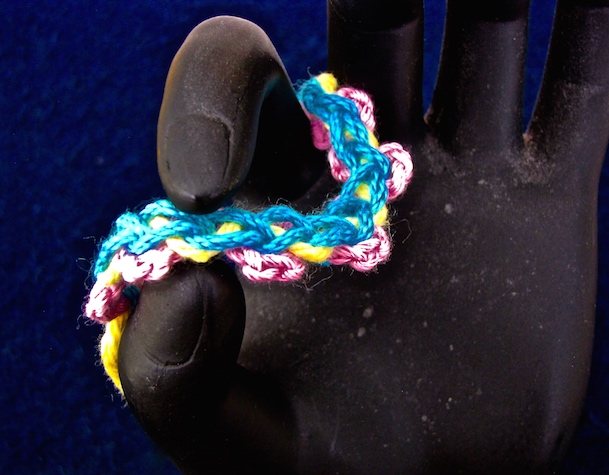
I’ve often used the starting end of yarn for the first two tasks for crochet jewelry. By now I reflexively leave a longer end when I swatch a new jewelry idea just in case I need it; also see #3 below.

2. Seaming

For some projects, a much longer starting end of yarn can be reserved for seaming later. It’s the best yarn for this because it’s already attached, and I often prefer a crocheted seam. I don’t always know how much yarn I’ll need for the seam; my general guideline is to multiply the length of the seam by 3 or 4 for a slip stitch seam and longer for a single crochet seam.

For this option, and for the next one, it helps to wind the starting end of yarn onto a bobbin or scrap piece of cardboard.

3. New Jewelry Clasp

Sometimes when designing new crochet jewelry I’ll use a long starting end of yarn to crochet a clasp  later. At least 36″/91 cm long gives me options for adding a range of jewelry clasps without having to attach a separate length of yarn.

4. Both Ends Together

You might start off crocheting a long starting yarn end together with the ball end. I’ve done this when starting at the center of a rectangular or oval shape so that the foundation chains are more substantial, since I’ll be crocheting Round 1 into both sides of the chains. In other words, I’m crocheting the foundation double-stranded—with two strands held together—but I didn’t need to add a separate length of yarn (with two more ends to weave in later!) to do so.

5. Add a Simple Finished Edge

For small projects and simple edgings, you don’t need a crazy-long starting yarn end. An edge of slip stitches and chains or of single crochets would require roughly the same amount of yarn as a crocheted seam (see #2).

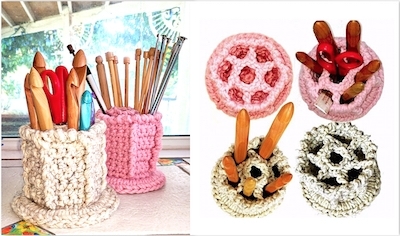
I’ve done this most often with coffee cozies. With the starting end of yarn I slip stitch around the bottom rim to firm it up. It also looks nice.

6. Improve a Join or Add a Few Stitches Later

Rosepuff crochet videos by Vashti.
Rose and lavender shawl points were completed later with fancy beaded picots, thanks to the reserve yarn of their long starting ends.

Sometimes a beginning is prettier when you save it for the end! For newer crocheters, this means you don’t have to sweat what your first round of stitches looks like, especially if it’s a spiraling round. Maybe it looks stringy, uneven, or lumpy. You can use your starting end and a yarn needle to smooth the area with a few darning stitches where you joined your round. Or, slip stitch a new edge with a crochet hook (see #5). It may help to unravel the starting knot first.

A more advanced example is when I start a shawl in one corner and it has a fancy built-in edging. I can get its edge to look like the other corners if I come back to it and crochet its first few stitches last. It’s a low-stress option that also makes the pattern easier to write and to follow.

There are probably many more handy uses for a long starting yarn end. Have I left out any special tasks?

One Last Thing

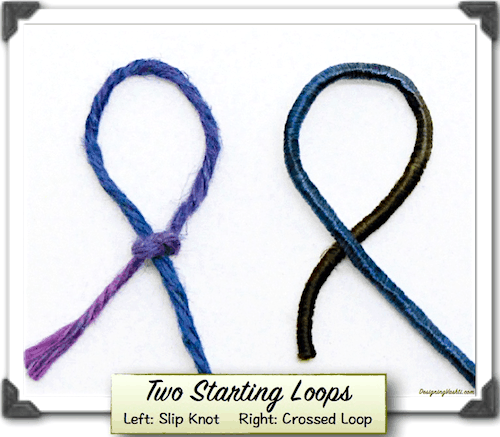
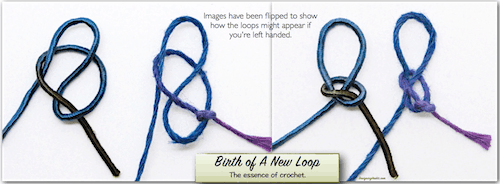
The starting end of yarn determines whether your starting slip knot is fixed and secure, or can be pulled loose enough to allow a seam to unravel! See my earlier post about these two different slip knots. Look closely at the starting yarn ends.

Updated November 2018. It’s part of an experimental blog post series: Vashti’s How to Crochet Book. Next post: More Ways to Start Crocheting.
Posted on Leave a comment

Starting With the Best Slip Knot

How to make the best (most secure) slip knot (leftie view too).
View above image full size.

I knew of only one kind of slip knot when I learned how to crochet at the age of nine. It’s a common, fast, useful, and easy knot. As I recall it was occasionally called a slip loop

The simple slip knot we’re all taught when we first learn how to crochet can be made to be either adjustable (blue one in photo) or secure/locking (the red one). The only difference is which yarn end you use to make it.

Many years passed before I learned about these two versions of the same slip knot. (I discovered other kinds of slip knots a few years after that. More on those at the end of this post.)

It used to be that all of my slip knots were adjustable by accident. Now they are all secure on purpose!

Which Slip Knot Do You Make?

Tug on the short end of the yarn (a.k.a. the cut end or “tail”).

  • If doing this tightens the loop, you made an adjustable slip knot
  • If you have to tug on the long or “ball end” (i.e. where the yarn that is attached to the skein) to tighten the loop, it is a locking slip knot.

The locking type is important because there’s no chance of it loosening and perhaps even unknotting over time under stress. A source of stress could be when the slip knot is part of a purse bottom, at the clasp end of heavy beaded jewelry, or—very commonly—at the center of afghan motifs.

The adjustable version could come in handy when you want to close up a center hole in one of the many methods of crocheting in the round. (Make sure a lot of stress won’t be put on it.)

Here’s how: If you work all stitches of the first round into one chain, you can then pull on the yarn tail to close up the center hole tightly. This is how I was taught to start granny squares in the 1970’s.

Be sure to leave a long enough end (more than four inches/10 cm) for weaving in securely so that it won’t loosen later.

If your adjustable slip knots have never loosened, great! Perhaps you have woven in a nice long yarn end to secure it; or used a non-slippery yarn, or a tight stitch gauge. Maybe your projects have not subjected the slip knots to a lot of stress.

Slip Knot How-To Video

This video demonstration (not mine) shows three ways to make a slip knot. The first two are just different ways to make an adjustable slip knot. Notice how she uses the short yarn end when completing the slip knot, and then tightens the loop around the hook by pulling the short end.

The third slip knot in the same video is the locking slip knot. Notice she uses the ball end (long yarn end) when completing the slip knot.

More Slip Knots?

Knot tyers make several types of slip knots!

Among non-crocheters, our simple slip knot may go by other names, such as Simple Noose KnotOverhand Knot with Draw Loop, and Slipped Overhand (or Thumb) Knot.

Knot tyers have more slip knots that crocheters could use. After all, we really just need a simple loop to start crocheting. When we know more slip knots, we can choose one that offers advantages for the project we’re starting.

You can see some of the ones I tried at right. In another post I explained how to do a few of them and why you might want to.

Updated November 2018. It’s part of an experimental blog post series: Vashti’s How to Crochet Book. Next post: Starting End of Yarn: No Small Thing!
Posted on 5 Comments

Start Crocheting From Scratch

Classic Slip Knot on left, Crossed Loop on right.
Classic Slip Knot (left), Simple Crossed Loop (right). Either one works. View larger.

How We Tend to Start

Let’s really look at how we start crocheting, and why we do it this way. Most of us learn to make a slip knot that gives you your first loop (called a slip loop) that you can tighten or loosen a bit to fit nicely over your crochet hook.

Later, some of us may alter the beginner’s slip knot, depending on the project. We may start crocheting in the round with a magic ring instead; or we might undo it later because that starting knot is too noticeable in the yarn we’re using. Some crocheters loosen it and crochet the last stitch of the row into it.

Over the next few posts I contrast the advantages of the standard slip knot with some alternatives.

Are you a beginner? Head over to this post first so that you’re clear on the best way to make the standard starting slip knot.

Many Crocheters Don’t Know:

  • The simple slip knot we all learned as beginners is one of two types based on which yarn end tightens the slip loop. Which one we learned matters.
  • The slip knot has a special relationship to the chain stitch. (That’s the first stitch you make after putting the slip loop on your crochet hook.)
  • A slip knot is not required at all, but it’s helpful if you’re a beginner.
  • There are slip knot variations that could be more useful for a particular project. (Explained in future posts.)

Start Crocheting With Just a Loop

The knot part is optional. Compare the two starting loops in the image above. Frankly, you don’t even need a crochet hook or a specific kind of yarn. Isn’t this a remarkable thing about crochet? Musicians need to tune their instrument first, and weavers need to string a loom first. Even knitters need to cast on more than one loop.

The minimum a crocheter needs to start crocheting is a yarn end looped around a hook (or your finger if finger crocheting).

About the “Yarn”

To start crocheting with a loop implies that you need a length of something that bends into a loop, right? If you’ve never, ever crocheted before, you don’t need a ball of yarn. Start crocheting right now with a piece of yarn-like cord that’s at least 36″ long (almost 1 meter). Ideally your cord or string is smooth, limp, and a light enough color to see well. Kind of thick—like craft yarn or cotton clothesline. Not stiff or wiry, neither bristly nor bumpy, and not as skinny as kite string. From here on I’ll refer to this as “yarn.”

The Crossed Loop

When a simple loop has crossed ends, you’ve already got a starting loop for crochet. See it in the photo above? When you think about it, all of crochet is based on loops with crossed ends.

The two crossed ends of a loop matter later. They have different roles in crochet. (For a future post.)

A quick and easy way to think of this Crossed Loop is to imagine that you’re writing a cursive letter “e”. You can do it in the air or “write” with the yarn on a table. See how the Crossed Loop in the photo above could be a cursive “e”?

From Crossed Loop to Slip Knot

If You’re Right-Handed

Pinch and hold a Crossed Loop with the fingers of your left hand where the yarn crosses itself. It now appears that two strands are hanging down from your hand. With your right hand, pick up the strand on the right that crosses in front of the other strand. Bring it around behind your loop. Bend it so that you can pull a new loop through the first loop, from behind. Leave it sort of loose, and set it down.

It's this easy to create a loop with a Slip Knot
Two kinds of yarn shown. Slip knot is loose on the left and tighter on the right. View larger.

If You’re Left-Handed

Turn it around, pinch and hold it with the fingers of your right hand where the yarn crosses itself. Or, you could write a cursive “e” backwards. It now appears that two strands are hanging down from your hand. With your left hand, pick up the strand on the left that crosses in front of the other strand. (See below.) Bring it around behind your loop. Bend it so that you can pull a new loop through the first loop, from behind. Leave it sort of loose, and set it down.

For Lefties. Two kinds of yarn shown. Slip knot is loose on the left and tighter on the right. View larger.

Slip Knot: It’s a Chain Stitch!

You’re already crocheting. When you pulled the bent or “looped” strand through the initial loop, you finger-crocheted. You can see why some crocheters just leave the knot loose and crochet into it like it’s one of the foundation chains.

Key Takeaways

1. The Crossed Loop is one loop away from being a Slip Knot. Once you pull a new loop through a simple Crossed Loop, just tighten it to reveal that it’s actually a Slip Knot. (To tighten, pinch the loop and tug on the other strand to watch the knot tighten around the loop.) Notice that you can also adjust the loop size of the Slip Knot, and the knot part preserves the size of the loop.

2. The Slip Knot is the standard, official way to start crocheting, especially for beginners. This is probably because beginners also usually start crocheting with a crochet hook in their hand (as opposed to finger crocheting). The Slip Knot is great for this. You can tighten its loop around a crochet hook and wave it around like a magician. It stays put. Very handy!

3. Once you pull a loop through an initial Crossed Loop you’ve crocheted. A Crossed Loop is a fine start for any crocheting, when you’re ready for it. For finger crocheting, you wouldn’t need a Slip Knot to keep a loop on your finger because you can easily hold it. Just keep pulling a new loop through the next loop and you’re crocheting.

4. Chain stitches are self-knotting at the starting end. It’s another reason that a Slip Knot is not essential, it’s optional. Try it: undo the initial Slip Knot after you’ve crocheted some chains. Tug on that starting yarn end and the very next chain stitch automatically becomes the new starting knotThis is why some crocheters can leave the initial knot loose and undo it later.

Updated November 2018. It’s part of an experimental blog post series: Vashti’s How to Crochet Book. Next post: Starting with the Best Slip Knot.
Posted on 1 Comment

Why I’d Want to Learn How to Crochet

Crocheted honeycomb slots of the Big Hook Bucket seen from the top.
Pictured: Honeycomb-top Big Hook Bucket!


After decades of crocheting and writing about it, I’ve reconsidered the essential character and fundamentals of crochet. I’m an even bigger fan than I already was! Consider what is remarkable about crochet with me:

Why I’d Want to Learn How to Crochet

Easy Control

Terms like easy and simple come up often about crochet. They usually imply not complicated, but I think that’s misleading. What’s easy about crochet is that you have a lot of built-in control. The hook provides it, and the logical structure of one “locked down” loop at a time does it.

Irresistible Rhythm

Crocheting has a wonderfully rejuvenating rhythm. It’s comforting to frayed nerves and reassuring in difficult times. I would want to learn how to crochet just to have this experience.

The Textures Look Complex

The result is a textured fabric that looks more complex than it is. I also appreciate how the inter-looped structure reinforces the material used. It can take the form of diaphanous, seemingly two-dimensional weightless fabrics, a stretchy wind-proof covering, a luxe pearl strand, or a big free-standing figure.

Rapid-Rip

The whole piece is easily “unzipped.” Crocheters call it frogging (because you “rip-it”). The yarn can then be reused, unlike with macramé, for example, which requires you to use several cut pieces instead of one continuous length.

Experience Every Color & Fiber

Stack of sparkling crocheted Solstice Bangles.
Crocheted wire, fancy embroidery braids, and metallic flosses: Solstice Bangles.

If I didn’t already know how, I’d want to learn how to crochet just to try crocheting with yarns of different fibers, colors, and thicknessesIt’s a new experience each time. I’m in control of what I spend, too: each crochet project can be as economical or expensive as I want it to be.

I’d say that anything based on manipulating several yards (meters) of stringy stuff will not be easy initially for some folks, but the small challenge is so worth it. Wielding that crochet hook gives you the edge you need to control the yarn while it flows through your fingers at a good rate. It takes just a bit of practice to get up to speed.

As Fast & Portable As Needed

Crochet is as fast, lightweight, and portable as you want it to be. You’re in control there too. No bulky or heavy frames or looms to manage with crochet. Even hairpin lace, a crochet lace technique that uses a type of “loom,” is portable. Most of these mitts were crocheted in one day during a road trip!

I learned how to play the piano, and how to weave, and neither of these was very portable. I’d want to learn how to crochet like some people want to learn guitar: so that they can play anywhere.

Varied & Versatile

Finally, I’d want to learn how to crochet because it adapts to every phase of my life. It’s a distinctly useful, accessible, and versatile construction method. As a child I crocheted things for my sister’s dolls, and for my teachers and friends. As an expectant mother I crocheted things for the baby and to help me wait. I’ve crocheted trendy accessories, toys, Halloween props, protective shields for tech items, educational aids, and the best thing I’ve ever worn to a memorial service.

Double-stranded Lovelace swatch: sport weight Lotus and lace weight glittery mohair.
I designed Lovelace to see a northern stitch & southern stitch together in a project!

Historically, crochet developed in several places worldwide. Too bad the specifics of when, and in relation to where, are under-researched and inconclusive.

Given that crochet is a dramatically responsive technique, its development is likely to show marks of time, place, and purpose. For example, doesn’t it seem likely that crochet used in icy climates would develop different stitch patterns, methods, and materials from crochet that developed in tropical climates?

About the Name Crochet

It’s French and means small hook. It’s properly pronounced cro-shay. (Many crochet how-to books don’t give the pronunciation, so I thought I should.) Occasionally I see it spelled crotchet, so perhaps some people pronounce it that way.

All of us English speakers use the French term. In other languages, to crochet is called:

  • tejer in Spanish,
  • häkeln in German,
  • szydelkowac in Polish,
  • Gōu biān in Chinese,
  • virkning in Swedish,
  • hekle in Norwegian, and
  • haken in Dutch.

Defining Crochet

Crochet how-to books start out with some kind of introductory description of crochet. I started to write that for this post, then remembered that I did this for the launch of my DesigningVashti.com website! I still like what I wrote there, so please have a look.

Update: In 2018 I suggested this definition of crochet to the Center for Knit and Crochet. As a starting point the group has been using The Getty’s indexing description:

Textile construction involving the interlocking of looped stitches, employing a single cord or strand of yarn and a single hooked needle.

My preference:

Textile construction involving the continual loosening, tightening, wrapping, and interlocking of adjustable loops to form a range of stitch types. A fabric can be built in any direction by adding new stitches anywhere, including “in the air” to add a foundation for new stitches. This freeform property distinguishes crochet from linear grid-based textiles such as weaving (and perhaps nålbinding and knitting). Usually, a single strand of cord or yarn is employed at a time. More than one strand may be held together and used as one, or alternated in use (such as to change colors frequently).

The primary tool is a crochet hook, which resembles a dowel of any diameter with a hook at one end (sometimes at both ends). Stainless steel is the preferred material for the crochet hooks of extremely small diameters (typically 1.75 mm down to .5 mm, for use with superfine threads) for greatest strength and durability. This is probably why the crochet hook may still be referred to with the outdated term “needle”.

This page was updated November 2018. It’s part of an experimental blog post series: Vashti’s How to Crochet Book. Next post: Start Crocheting From Scratch.
Posted on 6 Comments

Introducing: Vashti’s How to Crochet Book!

Crochet chain stitches in different colors, combined to look like a cabled braid. Full size: https://www.flickr.com/gp/vashtirama/2c5494
A compound braid of simple crochet stitches. View full size.

I invite you to join me as I try an experiment: what is it like to write an in-depth crochet book, post by post, right here on this blog?

I’m excited to show you what I’ve come up with! The working title is Vashti’s How to Crochet Book. I don’t see it as being a typical how-to-crochet guide.

My vision for it is that it goes step by step, more deeply and thoroughly than any other I know of. (I’ve read a hundred or so.) It’s for beginning crocheters and the rest of us. It could even be for aliens. Surely there’s an extraterrestrial who’s trying to learn how to crochet.

What’s the Rush?

Sometimes I feel kind of rushed along when reading about how to crochet basic stitches. I have lots of why questions, including why do I feel rushed? Rushed toward what? taller stitches? Finished projects? Maybe it’s just that no book can be big enough for what is really going on with crochet loops.

New to Crocheting?

May this be the place for beginners to get solid answers to how to crochet at each step. Stuck at the beginner level? Surely there’s a way to explain things that finally clears up confusion. Here’s an example: I’ve noticed that crochet relies on simple terms like loop or chain that actually have multiple meanings. This can confuse some folks when they’re not spelled out. Please let me know in the comments how I can do even better.

If you already own a crochet how-to book, great! Some of them are designed to be sweet portable project companions. Come back here to fill in the gaps, answer your why questions, or just to see if a different point of view enriches your understanding.

Know How to Crochet Already?

This book is for us too. What can be said about the most basic elements of crochet that’s worth saying AND hasn’t already been said? As it turns out, a lot in my humble opinion. I keep discovering important things about crochet when I take nothing for granted. What I find about the chain stitch alone could fill a small book. (As you probably know, crochet books typically devote about a page to it.)

Can’t Know Too Much!

Knowing what’s in the usual how to crochet book won’t make any of us crochet experts. Crochet is too big to fit in a book; it’s even too big for one person to master 100% of it! Another way I think of it is, every crocheter is a beginner at some part of crochet. This is why I see the standard crochet skill levels as more of a spiral than ranked levels.

Why I Want to Blog This

  • A how to crochet book has not yet been blogged and I can’t resist a good experiment.
  • A blog allows me all the room I need. It’s ambitious. To avoid getting overwhelmed, I’m blogging a section at a time. This first section is all about initial fundamentals, which are often taken for granted the most.
  • I want to write crochet books and not disappear from my online crochet communities while I do so. This way the book gets written publicly. I also want it to be interactive. Please leave comments!

Other Book Titles I’ve Considered

Secret Lives of the Great Crochet Stitches (because when I gave the Chain Stitch room to speak, it did…)

How to Crochet Like a Geek (because geeks love to get granular instead of skipping the juicy stuff. I found kindred crochet spirits in CGOA’s crochet geek seminar last year.)

How to Crochet: Vashti’s Missing Manual (So much is missing in the official crochet how-to books.)

Vashti’s Deluxe How to Crochet Guide (This is my ultimate way to celebrate my beloved art and hobby.)

This page was updated November 2018. It’s the first post of an experimental blog post series: Vashti’s How to Crochet Book. Next post: Why I’d Want to Learn How to Crochet.