See gallery below. Here’s what July was all about: planning for my first Designing Vashti show booth. Then building it. Then meeting lots of people! Then breaking it down.
My regular blogging, newslettering, and crochet designing resumes as soon as I finish recovering from that big adventure!
Click each photo for full view.
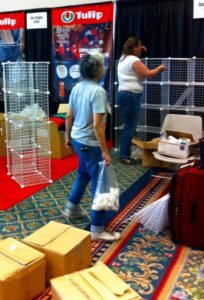
Building the Booth with metal grid panels. that’s Doris Chan in the foreground, Linda Dean behind her.
First full day in the completed booth! That’s Linda and me standing, and my knitting niece Ashley in the chair.
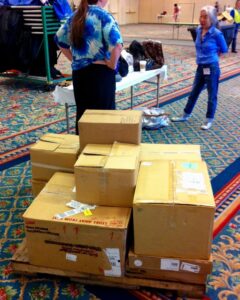
Booth is all boxed up and fits on one pallet.
The Event:
The Knit and Crochet Show (a.k.a. the annual Chain LinkConference of the Crochet Guild of America/CGOA), July 22–25 2015. This year in was in San Diego CA.
Want to know about the 2016 show? July 13–16 in Charleston, South Carolina. Why YES, I’ll be there!! So will the DesigningVashti booth!
How to videos are a great way to learn hand chaining. I viewed several this past week. My favorites are listed below.
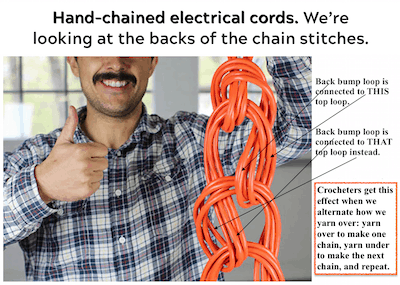
Here’s an example of a knot tying approach to hand chaining. Image is from artofmanliness.com; text is mine. For a front-facing view of chains with mixed yarn overs, see my Yarn Overs, Yarn Unders post.
After watching so many hand chaining videos, I found that only some show how to do it the crochet way. Other videos show a knitting style, or as a form of knot tying. I’ve chosen a few video links for each approach so that you can try them and see which you like best.
Hand Chaining the Crochet Way
This is the chenille yarn that Kathleen Sams shows in her crochet video (see link below).
Hand chaining the crochet way means you’re using your fingers or whole hand the same way that you’d use a crochet hook. In crochet, if we put a loop on the crochet hook by winding the yarn around it, it’s called a yarn over. It’s also possible to just “grab” the yarn with the hook and pull it through with no actual yarn over. This has sometimes been called a yarn under. The yarn over is the standard, correct one.
Watch for when a hand chaining video shows the yarn over, or the yarn under, or mixes them. It’s tempting to use the yarn under when hand chaining because you can just reach through a loop, pinch the yarn, and pull it through. The simple pull-through of the yarn under makes for very quick hand chaining! However, if you plan to do most of your crocheting with a crochet hook, the yarn over is a very good habit to establish.
Three videos that show yarn overs:
Amy Kleinpeter of Swellamy Crochet demonstrates arm crocheting with true yarn overs. At 1:04 in the video, she specifies how to yarn over: “Notice my hand is going under the yarn, and pulling it through.” This is a true crochet yarn over. The hand moves the same way as a crochet hook would.
Donna Wolfe of Naztazia.com starts off her video showing hand chaining by pinching the yarn with her two fingers to pull it through a loop: a yarn under. When she shows how to do the same thing with a crochet hook, she uses a standard yarn over.
Watch Kathleen Sams make hand chaining look so fast and easy with yarn unders and the thickest chenille yarn ever!
ThePreschoolMommy adds adorable sound effects to her yarn unders: “The fingers go ‘Hel-LOO’ and bite the yarn and pull it through.”
By the way, in most of these the adjustable slip knot is made instead of the locking one. Donna Wolfe uses the locking slip knot. Now try some of the other videos below for contrast. Whichever one you enjoy the most is the best one for you!
Hand Chaining the Knitting Way
Hand chaining with a knitting approach means that a finger or hand is held like a knitting needle while a loop is worked off of it. A possible advantage is that one tends to work at a smaller scale, keeping the loops closer to the fingers. This can help one to control the size of each chain stitch.
This video is a good example of a knitting style of hand chaining. She keeps a loop on her left finger, wraps the yarn over it with her right hand, then pulls the loop over the new loop and off the finger. (It reminds me of spool knitting, if the spool had only one peg.).
Here’s a variation by Beadaholique. She uses beads and beading thread for making a necklace.
Hand Chaining the Knot Tying Way
The most noticeable thing to me about a knot tying approach is the terminology. A rope is bent, which is called a “bight,” and then pushed through a loop. Terms like “sinnet” or “knot” are used; never “stitch.”
There are a few other differences too. The purpose of hand chaining in these videos seems to be of practical interest mainly to men who need to make long lengths of heavy rope more manageable for storage, cleaning, or for a “quick deploy” survival bracelet. It’s also called a “zipper sinnet” and “chain shortening” because it quickly unravels when the rope is needed. It ranks as one of the Four Knots You Need to Know.
Here are a few knot tying videos on hand chaining:
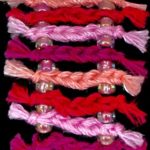
Hand chaining is when you crochet chain stitches with your hands and fingers instead of with a crochet hook. It’s also called finger crocheting. Hand chaining is so easy! Kindergartners do it. It’s a popular way to crochet trendy necklace-scarves with fancy yarns in under 30 minutes.
Love it! “Poseidon Scarf Kit” at loopymango.com
You might have learned hand chaining as a child in kindergarten, at camp, or from a babysitter. It’s often taught as a stand alone activity rather than as an introduction to the larger world of crochet, knot tying, or knitting. I don’t even remember how I learned it. I just already knew how by the time I officially learned how to crochet with a hook at the age of nine.
For the next blog post I viewed several videos that show how to do hand chaining as a crocheter, a knitter, or a knot tyer. It left me with a new way of thinking about the origins of crochet.
Not Just for Beginners
Hand chaining is so fun to do that even experienced crocheters are at risk of getting “hooked” (if they remember to try it). It’s often forgotten as a crochet method even though it offers nuanced control over unusual yarn combinations for edgy, artsy effects. I get new, deeper insights into simple stitches when I hand crochet them, thanks to the intimate, tactile experience of crocheting.
Hand chaining a special subset of crochet that merits a closer look than it usually gets.
Hand Chaining vs. Hook Chaining
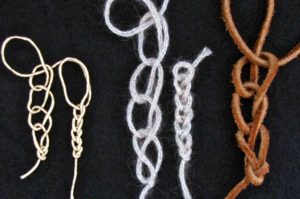
Hand Chaining loosely vs. tightly. L to R: Satin cord, wool knit tube yarn, suede lacing.
Hand chaining cuts out the middleman (er, the crochet hook). This is perfect for crochet beginners! Learning to use a new tool with yarn loops for the first time takes the focus off of the stitch. Shouldn’t getting to know a stitch be the most important part of learning to crochet? Especially when that stitch—the chain stitch— is the foundational core of all crochet? I think so.
The crochet hook is the one central tool of crochet. When researchers encounter an unfamiliar fabric, they consider the tool used to create it. An item made with a crochet hook is usually classified as crocheted. I wonder how hand-chained items are classified.
Earliest Crochet Roots?
Hand chaining straddles two worlds: Crochet, and Knot Tying. The same basic crochet stitches can be made with hand chaining as with a crochet hook: Chain Stitch, Slip Stitch, and Single Crochet. (Other stitches are more of a struggle without a hook.) The fingers or the whole hand simply take the place of the crochet hook. Perhaps hand chaining came first, at least in some early cultures, and the crochet hook evolved to substitute for hands and fingers.
Among knot tying aficionados, hand chaining is called many other things: Drummer Boy’s Sinnet, Zipper Sinnet, Monkey Braid, Sea Chains, Chain Knots, Caterpillar Sinnet, and Daisy Chains. Boys and men may have encountered hand chaining via knot tying. Some practical uses among knot tyers include:
To quickly neaten long lengths of rope or electrical wire for storage. (To this linked video, a commenter added, “This is used by riggers [who set up e.g. the ceiling on stages for rock concerts] as a cool way of shortening and storing several long ropes in a hurry.”)
Launder climbing rope so that it can be easily machine washed, allowed to dry, and then “unzipped” for use afterwards.
Even if you already know how to crochet, I think Chain Stitch In Depth and other posts about crochet basics offer some new ways to think about our most basic and important crochet stitch of all, the Chain Stitch.
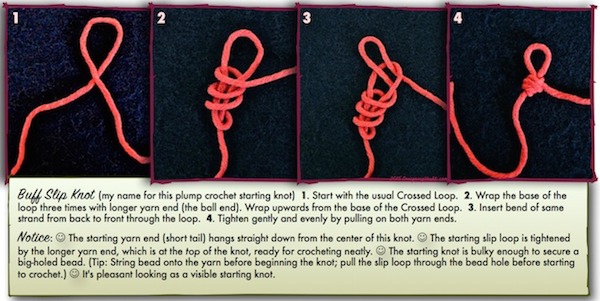
Here’s the follow-up how-to for yesterday’s “Pros & Cons of the Starting Slip Knot” post. I’ve created photo step outs for two promising alternatives to the basic starting slip knot. The first is what I call the Buff Slip Knot, shown above. The second is the Three-Loop Starting Slip Knot.
Special Slip Knots for Crochet
The Buff Slip Knot
Like our general-purpose slip knot, the Buff version offers a slip loop that you adjust by tugging on the longer yarn end. Unlike many other knots I tested, the longer yarn end is waiting for you up where the slip loop is rather than down at the bottom of the knot near the short yarn end. Stays tidy-looking this way.
Tying it is like tying a basic slip knot that has more wraps. A crochet beginner might wish to come back to this one later. Follow the four steps shown above. (View the high-resolution image).
I listed ten possible functions crocheters might need from the starting slip knot in yesterday’s post. The Buff Slip Knot variation is an especially good candidate for advantages #6 and #10 on the list. Try it when you need or want a visible crochet slip knot that is nice looking. It’s symmetrical in more than one way. It’s also beefier if you wish to start with a large-holed bead accent.
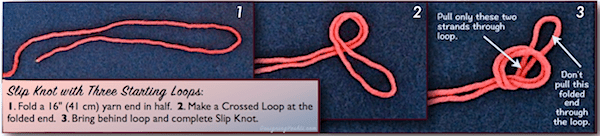
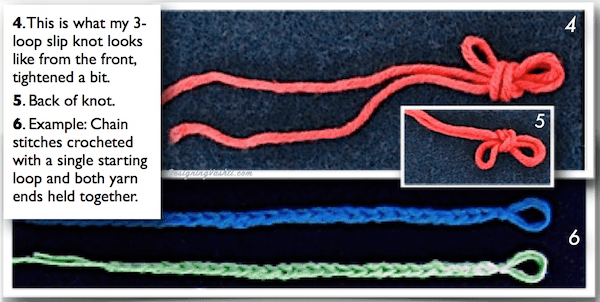
The Three-Loop Slip Knot
This one may seem odd. Why would anyone want a crochet slip knot with three starting loops? This one is a great way to start right off crocheting with a finished, usable button loop, hanging loop, or other handy use for a secure loop. Think jewelry, cords and straps, and how about potholders?
Puff stitches look finer than the chain stitches of the clasp loop!
Normally we’d start with a basic slip knot, crochet some chain stitches, then slip stitch them together to form a loop of chains. These work great for most things. Occasionally, chain stitches are too thick or textured for what I need. This tends to happen for me with jewelry projects. I’d like a slim loop to fit under a button clasp. The chained loops of these Puffpearl necklaces look unnecessarily chunky to me.
Another example is when a crocheted charm or pendant is designed to dangle. I’m thinking the Three-Loop one would have been a sleeker choice for the tops of the Lovebud Vines.
Three-Loop: How to Do It
The Three-Loop Slip Knot variation is similar to making a basic slip knot except: take the first 16″ or so* of your starting yarn end and fold it in half first. Use the fold to make the slip knot. Don’t pull the folded end all the way through.
*Use a longer length than 16″ if you’ll be crocheting both ends together throughout, like I did in image #6 below. It’ll depend completely on each project. (It’s a great way to avoid weaving in the end.)
Adjust and tweak the final desired size of the loops first before tightening completely. Then, pull the knot tight enough to give it a streamlined look.
How the 3-loop slip knot looks with a simple foundation chain. View full size.
Here again is a feature I appreciate: the long yarn end is waiting close to the loop that goes on the crochet hook. This means you won’t have to see a stringy strand of yarn traveling over the knot, which would look messy, asymmetrical, and unnecessary.
In the previous post I listed five decisions we’ve already made by the time we’ve made a starting slip knot in the yarn, and six options we have for doing more with the starting yarn end. Below I compare the advantages and disadvantages of different slip knots.
Reinforced with a twist (two leftmost photos). Three-loop slip knot (upper right). Fancy “jury mast knot” (lower right).
A Creative Start
Crochet happens when a loop can be pulled through another loop. So much creative freedom in this!—including the very first step we take when starting a new crochet project. With options come new advantages.
Simple and quick to make, remember, adjust, and use to start crocheting the first stitch.
The slip loop blends in as a stitch: it forms the top two loops of the first chain stitch.
✅The beginner’s slip knot is a great choice for #1 through #5, with a few minor exceptions.
(Slight) Disadvantages
The basic slip knot is not truly invisible.
It’s usually invisible enough, but occasionally not in certain yarns and project types. The thicker the yarn, the bigger the knot when you start crocheting. A knot in the center of a motif, flower shape, or nose of a stuffed animal can make it more noticeable.
It’s not particularly pretty.
The basic slip knot adds no beauty or polish when it’s noticeable. For me it’s because it lacks symmetry. The yarn end doesn’t hang straight and centered from it. The knot itself is a bit lumpy (sort of like a tiny fist). It looks like what it is: a simple, common, serviceable knot.
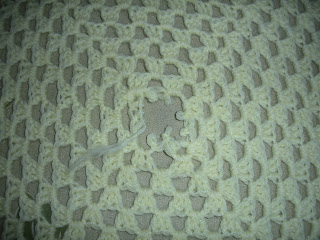
If the starting yarn end is clipped too short and/or the yarn is slippery, watch out. The knot could loosen and even unravel in certain projects (see example at right).
Ever seen an old lace or granny square afghan with only the centers unraveled? It’s sad how common this is and how easily it could have been prevented.
Alternatives: Advantages
Given that…crochet is great for everything from delicate lace dresses to sturdy beach totes and slipper soles; from super strong pet leashes to artistic jewelry; from weightless shawls to heavy coats and afghans, and still more! —
And…that many crochet projects are actually “started” over and over, like granny square afghans (each granny square starts in its center), Irish crochet lace (separate shapes are assembled later), and intarsia (patterns of colors with varying lengths of yarn), —
Doesn’t it make sense that some crochet projects could benefit from specialized ways of starting them?
6. Pretty.
A clearly visible starting slip knot could be intentionally decorative. Imagine one that looks symmetrical and has a charming, fancy, or fascinating texture. It could also be functional. A dense and bulky one would serve as a stopper for a large-holed bead. (I’ve often needed a good knot for this purpose!) It could also add weight to the ends of fringe for a nicer drape. See my Buff Slip Knot.
7. Temporary.
Some crocheters and knitters have a blanket “no knots” policy. Temporary knots are easy. Just make your basic slip knot really loose so that you can undo it later. Or, crochet right into it as if it’s a foundation chain. This way, the knot makes it easy to start crocheting, but you’re not stuck with it permanently.
8. More than one starting loop.
I keep discovering more uses for starting with more than one loop. Make a simple slip knot variation that produces two (or more) starting loops, then start crocheting with one of them. The remaining starting loop(s) can be used as a button loop or hanging loop for your finished project.
9. Reinforced strength.
Add a twist or an extra wrap while making the basic slip knot reinforces its strength and security. I need this reinforcement when using extra slippery or wiry yarns and threads. See some in the first picture above.
10. Change the angle of the yarn ends.
Yarn ends hang bent from basic starting slip knots.
“Change the angle of the yarn ends” may sound odd, but for me it’s a new way of looking at starting knots. When my yarn end is visible as fringe, sometimes it’s noticeable to me that it doesn’t hang straight. This is because our basic slip knot causes the yarn end to hang at an angle. I’m currently looking for starting knots that cause the starting yarn end to hang differently. I like the Buff Slip Knot so far.
11. Attach to something with a starting loop.
I’ve needed a way to start crocheting while also neatly, elegantly attaching it to something when I’ve made: watchbands, a belt with a buckle, and certain pendants for necklaces. I’m currently looking for new favorite starting knots in this category.
A Note about Knots
Remember I mentioned that some crocheters and knitters have a NO KNOTS policy? Perhaps some of them mean tight knots. A tight knot can weaken the yarn over time. It’s also unsightly, intruding on a buttery, spongey look and hand.
I almost always use knots when I start crocheting, but I don’t pull them into tight hard lumps. I rely on reinforcement from a long woven-in yarn end more than on a knot if I can. It depends on each project. I’m especially careful in areas that will have to sustain strain and weight. That would be the shoulders of a sweater, the motif centers and seams of a blanket, the toes and heels of socks, a bag bottom and its handle attachments, and so on.