Posted on

New Free Crochet Jewelry Pattern & Guide

My three newest crochet jewelry pattern releases share a theme: all are methods for crocheting beaded strands, without actually using beads. I’ve developed special beady crochet stitches and found jewelry-crocheting ways to make stitches stack up symmetrically and neatly, like beads do.

Not only do I love crocheting beads instead of adding beads to crochet; sometimes it’s better – allows a crochet project to be more portable or faster to begin, for example. For more images, here’s my “Pearly Crochet Stitch Types for Jewelry Crochet” photo set.

My free Puffpearls Jewelry Cord Crochet Guide is really three small patterns in one, because each pattern is a jewelry component that can be used independently with other designs. The three components are the Chain Loop Clasp, the Puffpearl Stitch Cord, and the Mushroom Button. Along the way I explain what makes each of these my “go-to” jewelry components, and suggest some creative ways to vary them and enhance their basic features.

After wearing crochet jewelry for years, and teaching Crochet Jewelry in local yarn shops and at national conferences, I wanted to provide a free guide to some of the simplest basics I find that I’ve relied upon for years. That’s why I came out with the free Puffpearls Jewelry Cord Guide. Together with the Irish Pearl Knot Stitch and the stitch menu in the Sweet Almonds Jewelry Set, I use it myself as a reference guide, so I’ve rounded out the free crochet jewelry pdf with:

  • A chart of standard necklace lengths
  • How to make the best beginning slip knot when starting a crochet jewelry project
  • How to make necessary adjustments for a good match between pendant and crochet cord.

Something else I’m noticing about crocheting ‘beads’ is that they’re amazing in silk and rayon threads. You might like issue #47 of the Crochet Inspirations Newsletter on using rayon threads for crochet jewelry. You also might like issue #46, “Open and Closed Clones Knots.” It was inspired by the Irish Pearl Knots design.

The Puffpearl was one of the first (if not THE first) of the pearly stitches I swatched, back in 2008. Allow me to end by counting the ways that I like it now more than ever! The Puffpearl Cord is…

  1. Strong with a bit of built-in stretch. It has clean good looks from any angle and has many uses, so it’s fun to see how it responds to different fibers and hook sizes.
  2. Fun to experiment with simple changes to the stitch’s basic steps for creating alternate versions of the cord.
  3. Fast! A 20-minute crochet friendship bracelet is pretty instant gratification.
  4. Easy to make this stitch uniform in size and shape for a polished-looking pendant cord.
  5. The most straightforward and structurally familiar of all my favorite bead-like crochet stitches for fancy cords. (I especially appreciate this when using slippery threads like silk and rayon.)

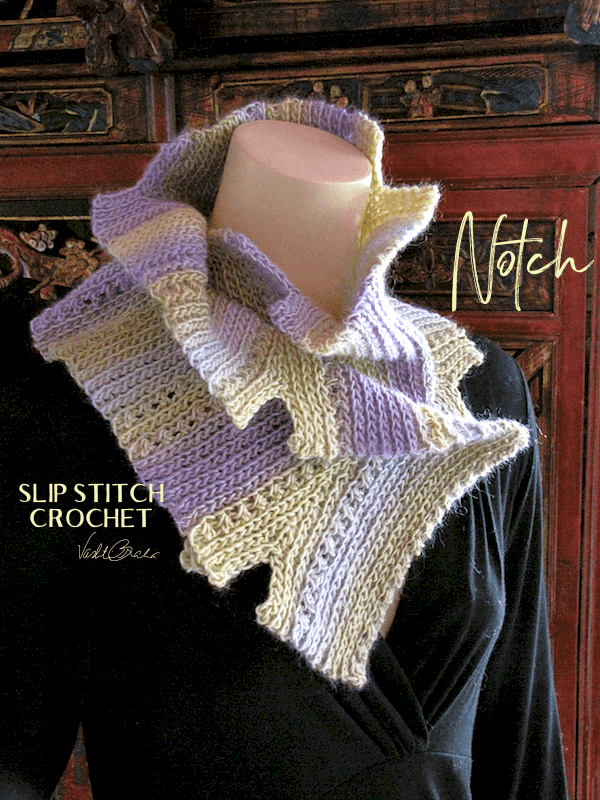
Notch

Like its cousin the Thaxton Hooded Cowl, Notch is luxuriously stretchy, squishy, and toasty-warm. This is modern slip stitch crochet with taller crochet stitches added for contrast. Experiencing how the notched short-row wedges take shape is heavenly fun. They’re the textural highlights of Thaxton, repeated for decorative impact.

Notch started out as a way for me to test the Thaxton cowl and take the pattern out of “beta.” I fell in love with the long-striping yarn effects. To get notches on both sides of the scarf, I found a simple way to alternate the wedges so that the textures always face the front.

Skill Level

Intermediate. Short rows are considered an Intermediate skill. Also, although the slip stitch is elementary crochet, crocheting them with a hook-led gauge takes practice for many crocheters in my slip stitch classes.

Build up to this pattern with Luckyslip Mitts: I wrote it for my introductory slip stitch classes. Practice simple short rows with Slip Slope. View all of my slip stitch crochet patterns here.

Pattern has a color-coded stitch diagram. Included: international English equivalents for American terms.

After following this pattern you will know (if you didn’t already):

  • How to crochet simple slip stitch ribbing
  • How to add dramatic surface texture with short rows
  • How to add designer touches to short-rowed ribbing
  • How to use a hook-led stitch gauge

Finished Dimensions

Two full skeins of the yarn shown (640yd/585m) yield a scarf 8.5″ wide X 64″ long {21.5 cm X 162.5 cm}. This is a stretchy scarf. Your yarn choice may add even more. Mine stretches to 72″ {182.75 cm}. A one-skein scarf would be half as long: 32″ {81 cm}.

Materials

  • Crochet Hook: Size US J/10/6 mm hook or size needed for gauge.
  • Yarn Shown: Marks & Kattens Big Trend (70% Acrylic, 30% Wool, 321yd/294m per 3.5oz/100g skein), color 409; 2 skeins for full-length scarf. Substituting a yarn: The best yarns for this project are wool or acrylic blends because they add bouncy loft. Cotton yarn is just not the same for this. Long, gradual color changes in a yarn, such as Crystal Palace Mochi Plus or Noro Kureyon, or subtle tonal shades of a hand dyed yarn, work great for this! Choose a plump #4 medium-weight yarn with a crochet hook size range from US H/8/5mm-J/10/6mm listed on its label. These yarns may be referred to as Heavy Worsted, Aran, Afghan, and occasionally “Light Chunky” Weight.
  • Stitch markers: Two or more until you can recognize the last slip stitch of each row.

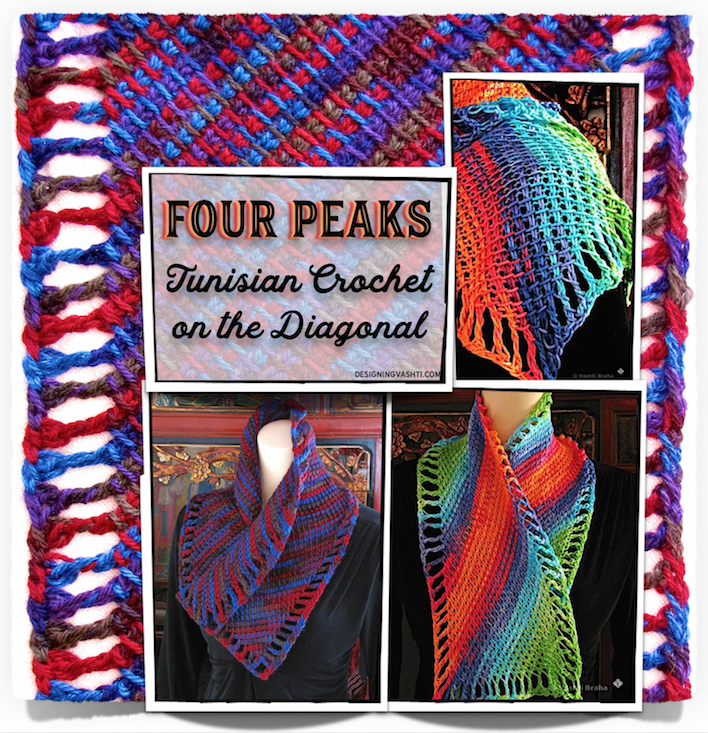
Four Peaks

Four Peaks Scarf is a newly remastered, rectangular variation of the L-shaped Five Peaks Shawl that first appeared in the Spring 2010 issue of Interweave Crochet magazine.

Special Features

Use any yarn weight, fiber, amount, and Tunisian hook size with this pattern. Pictured are dense wintery wool scarves and breezy summery options.

“Four Peaks” refers to what it’s like to start in one corner (a “peak”) and then crochet Tunisian rows diagonally to create the remaining three “peaks” of a symmetrical Tunisian rectangle (i.e., a scarf; or…stole, shrug, headband, afghan, and more!). This geometric construction method frees you to do several other promising things with Tunisian crochet.

The eyelet edging is built in to each biasing row for uninterrupted striping. This exciting special effect wouldn’t be the same if the edging had to be added later instead.

Four Peaks also introduces the ”Tunisian foundation slip stitch.” I’ve discovered that special increase methods along the left edge are needed for the Tunisian eyelets to drape symmetrically.

Pattern includes a stitch diagram and easy customizing instructions for any length, width, and amount of yarn you have on hand. My favorite way to crochet the Four Peaks Scarf (and the Five Peaks Shawl) is with a chart, because all rows face the front. It also reveals the simple logic that underlies fancy-looking biasing rows and eyelet stitches.

Skill Level

Intermediate. Almost all of the scarf is Tunisian Simple Stitch (a beginner-level stitch), and the return pass for each row is the standard one that beginners learn. (The Burly scarf would be a good basic review.) How each forward pass begins and ends is what makes this Intermediate level. You should have experience using easier Tunisian crochet patterns before attempting it. Tunisian Shakti Scarfythings is a good way to experience simple lacy biasing. My free Symmetrical Tunisian Diamond 101 pattern is great preparation for the Four Peaks experience.

After using this pattern, you will know (if you didn’t already):

  • How to start a Tunisian crochet project in one corner and build a scarf on the diagonal by increasing along both edges.
  • How to shape the left edge with a Tunisian Foundation Slip Stitch so that it matches the stretch and drape of the right edge.
  • How to edge Tunisian crochet with lacy eyelets as you go.
  • How to choose a good combination of hook size and yarn for this kind of design.

Finished Measurements

One skein of the summery rainbow bamboo-rayon yarn yielded a 50” x 9.5” {127 x 24 cm} scarf.
One skein of the wintery wool yarn yielded a 34” x 10” {86 x 25.5 cm} scarf.
Pattern includes information for customizing the scarf’s width and length.

Materials

Tunisian Crochet Hook, straight or circular: As a general guideline, use a crochet hook size that is 1.5 mm to 2 mm larger than the one recommended on the yarn’s label. Gauge is not very important for this pattern. For the rainbow light weight yarn, I almost decided on a K/6.5 mm hook. By the 16th row, the solid part of the scarf was feeling stiffer than I wanted it to so I started over with the next larger hook size I had (L/8 mm). Nowadays I would use the less common 7 mm hook size instead.

Yarns Used

  • For Summery rainbow scarf, Mondial Bamboo (100% Bamboo rayon; 252yds/230m per 3.5oz/100g skein): 1 skein in color #680 Parrot. (This yarn seems like a #3 Light Weight one to me, a.k.a. DK, light worsted wt.)
  • For Wintery wool scarf, Patons Classic Wool Worsted (100% Wool; 210yds/192m per 3.5oz/100g skein): 1 skein in color Palais for a wide neckwarmer, 2 for a full length scarf.

Substituting Yarns: I’ve swatched several types of yarn and hook sizes for this pattern. Each new yarn I try gives unpredictable results because biasing Tunisian eyelet fabric is more dynamic than any other Tunisian crochet I’ve made.

You might like to try this pattern with a thinner yarn from the #2 Fine Weight category (a.k.a. sock yarn, fingering, light sport, baby) and a size J/US10/6mm or K/US10.5/6.5 mm Tunisian crochet hook. For a light breezy scarf, I liked a K hook with my Louet Euroflax swatch.

A lace weight mohair yarn would be beautiful!

Posted on

From Crochet Design Idea to Professional Proposal

Resources Page for Presentation given by Vashti Braha: From Crochet Design Idea to Professional Proposal  CGOA Professional Development Day, Reno NV September 12, 2012

Clickable links are listed below under four subheadings, but first!  A Gallery of Ten Crochet Photography Challenges I’ve Encountered (out of Thousands)  Click or double-click on a photo for details.

1. Creating, Choosing, Sharing Images of Swatches, Sketches, and Designs


2. Why Photography Skills for all Crochet Professionals are Important

Photography has been a challenging journey for me. I’m a crochet designer and teacher first. Perhaps this is why I was slow to realize that every photo I take is also my intellectual property (therefore a business asset) with the same potential infinite value as a crochet design. The more rights one retains to each type of original crochet-related content (whether photo, diagram, text, video, etc.), the more capital one has. Forever. Content to be used as the rights holder sees fit, especially in the unforeseen opportunities the future holds. In other words, do yourself a big favor: err on the side of sitting on the full rights to too much content, because chances are your future self will be glad you did. I speak from experience already! Regarding photography for example, I only waited 2 years to learn how saving my seemingly superfluous photos pays off.

I may never see myself as a professional photographer, but everything I’ve learned about it has been worth the effort, both personally and professionally. Understanding how cameras and light and angles work is nice; even better are the unexpectedly deeper and almost spiritual things photography is teaching me, like: the kinds of beauty I used to overlook; what I want to see and what’s most ‘real’ to me; choices of visual subtexts (those ‘1000 words’ that pictures speak), and just plain what’s important to me about crochet. A surprise fringe benefit is that as I page through the latest crochet magazine or book, I now also detect other points of view non-crocheting pro photographers take, either by default or by direction.

As a crochet designer who finds project photography challenging, the best thing I’ve done is to allow myself the time to take baby steps:

  • If all I do is keep the camera very still, I’m already ahead. It can singlehandedly produce a great raw photo for isolating key details later at the editing stage. Sounds obvious, but it’s a special skill to do this for certain kinds of shots. Surprisingly, it has also taken me a long time to recognize when a photo is subtly out of focus.
  • I block everything, even jewelry. Otherwise the camera will blab loudly to everyone that I didn’t, and I’ll have to retake the photo {shudder}.
  • Having at least one mannequin is fabulous, mainly because using live models for any kind of crochet photography is overwhelmingly complicated for me. Photographing crochet on/with live models require a whole different skill set. I’m going easy on myself and still learning so much with still photography. Another surprise for me has been the strong opinions I hear FOR or AGAINST crochet or knit designs photographed on live models!
  • I refuse to obsess about perfect light. There’s no way I’m getting up at dawn to photograph anything! No way am I delaying a new pattern release just because a tropical storm is brewing! However, the more I’ve thought about this, the more I wonder if this is a luxury I have in Florida, where I usually deal with too much light. The more photos I take of crochet, the less light I need, especially when my priority is to emphasize a stitch texture, or the intricate interaction between fiber type, yarn construction, stitch pattern and drape. I can add light during photo editing, but taking away too much light is trickier.
    • As a result, I avoid buying specialized paraphernalia that clutters up my house or makes it feel too much like a photographer’s studio. I often just put up a low three-fold cardboard screen to mute the Florida sun. Having a range of simple light modifying tools and backgrounds at hand, such as folding foam-core boards, frees me from waiting for only one ideal hour of indirect sunlight or a weather-perfect day.
  • Photoshop will just have to wait its turn. Until more non-photographers’ faces relax when they talk about using Photoshop, I’m making the most of iPhoto and supplementing with iWatermark and whatever the current incarnation of the online Picnik is – and enjoying myself while mastering the basics.
  • I learn a new setting on my camera when I’m good ‘n’ ready. My favorite option so far is the macro setting (on my Canon it looks like a flower symbol). It’s especially great for any beaded crochet, fancy stitches, and step outs (tutorials). I practiced for months with different close up ranges to recognize the macro ‘sweet spot.’ I wish I’d taken a few macro pics of the beaded seam of Tunisian Petals (see my blog link below about this)
  • I turn a crochet photo session into a relaxing event. I do a batch at a time. I often jot down a specific shot I need for a pattern or blog post, because I don’t always remember by the time it’s ‘photo shoot day.’ Depending on the time of day, I may turn up the music, pour a glass of wine, and relax into the job. Or in the morning I may get all sporty and aerobic about it, especially if I’m cleaning up the room reaching to get artsy angled shots, changing backgrounds, moving mannequins around etc. I might chat on the phone, or listen to my husband’s TV show. I avoid a lot of caffeine, though, for a steadier hand.

Helpful Links for Crochet Photography Newbies:


3. Submissions Guidelines for Crochet Pattern Magazines:

Submissions Guidelines for Pattern Book Publishers:


4. Recommended Miscellaneous Resources for New/Aspiring Professional Crochet Designers:

Note: even though some of these links offer advice about expired calls for proposals, the information is still relevant for future calls.

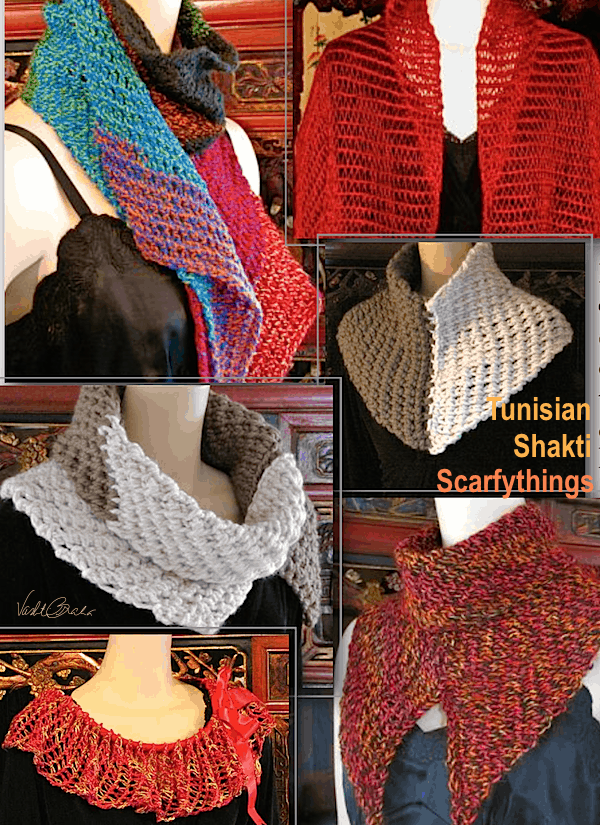
Shakti Scarfythings

This simple scarf & wrap pattern is really all about one powerful Tunisian crochet stitch. Quickly crochet easy scarves, wraps and shawls with this exciting lacy Tunisian crochet stitch. Learn to crochet it on the bias with any yarns and crochet hook sizes, then try seaming your scarf four different ways for new fashion looks.

As a “superpattern,” pattern includes a menu of six projects for you to choose from. Use it for your own freeform crochet: pair your own yarn and hook size, choose how many chains you start with and how many rows you end with, and try a new way of seaming it.

Crocheting this stitch on the bias feels so natural that it’s my first choice for crocheters new to crocheting on the bias. Oddly, this stitch has no standard name or description, and doesn’t seem to be one of the basic stitches one learns after the Tunisian Simple Stitch, even though it’s easy to do! I’ve seen it called several different names. I prefer Extended Knit Stitch and abbreviated it Tkes in this pattern.

The rows bias effortlessly for a dynamic stretch and flowing drape. The stitch is equally lovely in a tighter gauge for a solid warm scarf, or crocheted very loosely for a lacy layer, so this one pattern spans every season. I like wearing it as a narrower scarf, and also as a wider wrap.

The possibilities get even more exciting when I’ve tried seaming it four different ways! A mobius with a corner is one of my favorite results. The Tkes so versatile is that it looks great on both sides, so it’s a natural choice for a scarf or wrap with a mobius twist.

Skill Level

Easy. You should already be familiar with beginner Tunisian crochet patterns; you might like this handy checklist. This pattern is a good introduction to these other DesigningVashti patterns: Tunisian Islander Wrap (same stitch with a fancier edge), Neck Lattice (published in Simply Crochet by Interweave Press ©2011), Four Peaks (offset Tunisian Simple Stitch with eyelet edge), and most recently, Eilanner.

UK and Australian equivalents to American measurements, yarn weights, and stitch terms are provided in brackets. After using this pattern you will know (if you didn’t already):

  • How to crochet the Tunisian Extended Knit Stitch
  • How biasing works with Tunisian crochet stitches
  • How to crochet easy Tunisian lace by pairing a crochet hook size and yarn
  • How to seam a crochet scarf into four or more fashion wraps

Finished Dimensions

With materials used, tips & wearing notes for six projects. I have so many images for this pattern that I invite you to see more in this online photo set.

For several projects shown I used a size L/US11/8mm Tunisian crochet hook used, at least 8″ {20.5 cm} long. For some I used a size N/US15/10mm, and a size K/US10.5/6.5mm hook would also work great with some yarns.

Colorblock-Shakti: I love wearing this one unseamed as a simple scarf, because it shows off the diagonal color blocks the best. I also like how the wool fibers felt together a bit over time for a warm soft scarf. If I had 100g-150g of this yarn instead of 75g, I’d make the scarf slightly wider and longer.

  • Measured hung and unseamed, 64″ long X 6.5″ wide {163 cm X 16.5 cm}.
  • Yarn used: An anonymous self-striping mill-end yarn that is most likely merino wool; its weight category appears to be #3 (DK, light worsted). Yardage unknown; scarf weighs 2.65oz {75g}. For a fun scrap yarn project that approximates this look, crochet two strands held together of 8 contrasting #1 Super Fine Weight yarns (Fingering or light sock yarn, 3-ply baby yarn).

Swizzle-Shakti: As a 1-skein project, I like this one several ways, such as partially seamed with a half-twist mobius-style cowl. However, I love the luxurious feeling of it and its dramatic tiger pelt look, so I’d also like it longer and wider to wear as a wrap.

  • Measured hung and unseamed, 46″ X 7″ {117 cm X 18 cm}.
  • Yarn used: The Alpaca Yarn Company Swizzle (100% superfine alpaca; 215yd/197 m per 3.5oz/100g skein), 1 skein of color 07 Tiger Lily.

Skinny-Shakti: I like this one as a ruffled collar tied with a ribbon drawstring, instead of wearing it as a long skinny scarf, because it’s the only way that the stitch texture shows. I’d like it even more if I had a soft silk tie to use instead of the ribbon.

  • Measured hung and unseamed, collapses to 88″ X 2″ {approx. 220 cm X 5 cm}
  • Yarn used: Tilli Tomas Rock Star (100% silk with beads; 150yd/137m per 3.5oz/100g skein), 1 skein of color Ginger.

Red Mohair Veil: I love draping this fabric around me, and have plenty of yarn left to make it bigger. It’s weightless but warm, delicate and strong, and soft with an elegant sheen. It’s already a good bare-minimum width for me as a wrap, fine for throwing around my shoulders easily without catching on anything while I’m sitting.

  • Measured hung and unseamed, 53″ X 12.5″ {135 cm X 32 cm}.
  • Yarn used: Wagtail Yarns 4-Ply (100% Fine Kid Mohair; 410yd/375m per 3.5oz/100g skein), 1 skein of color 350 300, Winter Red.

Mobi-Dickie: I most like this one seamed with a half-twist, mobius-style. This is a stiffer but still soft fabric for more structured looks. Hanging it doesn’t change its dimensions much, but it does stretch nicely when worn.

  • Measured flat, 33″ X 9.5″ {84 cm X 24 cm}.
  • Yarn used: Lion Brand Wool-Ease Thick & Quick (80% acrylic, 20% wool; 108yd/99m per 6oz/170g skein), one skein of Wheat and half of a skein of Taupe for 2-color version.
Suave Shoulders: This capelet-type cowl variation of Mobi-Dickie is seamed as a simple tube, and stretches wider at the shoulder than at the neck.

  • Measured flat, 33″ X 12″ {84 cm X 30.5 cm}.
  • Yarn used: Lion Brand Wool-Ease Thick & Quick (80% acrylic, 20% wool; 108yd/99m per 6oz/170g skein), one skein of Wheat and one skein of Taupe for 2-color version.