Fish Lips Scarf-to-Shrug

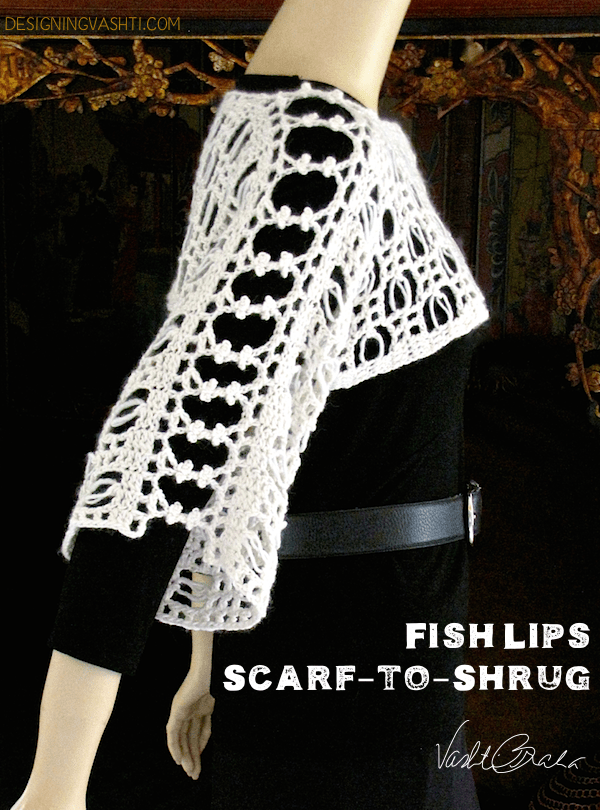
Fish Lips brings out the bold, modern side of Love Knot stitches (a.k.a. Lover’s Knot, Solomon’s Knot) for a trendy pullover shrug. The shrug is created by joining two simple shapes—scarves—with a lacy seam. The wide seam also modifies the bateau neckline for a comfortable fit.

It’s also a scalable method for adding freeform love knots anywhere: I’ve been using it to sculpt the size and shape of Love Knots. I developed the method while exploring new material for my 21st Century Love Knot Adventures crochet classes.

Crocheters with more experience can use the scalable method to substitute any yarn, thread, or hook size. Once you know how to scale the size of Love Knots yourself, it’s easier to add them anywhere, and “sculpt” their shape in a freeform manner.

The stitch pattern is fast and easy to memorize. A finished edge (selvedge) is built in to stabilize the “fish lips.” Stitch pattern multiples, a stitch diagram, schematics, and other information for customizing the width and height of your rows are included. I’ve also included some yarn and swatch talk, because different yarns add their own effects to Love Knots.

Skill Level

Advanced Intermediate due to the scalable approach to making Love Knots. Complete, in-depth, tested information on how to crochet it for all skill levels is provided.

View all of our love knot patterns here.

Included: international English equivalents for American terms.

?After using this pattern, you will know (if you didn’t already):

  • How to crochet a standard Love Knot Stitch (a.k.a. Solomon’s Knot, Lover’s Knot).
  • How to customize the size and shape of your Love Knots.
  • How to add Love Knots of any size anywhere in a crochet pattern for unique lacy effects.
  • How to crochet two scarves together with a decorative Rosebud Bridge seam.
  • How to construct a pullover shrug with a scarf pattern.

Finished Dimensions

Pattern includes options for customizing the dimensions, and information for using thicker or thinner yarns with the Fish Lips stitch pattern.

Fish Lips Lace Scarf: 60″ X 7-7.25″ wide {152.4 cm X  17.75-18.4 cm}.

Shrug Option: One size fits Small to Large (see schematic, p. 8).

  • Head opening: 12.5″ {31.5 cm}.
  • Bust: 42″ {106.7 cm}. Designed for roomy fit. Easy to adjust during seaming.
  • Sleeve opening: 8″ {20.3 cm}. Bust opening/hem adds extra ease to armhole drop.
  • Sleeve length (adjustable) from shoulder point to cuff: 15″ {38 cm}.

Materials

  • Crochet Hook: Size US-8/H/5 mm and US-7/G/4.5 mm crochet hook. Smaller hook is used for the shoulder seam of the shrug.
  • A spray bottle filled with fresh water. A tiny travel size is great to have on hand for the first few rows while you are establishing the scale of your Love Knots.
  • Yarn Shown: The Alpaca Yarn Company Astral (50% Tencel, 30% Alpaca, 20% Wool; 197yds/180m per 3.5oz/100g) color 8100 cream. For scarf, .75 skein; for Shrug, 1.5 skeins.

Substituting a yarn: Look for a Standard Medium Weight #4 Yarn that has some bounce, and that is at least 50% natural fiber so that damp blocking will bring out some drape. (Steam blocking, such as for “killing” acrylic to create drape, is not recommended for this pattern because it could cause the “fish lips” to collapse.) This yarn weight usually pairs well with a hook size in the range of US7/G/4.5mm to US9/I/5.5mm. These yarns may also be referred to as DK (Double Knitting), Light Worsted, or Worsted weight.

Symmetrical Diamond

This Symmetrical Diamond pattern introduces diagonal Tunisian crochet for clothing and fashion accessories. It’s a basic pattern, so it works just as well for afghan motifs, pillows, hot pads, and other home decor. Pick a yarn with built-in color changes for exciting stripes! The pattern starts out as an all-purpose swatch for any yarn and hook size, then offers three ways to turn your swatch into a practical project:

  • Make dish cloths with medium cotton yarn.
  • Make a padded wrist rest, sleeve for your cell phone or sunglasses, or a set of reusable makeup remover pads with thinner yarns.

I developed this strategic four-edge stitch shaping combination from scratch because common shaping methods don’t work well for diagonal Tunisian crochet. My goal was to find a uniformly finished solid edge for Tunisian Simple Stitch (Tss) that’s also symmetrically stretchy. I researched 100 or so sources and I know of no one else using it; nor do I know of a published option that offers a close substitute. 

There is a Crochet Inspirations Newsletter issue about this pattern: #48 Diagonal Tunisian Crochet Discovery – http://eepurl.com/wNeCn

After you try this pattern, have a look at the new Burly Bias. I designed it for the Tunisian on the Diagonal class as the next step in having fun crocheting diagonally.  Four PeaksWarm Aeroette, and Aery Faery (rectangular wrap scarves with eyelets). Adding eyelets to each edge requires specialized tweaks for Tunisian lace; in fact, I’m discovering a new world of Tunisian edges with special effects. You might also like my other Tunisian projects that begin in one corner (Islander) or crocheted in biasing rows (Petals, Shakti Scarves).

Skill Level: Easy Intermediate

You should know how to crochet the Tunisian Simple Stitch (Tss) and have some experience using a Beginner-Level Tunisian crochet pattern. (Burly is an example of one.)

Pattern abbreviations are kept to a minimum. International English equivalents to American measurements, yarn weights, and stitch terms are in brackets { }. In response to feedback in Tunisian crochet classes, I list the stitch names and descriptions in a pink sidebar on the pattern pages. (This way there’s no need to flip back to the “Stitch Guide” page while crocheting.)

After using this pattern, you will know (if you didn’t already):

  • How to create a symmetrical triangle and a square of any size with Tunisian simple stitch by starting in the corner (and how much fun it is!).
  • How to start in one corner to add stretch, drape, and diagonal striping to Tunisian crochet.
  • How to increase and decrease along the right edge of Tunisian crochet rows to take advantage of this dynamic biasing fabric.
  • How to increase along the left edge of Tunisian crochet rows to match the drape and stretch of the right side.

Finished Dimensions

It’s easy to make your diamond larger or smaller. (That’s the “point” of corner-to-corner, really.)

  1. Dishcloth: 6.5″ {16.5 cm} square.
  2. Diamond Eyeglass Sleeve: 6″ {15.25 cm} square.
  3. Diamond Makeup Reusables: 2.75″ {7 cm} square.

Materials Used

Diamond Dishcloth

  • Crochet Hook: Size US10/J/6.0 mm Tunisian crochet hook that is at least 10″ {25.5 cm} long for the longest rows.  Tip: Since you begin in one corner, you can use a regular crochet hook as your Tunisian hook until it’s difficult for you to keep all loops of the Forward Pass (FP) on your hook; then switch to a longer Tunisian hook.
  • Two stitch markers (optional)
  • Yarn Shown: Lion Brand Cotton Ease (50% Cotton, 50% Acrylic; 207yds/189m per 3.5oz/100g ball), color #123 Seaspray. Each ball yields 4 to 6 dish cloths.

Substituting a yarn: For most dish cloths and face cloths I like a cotton-acrylic blend. It seems to stay soft longer and dry faster. Choose a #3 Light or #4 Medium Weight yarn with a recommended crochet hook size range of US7/G/4.5mm to 9/I/5.5mm. These yarns may also be called DK (Double Knitting), Light Worsted, or Worsted weight.

Diamond Eyeglass Sleeve

  • Crochet Hook: Size US8/H/5.0 mm Tunisian crochet hook that is at least 10″ {25.5 cm} long for the longest rows.  Tip: Since you begin in one corner, you can use a regular crochet hook as your Tunisian hook until it’s difficult for you to keep all loops of the Forward Pass (FP) on your hook; then switch to a longer Tunisian hook.
  • Two stitch markers (optional)
  • Yarn Shown: (75% Superwash virgin wool, 50% Nylon; 410yds/375m per 5.25oz/150g ball), color #63, approx. 41 yds {57.5 m} per Sleeve.

Substituting a yarn:  I chose a thicker than usual sock yarn for two reasons: I want this yarn to hold up when I keep this sunglass sleeve in my handbag, and it’s easy to find a dramatically self-striping sock yarn. (See Diamond Makeup Reusables below for standard thinner weight sock yarn examples.) Choose a #2 Fine Weight yarn with a recommended crochet hook size range of US4/E/3.5mm to US6/G/4.0mm. These yarns may also be called Sport, Heavy Sock {Light DK, 5-Ply}.

Diamond Makeup Reusables

  • Crochet Hook: Size US5/F/3.75 mm Tunisian crochet hook of any length.
  • Two stitch markers (optional)
  • Yarn Shown: Plymouth Sockotta (45% Cotton, 40% Superwash wool, 15% Nylon; 414yds/379m per 3.5oz/100g ball), color #6655.

Substituting a yarn:  This cotton blend sock yarn is an unconventional choice for crocheted makeup remover pads and I’m really happy with it. Many crocheters use a thicker 100% cotton “dishcloth” yarn instead (see “Diamond Dishcloth” above). Most sock yarns are designed to hold up to hard wear and machine washing and drying. I like the sock yarn I used because it’s thinner, it has enough cotton to feel soft and absorbent, and the heathered color changes don’t show any traces of makeup residue after washing. I prefer them over the one-use quilted cotton balls I’ve used for years!

Choose a #1 Super Fine Weight yarn with a recommended hook size range of US2/C/2.25mm to US4/E/3.5mm. These yarns may also be called Fingering, Sock, Light Sport, Baby {3-Ply}.

I loved this yarn for a soft and durable padded wrist rest: Schachenmayr nomotta Regia Silk Color (55% Wool, 25% Nylon, 20% Silk; 218yds/199m per 1.75oz/50g ball), color #0181. For more information about this project variation, see this Ravelry project page: http://ravel.me/vashtirama/ptdwr .

Want to see another project? I love making these double-thick Diamond Coasters with a crazy Noro yarn!

Sweet Almonds Set

The original goal was to find a way to crochet with oblong-shaped beads so that no stitch strands cover them. I love discovering crochet stitches that resemble fiber beads, and then seeing what happens when beads are added.

I think of the featured stitches as “jewelry quality” because they don’t have an obvious wrong side, and drape more symmetrically with less unintended twisting.

The four bracelets are different blends of Pearlpuff, Pillowpuff, and Bow Tie Picot stitches. They use at least one of three beading methods.

To keep the beading simple, all beads are strung onto the yarn or thread before crocheting, even for the method I call “super-hoisting.”

It’s easy to make one of the bracelets long enough to be worn as a headband, wrapped bracelet, necklace, or pendant cord. Thanks to the crocheted clasps, a set of bracelets can be linked up to create a new necklace — my favorite option!

Skill Level

Mixed (Easy, Intermediate, and Experienced). The Puffpearl is Easy. Pillowpuff and Bow Tie Picot are Intermediate. Adding beads can make any stitch more challenging, depending on the compatibility of bead (its weight and hole size), beading method, thread/yarn, hook size, and stitch gauge. See the Helpful Resources sidebar in the pattern. Pattern is written with a limited amount of abbreviations, and includes International English equivalents to US terms.

After following these patterns you will know (if you didn’t already):

  • How to crochet these jewelry stitches: Bow Tie Picots, Pillowpuffs, and Puffpearls.
  • How to crochet adjustable and reinforcing jewelry clasps.
  • How to use three bead crochet methods for five kinds of jewelry cords.
  • How to coordinate bead sizes and shapes with stitches, thread types, and hook sizes

Bracelet pattern instructions are for a finished length of a standard 7″-7.5″ bracelet.  My finished necklace lengths of 22″ (pink beads) and 36″ (green beads) are based on the number of usable oblong beads in one package.These are foundation-row cords: just keep going until the bracelet or necklace is as long as you wish. Pattern includes a crocheted clasp. Or, use the yarn ends to attach a metal jewelry fastener instead.

Materials

Silver & Pink Set; changes for the Brown & Green Set are in italics.

Thread: Katia Syros (45% Polyester, 28% Cotton, 27% Acrylic; 306yd/280m per 1.75oz/50g ball), color #75 (silver), much less than one ball. About this thread size: This is a Size #5 crochet thread, equivalent in thickness to CYC #1 Super Fine Weight yarn, a.k.a. “fingering” or “sock” weight {UK & AUS 3 Ply or 4 Ply}.

Brown & Green Set: I used Handy Hands Lizbeth Size #10 cotton thread instead, because a size #5 was too thick to fit through the holes of the green seed beads when super-hoisting. (See Beads below.)

Crochet Hooks: 2.25 mm for crocheting, and a size .75 mm steel crochet hook or small enough size that works for “super-hoisting” your choice of beads with your thread (see Special Stitches section below). Hook sizes are not standardized across brands, so it’s best to go by the mm. size.

Brown & Green Set: I used a Boye 1.65mm (size #7) steel crochet hook instead, because I worked with a thinner thread size (see Thread above.) This size falls between the 1.5 mm and 1.75 mm of most other brands. Feel free to use the size that works the best for you to comfortably crochet fairly tight.

Beads Used for Necklace: It’s wise to string on more beads than you’ll need.

Bead Gallery 10-inch strand (14 usable beads) of 8X16mm ‘Twist Cats Eye Pink Glass’ (style #55692, MSKU #10401972), and 28 silver-lined colorless glass large seed beads (a.k.a. E-beads, size 6/0 or 6º).

Brown & Green Set: I used 29 African trade beads (approx. 10X16 mm), and 100 small-holed size 6º seed beads from Twisted Sister (item # TS-7283.12 “Translucent Olive Gold Liner”). These seed beads required a thinner thread size (see Thread above.)

Beads Used for Bracelets: It’s wise to string on more beads than you’ll need.

Up to 75 large Japanese seed beads per bracelet, see each pattern (a.k.a. Miyuki, E-beads, size 6/0 or 6º): ‘hot pink lined crystal AB Miyuki’ (item #6-9355-100; UPC 7-9052499661-2).

Brown & Green Set: see Necklace.

A beading needle or your preferred bead stringing tool.

Four Peaks

Four Peaks Scarf is a newly remastered, rectangular variation of the L-shaped Five Peaks Shawl that first appeared in the Spring 2010 issue of Interweave Crochet magazine.

Special Features

Use any yarn weight, fiber, amount, and Tunisian hook size with this pattern. Pictured are dense wintery wool scarves and breezy summery options.

“Four Peaks” refers to what it’s like to start in one corner (a “peak”) and then crochet Tunisian rows diagonally to create the remaining three “peaks” of a symmetrical Tunisian rectangle (i.e., a scarf; or…stole, shrug, headband, afghan, and more!). This geometric construction method frees you to do several other promising things with Tunisian crochet.

The eyelet edging is built in to each biasing row for uninterrupted striping. This exciting special effect wouldn’t be the same if the edging had to be added later instead.

Four Peaks also introduces the ”Tunisian foundation slip stitch.” I’ve discovered that special increase methods along the left edge are needed for the Tunisian eyelets to drape symmetrically.

Pattern includes a stitch diagram and easy customizing instructions for any length, width, and amount of yarn you have on hand. My favorite way to crochet the Four Peaks Scarf (and the Five Peaks Shawl) is with a chart, because all rows face the front. It also reveals the simple logic that underlies fancy-looking biasing rows and eyelet stitches.

Skill Level

Intermediate. Almost all of the scarf is Tunisian Simple Stitch (a beginner-level stitch), and the return pass for each row is the standard one that beginners learn. (The Burly scarf would be a good basic review.) How each forward pass begins and ends is what makes this Intermediate level. You should have experience using easier Tunisian crochet patterns before attempting it. Tunisian Shakti Scarfythings is a good way to experience simple lacy biasing. My free Symmetrical Tunisian Diamond 101 pattern is great preparation for the Four Peaks experience.

After using this pattern, you will know (if you didn’t already):

  • How to start a Tunisian crochet project in one corner and build a scarf on the diagonal by increasing along both edges.
  • How to shape the left edge with a Tunisian Foundation Slip Stitch so that it matches the stretch and drape of the right edge.
  • How to edge Tunisian crochet with lacy eyelets as you go.
  • How to choose a good combination of hook size and yarn for this kind of design.

Finished Measurements

One skein of the summery rainbow bamboo-rayon yarn yielded a 50” x 9.5” {127 x 24 cm} scarf.
One skein of the wintery wool yarn yielded a 34” x 10” {86 x 25.5 cm} scarf.
Pattern includes information for customizing the scarf’s width and length.

Materials

Tunisian Crochet Hook, straight or circular: As a general guideline, use a crochet hook size that is 1.5 mm to 2 mm larger than the one recommended on the yarn’s label. Gauge is not very important for this pattern. For the rainbow light weight yarn, I almost decided on a K/6.5 mm hook. By the 16th row, the solid part of the scarf was feeling stiffer than I wanted it to so I started over with the next larger hook size I had (L/8 mm). Nowadays I would use the less common 7 mm hook size instead.

Yarns Used

  • For Summery rainbow scarf, Mondial Bamboo (100% Bamboo rayon; 252yds/230m per 3.5oz/100g skein): 1 skein in color #680 Parrot. (This yarn seems like a #3 Light Weight one to me, a.k.a. DK, light worsted wt.)
  • For Wintery wool scarf, Patons Classic Wool Worsted (100% Wool; 210yds/192m per 3.5oz/100g skein): 1 skein in color Palais for a wide neckwarmer, 2 for a full length scarf.

Substituting Yarns: I’ve swatched several types of yarn and hook sizes for this pattern. Each new yarn I try gives unpredictable results because biasing Tunisian eyelet fabric is more dynamic than any other Tunisian crochet I’ve made.

You might like to try this pattern with a thinner yarn from the #2 Fine Weight category (a.k.a. sock yarn, fingering, light sport, baby) and a size J/US10/6mm or K/US10.5/6.5 mm Tunisian crochet hook. For a light breezy scarf, I liked a K hook with my Louet Euroflax swatch.

A lace weight mohair yarn would be beautiful!

Posted on Leave a comment

From Crochet Design Idea to Professional Proposal

Resources Page for Presentation given by Vashti Braha: From Crochet Design Idea to Professional Proposal  CGOA Professional Development Day, Reno NV September 12, 2012

Clickable links are listed below under four subheadings, but first!  A Gallery of Ten Crochet Photography Challenges I’ve Encountered (out of Thousands)  Click or double-click on a photo for details.

1. Creating, Choosing, Sharing Images of Swatches, Sketches, and Designs


2. Why Photography Skills for all Crochet Professionals are Important

Photography has been a challenging journey for me. I’m a crochet designer and teacher first. Perhaps this is why I was slow to realize that every photo I take is also my intellectual property (therefore a business asset) with the same potential infinite value as a crochet design. The more rights one retains to each type of original crochet-related content (whether photo, diagram, text, video, etc.), the more capital one has. Forever. Content to be used as the rights holder sees fit, especially in the unforeseen opportunities the future holds. In other words, do yourself a big favor: err on the side of sitting on the full rights to too much content, because chances are your future self will be glad you did. I speak from experience already! Regarding photography for example, I only waited 2 years to learn how saving my seemingly superfluous photos pays off.

I may never see myself as a professional photographer, but everything I’ve learned about it has been worth the effort, both personally and professionally. Understanding how cameras and light and angles work is nice; even better are the unexpectedly deeper and almost spiritual things photography is teaching me, like: the kinds of beauty I used to overlook; what I want to see and what’s most ‘real’ to me; choices of visual subtexts (those ‘1000 words’ that pictures speak), and just plain what’s important to me about crochet. A surprise fringe benefit is that as I page through the latest crochet magazine or book, I now also detect other points of view non-crocheting pro photographers take, either by default or by direction.

As a crochet designer who finds project photography challenging, the best thing I’ve done is to allow myself the time to take baby steps:

  • If all I do is keep the camera very still, I’m already ahead. It can singlehandedly produce a great raw photo for isolating key details later at the editing stage. Sounds obvious, but it’s a special skill to do this for certain kinds of shots. Surprisingly, it has also taken me a long time to recognize when a photo is subtly out of focus.
  • I block everything, even jewelry. Otherwise the camera will blab loudly to everyone that I didn’t, and I’ll have to retake the photo {shudder}.
  • Having at least one mannequin is fabulous, mainly because using live models for any kind of crochet photography is overwhelmingly complicated for me. Photographing crochet on/with live models require a whole different skill set. I’m going easy on myself and still learning so much with still photography. Another surprise for me has been the strong opinions I hear FOR or AGAINST crochet or knit designs photographed on live models!
  • I refuse to obsess about perfect light. There’s no way I’m getting up at dawn to photograph anything! No way am I delaying a new pattern release just because a tropical storm is brewing! However, the more I’ve thought about this, the more I wonder if this is a luxury I have in Florida, where I usually deal with too much light. The more photos I take of crochet, the less light I need, especially when my priority is to emphasize a stitch texture, or the intricate interaction between fiber type, yarn construction, stitch pattern and drape. I can add light during photo editing, but taking away too much light is trickier.
    • As a result, I avoid buying specialized paraphernalia that clutters up my house or makes it feel too much like a photographer’s studio. I often just put up a low three-fold cardboard screen to mute the Florida sun. Having a range of simple light modifying tools and backgrounds at hand, such as folding foam-core boards, frees me from waiting for only one ideal hour of indirect sunlight or a weather-perfect day.
  • Photoshop will just have to wait its turn. Until more non-photographers’ faces relax when they talk about using Photoshop, I’m making the most of iPhoto and supplementing with iWatermark and whatever the current incarnation of the online Picnik is – and enjoying myself while mastering the basics.
  • I learn a new setting on my camera when I’m good ‘n’ ready. My favorite option so far is the macro setting (on my Canon it looks like a flower symbol). It’s especially great for any beaded crochet, fancy stitches, and step outs (tutorials). I practiced for months with different close up ranges to recognize the macro ‘sweet spot.’ I wish I’d taken a few macro pics of the beaded seam of Tunisian Petals (see my blog link below about this)
  • I turn a crochet photo session into a relaxing event. I do a batch at a time. I often jot down a specific shot I need for a pattern or blog post, because I don’t always remember by the time it’s ‘photo shoot day.’ Depending on the time of day, I may turn up the music, pour a glass of wine, and relax into the job. Or in the morning I may get all sporty and aerobic about it, especially if I’m cleaning up the room reaching to get artsy angled shots, changing backgrounds, moving mannequins around etc. I might chat on the phone, or listen to my husband’s TV show. I avoid a lot of caffeine, though, for a steadier hand.

Helpful Links for Crochet Photography Newbies:


3. Submissions Guidelines for Crochet Pattern Magazines:

Submissions Guidelines for Pattern Book Publishers:


4. Recommended Miscellaneous Resources for New/Aspiring Professional Crochet Designers:

Note: even though some of these links offer advice about expired calls for proposals, the information is still relevant for future calls.