Posted on 1 Comment

How to Crochet Slip Knot Variations

Steps to do a slip knot with more wraps when you need a decorative one.
View the above image full size.


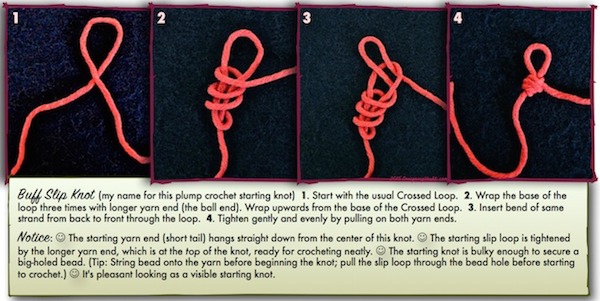
Here’s the follow-up how-to for yesterday’s “Pros & Cons of the Starting Slip Knot” post. I’ve created photo step outs for two promising alternatives to the basic starting slip knot. The first is what I call the Buff Slip Knot, shown above. The second is the Three-Loop Starting Slip Knot.

Special Slip Knots for Crochet

The Buff Slip Knot

Like our general-purpose slip knot, the Buff version offers a slip loop that you adjust by tugging on the longer yarn end. Unlike many other knots I tested, the longer yarn end is waiting for you up where the slip loop is rather than down at the bottom of the knot near the short yarn end. Stays tidy-looking this way.

Tying it is like tying a basic slip knot that has more wraps. A crochet beginner might wish to come back to this one later. Follow the four steps shown above. (View the high-resolution image).

I listed ten possible functions crocheters might need from the starting slip knot in yesterday’s post. The Buff Slip Knot variation is an especially good candidate for advantages #6 and #10 on the list. Try it when you need or want a visible crochet slip knot that is nice looking. It’s symmetrical in more than one way. It’s also beefier if you wish to start with a large-holed bead accent.

The Three-Loop Slip Knot

This one may seem odd. Why would anyone want a crochet slip knot with three starting loops? This one is a great way to start right off crocheting with a finished, usable button loop, hanging loop, or other handy use for a secure loop. Think jewelry, cords and straps, and how about potholders?

Chained loops look less delicate than the satiny fine-grained texture of the puffpearls.
Puff stitches look finer than the chain stitches of the clasp loop!

Normally we’d start with a basic slip knot, crochet some chain stitches, then slip stitch them together to form a loop of chains. These work great for most things. Occasionally, chain stitches are too thick or textured for what I need. This tends to happen for me with jewelry projects. I’d like a slim loop to fit under a button clasp. The chained loops of these Puffpearl necklaces look unnecessarily chunky to me.

Another example is when a crocheted charm or pendant is designed to dangle. I’m thinking the Three-Loop one would have been a sleeker choice for the tops of the Lovebud Vines.

Three-Loop: How to Do It

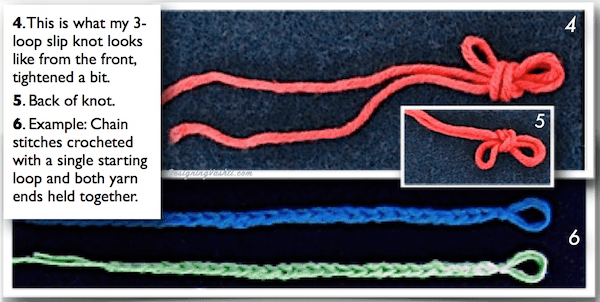
The Three-Loop Slip Knot variation is similar to making a basic slip knot except: take the first 16″ or so* of your starting yarn end and fold it in half first. Use the fold to make the slip knot. Don’t pull the folded end all the way through.

3 steps to making a standard slip knot with a doubled length of yarn to result in 3 loops, not 1.
View higher-res image.

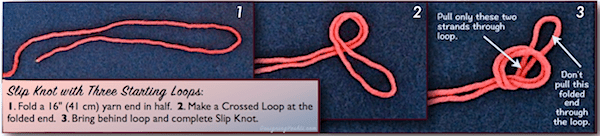
*Use a longer length than 16″ if you’ll be crocheting both ends together throughout, like I did in image #6 below. It’ll depend completely on each project. (It’s a great way to avoid weaving in the end.)

Adjust and tweak the final desired size of the loops first before tightening completely. Then, pull the knot tight enough to give it a streamlined look.

Starting slip knot variation: this one has 3 loops. One goes on your crochet hook; after crocheting, two loops are left.
How the 3-loop slip knot looks with a simple foundation chain. View full size.

Here again is a feature I appreciate: the long yarn end is waiting close to the loop that goes on the crochet hook. This means you won’t have to see a stringy strand of yarn traveling over the knot, which would look messy, asymmetrical, and unnecessary.

Updated November 2018. It’s part of an experimental blog post series: Vashti’s How to Crochet Book. Next post: Hand Chaining, a Straddler of Worlds.
Posted on 1 Comment

Pros & Cons of the Starting Slip Knot

In the previous post I listed five decisions we’ve already made by the time we’ve made a starting slip knot in the yarn, and six options we have for doing more with the starting yarn end. Below I compare the advantages and disadvantages of different slip knots.

If you’re new to crochet, stick with the basic slip knot for now, and read on for future reference.

Starting slip knots: reinforced with a twist; three-loop; fancy "jury mast knot".
Reinforced with a twist (two leftmost photos). Three-loop slip knot (upper right). Fancy “jury mast knot” (lower right).

A Creative Start

Crochet happens when a loop can be pulled through another loop. So much creative freedom in this!—including the very first step we take when starting a new crochet project. With options come new advantages.

Basic Slip Knot: Advantages

The role of the traditional beginner’s slip knot is to be:

  1. Invisible (ideally completely).
  2. Strong.
  3. Permanent (when made the right way).
  4. Simple and quick to make, remember, adjust, and use to start crocheting the first stitch.
  5. The slip loop blends in as a stitch: it forms the top two loops of the first chain stitch.

✅The beginner’s slip knot is a great choice for #1 through #5, with a few minor exceptions.

(Slight) Disadvantages

The basic slip knot is not truly invisible.

It’s usually invisible enough, but occasionally not in certain yarns and project types. The thicker the yarn, the bigger the knot when you start crocheting. A knot in the center of a motif, flower shape, or nose of a stuffed animal can make it more noticeable.

It’s not particularly pretty.

The basic slip knot adds no beauty or polish when it’s noticeable. For me it’s because it lacks symmetry. The yarn end doesn’t hang straight and centered from it. The knot itself is a bit lumpy (sort of like a tiny fist). It looks like what it is: a simple, common, serviceable knot.

It can loosen and unravel (due to user error).

©2013 Reyna Lorele: Granny square blanket with just the center unraveled.
©2013 Reyna Lorele. Only the center of this granny square unraveled.

If the starting yarn end is clipped too short and/or the yarn is slippery, watch out. The knot could loosen and even unravel in certain projects (see example at right).

⚠️Beginners: this is why I go into detail about the starting yarn end and how to make the basic slip knot the best way.

Ever seen an old lace or granny square afghan with only the centers unraveled? It’s sad how common this is and how easily it could have been prevented.

Alternatives: Advantages

Given that…crochet is great for everything from delicate lace dresses to sturdy beach totes and slipper soles; from super strong pet leashes to artistic jewelry; from weightless shawls to heavy coats and afghans, and still more! —

And…that many crochet projects are actually “started” over and over, like granny square afghans (each granny square starts in its center), Irish crochet lace (separate shapes are assembled later), and intarsia (patterns of colors with varying lengths of yarn), —

Doesn’t it make sense that some crochet projects could benefit from specialized ways of starting them? 

6. Pretty.

A clearly visible starting slip knot could be intentionally decorative. Imagine one that looks symmetrical and has a charming, fancy, or fascinating texture. It could also be functional. A dense and bulky one would serve as a stopper for a large-holed bead. (I’ve often needed a good knot for this purpose!) It could also add weight to the ends of fringe for a nicer drape. See my Buff Slip Knot.

7. Temporary.

Some crocheters and knitters have a blanket “no knots” policy. Temporary knots are easy. Just make your basic slip knot really loose so that you can undo it later. Or, crochet right into it as if it’s a foundation chain. This way, the knot makes it easy to start crocheting, but you’re not stuck with it permanently.

8. More than one starting loop.

I keep discovering more uses for starting with more than one loop. Make a simple slip knot variation that produces two (or more) starting loops, then start crocheting with one of them. The remaining starting loop(s) can be used as a button loop or hanging loop for your finished project.

9. Reinforced strength.

Add a twist or an extra wrap while making the basic slip knot reinforces its strength and security. I need this reinforcement when using extra slippery or wiry yarns and threads. See some in the first picture above.

10. Change the angle of the yarn ends.

Simple crochet jewelry with chain stitches, starting slip knots, and simple fastening off knots. Lotus yarn, four colors.
Yarn ends hang bent from basic starting slip knots.

“Change the angle of the yarn ends” may sound odd, but for me it’s a new way of looking at starting knots. When my yarn end is visible as fringe, sometimes it’s noticeable to me that it doesn’t hang straight. This is because our basic slip knot causes the yarn end to hang at an angle. I’m currently looking for starting knots that cause the starting yarn end to hang differently. I like the Buff Slip Knot so far.

11. Attach to something with a starting loop.

I’ve needed a way to start crocheting while also neatly, elegantly attaching it to something when I’ve made: watchbands, a belt with a buckle, and certain pendants for necklaces. I’m currently looking for new favorite starting knots in this category.

A Note about Knots

Remember I mentioned that some crocheters and knitters have a NO KNOTS policy? Perhaps some of them mean tight knots. A tight knot can weaken the yarn over time. It’s also unsightly, intruding on a buttery, spongey look and hand.

I almost always use knots when I start crocheting, but I don’t pull them into tight hard lumps. I rely on reinforcement from a long woven-in yarn end more than on a knot if I can. It depends on each project. I’m especially careful in areas that will have to sustain strain and weight. That would be the shoulders of a sweater, the motif centers and seams of a blanket, the toes and heels of socks, a bag bottom and its handle attachments, and so on.

Updated November 2018. It’s part of an experimental blog post series: Vashti’s How to Crochet Book. Next post: .
Posted on Leave a comment

New Free Crochet Jewelry Pattern & Guide

My three newest crochet jewelry pattern releases share a theme: all are methods for crocheting beaded strands, without actually using beads. I’ve developed special beady crochet stitches and found jewelry-crocheting ways to make stitches stack up symmetrically and neatly, like beads do.

Not only do I love crocheting beads instead of adding beads to crochet; sometimes it’s better – allows a crochet project to be more portable or faster to begin, for example. For more images, here’s my “Pearly Crochet Stitch Types for Jewelry Crochet” photo set.

My free Puffpearls Jewelry Cord Crochet Guide is really three small patterns in one, because each pattern is a jewelry component that can be used independently with other designs. The three components are the Chain Loop Clasp, the Puffpearl Stitch Cord, and the Mushroom Button. Along the way I explain what makes each of these my “go-to” jewelry components, and suggest some creative ways to vary them and enhance their basic features.

After wearing crochet jewelry for years, and teaching Crochet Jewelry in local yarn shops and at national conferences, I wanted to provide a free guide to some of the simplest basics I find that I’ve relied upon for years. That’s why I came out with the free Puffpearls Jewelry Cord Guide. Together with the Irish Pearl Knot Stitch and the stitch menu in the Sweet Almonds Jewelry Set, I use it myself as a reference guide, so I’ve rounded out the free crochet jewelry pdf with:

  • A chart of standard necklace lengths
  • How to make the best beginning slip knot when starting a crochet jewelry project
  • How to make necessary adjustments for a good match between pendant and crochet cord.

Something else I’m noticing about crocheting ‘beads’ is that they’re amazing in silk and rayon threads. You might like issue #47 of the Crochet Inspirations Newsletter on using rayon threads for crochet jewelry. You also might like issue #46, “Open and Closed Clones Knots.” It was inspired by the Irish Pearl Knots design.

The Puffpearl was one of the first (if not THE first) of the pearly stitches I swatched, back in 2008. Allow me to end by counting the ways that I like it now more than ever! The Puffpearl Cord is…

  1. Strong with a bit of built-in stretch. It has clean good looks from any angle and has many uses, so it’s fun to see how it responds to different fibers and hook sizes.
  2. Fun to experiment with simple changes to the stitch’s basic steps for creating alternate versions of the cord.
  3. Fast! A 20-minute crochet friendship bracelet is pretty instant gratification.
  4. Easy to make this stitch uniform in size and shape for a polished-looking pendant cord.
  5. The most straightforward and structurally familiar of all my favorite bead-like crochet stitches for fancy cords. (I especially appreciate this when using slippery threads like silk and rayon.)

Sweet Almonds Set

The original goal was to find a way to crochet with oblong-shaped beads so that no stitch strands cover them. I love discovering crochet stitches that resemble fiber beads, and then seeing what happens when beads are added.

I think of the featured stitches as “jewelry quality” because they don’t have an obvious wrong side, and drape more symmetrically with less unintended twisting.

The four bracelets are different blends of Pearlpuff, Pillowpuff, and Bow Tie Picot stitches. They use at least one of three beading methods.

To keep the beading simple, all beads are strung onto the yarn or thread before crocheting, even for the method I call “super-hoisting.”

It’s easy to make one of the bracelets long enough to be worn as a headband, wrapped bracelet, necklace, or pendant cord. Thanks to the crocheted clasps, a set of bracelets can be linked up to create a new necklace — my favorite option!

Skill Level

Mixed (Easy, Intermediate, and Experienced). The Puffpearl is Easy. Pillowpuff and Bow Tie Picot are Intermediate. Adding beads can make any stitch more challenging, depending on the compatibility of bead (its weight and hole size), beading method, thread/yarn, hook size, and stitch gauge. See the Helpful Resources sidebar in the pattern. Pattern is written with a limited amount of abbreviations, and includes International English equivalents to US terms.

After following these patterns you will know (if you didn’t already):

  • How to crochet these jewelry stitches: Bow Tie Picots, Pillowpuffs, and Puffpearls.
  • How to crochet adjustable and reinforcing jewelry clasps.
  • How to use three bead crochet methods for five kinds of jewelry cords.
  • How to coordinate bead sizes and shapes with stitches, thread types, and hook sizes

Bracelet pattern instructions are for a finished length of a standard 7″-7.5″ bracelet.  My finished necklace lengths of 22″ (pink beads) and 36″ (green beads) are based on the number of usable oblong beads in one package.These are foundation-row cords: just keep going until the bracelet or necklace is as long as you wish. Pattern includes a crocheted clasp. Or, use the yarn ends to attach a metal jewelry fastener instead.

Materials

Silver & Pink Set; changes for the Brown & Green Set are in italics.

Thread: Katia Syros (45% Polyester, 28% Cotton, 27% Acrylic; 306yd/280m per 1.75oz/50g ball), color #75 (silver), much less than one ball. About this thread size: This is a Size #5 crochet thread, equivalent in thickness to CYC #1 Super Fine Weight yarn, a.k.a. “fingering” or “sock” weight {UK & AUS 3 Ply or 4 Ply}.

Brown & Green Set: I used Handy Hands Lizbeth Size #10 cotton thread instead, because a size #5 was too thick to fit through the holes of the green seed beads when super-hoisting. (See Beads below.)

Crochet Hooks: 2.25 mm for crocheting, and a size .75 mm steel crochet hook or small enough size that works for “super-hoisting” your choice of beads with your thread (see Special Stitches section below). Hook sizes are not standardized across brands, so it’s best to go by the mm. size.

Brown & Green Set: I used a Boye 1.65mm (size #7) steel crochet hook instead, because I worked with a thinner thread size (see Thread above.) This size falls between the 1.5 mm and 1.75 mm of most other brands. Feel free to use the size that works the best for you to comfortably crochet fairly tight.

Beads Used for Necklace: It’s wise to string on more beads than you’ll need.

Bead Gallery 10-inch strand (14 usable beads) of 8X16mm ‘Twist Cats Eye Pink Glass’ (style #55692, MSKU #10401972), and 28 silver-lined colorless glass large seed beads (a.k.a. E-beads, size 6/0 or 6º).

Brown & Green Set: I used 29 African trade beads (approx. 10X16 mm), and 100 small-holed size 6º seed beads from Twisted Sister (item # TS-7283.12 “Translucent Olive Gold Liner”). These seed beads required a thinner thread size (see Thread above.)

Beads Used for Bracelets: It’s wise to string on more beads than you’ll need.

Up to 75 large Japanese seed beads per bracelet, see each pattern (a.k.a. Miyuki, E-beads, size 6/0 or 6º): ‘hot pink lined crystal AB Miyuki’ (item #6-9355-100; UPC 7-9052499661-2).

Brown & Green Set: see Necklace.

A beading needle or your preferred bead stringing tool.

Posted on 2 Comments

Crochet Jewelry Class Resources

Most recently taught by Vashti Braha on September 13, 2012 at CGOA’s Chain Link Conference in Reno, Nevada

This clickable list of crochet jewelry resources is mainly to aid students of my classes in exploring more about jewelry crocheting at their leisure. (If you have not yet taken any of my crochet jewelry classes, I hope someday I’ll meet you in one of them!) You’re welcome to enjoy the links below whether you’ve taken the classes or not. They represent the extra information that doesn’t fit into a standard three-hour class. Some are the names of designers, books, jewelery styles, etc., that I may have mentioned in a class.

— Vashti Braha

  1. Page of my published Jewelry Crochet downloadable patterns
  2. Some of my not-yet published Jewelry Crochet projects

Crochet Inspirations Newsletter Topics:

Blogged:

Books, Four Recent Observations About:

  1. Here’s something I’ve noticed: Jewelry crocheters tend to have very strong opinions about which threads and other types of filaments are best. Some jewelry authors’ recommendations contradict others; some conflict with my actual experience of crocheting or wearing these materials. I also came to realize that I had my own fierce preferences (based upon what I know so far about how cotton crochet thread is made)! Crocheters know that we can crochet with just about anything. This is especially true for jewelry! Bead shops and craft stores offer beading threads, “memory wires,” leather lacing, braided waxed linen, etc., which offer us completely new crochet experiences. I haven’t tested every material favored by every author, and it’s looking like each crocheter needs to do her/his own open-minded experimenting and testing.
  2. How I make sense of Observation #1: When an author (and/or publisher) seems to come from the world of non-crochet beading and jewelry making, s/he tends to have a comfort zone and preference for synthetic beading threads for crochet. I also see an easy familiarity with traditional metal jewelry findings and related tools, and with using large amounts of tiny seed beads, or bead mixes, to the point of covering up the crochet stitches completely. If a natural fiber thread is recommended, I more often see a preference for perle cotton. On the other hand, authors who come to jewelry design from the world of crochet tend to: be conversant with the virtues of high-twist mercerized cotton threads; explore yarns of various fiber mixes; may use only a few beads as accents or no beads at all; feature crochet stitch textures and contrasting colors of thread work (which may stand in for beaded looks); and to crochet jewelry fastenings in place of traditional metal findings.
  3. Due to #1, I’m finding that having a library full of crochet jewelry books is paying off in a powerful way when I treat them as one individual jeweler’s “workbench notes.” Here’s an example of how I use them for reference: if I wish to try a new fine silk sewing thread, I look through the books to see if someone already has. If so, I look to see what crochet hook size the designer used as a starting point, and I go up or down hook sizes from there, depending on what I think about the stitch texture pictured. If it’s beaded, I check what size beads fit onto the thread. In this way, those jewelry books which are eclectic compilations of several designer’s patterns are goldmines of pointers toward how an unfamiliar (to me) material worked out for someone else.
  4. Observation #3 is why I now keep a better “jewelry workbench journal” as I travel this jewelry crochet journey, and I hope that you will, too. Each of us needs to discover what kind of hook size we prefer with a new unusual material, what beading needle made the stringing easiest with which bead & thread combo, etc. — and then record it so that future designs come together faster and easier. 🙂

See my crochet jewelry book list at the original DesigningVashti crochet blog for clickable titles and descriptions.

Crochet Jewelry Design Styles:

I’ve noticed that of the fullest range of crochet jewelry designs imaginable, some styles are far more explored than others. For example, bead crochet ropes (sometimes called “tubular crochet”), are so popular and recognizable that this style sometimes seems to represent the whole field of crochet jewelry. Several good books are available on this one type. I’ve discussed most of the crochet jewelry books in print in another blog post (see Books, above).

In the interest of promoting the broadest, most inclusive definition of what crochet jewelry is and can be, I’ve begun curating online images in galleries in Pinterest and in Flickr.

———————-

You might also be interested in the resource pages I’m creating for my other class topics: