This warm, richly textured crochet scarf would be a beautiful wintertime gift.
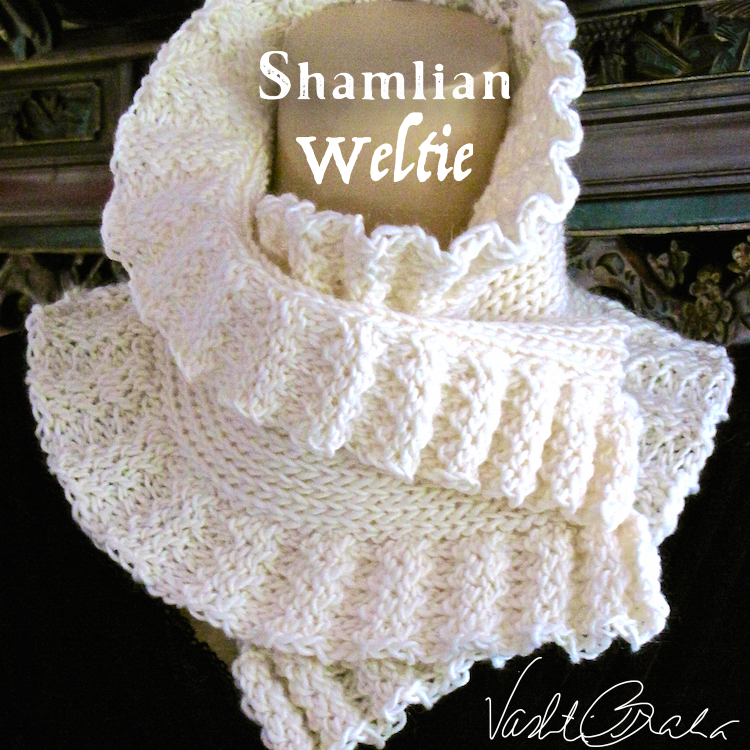
I began the design as a teaching aid — a rib stitch sampler — for Slip Stitch Crochet classes. To illustrate two important types of slip stitch ribbing, I combined them in one sampler swatch and fell in love. I knew I had to make a bigger version to wear. Not knowing how much yarn a scarf size would require, I made the one shown just long enough to overlap comfortably as a neck warmer.
I called this scarf a “Weltie” as a play on the UK term “welting.” (I noticed this term for what Americans call “ribbing” while doing some research on ribbed stitches.) This scarf is welted with both horizontal and vertical ribs. The fluted vertical rib looks like a ruffle in contrast with the horizontal rib. Like ribbing, it’s much stretchier than other kinds of crochet ruffles.
The pattern includes easy information and styling suggestions if you wish to increase the length and/or width. The one shown required less than two skeins.
Skill Level
Experienced. Three different kinds of slip stitches are used in this design, and one of them is advanced and uncommon: an inverse stitch.
The other two slip stitches, slip stitch in the front loop and slip stitch in the back loop, are common and easy, especially if you’ve already crocheted some slip stitch projects. Try Slip Tectonics or Expedient first!
This scarf doubles as a reference guide for combining these two types of ribbings as you go (no cutting & reattaching yarn). After crocheting this Weltie you’ll know how to add each of these two most useful kinds of slip stitch ribbing to other projects.
I have kept the pattern abbreviations to a minimum, and include International English equivalents for American measurements, yarn weights, and stitch terms.
After following this pattern you will know (if you didn’t already):
– How to crochet classic horizontal slip stitch ribbing
– How to crochet a useful & lovely vertical slip stitch ribbing
– How to crochet three kinds of slip stitches and understand their combined textures
– How to use a hook-led stitch gauge
– How to increase with slip stitches using two different methods
Finished Dimensions
Pictured Weltie is 27″ long X 8.25″ wide {69 cm X 21 cm} measured flat (unstretched). Customizing information is included in pattern for widening and lengthening scarf.
Supplies List
- Crochet Hook: Size K/US10.5/6.5mm hook or size needed for gauge.
- Size #4 Medium yarn: Brown Sheep Yarn Company Lamb’s Pride Worsted (85% wool, 15% mohair, 190yd/173m per skein), color M-10 Cream, 1.5 skeins.
Substituting a yarn: Choose a wool blend, or wool-textured acrylic #4 medium weight yarn that lists a crochet hook size range from US H/8/5mm-I/9/5.5mm on its label. These yarns may also be referred to as Worsted, Aran, and occasionally “afghan weight.” If you choose a tonal or other type of self-striping yarn, stripes will run lengthwise along the scarf (not across its width).
- Optional and recommended: 4 or more stitch markers until you can recognize the last slip stitch of each row of both ribbing types.
- Optional: A button or shawl pin (optional)